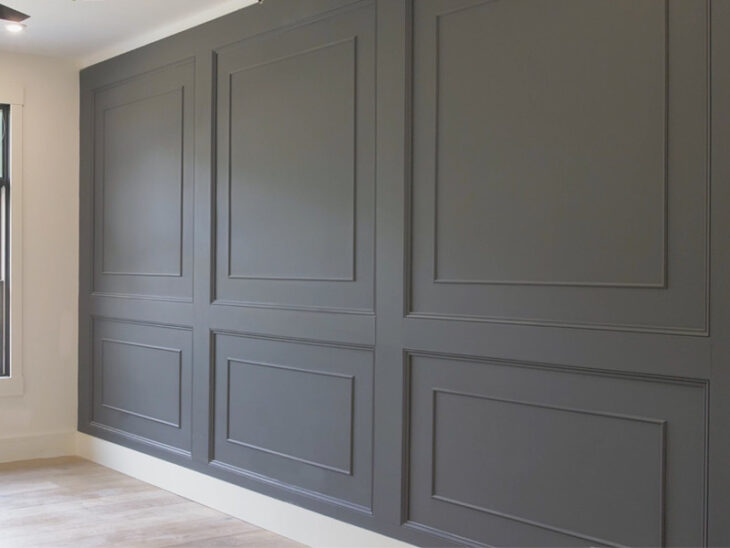
In our master bedroom we knew we wanted to do a cool feature/accent wall. After searching high and low for some inspiration we settle on, what I am calling, the double raised panel feature wall. Obviously, the cost of this wall treatment will depend on how large of a wall you are doing but to give you an idea, we spent about $600 on this one. However, we went with pre-primed poplar for the wood which was one of the pricier options but it is harder and will be a little more durable than say pine. If you wanted to save some money you could go with a paint grade pine. Overall, it was worth the money and definitely make a huge impact in this room.
Don’t forget to subscribe on YouTube and for sneak peeks of our upcoming projects be sure to check out Our DIY Life on YouTube, follow us on Facebook and Instagram. Also, follow me on Pinterest to get tons of projects plans from all around the web!
Disclosure: This post and video is sponsored by DAP products. While I was compensated for showing off their awesome products I would have used and recommended them anyway. Please support brands that support content creators like myself!
Required Tools
Materials
Disclosure: The links provided in the “materials” and “required tools” sections are affiliate links. If you would like to support our site and help keep our content free come find out more about how we can make money with no extra cost to you.

Nailing Up the Boards
To get started we installed the 1×8 top header. If you plan to install crown molding as well you may want to consider dropping it a few inches like we did. Also, if the run is longer than your board you’ll need to find a stud within the reach of your board and make the seam so that both sides can be nailed to the stud.
If you want to make sure these boards never come off you can use a construction adhesive like Dynagrip, but if you think this treatment ever may need to come off then don’t because the drywall will come off with it.

I also recommend using a quick-setting adhesive like DAP’s RapidFuse Wood Adhesive to hold the joints together. It’s great for this application because you can form the seam just how you want and glue it up in seconds. The holding power is pretty amazing. I use it in almost all of my trim joints for this reason.

Creating the “Raised Panel” Look
We used base cap molding to create the raised panel look. This a detailed molding used to “cap” the top of a baseboard but we thought it looked great in this application as well. We measured each run and cut the 45 degree miters on both sides. Then, to install it we actually glued it in place with RapidFuse as well. This is because we wanted the front of it to be flush with the front of the boards installed previously. Any gaps will get caulked in later.

Adding the Interior Trim
We used a pencil and a scrap 1×6 board to mark out the interior box. Any pencil marks will get painted over later, however, marker or pen will not always cover with paint.

Then, you guessed it, we cut and glued the clover screen molding up as well. The RapidFuse gives you just enough working time to get it how you want it, but don’t take long because it sets up in about 30 seconds or so.

Screen molding is a thin piece of trim that has only one flat surface. This means the remaining three sides have a detail on them which is what we want for this application; this one being the shape of a clover.

Preparing for Paint
Obviously we couldn’t just start painting. In order for this accent wall to look its best we needed to do some prep work. This included filling all the nail holes and the joints with DAP Plastic Wood X Wood Filler. Wood filler is a great options for filling in imperfections in wood and it changes color when its dry so you know it is time to sand.

To sand the wood filler we just used a fine grit sanding sponge. For any uneven joints you may need something more aggressive like an orbital or belt sander.

After the dust settled from the sanding we began to caulk the trim into the wall. The inside corner between the base cap molding and the wall can get caulked with any of the DAP Alex products. These products are what you want to use because they are flexible, paintable and dry fast. Plus, they have easy water clean up, so make sure you have a wet rag handy.

Prime and Paint
With all the prep out of the way, it was time to start painting. Since the screen molding that we used for the interior panel was bare would we needed to prime it first. For that we brushed on KILZ premium primer.

After the primer had time to dry it was on to the paint. We rolled the walls and the 1x boards and brushed the trim with “cracked pepper” from Behr in a matte finish.

We absolutely love how it turned out and while we still have a lot to do to finish off this room we couldn’t be happier with the progress.


Questions? Comments?
As always, if you have any questions don’t hesitate to comment below and especially don’t forget to post pictures of your finished products in the comments! ENJOY!