

Rustic X DIY Changing Table
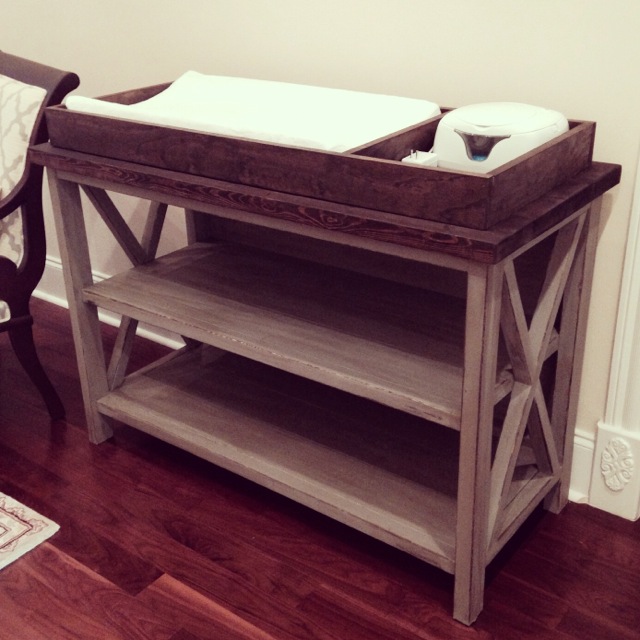
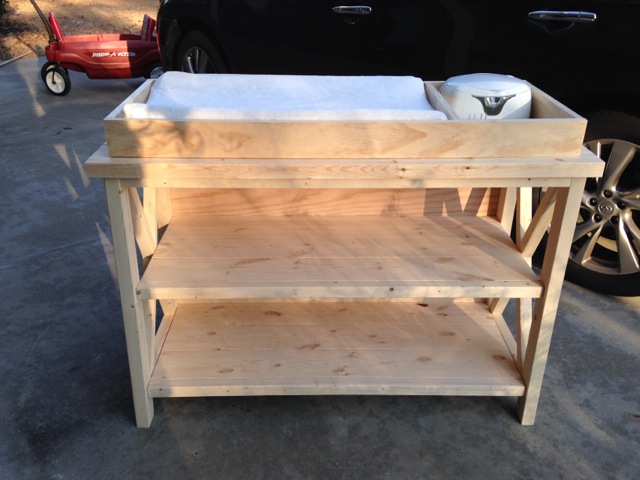
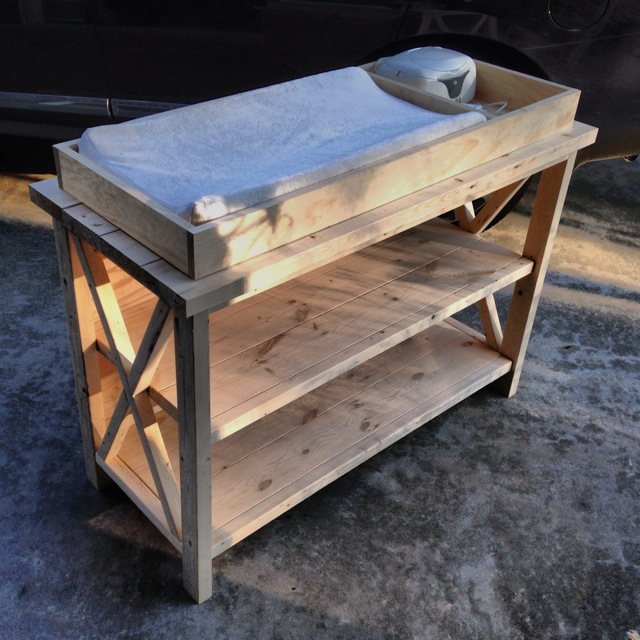
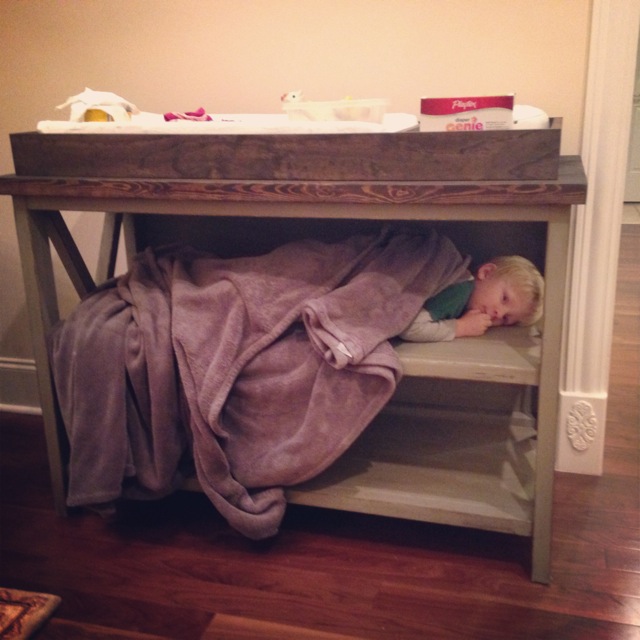
With a new baby on the way the list of projects can seem to be endless. One that was at the top of the list was a DIY changing table. My inspiration for this DIY changing table came from the Pottery Barn Belmont buffet and if you want to build that take a look at Ana White’s plans for it. Below I have provided detailed baby changing table woodworking plans for you to enjoy. Please post your results in the comments.
Tools Required:
Materials:
- 1x 1 x 4 x 8′
- 1x 1 x 4 x 6′
- 4x 2 x 2 x 8′
- 3x 2 x 3 x 8′
- 5x 2 x 6 x 8′
- 1x 1/4 x 24 x 48″ plywood (I went with sandply)
- 2-1/2″ #8 Coarse Pocket Hole Screws
- 2″ #8 Coarse Pocket Hole Screws
- 1-1/4″ #8 Coarse Pocket Hole Screws
- 2″ Wood Screw
Recommended Changing Pad: Summer Infant 4-Sided Changing Pad
Cut List:
When I started building furniture in my free time I always wanted to see it come together as fast as possible. Even though maybe the frame came together quickly the rest took some time. Thats why I now cut most/all my wood at once and I recommend you do the same. Hopping between the saw and the pocket hole jig waste a lot of time, and if your free time is limited like mine you’ll agree in the end that this is the only way to go.
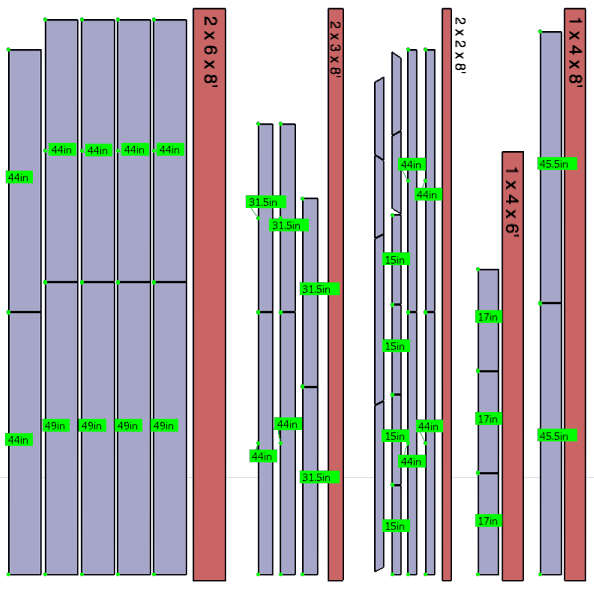
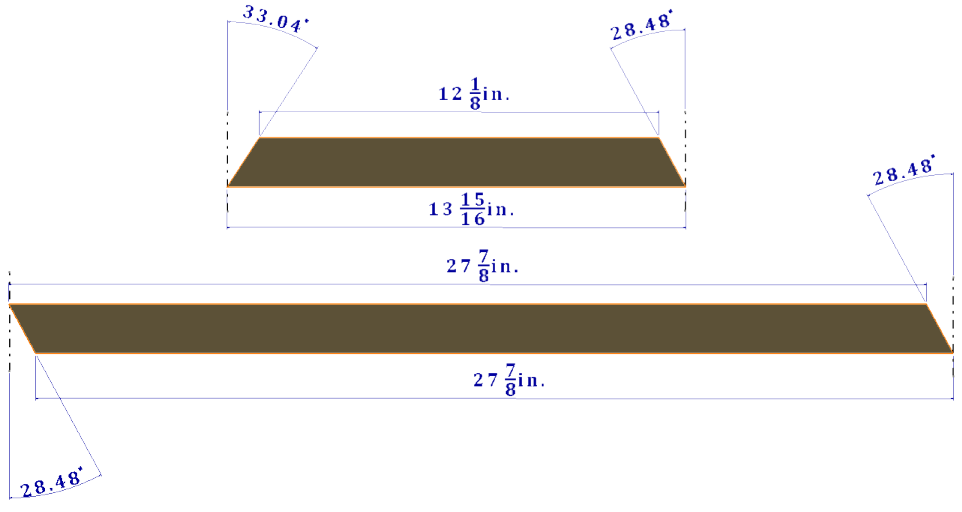
Before you get started… sand, sand, SAND!
It is best to sand all the cut wood before you start assembling. It’s so much easier to do now then once its assembled especially with all the tight corners. Please know that this kills me too, but I promise its worth it and you’ll be thanking me in the end. For a more in depth instructions take a look at our how to sand whitewood post.
Instructions
As always if you have any questions don’t hesitate to comment below and especially don’t forget to post pictures of your finished products in the comments! ENJOY!
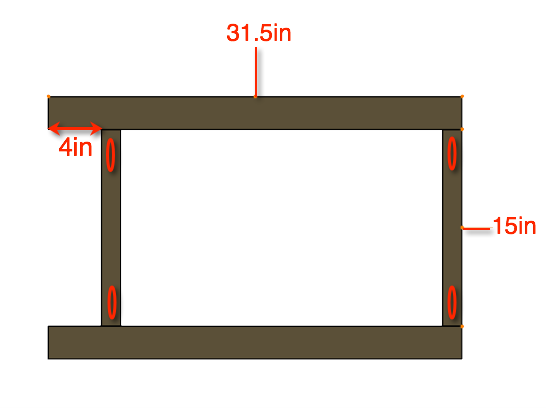
Step 1: Assembling sides
Drill pocket holes in each end of the 15in 2×2’s. Next, screw and glue them to the 31.5in 2×3’s as shown in the picture. Remember, we need two of these.
Note: Know that the pocket holes will be on the inside of the changing table, therefore, you should choose the uglier sides of your wood to be on this side.
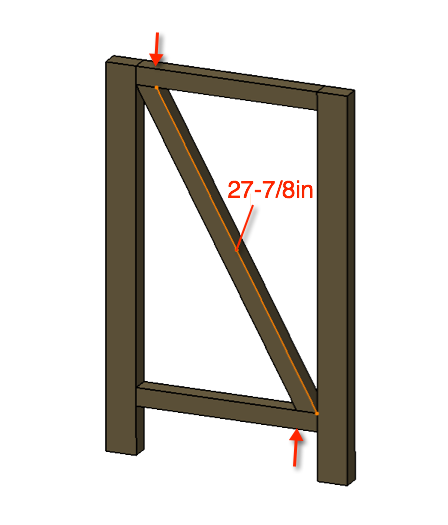
Step 2: Assembling sides
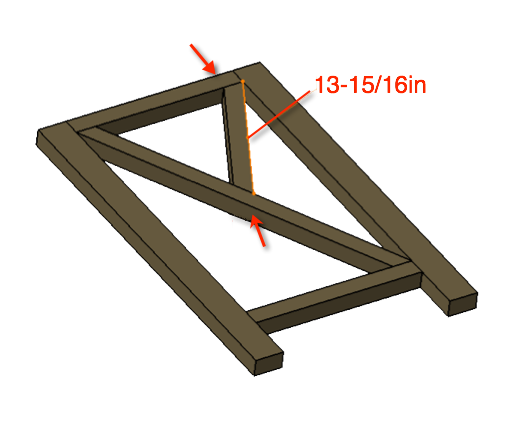
Attach the longer angled 2×2 with 2″ wood screws from the top and the bottom as shown. Make sure to glue these joints as well.
Step 3: Assembling sides
Screw and glue the smaller angled 2×2 in the upper right position with 2″ wood screws. As shown, place the lower screw slightly off from center and at an angle of the 2×2. (As you can see in the next step we will be coming right behind it with a pocket hole screw.)
Step 4: Assembling sides
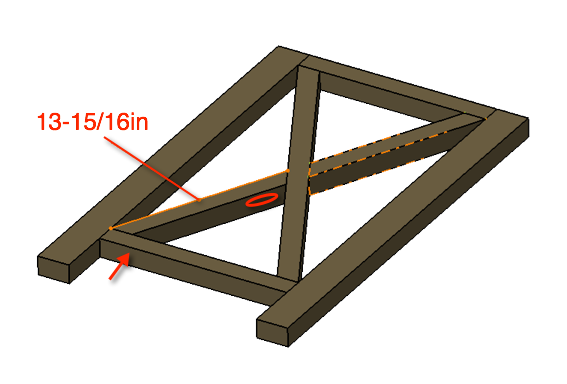
Using the Kreg jig, drill a pocket hole in the remaining smaller angled 2×2’s as shown in the picture. (Make sure you pocket hole is in the correct side)
Screw and glue the lower slat of the X in with one 2″ wood screw and one 2-1/2″ pocket hole screw, as shown.

Step 5: Assembling Top
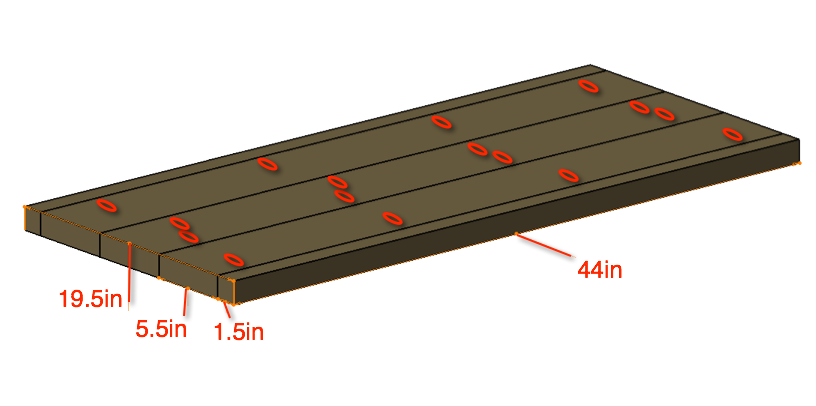
Drill four pocket holes, evenly spaced, in three of the 49 inch 2×6’s. You should choose the uglier sides of your wood to be on this side.
Clamp to maintain a flat surface and screw and glue together, as shown, with 2-1/2″ pocket hole screws.
I suggest giving this another sanding to smooth the top once assembled.
Step 6: Assembling Middle Shelf
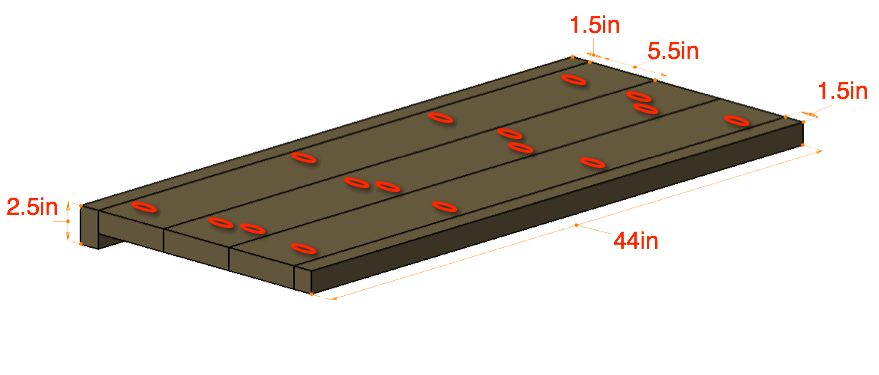
Drill pocket holes, evenly spaced, in the three 44 inch 2×6’s as shown in the picture. You should choose the uglier sides of your wood to be on this side.
Clamp to maintain a flat surface and screw and glue the three 2×6’s and two 2×2’s together, as shown, with 2-1/2″ pocket hole screws.
I suggest giving this another sanding to smooth the top once assembled.
Step 7: Assembling Bottom Shelf
Drill pocket holes, evenly spaced, in the three 44 inch 2×6’s as shown in the picture. You should choose the uglier sides of your wood to be on this side.
Clamp to maintain a flat surface and screw and glue the three 2×6’s, sandwiched between the 2×2 and the 2×3, as shown, with 2-1/2″ pocket hole screws.
I suggest giving this another sanding to smooth the top once assembled.
Step 8: Assembling Table
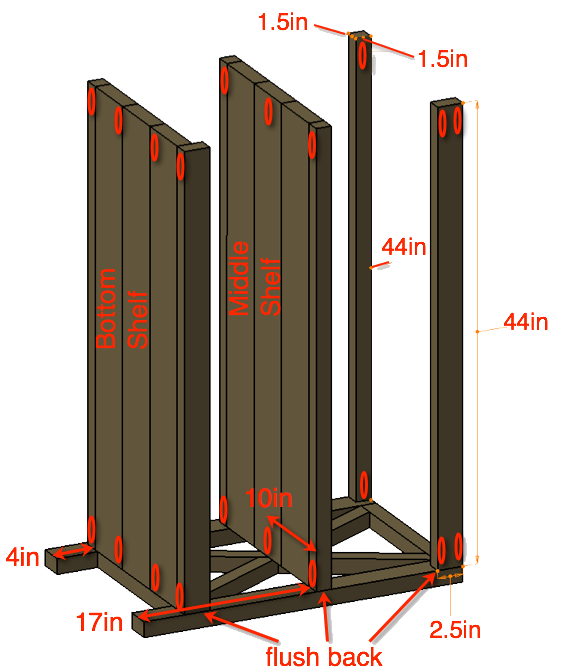
Drill the pocket holes, as shown in the shelves and upper rails. Make sure to notice that the middle shelf has three pocket holes, one at each end and one at the middle of the X (this is not the center). Make sure the back of the shelves are flush with the back of the side first and mark where your pocket holes should go.
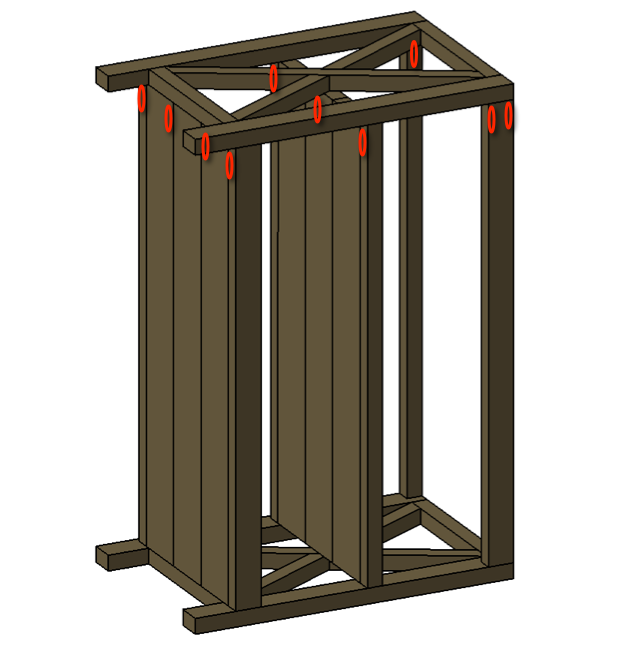
With the top rails flush with the outside top corners of the side panels, attach with 2″ pocket hole screws as shown. Assure that your shelves are square and attach with 2″ pocket hole screws as shown.
Step 9: Assembling Table
With the top rails flush with the outside top corners of the side panels, attach with 2″ pocket hole screws as shown. Assure that your shelves are square and attach with 2″ pocket hole screws as shown.
Step 10: Assembling Table
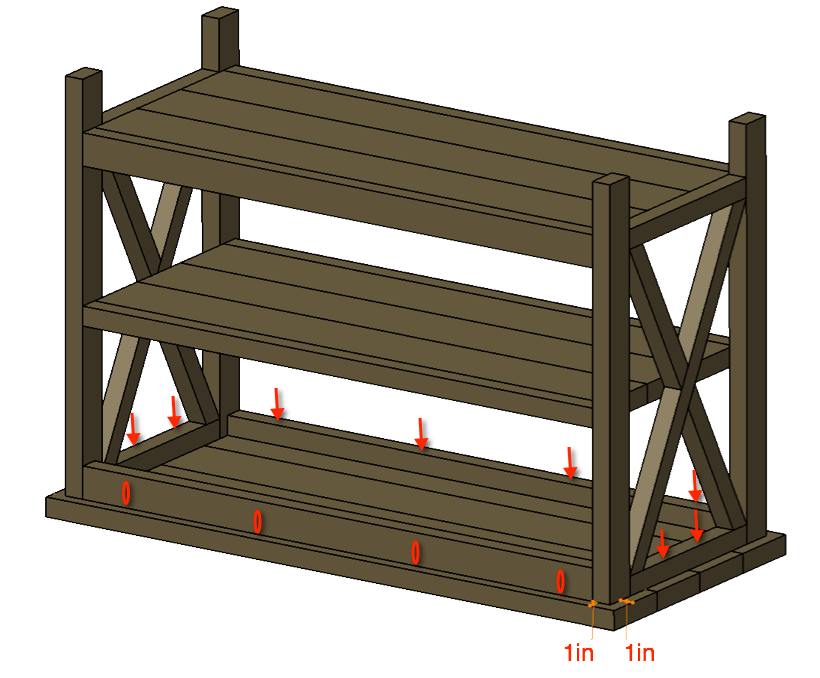
Finish off your table by adding the top. To do so you should drill four pocket holes in the back rail (2×3), as shown.
Attach the top with four 2″ pocket hole screws in the back rail and 2″ wood screws through the 2×2’s as designated by the arrows in the picture.
Step 11: Adding Back Panel
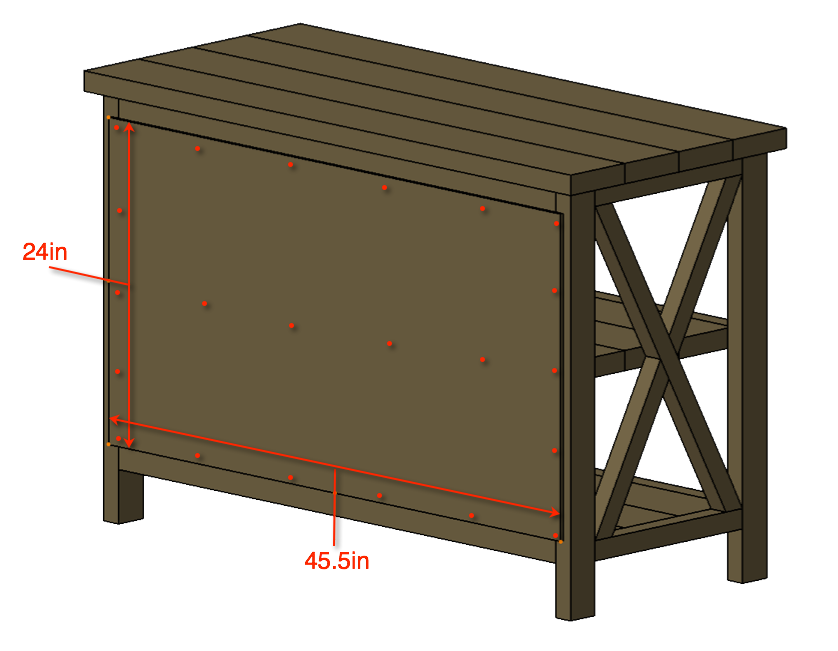
Cut your 1/4″ plywood to 24×45.5″ and nail or screw it to the back as shown in the photo. It is wise to draw a line across the back to show you where to nail.
Note: I used a finishing nailer for this with 1-1/4″ brads but if you don’t have a nailer you can just as well use screws.
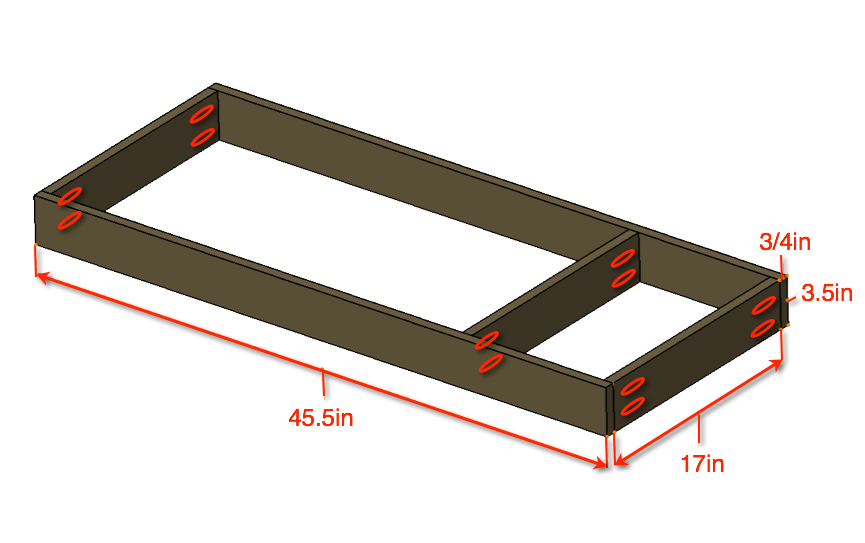
Step 12: Assembling Topper
Drill your pocket holes at each end of the 1x4x17″ boards. (Make sure to adjust your jig for 1″ material).
Make sure to place your pocket holes where they will be the best concealed. The two boards on the right in the picture should actually have the holes on the opposite side (But I can’t show that now can I?). Assemble your topper as shown with 1-1/4″ pocket hole screws, making sure to glue the joints.
Important Note:
If your going to stain the top like we did then now is a good time to do so. Make sure to stain both the top and the topper prior to installing the topper.
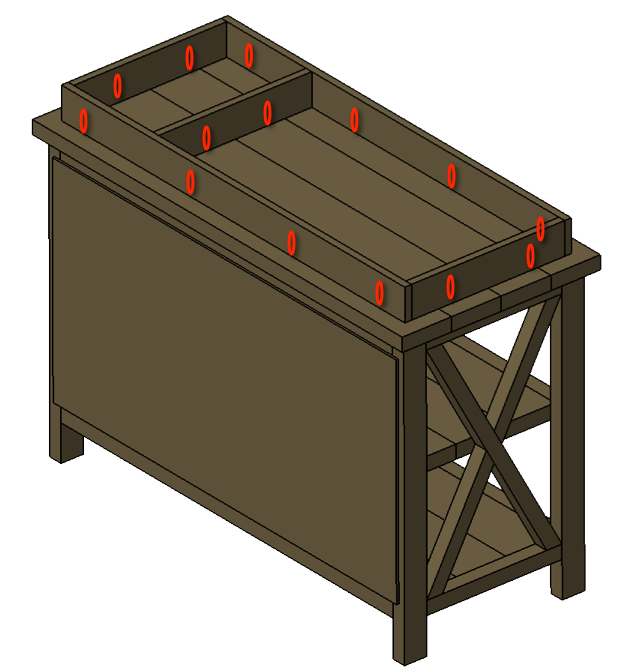
Step 13: Installing Topper
Drill the pocket holes as shown, except for the right hand board, those should be on the opposite side to best conceal them.
Attach the topper with with 1-1/4″ pocket hole screws.
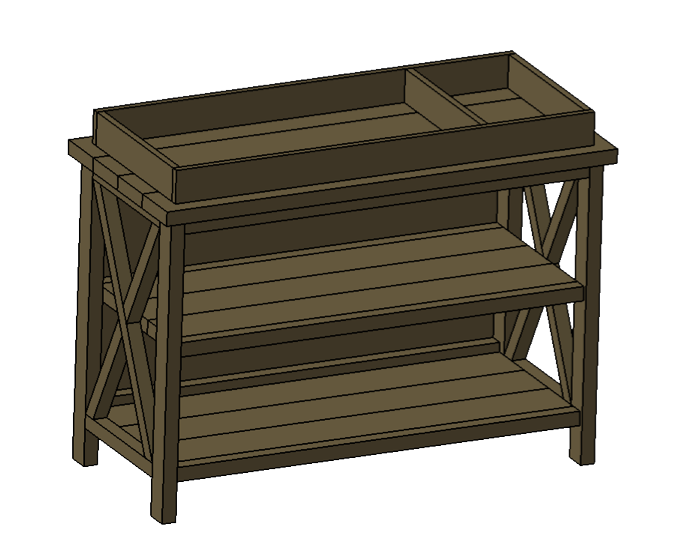
Finish
By: Jamie Rantz (aka Rogue Engineer’s wife)
To be completely honest with you, I had no clue where this project was headed when I started it. I just knew that I wanted the finished piece to be something I could use anywhere in my house and not just as a changing table. When I woke up that morning and actually had energy, which doesn’t happen often being 8 months pregnant, I went out to the garage and started throwing things together.
I wasn’t sure if I wanted a distressed look, but I wanted the option to do so just in case! With that in mind here is the combination of finishes I chose to go with.
Preperation Color Protectant
Top & Topper 1. Sanding
2. Pre-Stain Wood ConditionerMinwax Dark Walnut Stain Minwax Water-Based Polycrylic
Table Base 1. Sanding
2. Pre-Stain Wood Conditioner (edges)1. Minwax Dark Walnut Stain (edges)
2. Mix of paint samples we had laying aroundMinwax Finishing Wax
As always if you have any questions don’t hesitate to comment below and especially don’t forget to post pictures of your finished products in the comments! ENJOY!
This project was a blast to make. The plans and illustrations are so well laid out that just about anyone can do this project. I have some woodworking experience in my past but still think even a novice could do it. I used the less expensive and smaller Kreg jr R3 jig and it worked fine. For the angle cuts a dedicated mitre saw might benefit over a circular saw for more precision cuts. I really benefitted from a random orbital sander vs a traditional block just due to the amount of material needed to sand. For the other tools I used was circular saw, drill, and impact driver all of which are Dewalt 20v cordless tools.
Moving onto the finish, I used a minwax prestain. Once that dried, I applied 1 coat of aged oak minwax oil stain. Then once that dried, I ran another coat of minwax special walnut oil stain. After the stain had set, I covered the entire project with Varathane water based polyurethane with matte finish. I applied 3 coats with steel wool sanding in between coats. Finally I purchased 4 angle brackets and spray painted them with rustolem metallic rustic colored spray paint. The pad used in the topper was purchased off amazon that Jamison, the Rogue Engineer, provided the link to. All in all a great project, hurry up and get started!
PS: This thing is HEAVY. It could support thousands of pounds of weight in my opinion so your lil tike will be just fine resting atop it.
That looks awesome man! Great job! Thanks for sharing in such detail.
Haha, and yes you are indeed correct, this thing is built like a Mack truck and will last a lifetime.
Your pic got removed so I’m posting again for ya!
Greta job – that is beautiful!!! I always love to see when other people post their projects, from following the tutorial – yours is beautiful, and so is the original!!!!!
Reattaching photo that was removed
I agree with you!
so a problem i’ve run into making this is i’m using 2×6 pine, and i’ve had to rebuild the top and middle shelf 2 times because after gluing and pocket screwing the boards, they’ve warped. i’ve been working on the project now for over a month as i have had the time, and i’m a beginner woodworker. any suggestions on keeping the wood from warping ?
Startin mine tommorow, did u just use select pine, or doug fir, it did u use a hard wood like maple or oak?
Thanks a lot
Hey Pat! Awesome! I used pine studs for the 2x’s and pine select for the topper boards (you could use the common boards as well). The stud grade 2x’s are usually mixed, some being nasty and others being pretty clean. Just take your time and pick through them for some nice, clean, straight boards! For the price you cant beat it.
Don’t forget to post a pic when you’re done!
Here’s another great changing table that Ian helped his friend build! Great job guys!
I figured I should upload a picture of the changing table in our daughter’s room.
On a side but related note, if anyone is looking to try a different kind of stain I highly recommend General Finishes Oil Based Gel Stains and their Oil Based Arm-R-Seal Urethane Topcoat. Both are incredible products. I used both on this project and will continue to use them in future.
Thanks for the plans Jamison.
Wow Augustine! Great picture and thanks for sharing. I’ve seen General Finishes around but never tried them out. Thanks for the tip.
Reattaching photo that was removed:
Reattaching photo that was removed:
Rogue,
The changing table plans are great and I though ours turned out really nice. I built this for my wife and gave it to her for Mothers Day. As far as the functionally it works great. I did install a light with a dimmer which makes those night time diaper changes a little easier. I hand-scrapped the top and distressed the 2×6 pine so it really added some great some good character to it. I also installed the changing basin on hinges so it can be removed and used as a table after the kids are grown up. I’m in the process of building a Lego table now, so I’ll let you know how that turns out too.
Hey Michael!
Awesome! That’s a great idea with the hinges! I actually used some non-skid adhesive pads to the bottom of the topper so it can be pulled right off. And, I would love to see how the hand scraping turned out! Would you be able to upload a picture here in the comments?
Also, when building the lego table make sure you pay attention to my note in the cut list area. One reader just let me know about his LEGO plates being ever so slightly larger making installation impossible. So measure your plates and if thats the case you’ll need to adjust the lengths accordingly.
Thanks for sharing!
Hey, sorry just saw this. Can you post a link to the kind of adhesive pads you used? That actually sounds easier than hinges. I would like for my friend to be able to use as a normal table once the baby is grown.
Sarah, I used these Clear 1/2-Inch Bumpers and they worked out great!
Here’s a picture.
Dang Michael, that is turned out very nice! Great work. Your top looks awesome! Thanks again for sharing!
Reattaching photo that was removed
Hey, so I’m about to attach my top this week and I’m a beginner. I’ll send a pic once I’m done. How do I install the top on basins like Michael for easy removal?
Thanks
Sarah
Looking forward to seeing how yours turns out! Use the clear 1/2″ bumpers on the bottom of the topper.
Thank you so much for sharing your step by step directions! I had my husband make this for our son’s nursery and it turned out beautiful! I look forward to checking out more of your stuff!
That’s awesome Lis! And no problem. I’m glad it turned out great. I’d love to see it, so if you get the chance upload a picture!
Hoping the picture posts this time..
Lisa, that’s amazing! Great job and I love the finish you choose! Excellent work. Keep on building!
Reattaching photo that was removed
I really want to make this changing table to put some labor into my sons nursery. However, I am
Not handy nor have I ever done wood work. If I get the pieces pre-cut at lowes and have the tools to do this project, being a newbie how long should I expect this to take and how much money roughly should I expect to spend?
Kara, This would probably be a weekend project for a newbie. And I think I built this one for under $100. If you have any questions during the build just email me and I’ll guide you through it!
Hi! My husband is going to make this for me and I was wondering what size changing pad you bought? 16 x 30? 16 x 32?
Thanks in advance.
That’s awesome Leah. I’d love to see how it turns out. We used a 16″ x 32″ changing pad that we had. I have been recommending the 4-sided changing pad for this because it will protect the baby’s head and feet from the topper. Good luck!
Love the table. I decided to make this for my wife. I made a top out of some reclaimed joists from an old brownstone in the city of Boston. I’m going to probably use poplar for the rest since I’ll just be painting it. Out of curiosity, did you run the pieces that made up the top and shelves through a jointer to guarantee straight edges and a solid joint? Or does the kreg jig negate having to do that? I only ask because this will be the first project with the Kregg that I’ve I’ve made. I used biscuits for the top, but don’t want to use them for the whole project.
Thanks-
Kevin
Kevin, that’s sounds amazing. I didn’t run anything through the planer or jointer. If you boards are fairly straight you should have any issue at all. The Kreg is kind of like cheating for what sounds like a true woodworker you are. I would say just to test it out and see if your happy with the joint and go from there.
Haha, I wish I could call myself a wood worker. I’m just learning right now. But thanks for the tip on the kregg. Also, out of curiosity has anyone ever mentioned how they may have made the top enclosure or box removable? I’d love to make it so that I could pull that off without creating holes in the top. Any tips or ideas would be appreciated.
I actually omitted the last step of securing the topper to the top and just used these Clear 1/2-Inch Bumpers on the bottom of the topper and they worked out great!
Hey Jamison, I was wondering if you could give me some tips. I was making solid progress with the sides, and the shelves. And then I got stuck on the cross members. I know you listed the angles, but I wasn’t able to get those cuts just right. I have a few gauges in the shop, but none of them are digital. So I wasn’t sure how you got such precise angles. Any tips or help would be huge. I’m so close to finishing, and would love to have this table ready for use by the time my baby is born. Thanks in advance!
Hey Kevin, when I laid out the dimensions for those angled cuts I did include the exact angle however, if you’re within a degree or two you should be just fine. If its the length thats a problem then maybe make one cut and overlay the board to mark the opposite end.
You can also cut start by cutting 4 of the long angled 2x2s and overlay the two as an X within the side and mark the overlapping section to cut away.
Hope this helps.
Just finished mine! This was my first furniture building experience and it was a blast. I got a kreg jig jr. and a Home Depot gift card for Christmas, so I knew I wanted to give this project a shot. Thanks for the detailed instructions – they helped a beginner like myself a lot!
That’s awesome Jeff. I’m glad I could be a help. Good luck on what I’m sure will be many projects to come!
[…] time last year, Jamison from Rogue Engineer was preparing for the arrival of a new baby and had a DIY to-do list a mile long. One project he […]
Thanks so much for the plans and the help along the way Jameson. I finished my table a couple days before my son’s birth. The top had finished off gassing and was attached the day he came home. My wife loved your paint choice so much that we did something similar. I used a chalk paint, and then waxed it to protect it from the future abuse. I used the Kreg Jig per your plans for the entire thing, and I have to say that it’s probably my new favorite tool. My top was a little different than the one in the plans. I picked up some former floor joists from an old brown stone in Boston, so I prepped them and joined those together with biscuits. Once they were joined I skip planned them to reveal the contrast from the aged wood and the beautiful color and grain underneath. I made sure things like saw marks were still visible. A few coats of satin poly and this was the result. My intention is to save the top, and turn it into a side table when we’re done having children. Not sure if I’ll do the same with the base. I also left the back off so that we can see through it. I’m really unhappy with my topper. The design is very useful for storing wipes and the changing pad, but I don’t like how a box made with the Kreg looks like. Because I didn’t like it, I just painted it the same color as the base. It’s also only attached with rubber feet because I intend on preserving the top. Once we begin to get this newborn thing down I’m going to revisit the shop and make a top using through dove tails on the corners and a through mortise for the sides. Then I intend on staining that.
And finally a huge thank you to you Jason. I can’t speak highly enough of how helpful you were, and how great your site is. I look forward to getting future ideas from you, and sharing those projects as well.
Kevin! I cant thank you enough for the kind words. Your changing table looks amazing and that wood you use for the top in incredible! Thanks for sharing all the details. Great job and I’m glad I could be of help to you. I look forward to seeing your future projects.
Reattaching photo that was removed:
More images.
Reattaching photo that was removed
One more.
Reattaching photo that was removed:
THANK YOU for the plans. Our space was a little smaller than most and I am by no means an expert in the ways of wood working. A little help from a neighbor that had a saw, some practice runs with the jig kit – and we were off to the races.
We went with pre-finished pine to cut down on the sanding but stayed true to the script for the most part.
My wife loved the design and we built it to fit the room – it really was a great experience. Thanks for laying down the foundation – we are ecstatic about our new addition (the kid, and the table). If anyone is reading this and wondering if they can pull it off – trust me. Some patience and a good plan is all you need. Took me a day to cut and build and a day to sand and milk paint.
Looks amazing Augie! Congrats! (On the baby and the table :)) That pre-finished pine sure does look good. Thanks for sharing!
Reattaching photo that was removed:
I am about to start mine. Did you need to rip the boards down to size?
You shouldn’t need to rip any boards. You should be able to cut everything with a miter saw.
just curious what are the finished dimensions of this table?
33″ tall and 49″ wide
I’m not sure if I missed it or not, but how far from an edge does the divider go in when making the top?
You’ll want that to be snug with the end of the changing pad. Go based on that measurement. SOme are longer than others.
Finishing: is staining the bottom assembly recommended after assembling? Or should each wood component be stained before assembly? Thanks!
I usually stain after assembly as long as I’m using all one color.
My husband and I are in the process of building this changing table. We are almost there but are having a problem with the topper and can’t figure out what’s wrong. When we lay the topper on the top shelf it wobbles/doesn’t lay flat .we were planning on using the bumpers instead of screwing it into the top shelf… However because the topper doesn’t lay flat and is raised at one corner. All of the measurements appear to be correct for all of the pieces that are put together, and any advice of what it could be would be really appreciated!
This is going to sound ridiculous but you can actually try to twist the boards back into place. Sometimes when you screw the frame together the boards can get twisted, if you just use your hands and twist the topper in the opposite way you can correct some of the issue. Hope that helps.
I would like to know what grade and species of wood you are using
Hey John. I normally use construction grade SPF
Thank you Jamison. I really like the plan and look forward to building it
Just finished this for a friends newborn.
awesome! Would love to see some pictures if you get a chance.
Hi, newbie here, tryin to adapt the project to my needs.
One question, how come the 4 2×6 pieces for the top in the step 5 adds up to 22 inches? did you tapered them beforehand or what?
No worries. 2x6s are the nominal lumber sizes and the actual size is 1.5″ x 5.5″. Hope that helps!
The plan calls for 2×2. Is that actually 1.5×1.5?
Sure is. 2×2 is the nominal dimension and 1-1/2″ X 1-1/2″ is the actual.
This was a very easy project. It is solid and will last for years. I made the table per the instructions and my wife finished it with chalk paint in an attempt to maintain that rustic look. After the paint, she used a finishing wax. The daughter is very happy and her first child will be using it when she is born in late November….
The changing table turned out great. Of all the plans I have done, this one gets me every time. I built this changing table right before my daughter was born, and now I get to see pictures of people preparing for their little ones to arrive. It’s awesome.
Reattaching photo that was removed
What happens if you don’t use glue? I have a lot of building projects and I’m trying to save every minute
It should be fine. It’s just an added layer of strength to the joint but I’ve done plenty of projects where I’ve left it out and they are perfectly fine
Love this change table! we finished making/painting ours not too long ago, and it looks great in our (Soon to be) baby’s room! 🙂
That looks amazing Liz! I love the color. Thanks for sharing!
Reattaching photo that was removed.
I done the change table same as you done.
thanks so much for the plans, ive always wanted a little work shop for things like this and my wife and i bought our first house about a year ago and i decided to make this my first project i EVER did with woodworking lol, needless to say with the detail in your plans it turned out great and my wife and daughter, born 3 weeks early and 2 weeks before i got the table done lol, absolutely love it.
thanks again!!! Jarrod Mayes
The picture
That turned out great Jarrod! Thanks for sharing. Congrats on the new addition and be careful, little girls can wrap you around their little finger pretty quickly!
Reattaching photo that was removed
Well after starting this project in July, baby came 5+ weeks early, and a personal surgery, we finally got our changing table completed by a sister in laws neighbor. Absolutely love it!
Wow! You had lots going on, but the end result is pretty awesome! Congrats on the little one.
Thanks! And thanks for the plans. I’m a little more confident in my abilities now after starting this project.
Glad I could help
Just wanted to say thanks for this. It was my first woodworking project.
Thank you for sharing! That looks pretty amazing for your first project.
So my wife is 6’1″ and wants it a little taller so she’s not bending all the time. If i made the 2×3’s 2 inches longer so In step 1 where is shows 4″ legs, I’d make that 6 inches would it throw anything else off?
That sounds like a good idea. Just adding it to the bottom of the legs would work fine. Just locate the shelves in the same relative location and you’re good.
So if 2×3’s are not sold in my area anywhere, will it throw things terrible off to use 2×4???
Will using 2×4 instead of 2×3 make much of a difference to the plans?
Hey Ian. It will work but the top will have no overhang on the for or back. You could add a 2×2 to the back of the top so you can get the 1″ overhang.
How did that work out for you?
So thankful for the plans and excellent instructions. They made this project so enjoyable and, dare I say it, easy!? I can’t wait to see what the little one thinks!
Awesome! I’m glad the plans helped. And yes, you can say easy. 🙂
Where, when, and how did you build/cut without waking the kids when you were working at your engineering job during the day?
Great site, I can’t wait to get started on this changing table.
Haha.. weekends my friend. Thanks and make sure to share a photo when you get it finished up!
Here is my offering that I made for my wife and I’s first son who is expected in a couple of weeks. Went with the 2 x 4 legs and just had extra spacers. She’s happy and I’m proud. Can’t wait to start my next project, but I’m sure I’ll have my hands full soon enough
Congrats man and this turned out awesome. I’m sure it will soon get tons of use. Little boys are awesome, my son is turning 5 soon and I know people say it a million times but it really does go by fast. My advice is to soak up every moment.
Thanks – we love it!
Looks great! Thanks for sharing.
[…] Rustic X DIY Changing Table […]
[…] Rustic X DIY Changing Table […]
We converted this table to a bar/wine table… Thank you for the plans! A+
WOW that looks great!
[…] crib. 4 comments on “ 16 baby furniture plans free cradle plans, free crib plans and more! ”. Free baby changing table woodworking plans. A baby changing table with inspiration from pottery barn for less than $100. Easy and free baby […]
Amazing! So what was the final cost of this peice? I’m debating taking on a diy at 7 months pregnant or purchasing.
I can’t recall the final price, but i know it was a heck of a lot cheaper than buying one!
I’m new to the woodworking game, and am going to start with this project for my son that is due in Ocbtober. I don’t know what wood I should be buying from the hardware store. Do you have a suggestion?
We used premium construction grade lumber SPF (spruce, pine, fur). It’s a great economical choice for people just starting out. Happy building and congrats on your little man! We have a niece/nephew due in October as well! Great month to be born!
Rogue Engineer inspired Changing Table. Plywood Shelves, Changing Pad frame 4/4 pine, ends and edge banding white oak. Thanks and enjoy
That looks great! Thanks for sharing.
Thanks for the plans and e-mail! I built for my new niece! She came a week early, so I had to rush start/complete it…I made it a bit smaller (I think that’s the only thing I adjusted, but my bad if you see something else different).
I dressed it up since it wasn’t in the nursery yet, and without the changing pad…now I realize that it looks pretty stupid “dressed up” with the tire tracks on the driveway, LOL.
That looks really great! Thanks for sharing. Tire tracks and all it looks REALLY good!
Thank you very much for the plans. My wife is super happy with the table.
Hope all is well with the flip.
Wow that looks great! Good work.