
Rustic Media Center
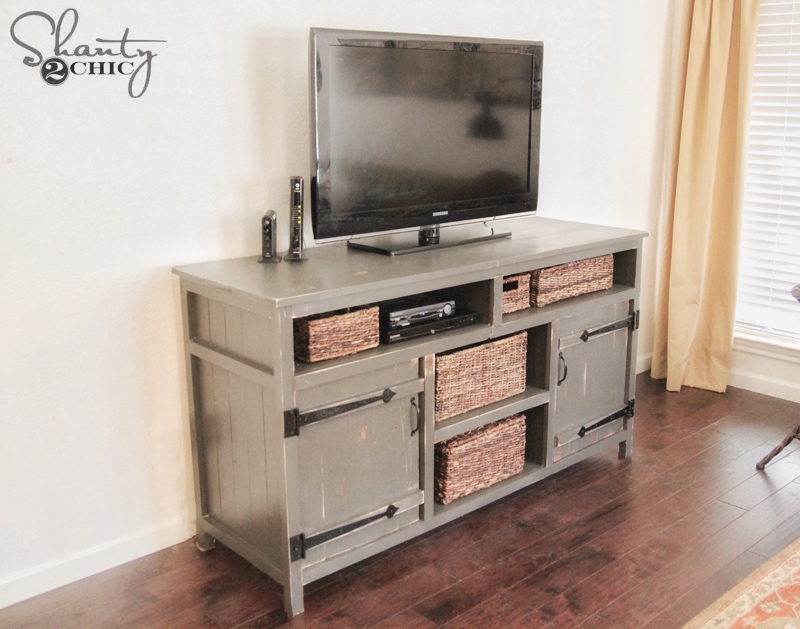
The girls from Shanty2Chic continue to amaze me. This time Whitney asked me to design a media center based on this media console from Joss and Main.
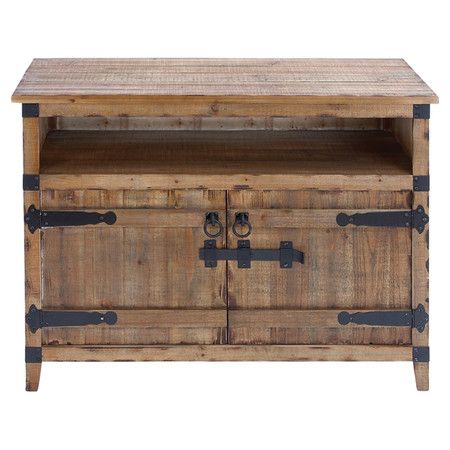
She just wanted it to be bigger. I new it was going to be a big build but it paid off. This thing turned out amazing and I love the color that she chose. I hope you enjoy the plans! Make sure you head on over to the Shanty2Chic post to see photos of the build.
For sneak peeks of our upcoming projects be sure to follow me on Facebook and Instagram. Also, follow me on Pinterest to get tons of projects plans from all around the web!
Required Tools
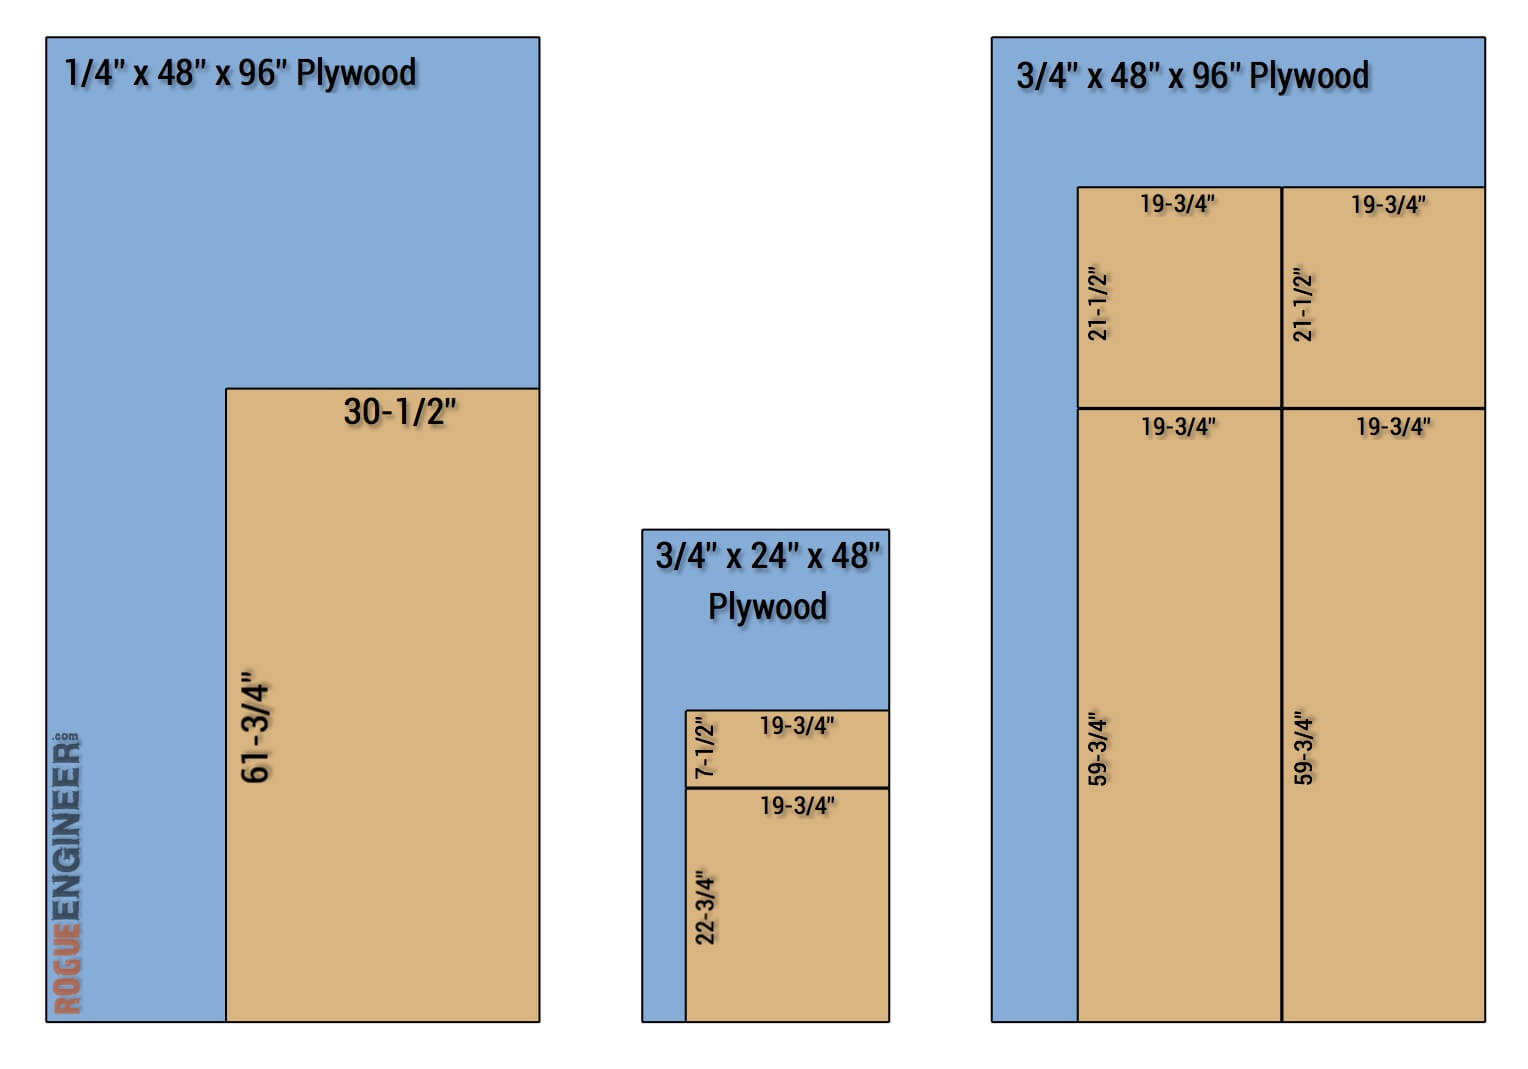
Materials
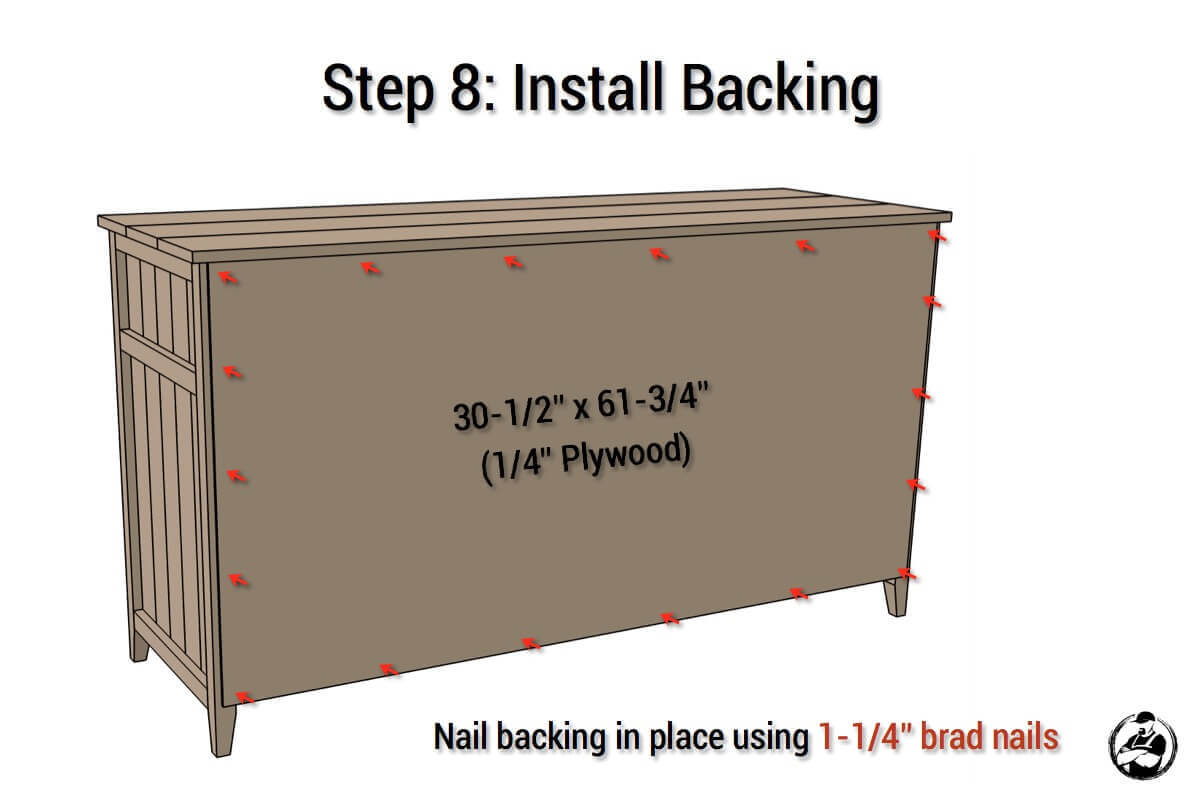
- 1/4″ x 48″ x 96″ Plywood
- Luan is acceptable. This is just for the backer board.
- 3/4″ x 48″ x 96″ Plywood
- 3/4″ x 24″ x 48″ Plywood
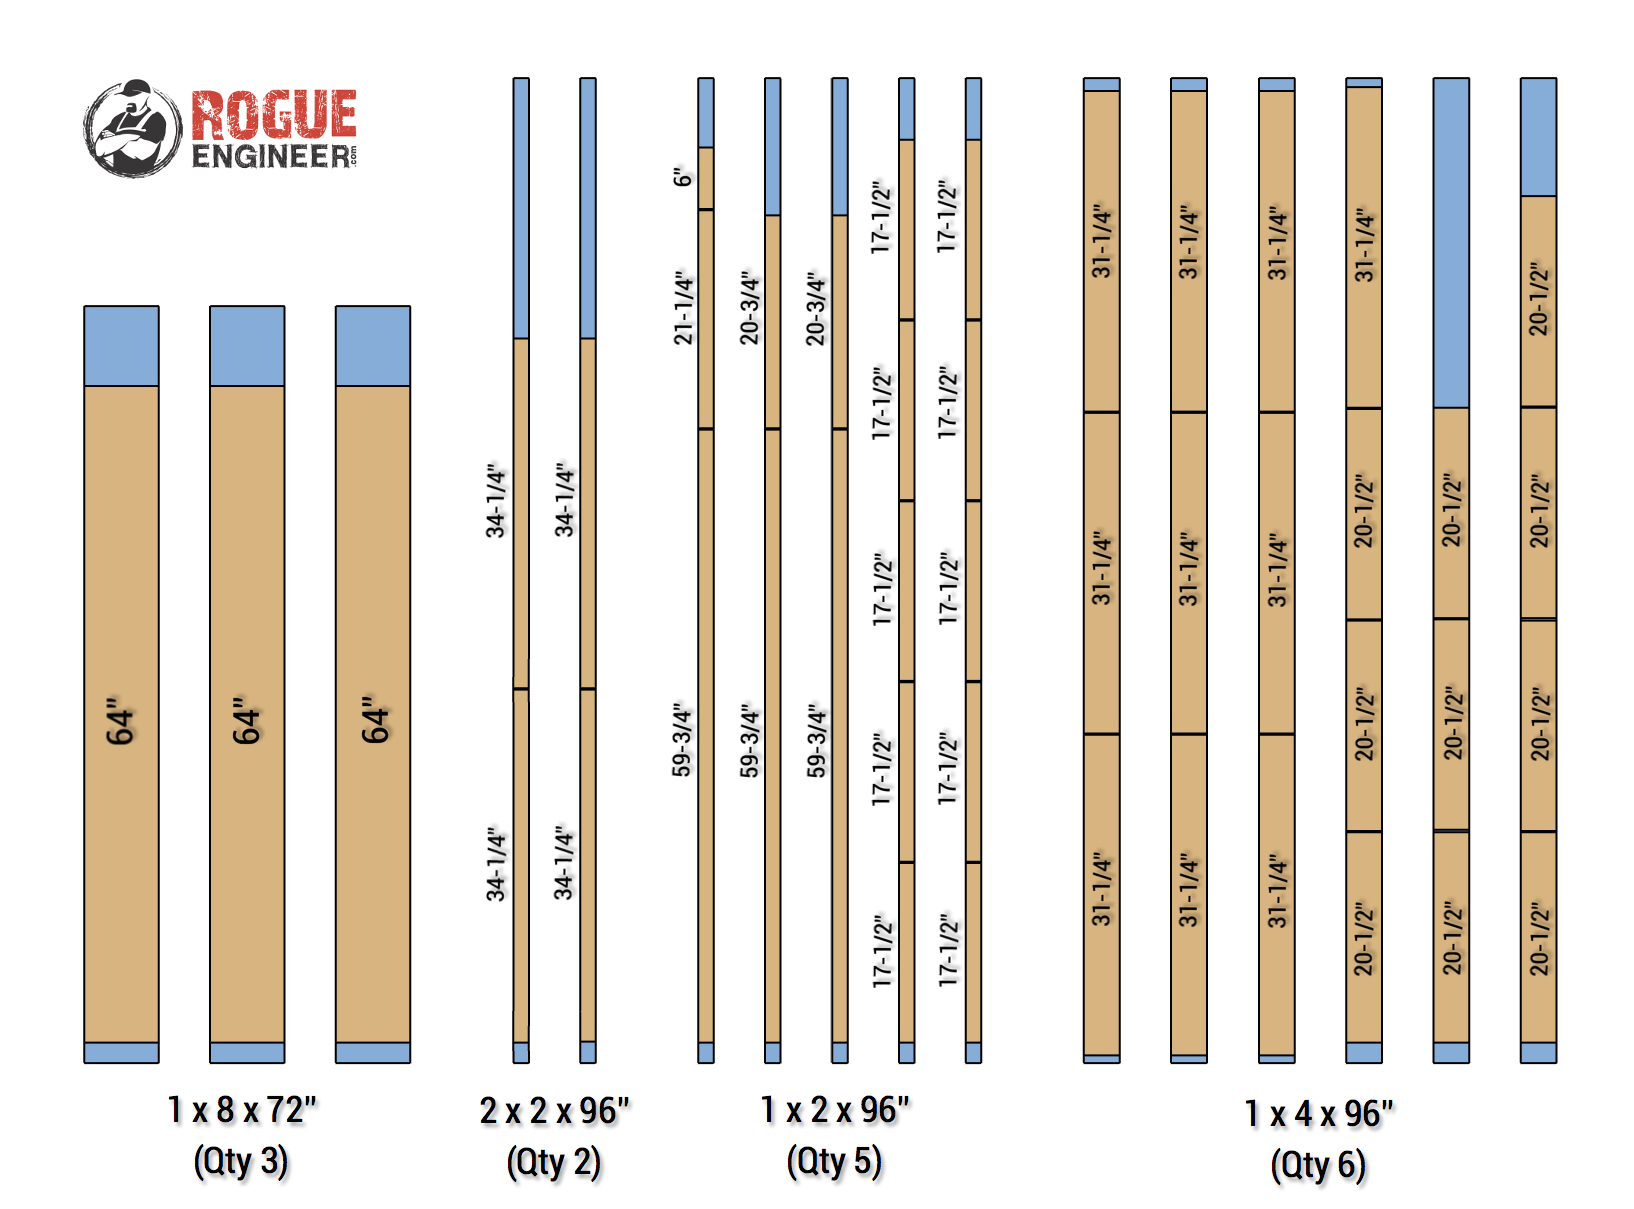
- Qty 3 – 1 x 8 x 72″
- Qty 2 – 2 x 2 x 96″
- Qty 5 – 1 x 2 x 96″
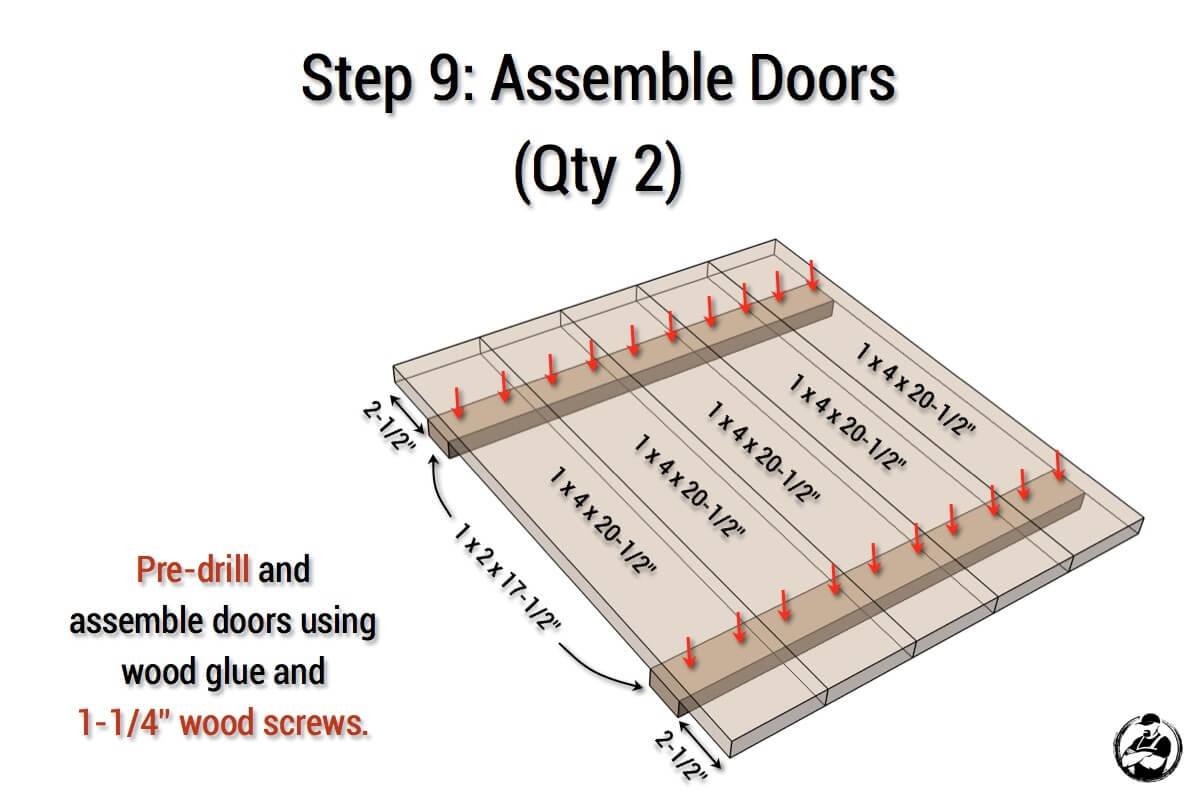
- Qty 6 – 1 x 4 x 96″
- (Link is to 6′; 8′ not listed online)
- 1-1/4″ Pocket Hole Screws
- 1-1/4″ Brad Nails
- 1-1/4″ Wood Screws
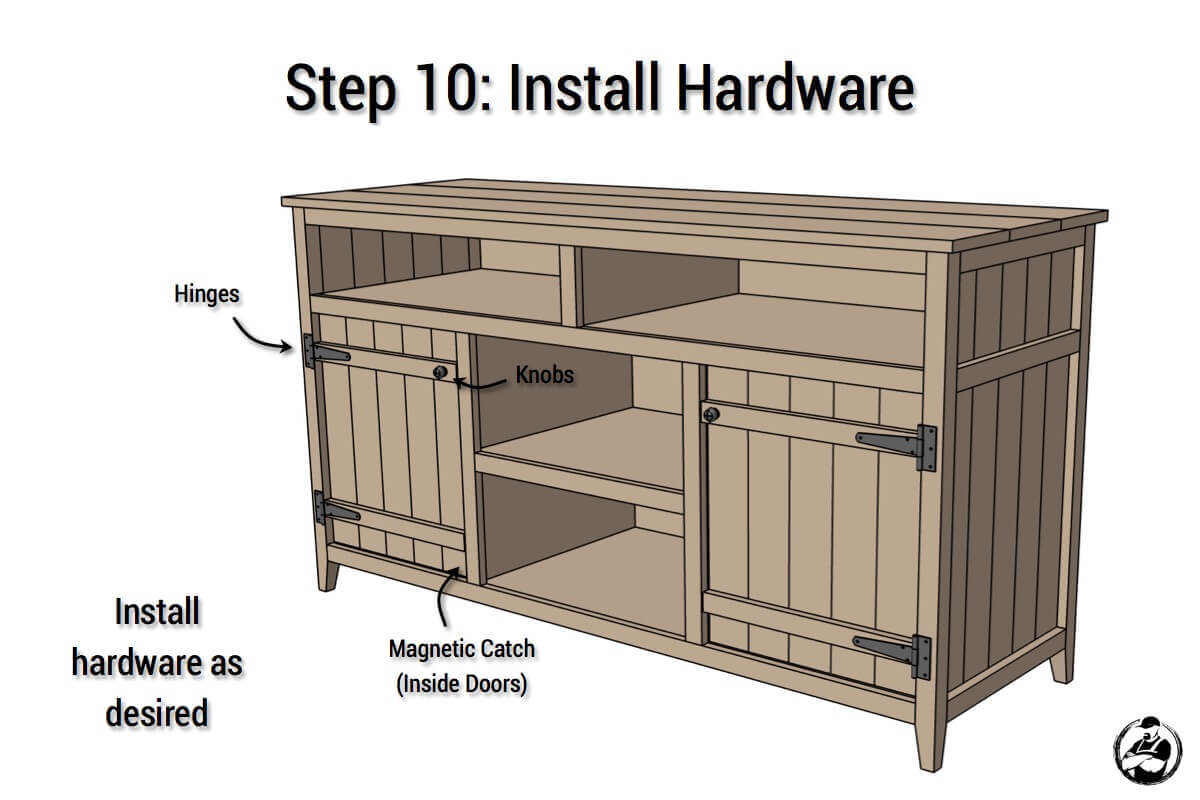
- Magnet Catch (2-Pack)
- Knob
- Qty 2 – T-Hinge (pair)
(Ebay Affiliate link)
Disclosure: The links provided in the “materials” and “required tools” sections are affiliate links. If you would like to support our site and help keep our content free come find out more about how we can make money with no extra cost to you.
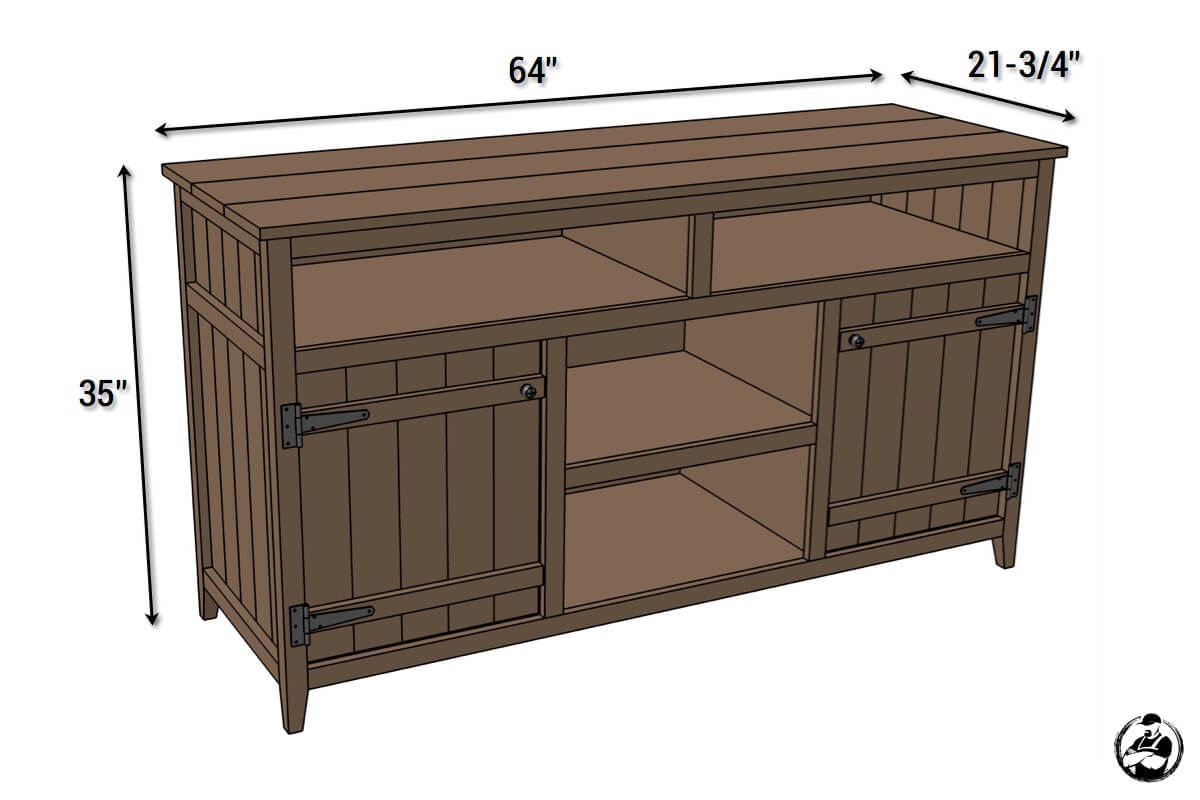
Dimensions
Cut List
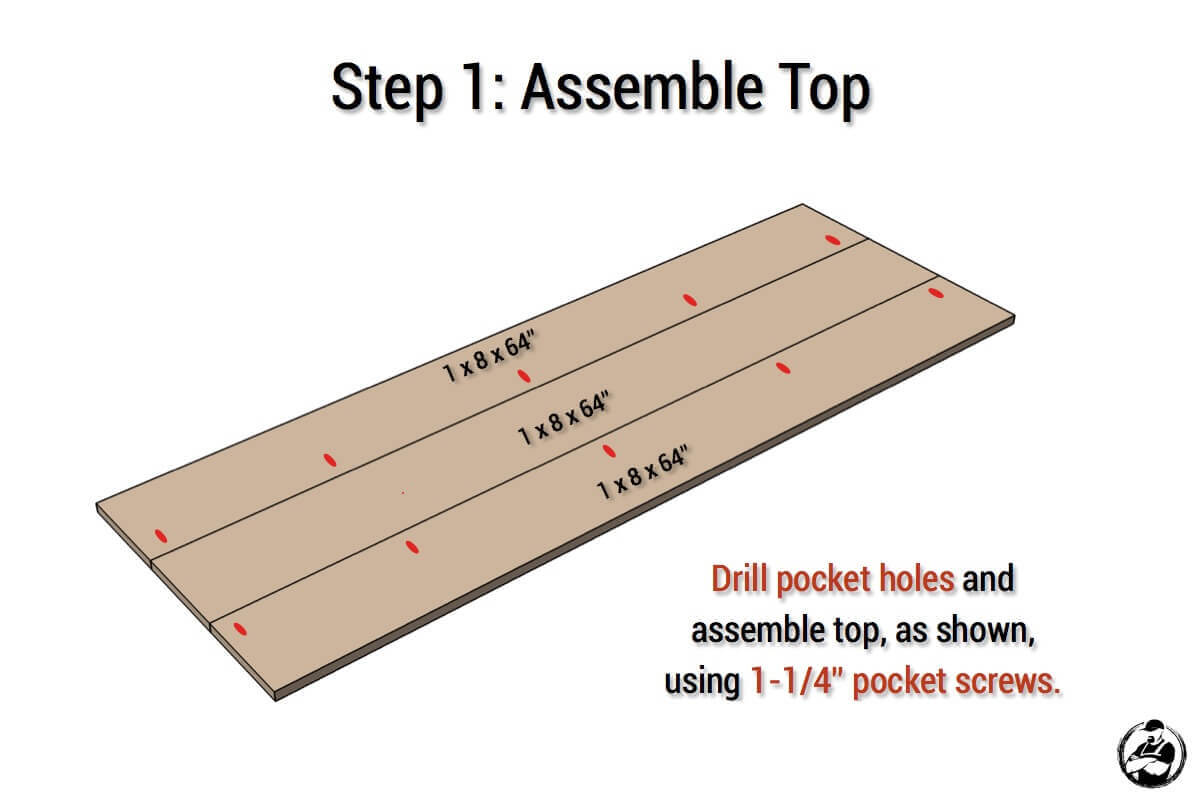
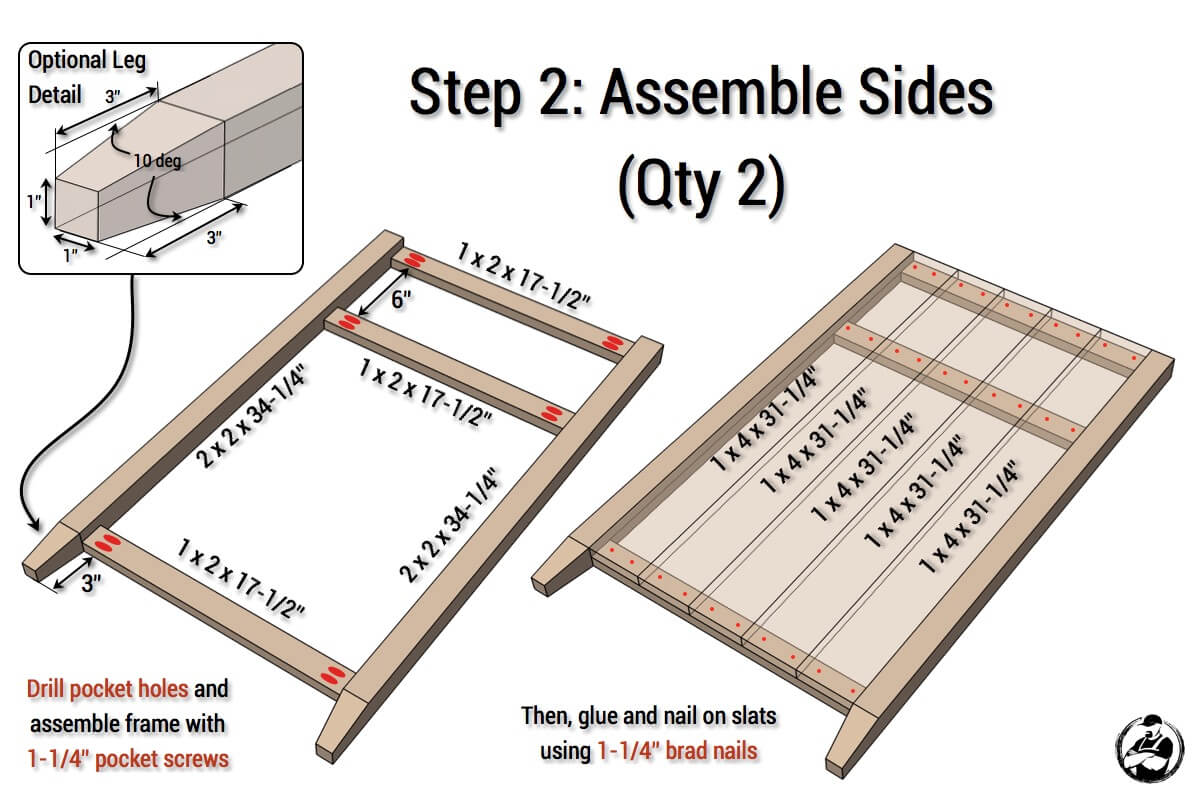
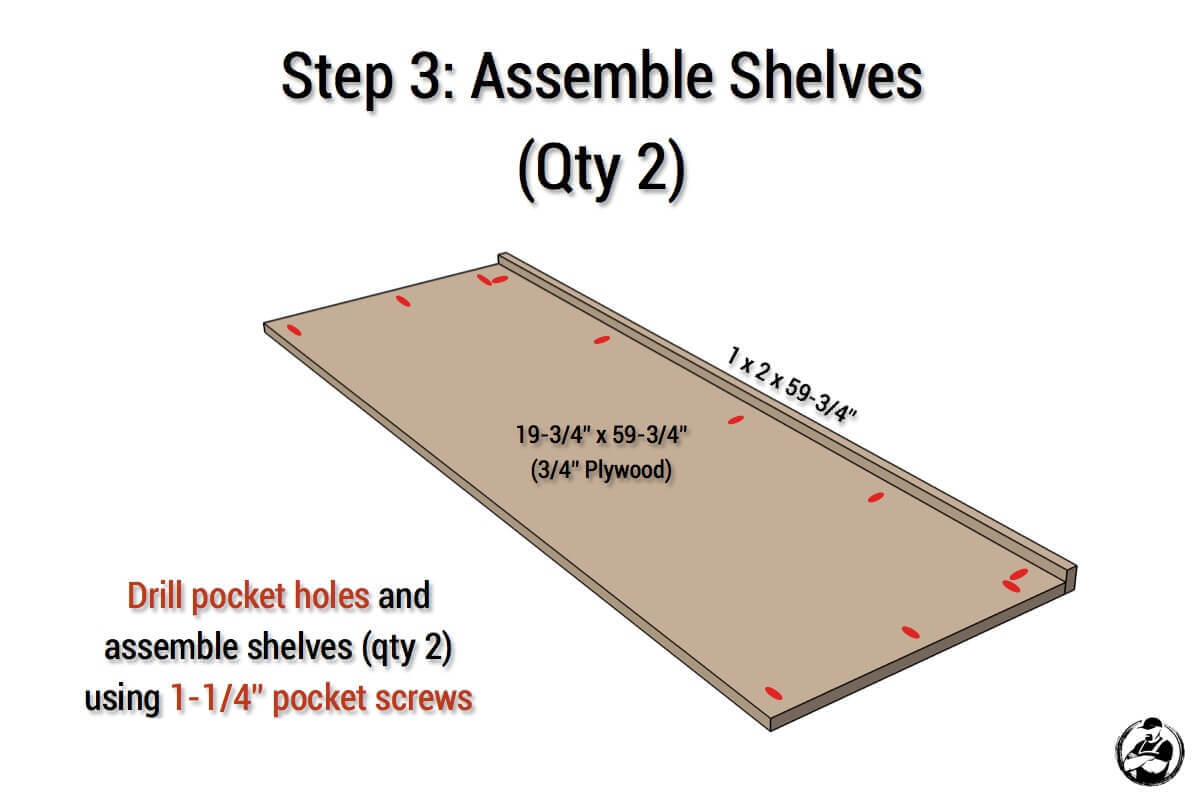
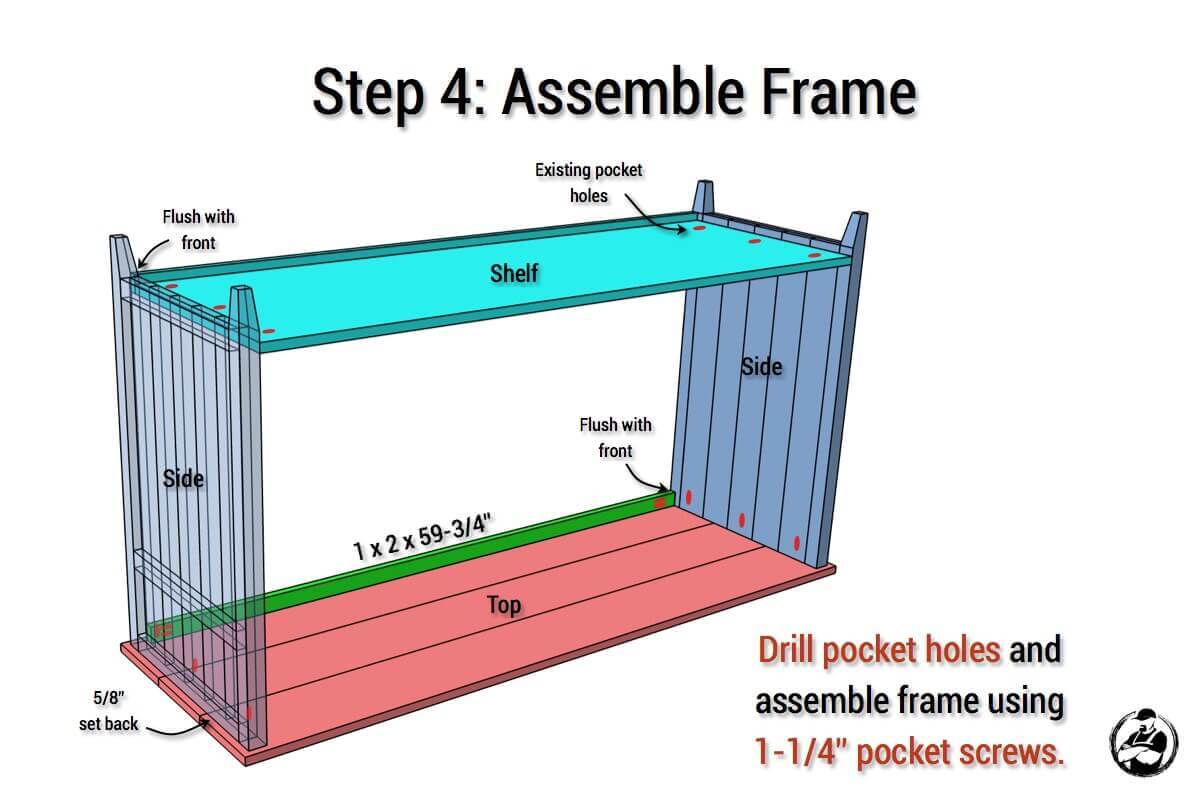
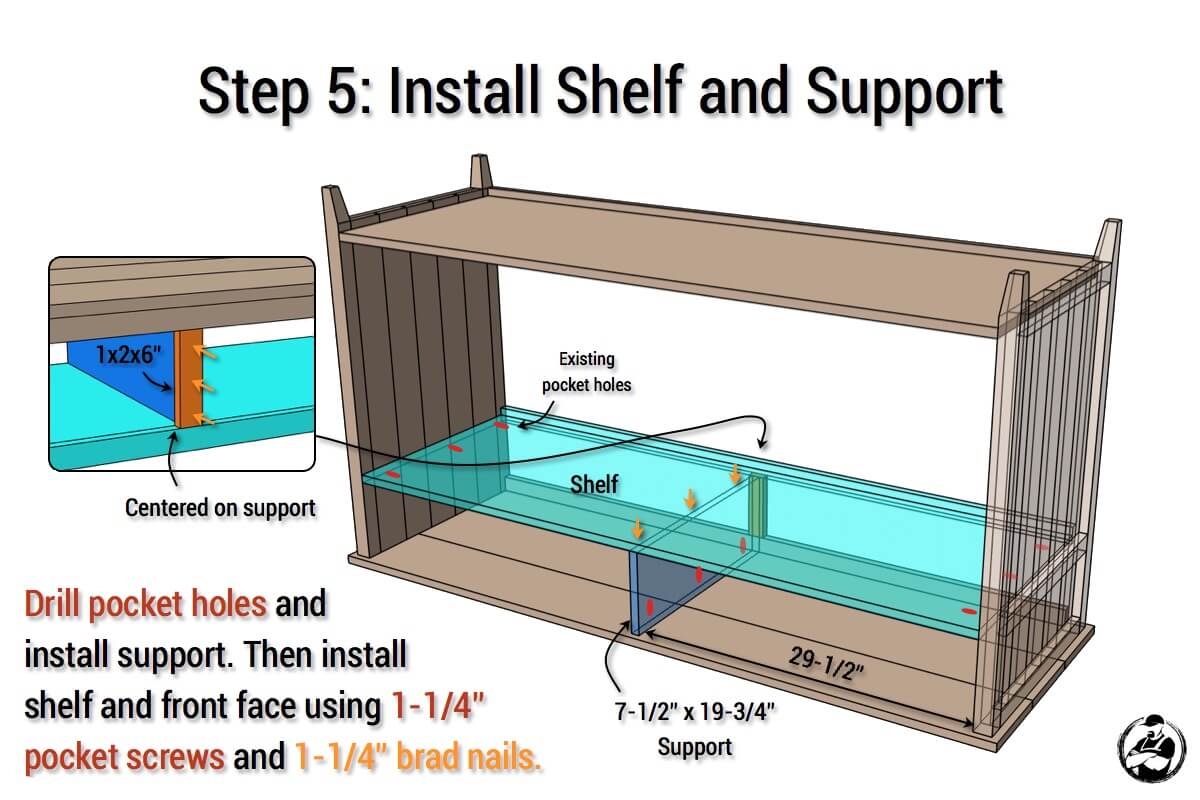
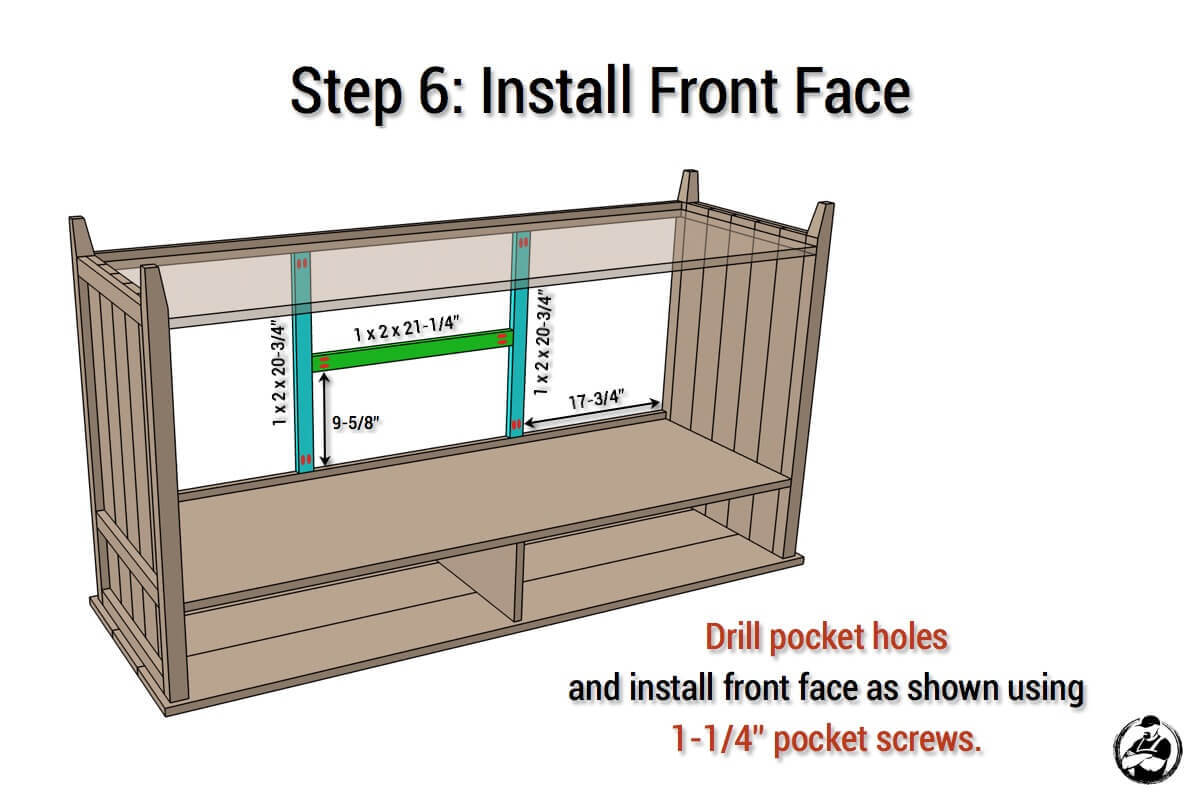
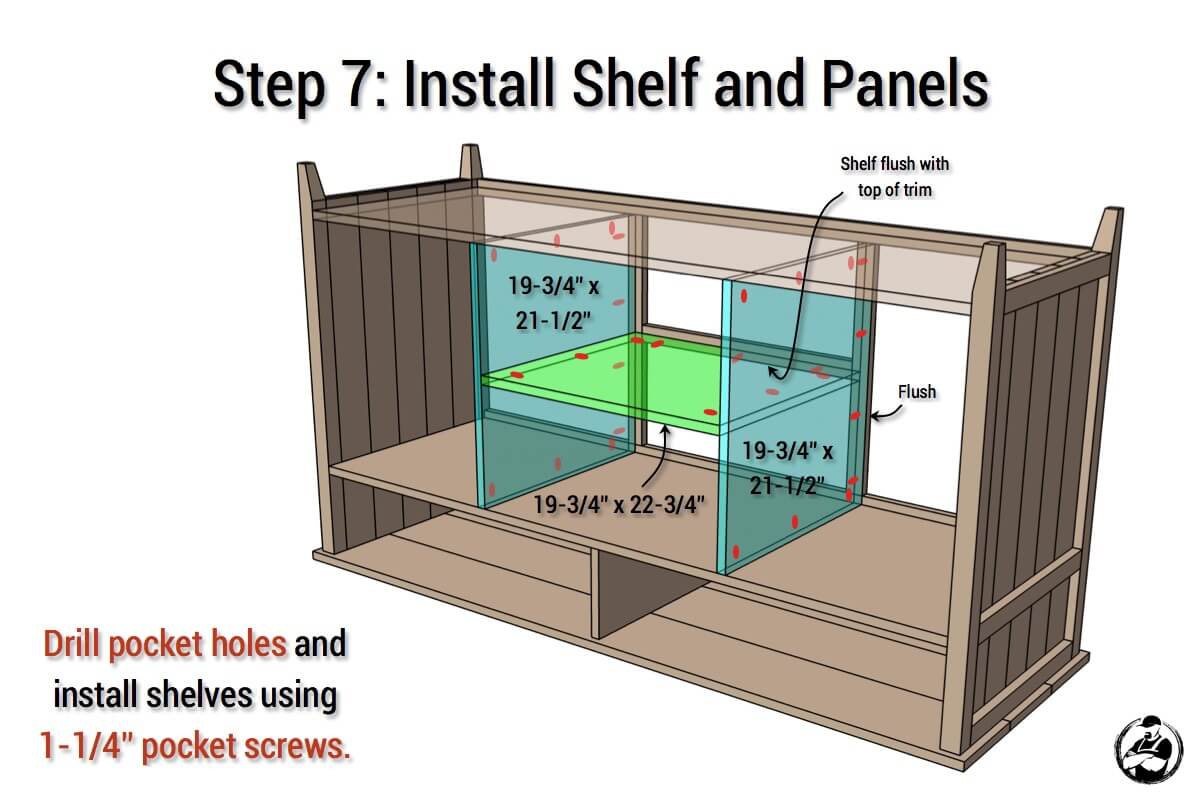
How to build a Rustic Media Cabinet
Following these step-by-step plans you can build your own rustic media cabinet just like Whitney from Shanty2Chic did!
Questions? Comments?
As always, if you have any questions don’t hesitate to comment below and especially don’t forget to post pictures of your finished products in the comments! ENJOY!
I think this would be perfect for my living room. Im wondering if that divider on the top shelf needs to be there. It would be good place to put the sound bar. Also I would be hanging my TV on the wall above it, so I would have anything other than decorative items on top. I can’t wait to build this.
I think you could get away without the mid support being that there wouldn’t be much weight on top.
I would still put the center divider in, just make it shorter and leave enough room for your sound bar to rest in front of it. You’d still gain some reinforcement from it and your sound bar would sit to the front appearing almost as a flush mount!
Great piece. What is stopping the doors from swinging too far in or out? Did you use a stop or additional hardware such as a magnet?
Thanks Jon, I just realized I didn’t include the last step! A magnetic catch is what I suggested for the stop.
Where did you find the t hinges and what size? I am in the process of building this and can’t find those kinds of hinges?
Hey Kyle, you can get those hinges on ebay. Here is the link.
http://www.ebay.com/itm/13-COLONIAL-DECORATIVE-BLACK-STRAP-HINGE-for-Sheds-Gates-Doors-1-pair-/160971947706?hash=item257aacfeba&rmvSB=true
Hi Jamison –
Thanks, love the site. Console looks great! I’ve ripped all the wood and about to go to assembly.
Can you share some insights into staining / painting? Generally are you staining before or after assembly?
This piece looks “distressed” – any hints on how to achieve that effect?
Any products / brands / colors you like to use would be appreciated.
Beautiful piece, love it!
HK
Thanks Hubert! I typically stain after assembly. Check out this tutorial I put together on the distressed finish.
https://rogueengineer.com/distressed-finish-tutorial/
How long would a build like this normally take for a weekend warrior?
It could be done in a weekend. Maybe two. One for building and one for finishing.
Any tips for cutting holes for cords out the back for the DVR, receiver, etc.?
Clamp the panel to a scrap board and drill with a hole saw bit through the panel and into the board. This will help avoid tear out of the back panel.
Hi Jamison,
I think I made a huge mistake!
I wanted to build this piece using hardwood so I went to a lumberyard and bought about 50 board feet of Ash. We ripped it down to the dimensions in the plans – but it looks like the dimensions are not exact.
For example, to make the sides, I have 5 boards that are 1 x 4 x 31 1/4″ – which is 20″ wide (5×4″). But how would I get these five pieces to fit onto a 17 1/2″ wide?
Am I reading the cut-list wrong?
I love the site and have been inspired to build! But now I’m faced with a puzzle I can’t quite resolve.
Any help you can provide is appreciated.
Thanks!
Hubert
Hubert,
Lumber has a nominal size (2×4) and an actual size (1.5×3.5). Dimensional lumber is what is found at most hardware stores and lumberyards. When the timber is cut, it is cut to a nominal size such as 2×4, but to make the finished lumber it is then milled and planed which reduces its size. If you look on line you can find dimensional size charts for lumber, which will help you in future projects.
Hi, wondering where you got the hinges for the Rustic Media Center.
The link to the hinges is in the materials list.
Hi Jamison
I have been looking all over the internet for a media console that could accommodate a turntable with a slide out drawer. I really liked the look of this plan and was thinking this plan might work if the “divider” on the top shelf be taken out and the top shelf be divided into three with the middle shelf being a slider. Would this work?
Any suggestions on the best way to handle the alterations to the plans?
Thank you!
I think that would be a simple mode and would work well. Adding another divider should be pretty straight forward. Happy building!
A father-son weekend project.
Made the rustic media console for my stepson. He recently graduated from college, got a good job, and his first apartment. Had to cut down the length of the console from 64 inches to 44 inches because the apartment is pretty small. Kept the middle shelves the same. Just cut down the doors. Turned out well and he loves it!
That’s great Max, thanks for sharing and I’m glad it turned out so well.
I don’t have a brad nailer, what could i use instead?
You can use finish nails and a hammer.
Is it possible for you to modify the plans for me? I wish I was good enough to do this myself but I am not. I need it to be 6ft long and 43″ high. This is the closest thing I can find to what I need. I appreciate any help I can get.
Unfortunately I cannot rewrite the plans to suit these dimensions right now. Sorry about that, I just don’t have the time.
Quick question … do you think the sides would support shelf support pins so I could do adjustable shelves?
Thanks for the great plan!
Sorry … I should clarify. I was thinking on both the closed door sides, and maybe centre,
I think with would be a great addition.
Thanks for the excellent plans. Thought I’d do a share of my completed project with you. Check out my completed pics here:http://www.handmadehome.us/blog/media-console
Nice work Blake! Thanks for sharing!
Im confused on the 1×4 slats it says they should be cut @31′ 1/4” but the frame is 34′ 1/4”. Am I missing something?
The legs extend 3″ past the slats. See step 2. I think that’s what you are referring too. Let me know if it’s not.
Thanks for the plans! Finished this Christmas Eve for my wife. She loves it.
Awesome Randy! Glad she likes it!
What did you use to angle the legs? I would like to add this feature and am having trouble visualizing it.
Can it be achieved with a miter saw?
Probably not with a miter saw since the angle would be too great. A jigsaw or a circular saw would be best.
That’s what I figured…have you heard of Home Depot or lowes doing the taper for you, by chance?
I haven’t but you could also do this with a hand saw.
Thanks for the plans! Just wrapped this up.
id like to add another set of shelves the long ones (so there are 4 shelf inlets instead of 2) are there any plans for this modification? or can you just let me know what the sides would measure ? thanks
Don’t have any plans for this mod. Just add 8-1/4″ to the sides and another shelf on top and you should be fine
I love this console. But I need it to be 84″ wide. With a cabinet for a woofer and taller. Not sure how to modify the plans and come up with correct measurements for cuts. Any help is appreciated.
Sounds like you’ll just need to add 20″ to the lengthwise boards and add 6 or 7 inches to the middle shelf.
Finished my version yesterday.
That looks amazing!!! Thanks so much for sharing and excellent work my friend.
What stain did you use for the top?
About how long does it take to make?
Finished mine today. The plans made for a slightly deeper cabinet than we needed. I changed to 1×3 and 1×6 boards. Super excited about how it turned out. Thank you!
That’s awesome Jay! Nice color choice and great work. Thanks for sharing!
We are also wanting to reduce the depth of the cabinet as you have done. Would you be able to share your modifications and any problems we might encounter?
The only thing I had to do different was on the door panels. I picked up a 3/4″ x 3/4″ stick from the finished wood section at the depot because the 1×3’s didn’t full the cabinet opening. Here’s a picture.
Thanks so much for the reply. So aside from the change to the door panel, you made changed all the 1x8s on the top to 1x6s and the sides all from 1x4s to 1x3s?
What were your final dimensions of the finished console?
I really appreciate your help!
The top is 16 1/4″ and the width is 64″. The cabinet is 15″ deep and 62 1/2″ wide. Use the same number of 1×3’s as the plan says for 1×4’s on the sides and doors. The three 1×2’s on step 2 are 12″.
You have been a big help. I appreciate you taking the time to assist!
We will give this a try.
Thanks for plans, finished mine today, used grey stain, satin poly and modified top section slightly.
You got it Joseph.
If I don’t include the divider piece for the top shelves (so there is only one long shelf instead of two shelves), would there be a support issue? We have a long and deep soundbar that we would like to place in this shelf. If we have the tv on top (55″ flatscreen I believe), would that be ok?
Yea I think it would probably be fine.
Jamison, What would need to be done to this piece to add a top hutch portion to it? I plan on adjusting the dimensions slightly to make it a little taller and a little longer and want to add a top to it and turn this piece into a China cabinet/buffet.
It should be plenty sturdy to had a hutch to the top of this without making any modifications to the plan. Can’t wait to see how it turns out. Be sure to post some pictures.
Love this! This is my first build I’m wanting to make this 54 inches wide what would I need to do to make it all work measurement wise
Thanks Alicia! Just take 10″ off any boards that run from side to side. Except for the doors. Leaves those the same.
Question….do you think i can get by with 1/2 inch plywood for the shelves? I am mid- build and i have 2 sheets of that on hand. The only thing i’d worry about is load over the full 60 inches
Finished mine a couple weeks ago. Took 7″ out of the depth and joined the top boards using dowels. Also changed the doors slightly.
https://uploads.disquscdn.com/images/aadbf4296b67552eca98e7744be0f198b5975af8ee34c0f4ad3062c30a311a6b.jpg
My son likes it a lot…
That’s awesome! Thanks for sharing. And he’s perfect height to press all the buttons now!
How long does this project take on average?
https://uploads.disquscdn.com/images/0dc05fbb12b008e68003eb5f9412c84327c303a4dc5dbdbb872353ba17adfd11.jpg
heres mine, slightly adapted… and incomplete, but u get the picture 😉
thanks and God bless Rogue Engineer!!
Hi Jamison, do you know what the approximate lumber cost of this media center is? Thanks,
Finished mine up tonight. All pine, stained dark walnut. Matte blue interior. I covered the back interior in fabric. Plus, I wanted more shelves instead of general storage, so I cut the doors in half horizontally and added a center shelf on each side. So it went from a coupe to a sedan. 😆👍 https://uploads.disquscdn.com/images/bd1fc90ef74290c77df2e5f71ddba02c40fe919e9c8ebbcdae35149f7a7f199c.jpg https://uploads.disquscdn.com/images/a144137040e5d61212129a3cd8902b5682cd919e05a34e6fc927b6b8c46e63cb.jpg
I finished this one last night. I modified the plans to make taller and not as wide.
https://uploads.disquscdn.com/images/9cd037913c3c5a3ca1ad32f60221f0103588614ad106db1e3575248b049839a3.jpg
Very nice! I really like how that turned out!
Mind sharing your modifications?
Absolutely LOVE how our media center turned out. Thank you so much for the plans! Minor modification to accommodate a sound bar. Stained with Varathane Carrington. Had shop lights on so a little bright in some places. Perfect first major build for me!
https://uploads.disquscdn.com/images/1355390858da51edc2d2128d3e9cbef7ff380f7a015fd1aa12a561da8158b9e8.jpg
Did you just omit the divider in the top slot to accommodate the sound bar? Any other modifications?
Yes I added a 1×2 across the back and couple 1x2s under the top for added support. https://uploads.disquscdn.com/images/fda59f16c2f5d4c4cead2b0bab06da3ace2a52f95521841dbdb20088cdd81fdc.jpg
This was asked but I don’t see where it was answered. About how much does this project cost?
Fun project for us to complete. We shortened the legs just a hair at the bottom but kept the rest of the dimensions as stated. We also changed the doors to be glass panel with muntins. We also made the center shelf adjustable with shelf pins. Added a few holes here and there for cords a air flow and used dados for the all the shelf dividers just to make it a bit more solid. The biggest mistake we had to over come was easing the edges on the face frame before assembly. This created a difficult design challenge and we ended up needing to make the frame members about 1/8 inch thinner in places to account for the easing. This created a situation where we actually had to use offset hinges in order get the doors to align flush on the latch side. But it worked out well. Would I do that again? Nope. Assemble the frame and then do the finish work after the fact. Lesson learned. Building the doors was a great challenge with a bunch of hand tooling to get everything just so. Finished it with a base coat of red stain and then black paint. We sanded through the black paint in places to allow the red stain to bleed through and then glazed over the paint with a coat of red stain to give it just a hint of red over the black paint. https://uploads.disquscdn.com/images/cc6a91ee0275a0c1da198ef3a3079515302e9107eaf2ae8ac7bb7a71459b3eb1.jpg https://uploads.disquscdn.com/images/53520334f827a82a87e9801ff61ba59a1ace0774e956f3541532361a190c14d6.jpg
Great modifications! It never fails when building you run into a few issues that you have to work though. The glass panels were a really nice touch, and we are digging the finish!
Love the site, Jamison – this is actually the third of your projects I have done. Thankfully the wife gave the blessing so I dove into this project. Made a couple modifications including the width as we did not have the real estate to take advantage of the entirety of it. Remainder was the same. Inside one of the doors I put a removable shelf. Project was fun, plans were excellent. https://uploads.disquscdn.com/images/ce24db023ef8a0b091c3110762a11dd2c40c2196c70fe1dc843acb472b66c478.jpg
That looks great! It’s cool to see people take the plans and make modifications to fit there space. Nice work man. Happy building
Could I use your measurements for my woods project?
Love this project plan. I’m going to grab materials today and start making cuts and glue-ups then continue over the weekend. Instead of hinged doors, I plan to mod it to have two sliding doors with the middle still open. I’ll post pics of the final product. Thanks for the plans!
I meant to post this a year and a half ago when I built it. Alas, I guess we were too busy admiring its beauty. These are the same dimensions as the plans posted here. https://uploads.disquscdn.com/images/e6c90ca4222a9675ab055fd8b6556dea944fcf5b1cc492ec87f48babed1583d6.jpg
Can I purchase the tapered legs anywhere? I’m pretty good but not this good!
Here’s my version, I used a grinder with a wire wheel to remove the soft grain from the wood then I sanded it to complete that really distressed look. I used 3″ x 3″ thick legs and two 1 1/2″ thick boards for the top. The wood was stained with minwax dark walnut, satin polyurethaned then finished with general finishes “flat out flat” coating. The console is 60″ wide by 16 1/2″ deep and 35″ tall. I also added a center drawer. Below the drawer, I added a piece of wood for one row of blu-ray/DVD’s. Behind that piece of wood is a space for my surge protector and all my wires. The unit sits almost flush to the wall with no visible wires showing behind or underneath the console. I used three cast iron ring pulls for the doors and drawer. I also used thick heavy duty iron door hinges and iron corvals for a finished rustic look. https://uploads.disquscdn.com/images/b99f8da660fa11a301fadb6a6c80e1dfcd8b9c6419accef1dc038ce9e1b08bd7.jpg https://uploads.disquscdn.com/images/c1c77e3efd94d454ae24dc038c64e2e0f1f6c1e8ecdebaddfe498e793492158a.jpg https://uploads.disquscdn.com/images/bf7003f9bf09ff7b8763069567fbbfc24278b65045d30f463699b5dd3313a906.jpg https://uploads.disquscdn.com/images/737da18e2aafd49737c08eb010c6e9d922742f1c368431a72e777234a730cfd1.jpg https://uploads.disquscdn.com/images/9ded27a857d14a8205b1707827df809966a46db8eda60504ec835c6a0acf94f1.jpg
What is the overall cost, on average, for this project?
What color did you guys use on this media table? Love the color! I really want to do project!
Only the third peice I have made, pretty happy with the results. https://uploads.disquscdn.com/images/040f31c2d907b7e763df7b0ef43b01dbb84af5b406e89cc227fb78c3b89f8744.jpg https://uploads.disquscdn.com/images/f62b3e1f22cc1a89bb0b19e7e26b03bde7de3e34bcd9ab6e5309110ac9f5f14a.jpg https://uploads.disquscdn.com/images/b760e9de22eebf74c6db0edd03da43567bb5a1663456fedfb332c5606fdfce89.jpg https://uploads.disquscdn.com/images/83489be363cb0309879ec8acea2a4efa55846d4830d70a379f8b5a375b9e23a8.jpg
Soooo. This build is great and all of the user photos are great as well! Wondering, anyone remember how much their build of this project cost them? Thanks!