

Printmakers Media Console
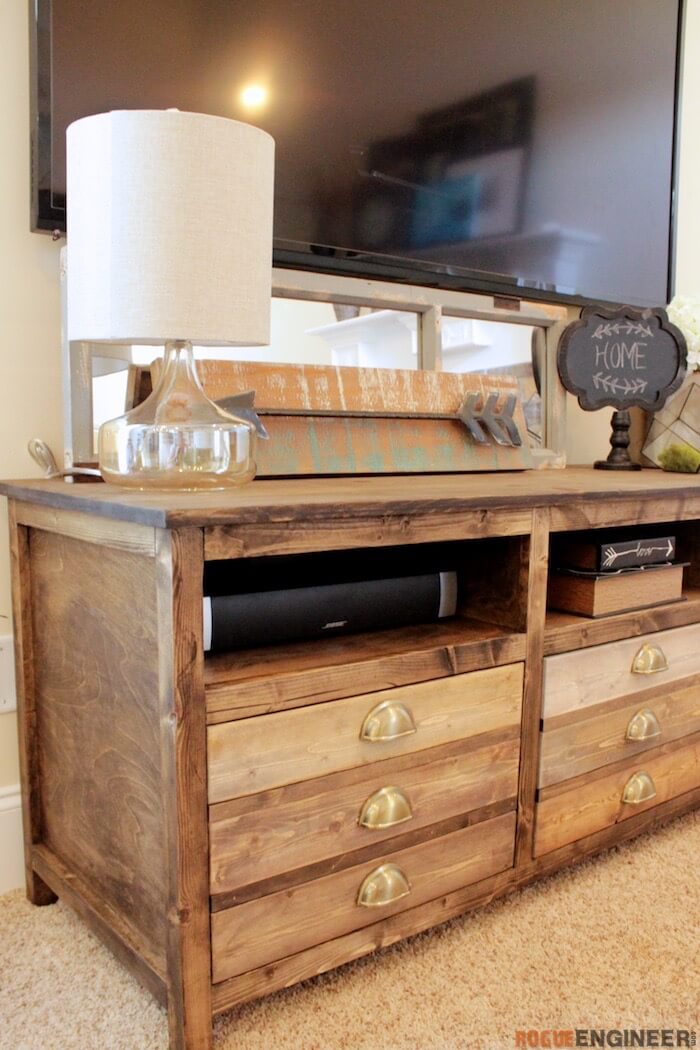
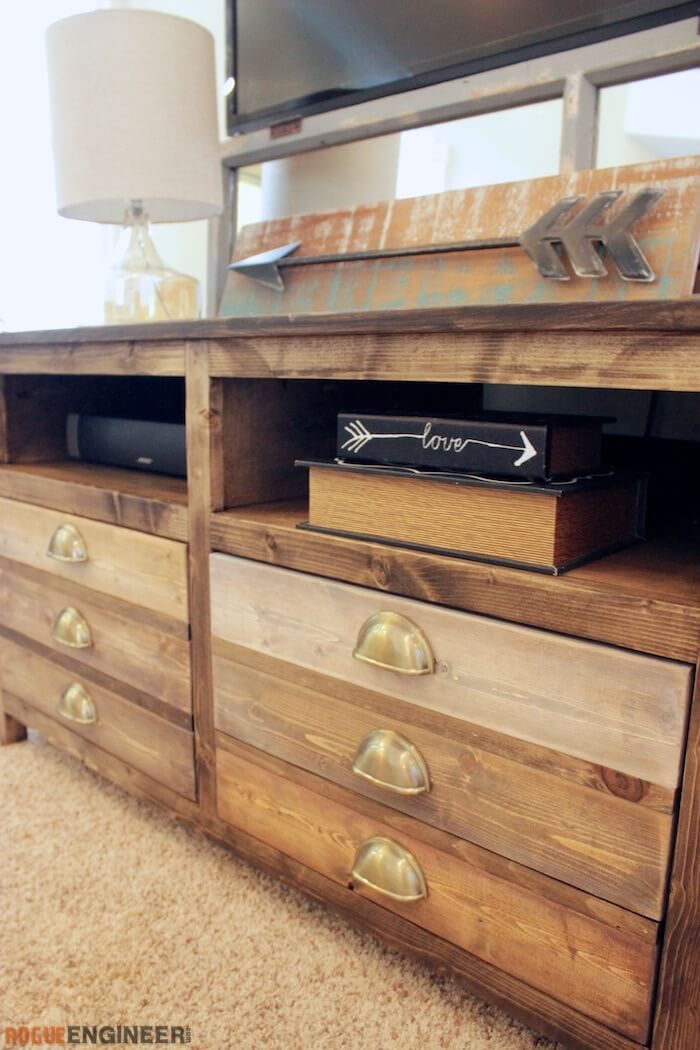
Hey everyone! This time I’m bringing you plans for this awesome printmakers media console that my wife just had to have. This was a fun build and a great addition to our living room. One cool feature on this media center is the 3 large drawers. Even better is that these drawers don’t require slides! If you’ve ever had to install slides then you’ll understand my excitement. I hope you enjoy the process of how it all came together. Be sure to check out my post with build photos over on Remodelaholic.
For sneak peeks of our upcoming projects be sure to follow me on Facebook and Instagram. Also, follow me on Pinterest to get tons of projects plans from all around the web!
Required Tools

Materials
- 2x – 1 x 8 x 6′
- 1x – 1 x 8 x 8′
- 3x – 1 x 4 x 8′
- 5x – 1 x 2 x 6′
- 2x – 2 x 2 x 8′
- 3x – 2 x 4 x 8′
- 2x – 1/4″ x 2′ x 4′
- 2x – 3/4″ x 4′ x 8′
- 2-1/2″ Kreg Pocket Hole Screws (Coarse)
- 1-1/4″ Pocket Hole Screws
- 1-1/4″ Brad Nails
- 1-1/4″ Wood Screws
- Wood Glue
Disclosure: The links provided in the “materials” and “required tools” sections are affiliate links. If you would like to support our site and help keep our content free come find out more about how we can make money with no extra cost to you.
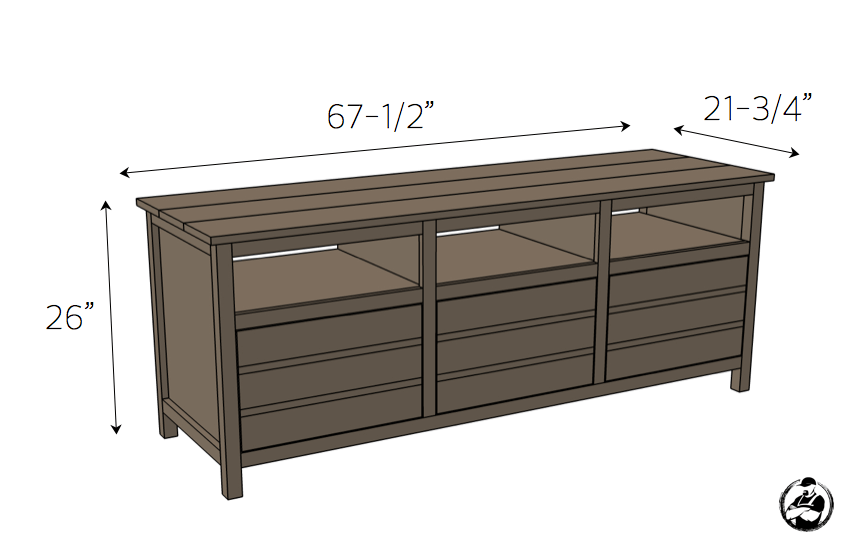
Dimensions
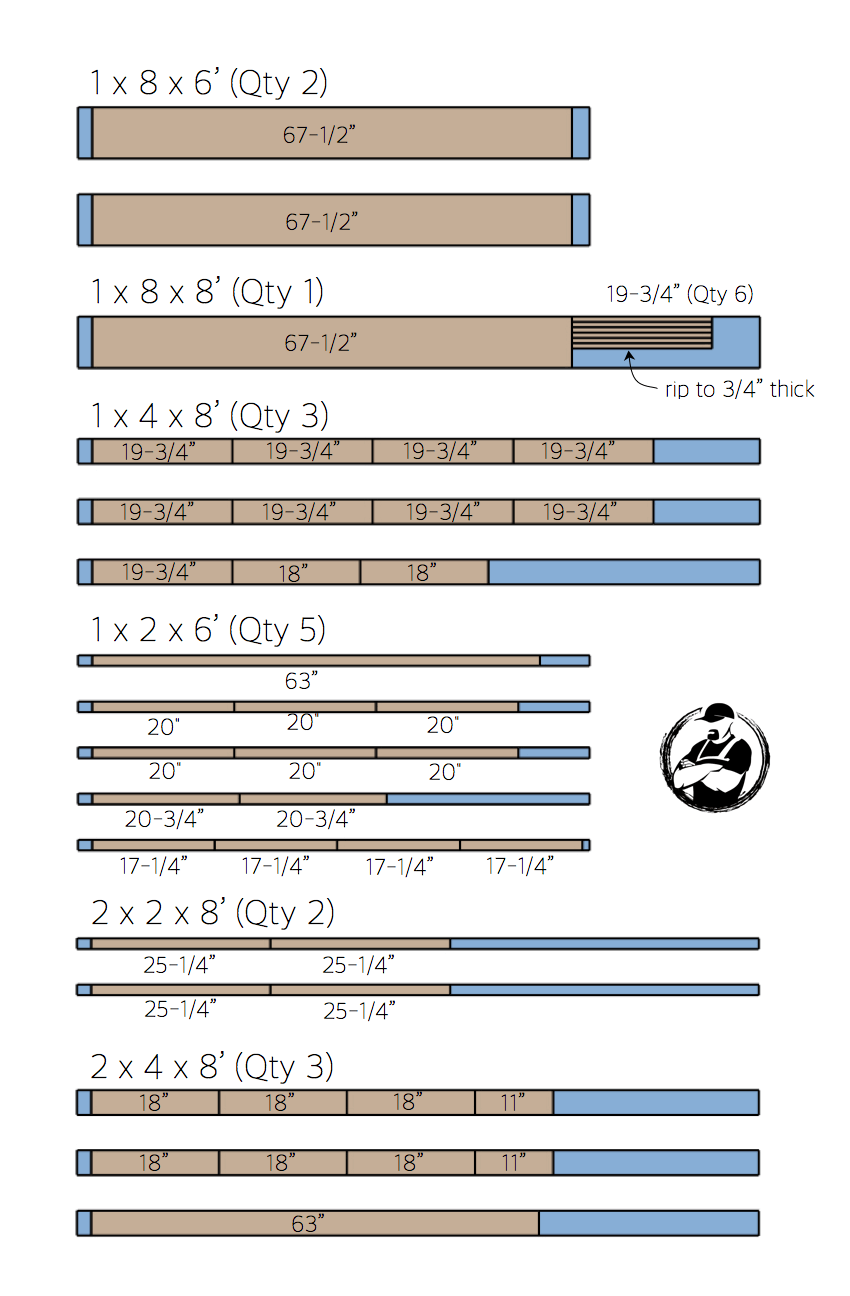
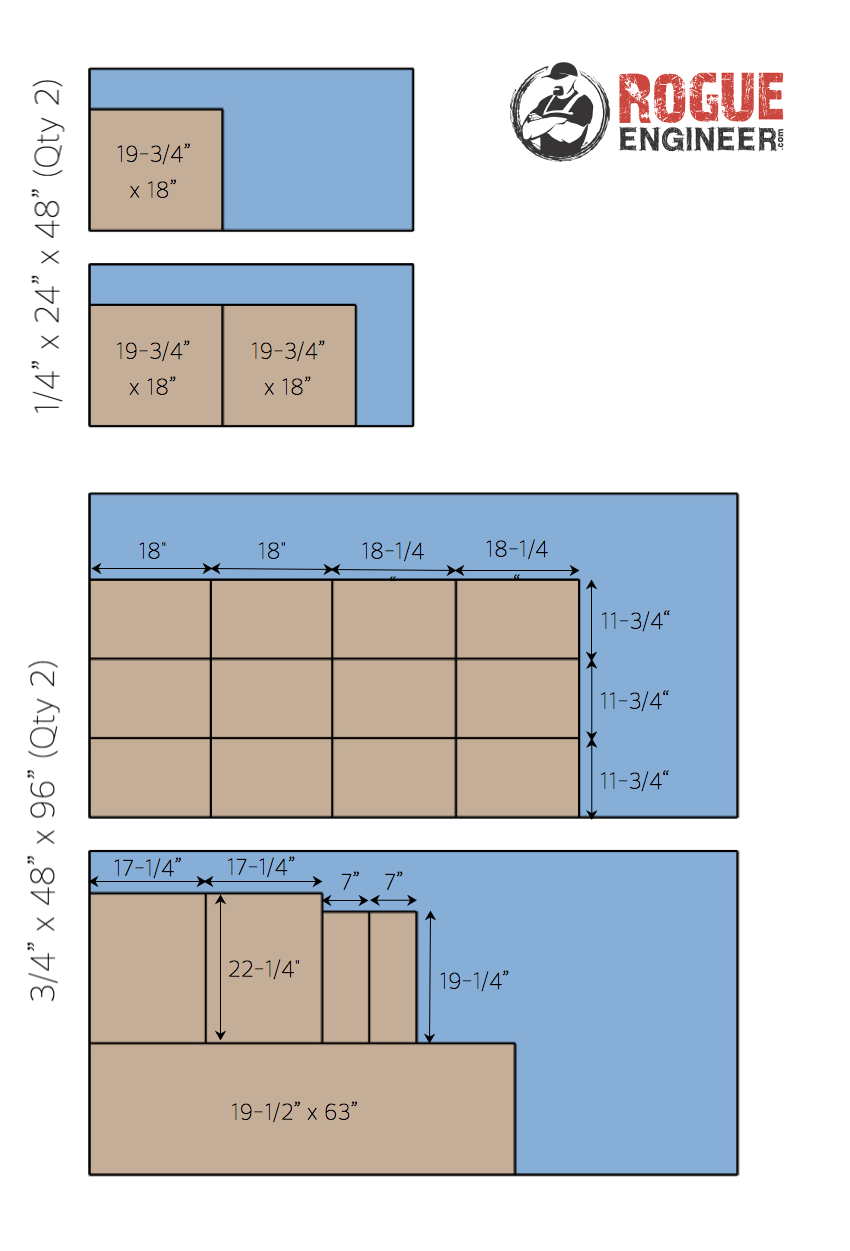
Cut List
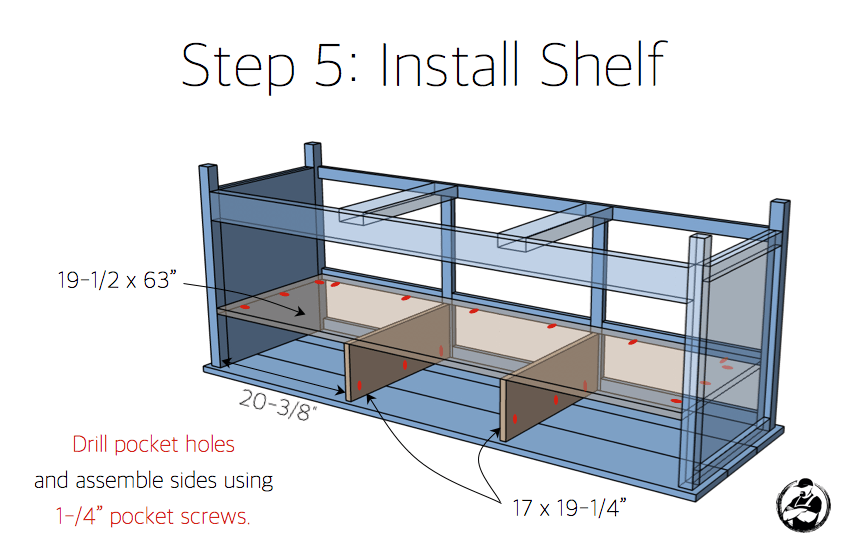
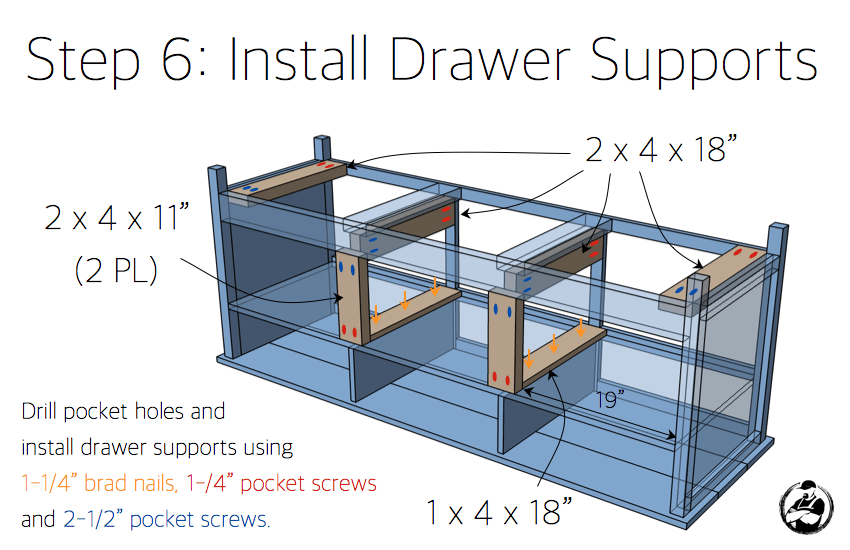
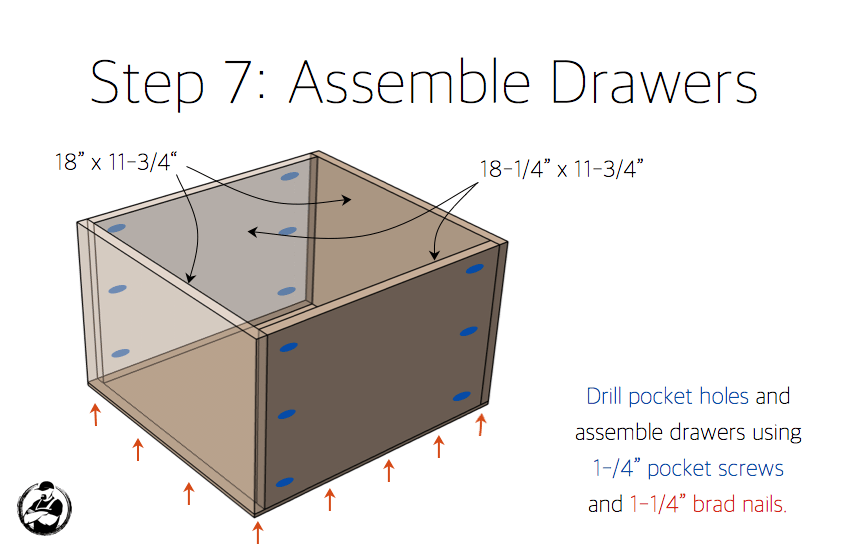
How to build a media console with false printmaker drawers
Follow these easy to understand DIY plans and you’ll be well on your way to building your very own printmakers media console. No woodworking experience required.

Finishing
Now is the best time to finish the media center. We wanted the false drawer fronts to all look a little different and worn. So we stained the entire console with Ash wood stain from Rustoleum but for the drawer fronts we used different stain colors and even mixed some stain colors to get the look we wanted.
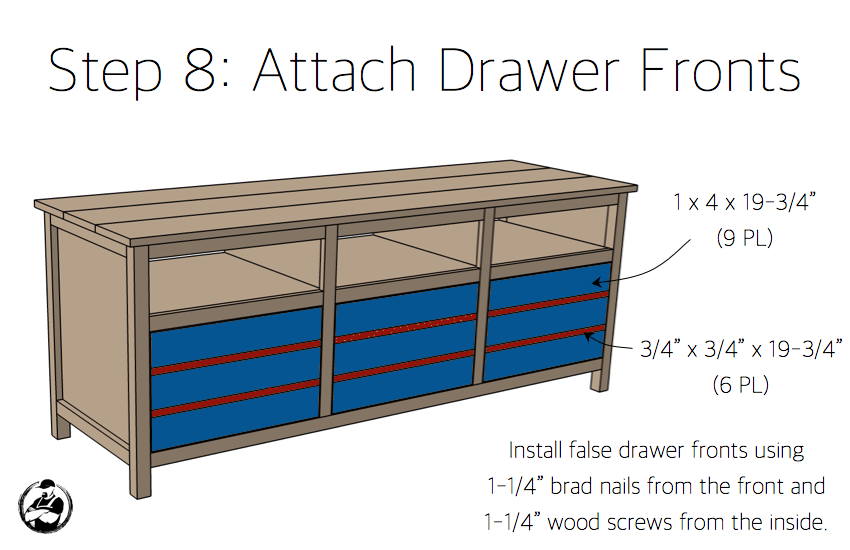
We finished this off with some cup pulls but the ones we used were a total pain in the rear so I would recommend these front mount cup pulls because they are way easier to attach. I hope you enjoyed these plans!

Questions? Comments?
As always, if you have any questions don’t hesitate to comment below and especially don’t forget to post pictures of your finished products in the comments! ENJOY!
Console looks amazing. Love the arrow sign! Where did you get that?
Thanks Jessica! That came from Hobby Lobby.
Nice build.. and thanks for the plans..info… Keep it up. God bless.
Thanks so much. And thanks for taking the time to leave a comment. I appreciate hearing from my readers.
I’m so happy to have discovered Rogue Engineer only a few weeks ago. You’ve inspired me to build furniture of which I’ve taken your designs and modified them to fit for my need. You are a great mentor and inspiration for those of us who are novices. Thank you so much. I look forward to each Tuesday. The best to you.
I am so happy you discovered us as well! Having awesome readers keeps me doing what I am doing, so thank you.
I’m brazilian woodworker, live in Amazon Forest (Belém city). Your plans are great e creative. Long life to you.
Thanks Albertino! All the best to you as well!
Thank you so much for these plans. We have been looking for a media console forever and just don’t want to pay the big bucks. Your design looks like something this I can handle, although I would need to adapt it to a 2 drawer version because of our space available. Thanks for the inspiration, I’m ready to get started!
Awesome. Glad you liked the plan and best of luck in your build. Remember if you run into any questions along the way just shoot me a message and I will be glad to help in any way I can. Also, be sure to post pictures of your finished product!
Hay Jamison, I downloaded the plans and will probably make it in the spring. Thanks for all you do.
Awesome Jack! I look forward to seeing some pictures.
Was wondering if you used your miter saw to cut the big pieces of plywood? Doesn’t mention any other saw in tools you need.
I used a table saw to break down my plywood. Thanks for the note I just added it to the tools list.
Hi I found you site months ago its great. After out kitchen reno i want to use some of your projects. Is there a way to make the drawers into working ones? Thanks,
Roy
Glad you found my site. The drawers are working, they are just 3 large drawers instead of 9 thin drawers. Are you asking how to make 9 thin drawers?
Yes. I’m interested in making the other nine drawers into working drawers if feasible. Thanks,
Roy
I’d say to use the same concept I did for drawers or add drawer slides for each. It could definitely be done.
Hello there!! I just wanted to comment on how really awesome your furniture designs are!!! I have several pinned, so that I can attempt to build a couple of them. My favorite is the hairpin leg coffee table, with the geometric pattern on top. I LOVE THAT!!! it looks sort of like a quilt pattern with the wood pieced together like you have it…. it turned out really beautiful But, then I saw this cabinet, and it is amazing too!! I really want to try and build some of these, but I better make sure I have somewhere to put them, first!!
Hey Julie!!! Thank you so much. We have to make room for stuff now! Constantly subbing old furniture out for new. Good luck and happy building
I am so excited to find this site! My grandfather and I would build furniture prior to his passing but I was always the understudy to his master carpentry skills. I cannot WAIT to start these projects for my wife and daughter with the help of your instructions!
Sam, what an awesome story. I hope you enjoy building and making new memories. Who knows, maybe one day you will be teaching your grandson. Happy Building.
What kind of stain did you use on the finished project? And the cup pulls that you recommended on the link is not available anymore? Thanks
I used Varathane Ash for the stain, on the drawers I used a mix of different stains to make them all look different. I’ll fix the link, thanks for the heads up.
Hi Jamison, This is the project that my daughter wants me to build her and I am excited to get going on it! Could you tell me what wood you used with the ash stain? Thanks!
Hey David, I used birch plywood and dimensional white and yellow pine for the rest.
Thank you!
What settings was your kreg jig set to for the pocket holes that are to be drilled?
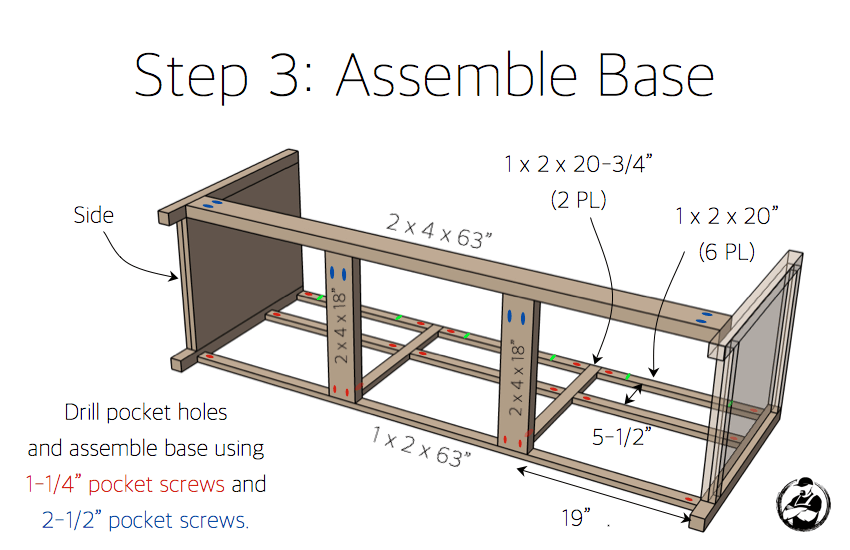
1-1/4″ pocket screws – Collar set for 1-1/4″ pocket screws and Jig for 3/4″ thick material
2-1/2″ pocket screws – Collar set for 2-1/2″ pocket screws and Jig for 1-1/2″ thick material
Hi Jamison. You do excellent work with everything you build! I was wondering if you would be able to tell me what materials are used for just the drawers to this media console. I am wanting to make it without the drawers and replacing them with doors instead. Any chance of you being able to help me out?
Hey Kristen! If you aren’t going to do drawers you can eliminate the 1 sheet of the 3/4 plywood.
I don’t understand what the 1/4″ plywood is for? The plan calls for 3 @ 19 3/4″ by 18″ Thanks
They are for the drawer bottoms. If you look at the diagram for assembling the drawers you can see that one side is 18.25 x 11.75…plywood is .75 inch thick..adding a piece to each side of the 18.25 will come out to 19.75 inches. and the other side of the drawer width is 18. So the bottom of the drawer would need to be glued and nailed to the edges…equaling 19.75 x 18. Their plans do not mention attaching the 1/4 inch plywood to the drawer bottoms. I believe with width of the drawer to attach the false fronts are 19.75 long…so the depth of the drawer sliding in would be the 18 inch side.
It seems as if the link is no longer working to download the plans. How might I go about downloading them?