

Corner Media Center
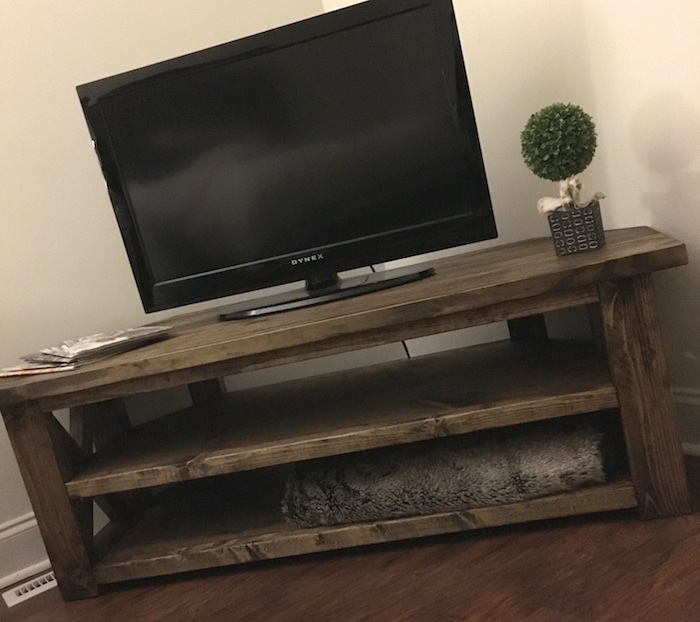
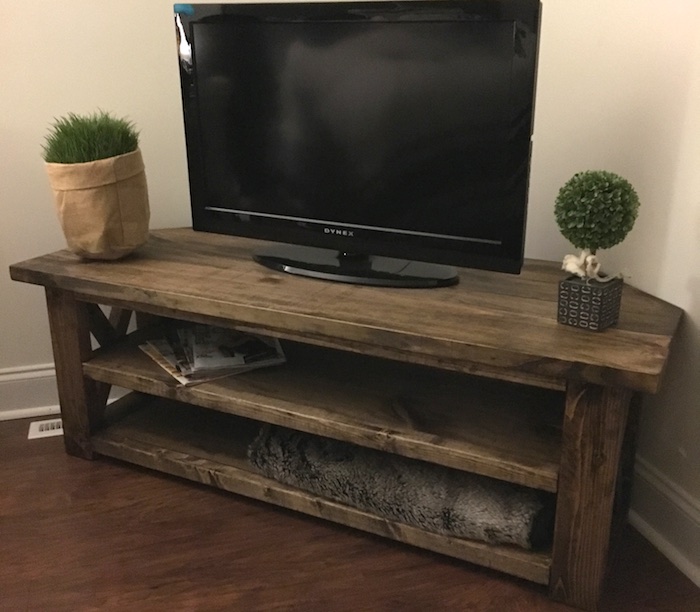
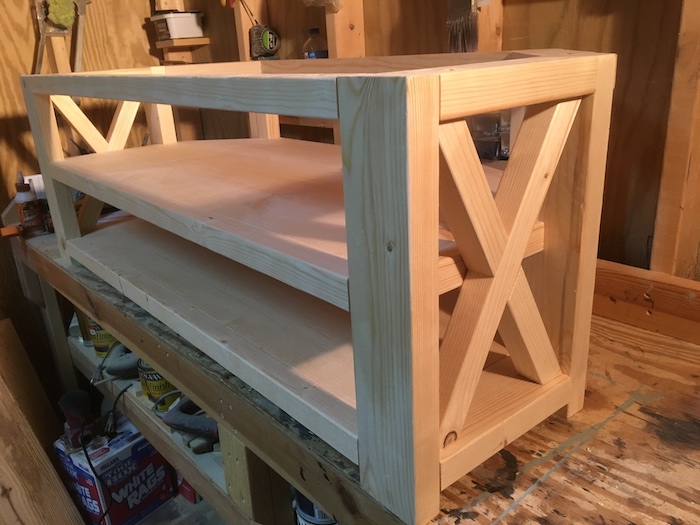
When I saw this amazing corner media center that Tom from Soulful Haven made for one of his customers, I couldn’t resist creating a plan for it. A media console the fits nicely into the corner of the room, why didn’t I think of that?
For sneak peeks of our upcoming projects be sure to follow me on Facebook and Instagram. Also, follow me on Pinterest to get tons of projects plans from all around the web!
Required Tools
Materials
Disclosure: The links provided in the “materials” and “required tools” sections are affiliate links. If you would like to support our site and help keep our content free come find out more about how we can make money with no extra cost to you.
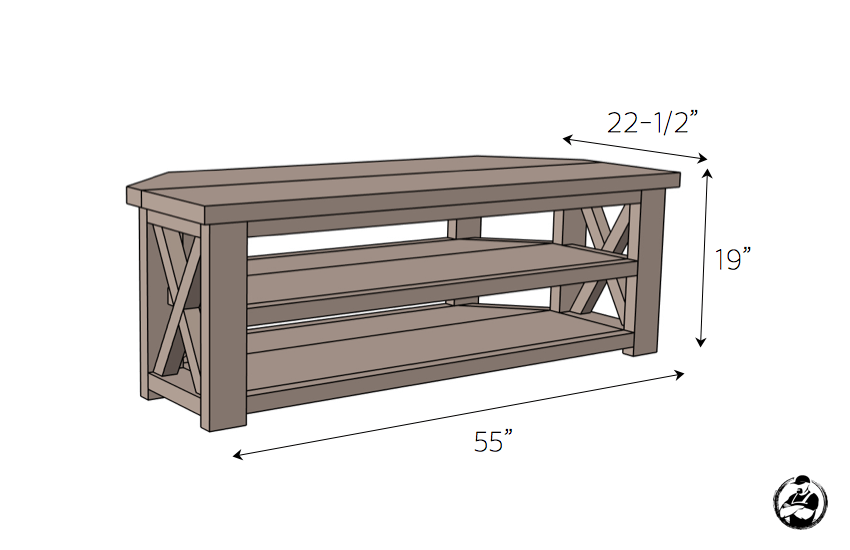
Dimensions
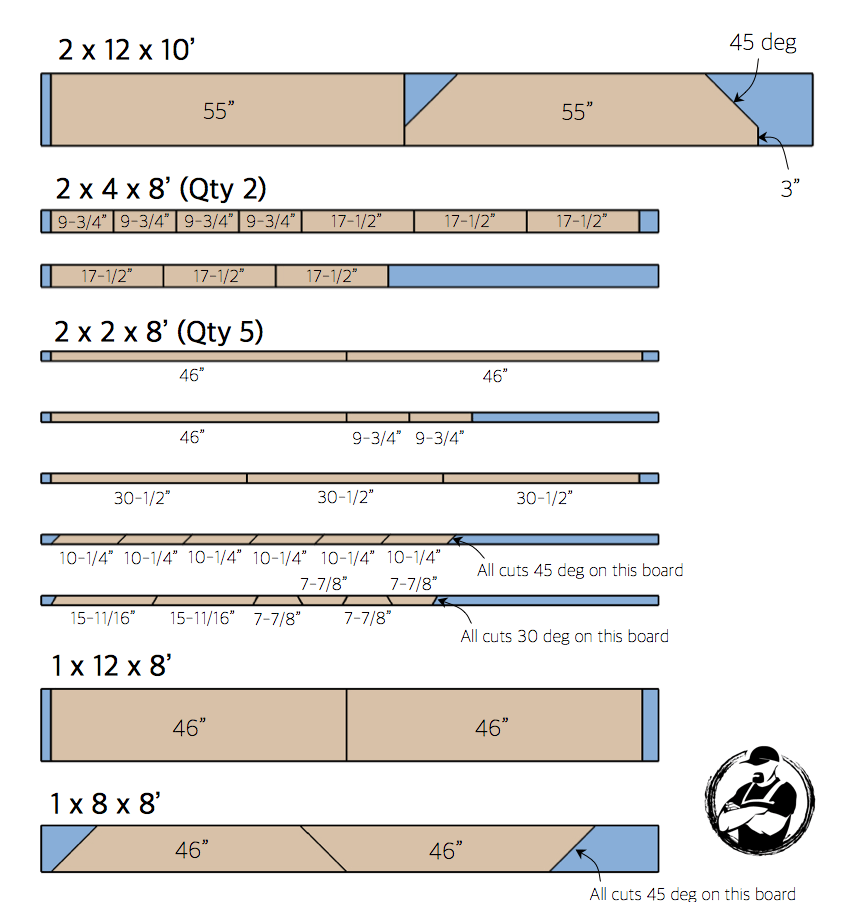
Cut List
How to build a Corner Media Console
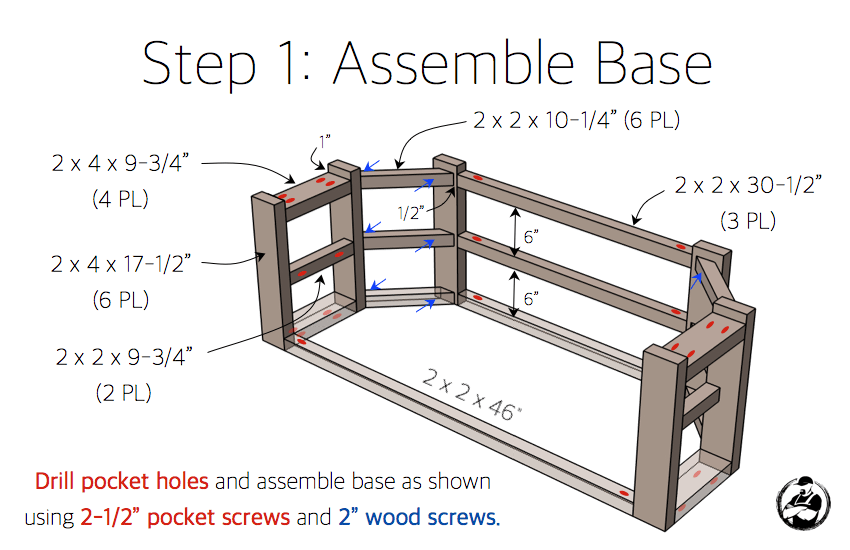
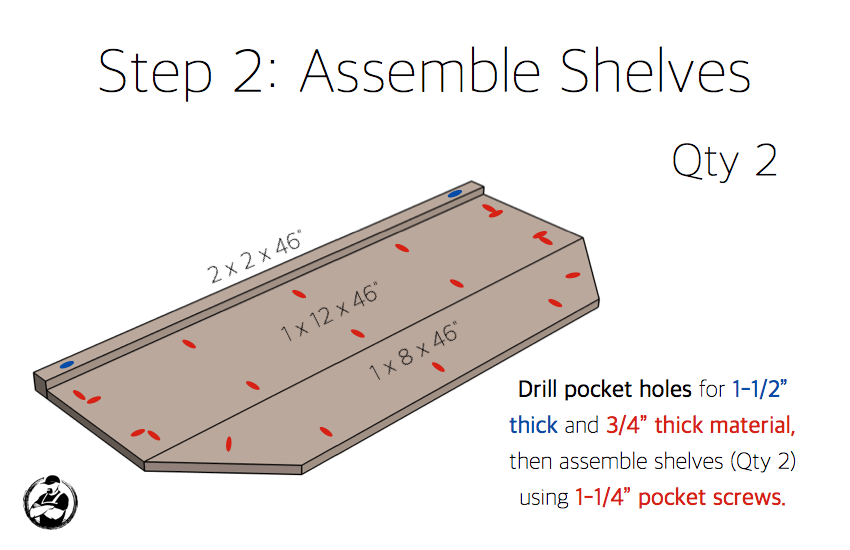
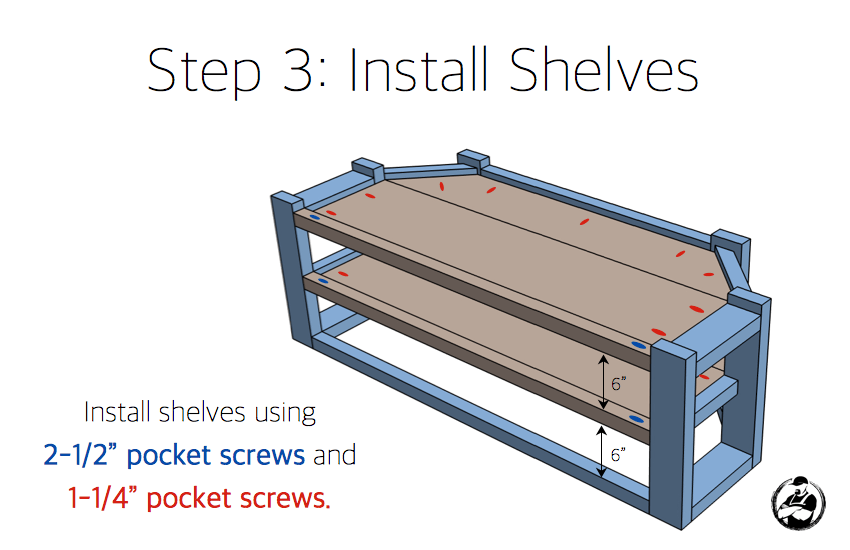
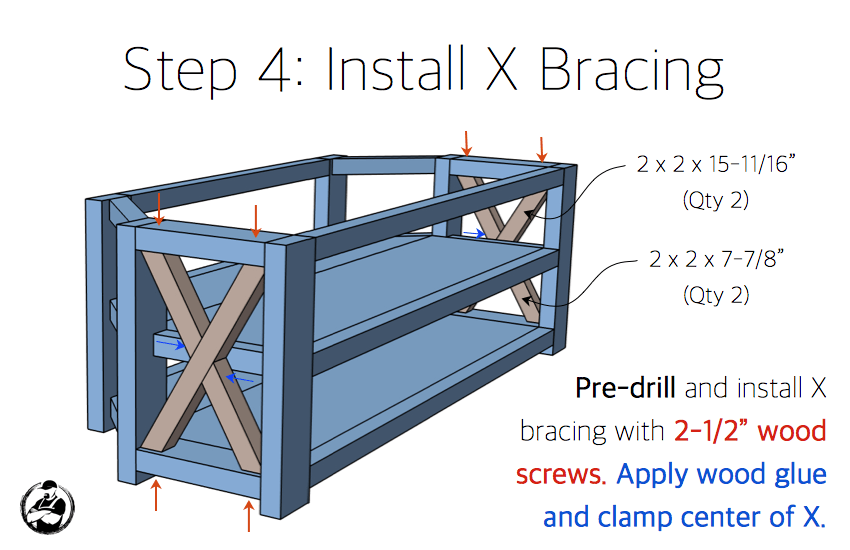
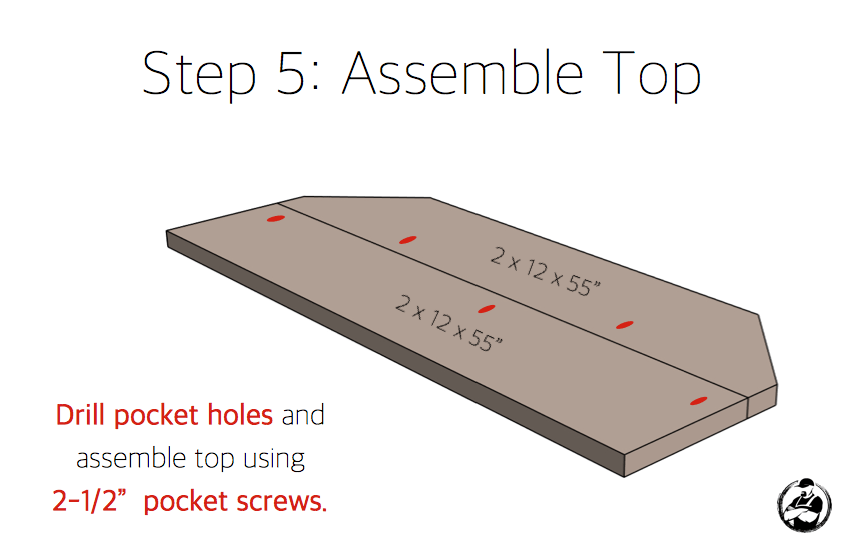
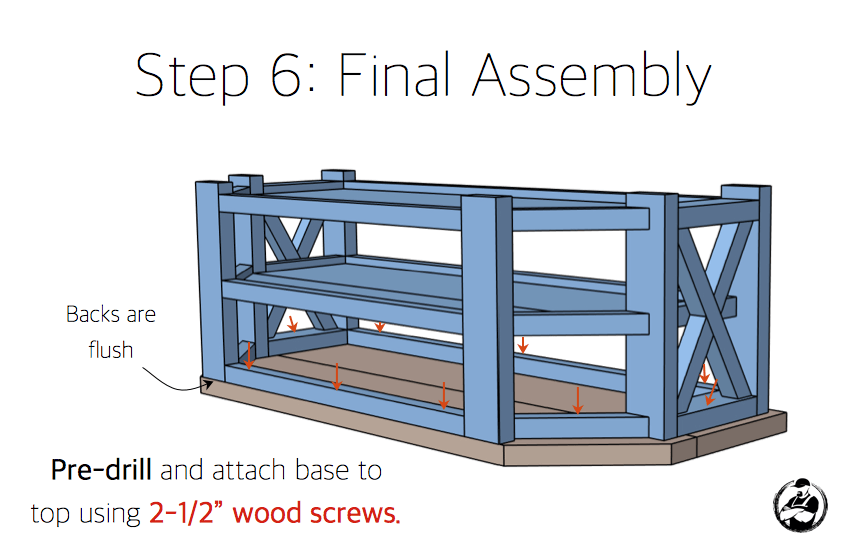
Questions? Comments?
As always, if you have any questions don’t hesitate to comment below and especially don’t forget to post pictures of your finished products in the comments! ENJOY!
sweet table Jamison. Do you have any pics of clamping the center of the “X”? i’m having a hard time visualizing that. Thanks.
Thanks Wes. Unfortunately I don’t. This would be nailed with a brad nailer as well. I was suggesting clamping straight across the X horizontally.
How about the finish? What stains, oils etc were used to get that look
I believe he used dark walnut wood stain.
Do you have a link to the stain he used or could you provide a similar one? The stain really makes this media center and would like to use it on other projects you have provided instructions for. I’m having a hard time finding a comparable stain.
Unfortunately I don’t know the brand of the exact stain he used. But I do know that Rust-Oleum makes a dark walnut stain. We’ve used their products on most of our projects and that is what I would recommend.
In your materials list you link to various species of pine. Is that the same species of wood used in the photos?
Good question. I didn’t build this one so I can’t be sure as to which species he used. Honestly, the box stores could have pine, spruce or fir in stock and once you add stain they all match up pretty closely.
If you wanted to make this 25-30 inches high, how would you do the x on the sides?
Appreciate the plans
Thanks Brett, I would suggest just holding the 1×2 in place and marking it.
Thank our Jamison, the plans were great. Here is the finished product.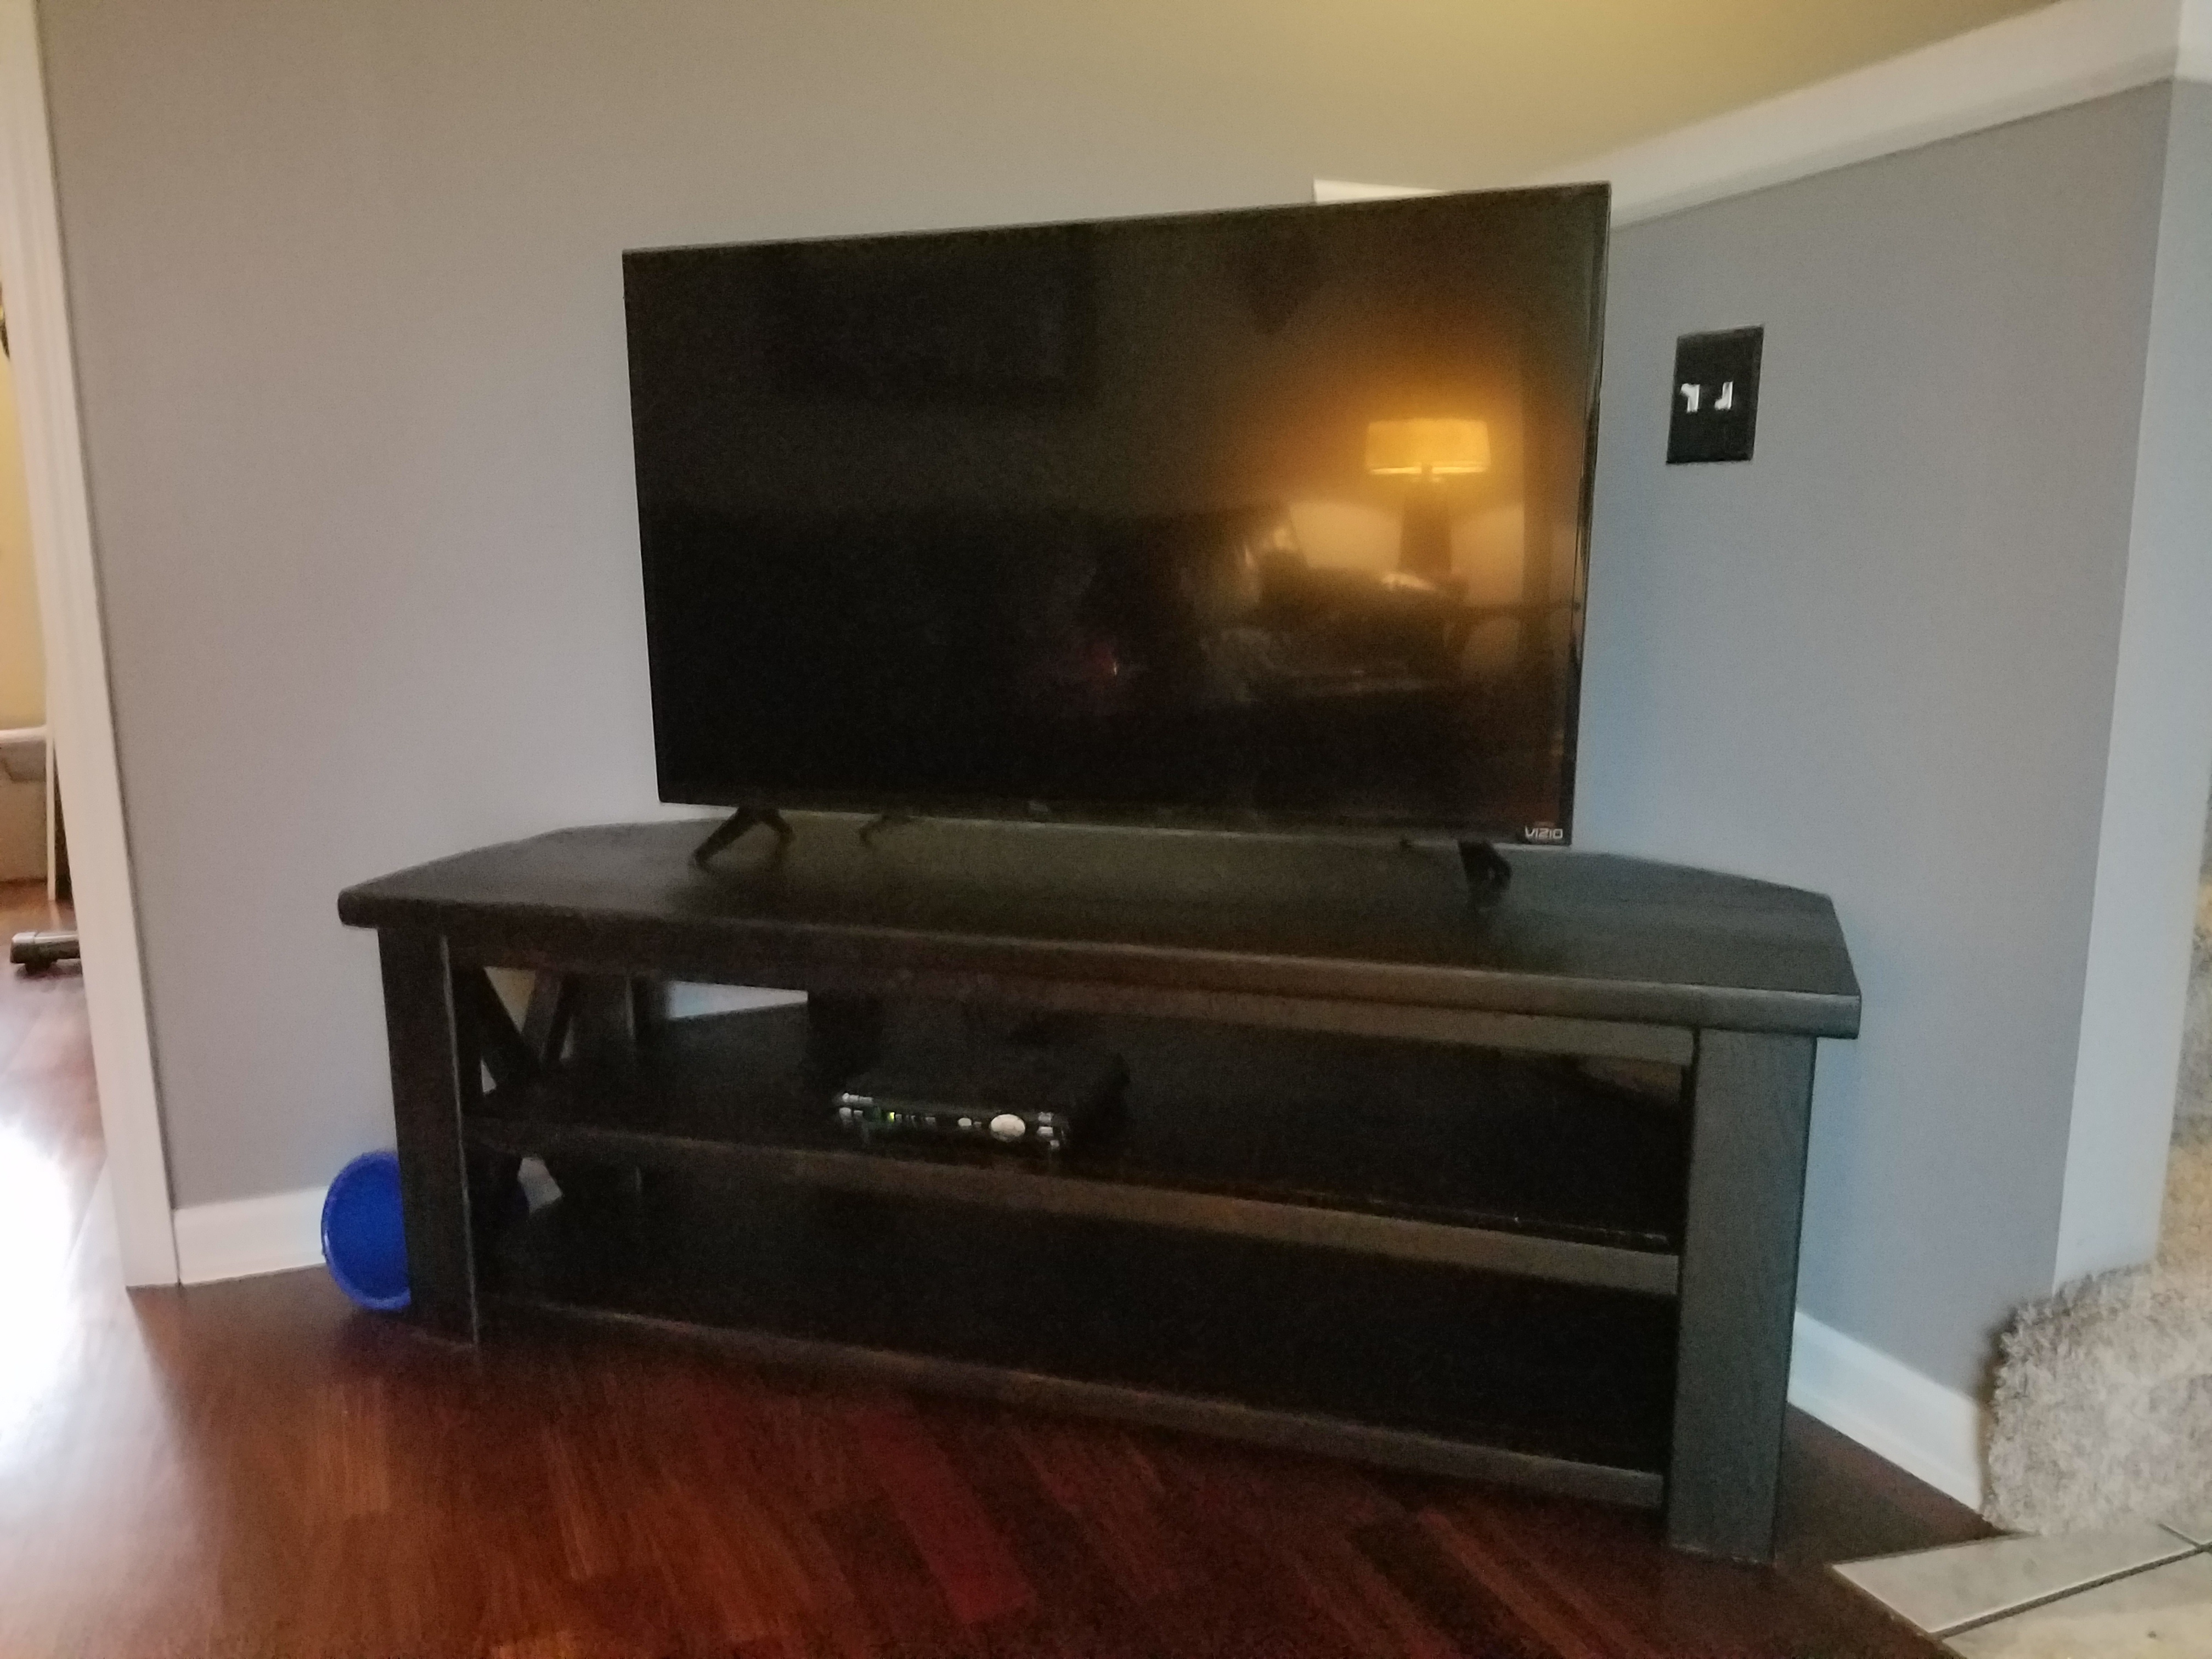
Looks awesome! Very nice work Paul!
Looks great. What kind of stain did you use?
man this is awesome! i was looking o get something for my sister and brother inlaw for their wedding anniversary coming up. what a better way of saying how much you like some people than by giving them something that is hand made
Hi – TV stand looks awesome. I do have a question though – Everytime I use structural type lumber, I never get the nice, clean finished look – is something like this planed with a hand planer and sanded a ton? I also find that joints don’t match up well because the lumber is rounded on the corners, so I sometimes clean the edges up on my tablesaw, which then affects dimensions some…
Thanks Andrew, yes this was built with construction grade lumber as well and has those rounded edges you are talking about. If you want a seamless look then ripping off those edges is what you’d have to do. Like you said this would affect the dimensions which you could change or you could buy wider board and rip those down to the proper width.
Great tv stand, i would like to follow this plan but need to shorten the length by 11 inches. can i just subtract the 11 inches off the total length of all pieces or will that change the angles on the back pieces?
Thanks Rob, I think that would work out fine. Just shorten only the pieces running the width of the stand.
thanks!! planning on making it to match a rustic x coffee table (plan over at ana white) that i made for my daughter for christmas. you have probably just made her day, thank you again!!
Awesome media center. I’m thinking about building my own, but I need doors on the front, or I need to otherwise childproof the cabinet. Any recommendations?
I have two questions I was hoping you might be able to answer.
1) are the x braces structurally needed? I was considering using 2×4 instead of 2×2 for the side portions to give a a more open look without the x.
2) if I were to extend the total width to 65 inches would I need to add any braces in the middle?
I made mine taller – 75cm. There is a recommended height for the center of TVs which can be found visiting audio/visual forums. I also cut some channels in the rear legs to hid the cables and speaker wires. The setup is perfect although I did have to get a smaller subwoofer (side firing instead of down firing) to fit into the space behind the stand. I did not put a poly coat ontop of the stain because the wife prefered the raw look.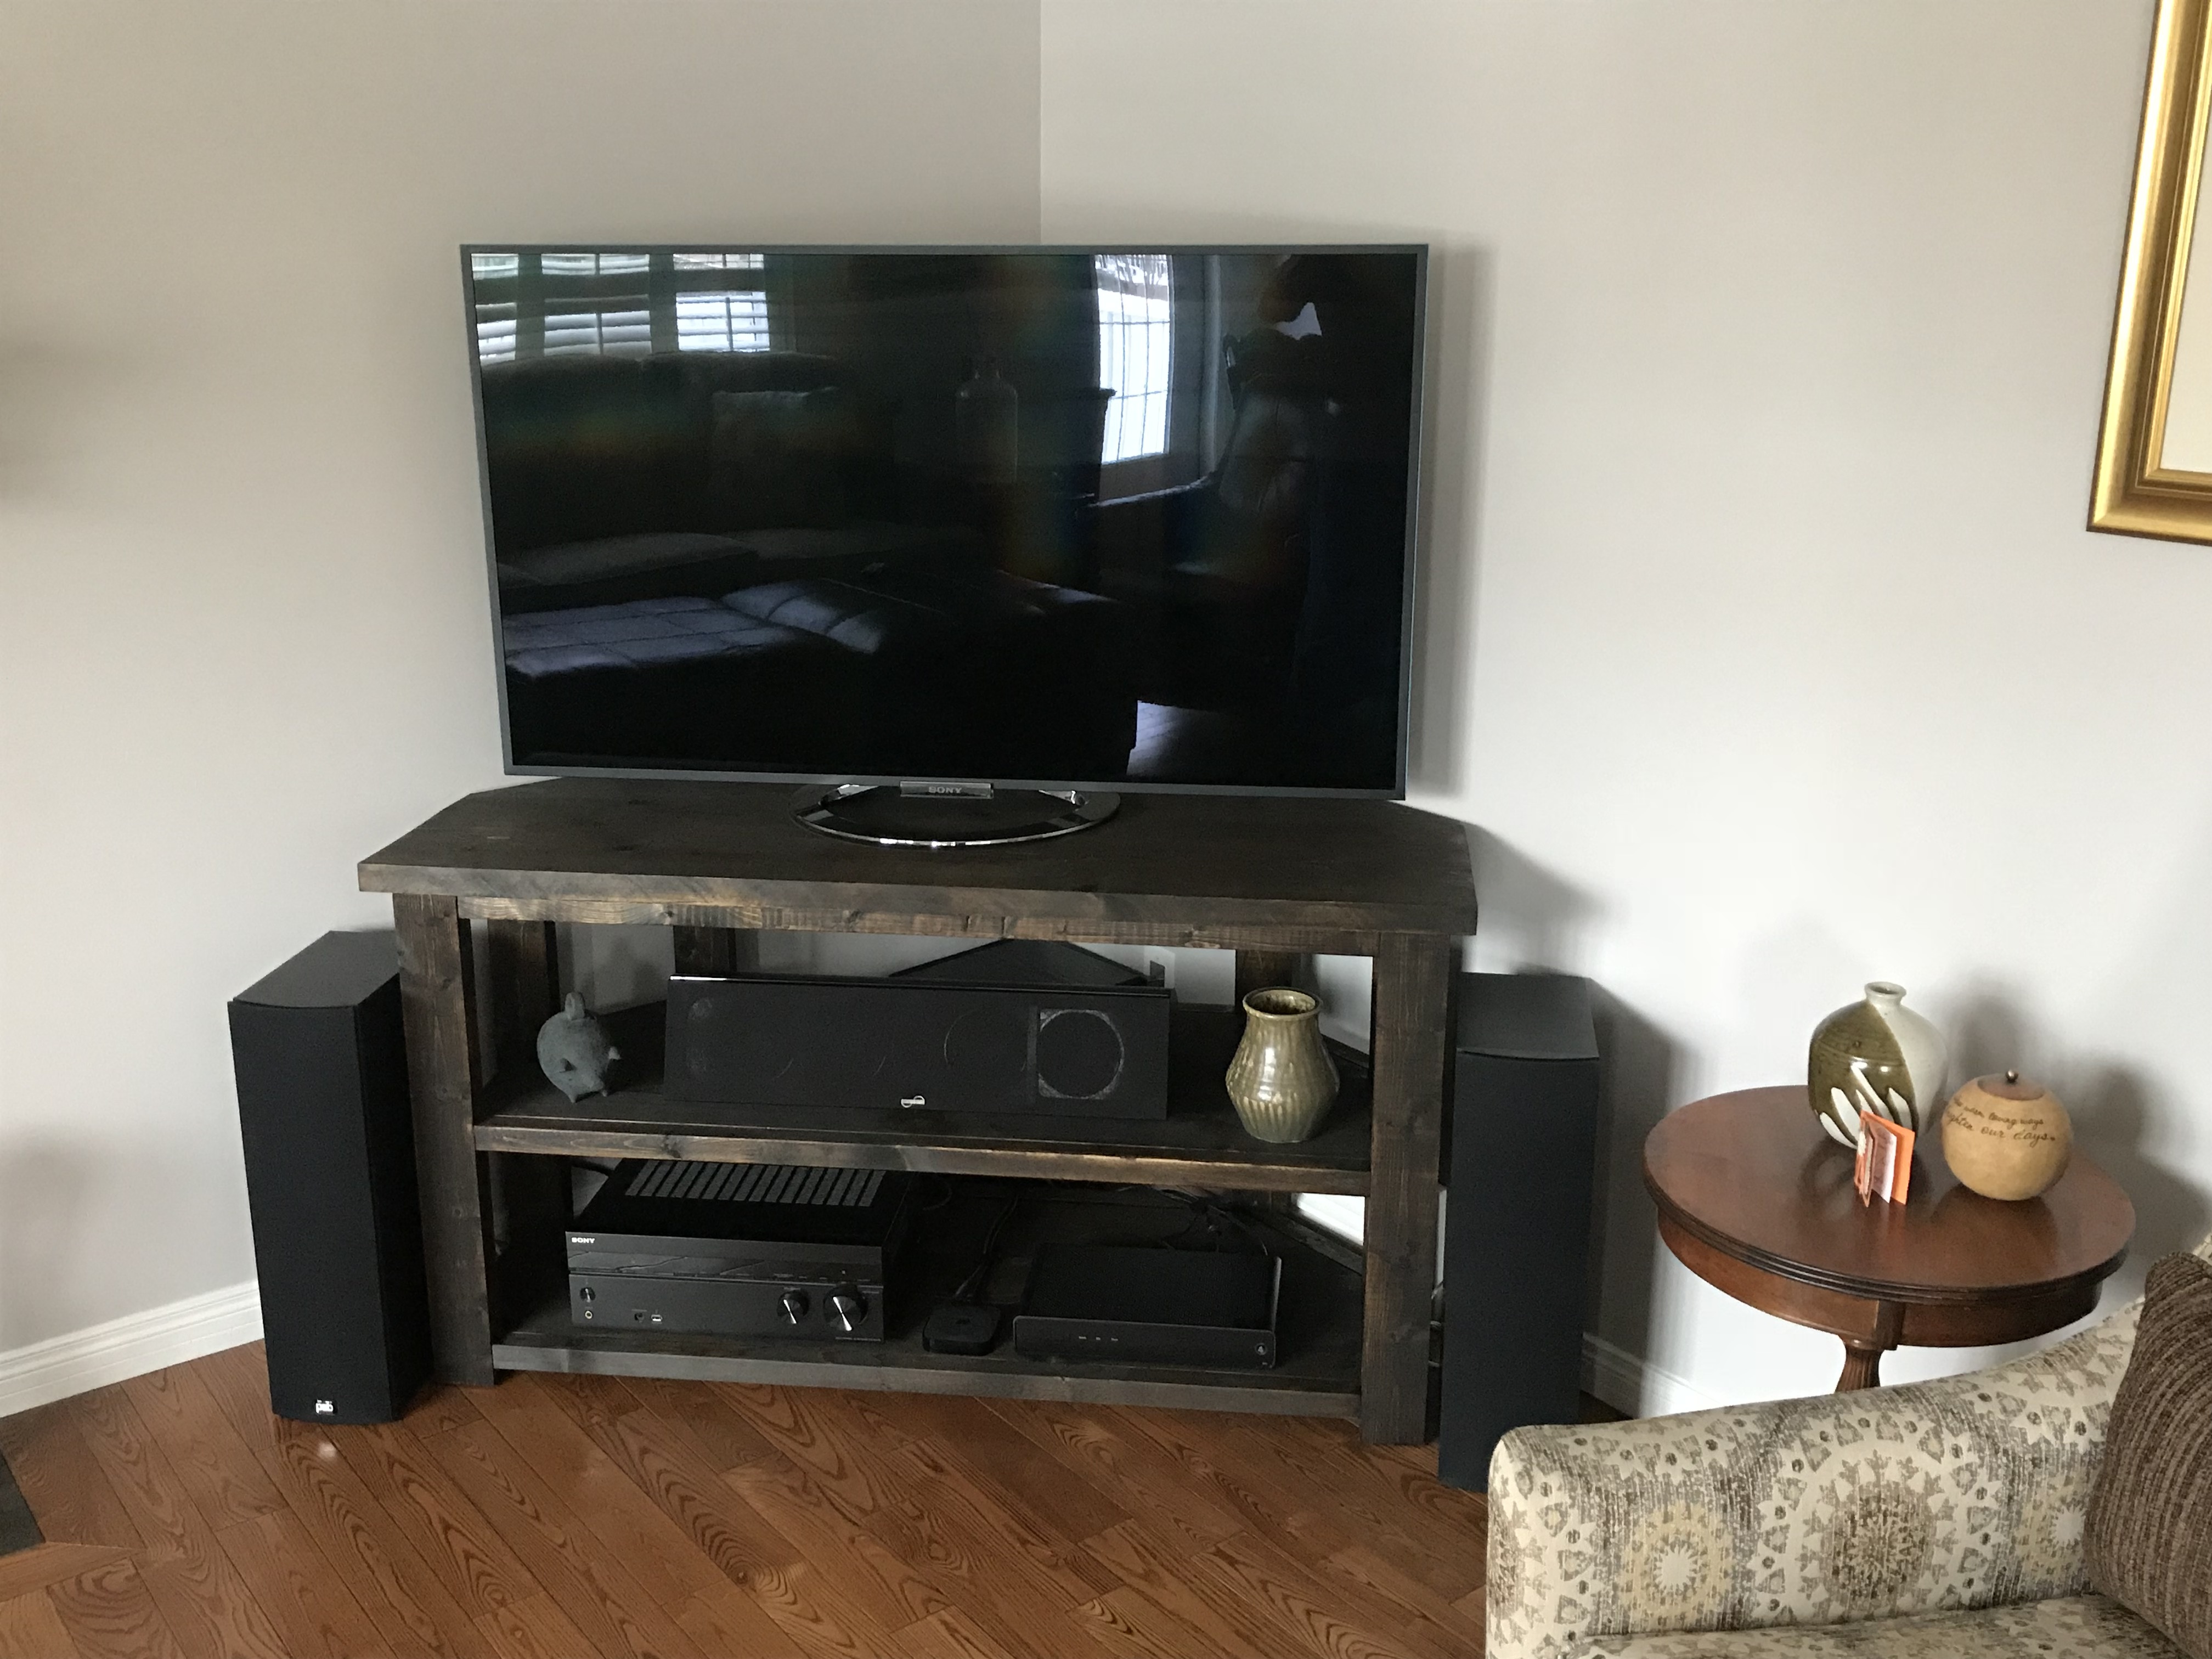
Do you happen to know the dimensions of the legs for your TV stand? I would like to make one that is taller like this but unsure of how much material and the lengths to cut at. Thanks
My first piece! Thanks for the plans! https://uploads.disquscdn.c…
Wanting to build this and was wondering what the general cost is? Excluding tools, i will need to find these as well, but only supplies to build
I had about $80 in mine.
AMAZING!! Love this, and I’m wanting to give it a go however based in the UK. We obviously have different measurements and wood types available to us. Would you please outline the wood measurements and types we would need?
hey, for the gap that is 6” between the pieces of the base when i do a sketch of it on google sketch the measurements are off
Are you taking into consideration that a 2×2 is actually only 1-1/2″ thick?
Just asking what does the -3/4 next to the inches mean
That means .75 inches
It is because i am trying to change it to mm
Here is some good info on the conversionshttps://www.archtoolbox.com…
Can u send me a plan in mm
I cannot but take a look at the following 2 links. They should have what you needhttps://www.archtoolbox.com…https://www.rapidtables.com…
Thankyou, also with the fraction next to the whole numbers are they added onto the whole numbers, eg 15 11/16 will be 15+11/16
No problem, that is correct
Do you think i will be able to use dowels for the base, and biscuit joint on the shevels and top instead of pocket hole jig and wood screws, because i am doing this for my year 12 project and i need different joints.
Yes, I think that should be fine.
Hey mate you said what wood for the first 2 but not the rest what wood do i use for them
hey, do i have to use that wood or can i use another with the same dimensions
Also, am i able to get this wood in Australia
you should be able to, it’s standard construction grade lumber
This is exactly what I’m been looking for, however I need it to be at least 63″ long, what adjustments need to be made to accomplish this?
Jamison,
I am a long time DIY’er but this is my first furniture piece following plans. Question about the cut measurements. The lengths of the angle cuts – do they measure from end to end for the entire piece? Or, do I measure for instance 10 ¼”only on one side of the board after each cut, and make another cut based on a 10 ¼” measurement from a consistent side of the board. In other words, if the cuts were all 90 degrees, the length would be 10 ¼” without question. But the 30 degree and 45 degree angles would be longer than 10 ¼” if the lengths are measured on one side of the board as I cut.
Also, is anyone willing to share what the project lumber cost was and what kind of wood they used? I already have the Kreg Jig and plenty of screws. I am looking to construct the piece from solid oak.
Thanks in advance.
Sorry if this is a naive question, but new in the DIY game. In Step 1, when attaching the 45 degree angled pieces to the legs with 2″ wood screws, not pocket holes/screws, how do you do this? Should these go in through the beam at an angle so they go straight into the legs? Or straight into the beam so they go into the legs at an angle? The diagram suggests the former, but then I need help on how to drill holes at an angle. Thanks!
Hi Jamison, my wife and I will be building this project together. This will be our first bigger project build, and were unsure about the order of operations in step 1. Would you recommend any certain build order to keep the build stable while attaching segments? I was thinking of building the 3 rectangle segments, then adding the diagonal braces before adding the front bracer like the picture. https://uploads.disquscdn.c…second question on step 3, how can I make sure my shelves are lined up properly to the base, and level, especially as this is built upside down for the first few steps.lastly, an observation, I like the idea of hiding cables in the legs, and may try to work that in to my build, thanks to Mark LaGrange’s idea.
Just built this myself, plans were easy to follow! Thank you for posting this! Saved my family over $200 and its made of real wood!
Hello, I am making this entertainment center. I am needing a bit of help. I am making it for an 80″ tv (yes I spoil my husband more than I should) I was wanting to make the entertainment center 80″ long. How would you add center braces for the weight? Or would you add center.braces? Thank you so much in advance
This is the first time I have worked with wood building anything. And I tweaked the plans to add a drawer on the bottom. https://uploads.disquscdn.c… https://uploads.disquscdn.c…
I can’t get pdf instructions to download
Jamison – do you have the plans for one that is not for the corner?