
DIY LEGO Table
My son Brayden started taking an interest in building blocks so I thought a LEGO table would be a welcomed addition to his corner of or living room. Since this LEGO table would be on display for everyone to see I decided to build it out of red oak and give it a nice stain. Personally, I think it turned out beautifully but it could just as easily be built out of pine (common boards) for that rustic farmhouse look. Below I have included detailed and, as always, totally free DIY LEGO table plans. I hope you enjoy! Please post your finished projects in the brag area so I can see!
FYI, these LEGO tiles work with the Duplo LEGOs for younger kids and standard LEGOs for older kids.
Required Tools:
- Jig Saw
- Miter Saw
- Kreg Pocket-Hole Jig
- Cordless Drill
- Level
- Square
- Tape Measure
- Safety Glasses
- Ear Protection
Materials:
*List is based on the assumption that the LEGO plates are truly 10″ x 10″. It has been brought to my attention that some may be slightly larger (1/32″ – 1/16″) Measure and if they are slightly larger or smaller you may need to adjust to fit.
- 2x 2 x 2 x 36″ (If you are using common boards, one 2 x 2 x 8′ will work)
- 2x 1 x 3 x 6′
- 2x 1 x 4 x 6′
- 1x 3/4 x 48 x 48″
- 1x 3/4″ screen moulding
- 8x Green or Blue LEGO Building Plate (10″ x 10″)
- Liquid Nails Adhesive
- 1-1/4″ Coarse Washer-Head Pocket Screws
Cut List:
- 4x 2 x 2 x 18″ (Cut the 2 x 2 x 36″ stock exactly in half)
- 4x 1 x 3 x 32″
- 2x 1 x 4 x 37″
- 2x 1 x 4 x 30″
- 1x 3/4 x 30 x 30″
- 4x 3/4″ screen moulding cut to 10″ in length with 45 degree cuts at each end
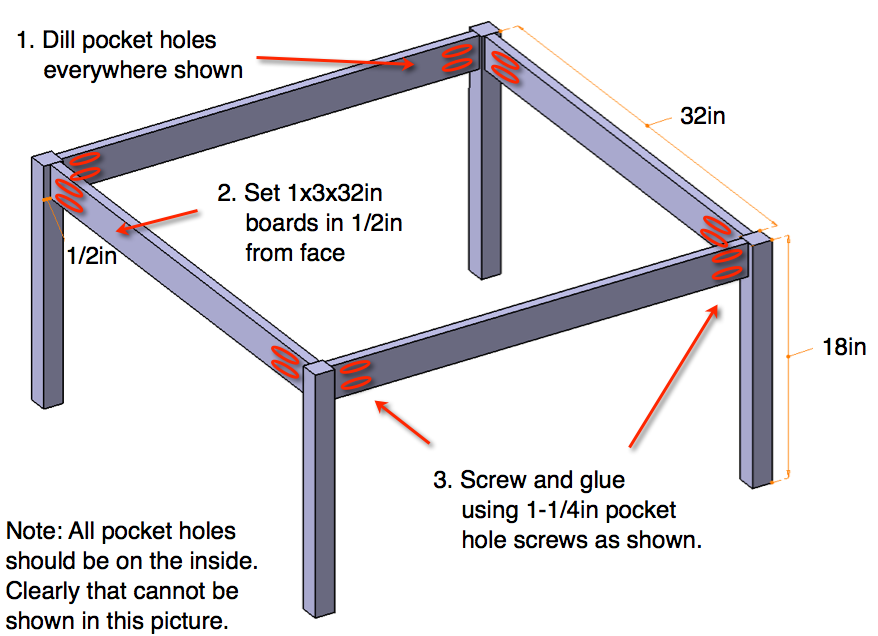
Step 1: Assemble Table Base
Drill two pocket holes at each end of the interior of your 1x3x30″ boards. Set them back 1/2″ from the face of your 2x2x18″ legs and screw and glue them in place using 1-1/4 pocket hole screws.
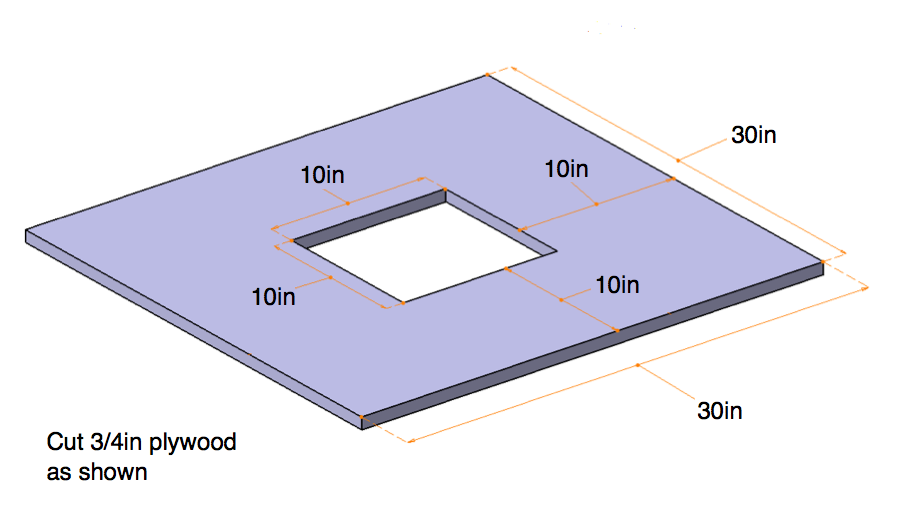
Step 2: Cut hole in plywood
Now cut out the 10×10 LEGO storage opening in the center of the 30×30 plywood. I found the easiest way to draw the square accurately was to line the LEGO tile up with the outside edge and draw a line using the interior side. A cutout tool is great for this kind of thing but if you don’t have one just start out your cutout using a large drill bit at each corner and then finish off using a jigsaw.
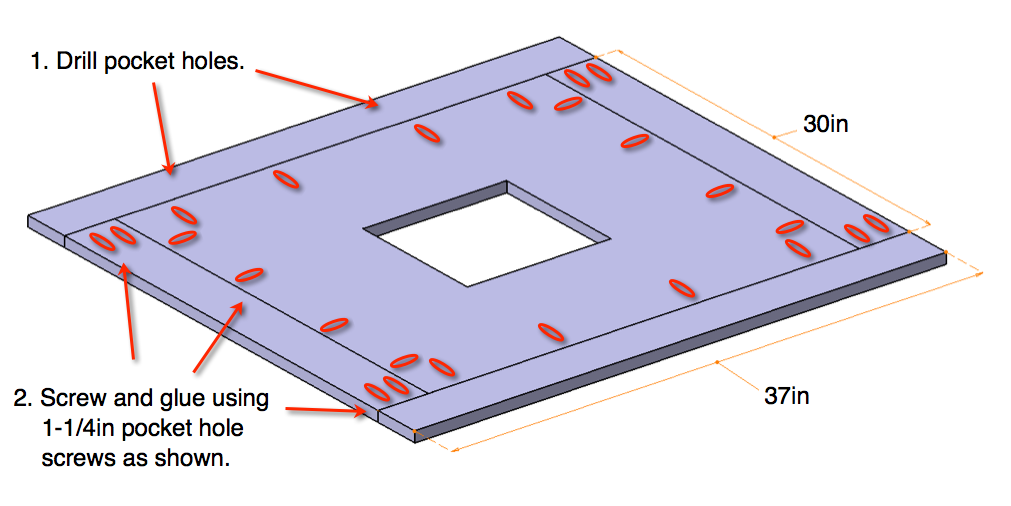
Step 3: Attach trim rail to plywood
Drill pocket holes in each end of the 1x4x30″ boards and all around the outside edge of the plywood as shown. Screw and glue the 1×4’s to the outside edge of the plywood using 1-1/4 pocket hole screws. Then, screw the 1×4’s at the corners using 1-1/4 pocket hole screws.
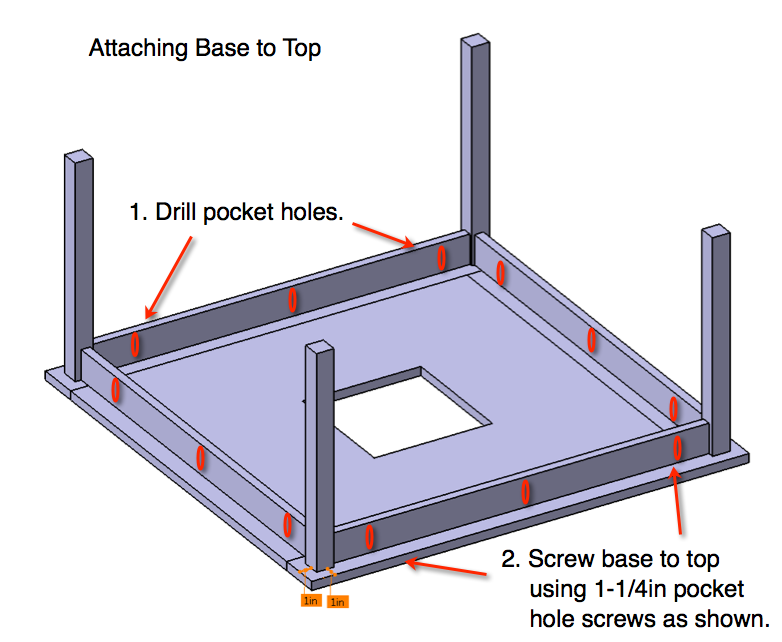
Step 4: Attach base to top
Dill pocket holes in the base as shown in the picture. Then, with the top laying upside down, lay the base on the top and then, while maintaining 1 inch from each post to the outside of the tabletop, screw the base to the top using 1-1/4 pocket hole screws.
Step 5: Apply Finish
Now is the best time to finish your project. After installing the LEGO storage it could get a little messy! 🙂 Below is what I chose to go with but your options are limitless.
Color:
After preparing the surface of the wood, I chose to go with a Minwax dark walnut stain. The benefits of using a nice species of wood like red oak is that the stain turns out beautifully.
Sealant:
After allowing the stain to dry I chose to use a clear gloss polyurethane. I applied 5 coats evenly knocking down the surface with a 3M Between Coats Finishing Pad in between coats and after the final coat was dry I smoothed it out with the 3M Final Finishing Pad.
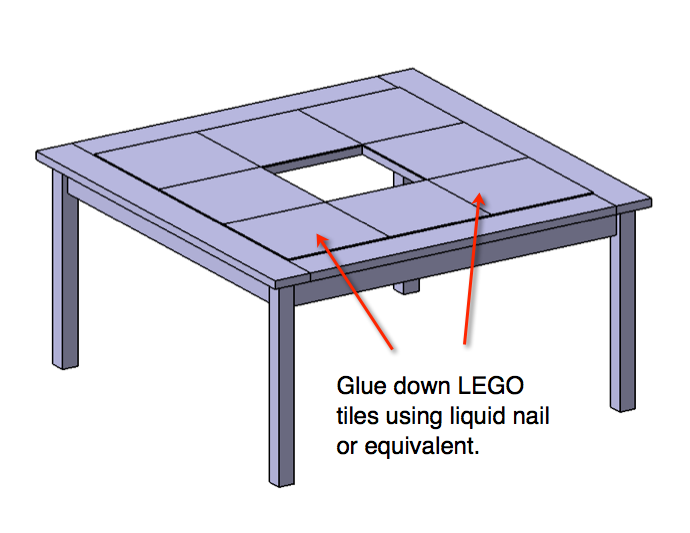
Step 6: Glue the LEGO Building Plates down
Now glue down the LEGO building plates as shown using liquid nails adhesive or an equivalent. Make sure that LEGO dots on these building plates line up with the adjacent plates. If this doesn’t happen then your little one will have a hard time laying blocks across the joints.
Step 7: Add the LEGO storage


Option 1:
For this I would recommend this metal basket that I found on amazon. The sizing works out well and it can be easily secured to the bottom of the table with the use of tension clips.

Option 2:
Another option here is to use a mesh bag and staple it to the inside of the hole.
Option 3:
Are you as cheap as I am? It was a lot more work but I had a mesh metal waste bin laying around that was close in size but a little too long so I dropped it in the hole and when it was level drew a line and cut it around the perimeter so that it would be an exact fit. I then stapled it to the inside of the hole.
Step 8: Trim the LEGO storage hole
Use finishing nails to attach the screen moulding to the interior of the LEGO storage hole to finish it off.
Ah, Legos. So good for kids yet so difficult to manage! What a great table! Our boys are older & their collection has grown with them. My husband built two large trays on castors for under a bed. One for Lego storage & sorting to find the exact teeny tiny piece they need. The other for completed projects. No more wall to wall Legos!
That’s a great idea Erin .. I’ll keep that in mind as our collection grows. I’m sure we will need some additional storage!
I want to build this! It looks great! What kind of wood did you use? Thanks!
Thanks Harry! I used red oak for this one.
I found that the Lego building plates are slightly larger than 10″, maybe 10 1/32″ or 10 1/16″. I made my original trim rails 30″ and 37″, but found that a 3×3 pattern of plates didn’t quite fit inside them. I recut new rails 30 3/16″ and 37 3/16″ long, which seemed to fit better.
I’m sorry about that William. I have updated the cut list to include a note so that hopefully others wont get burned in the future. Sorry about that!
If you have a picture I’d love to see how yours turned out! You can upload here in the comments.
Thank you for putting the plans online!
My son is eight and has a ton of Legos that we store in plastic storage bins/drawers (not shown). Because of this, I opted against the built-in storage and made the legs 30″ long.
I also used pine because of cost and the fact that this is the first real piece of furniture I’ve ever made.
Awesome work William! Especially for your first piece of furniture! I like the LEGO plates you used, my son would love them. Thanks for sharing!
Reattaching photo that was removed
Build this LEGO table for our friends kids (twins)…changed things up a little from Rogue’s plan and put my spin on it with the gladiator boxes for LEGO storage. Each kid had a favorite color, so that’s the reason for the two tone color scheme.
Awesome storage idea! I love the way you finished it too. Great work and thanks for sharing!
Reattaching photo that was removed:
I am reviewing the plans…How do you keep the top of the table flush (1×4’s and lego plates)? It seems the lego plates will sit .10″ above the 1×4’s. Your photo looks flush.
Are your red wood 2×2’s 1.5×1.5, or like mine 1.75×1.75.
Thanks
What I did was lay the lego plate under the plywood center when I screwed it to the rails. So the bottom of my plywood actually protrudes about .10″ below the rails but you cant see that and it creates the flush look on the top.
My 2x2s are actually 1.5″x1.5″. You could still use the same dimensions I have here, only difference would be that you would have 3/4″ overhang instead of 1″ as shown in step 4. But, also double check that your 1×4’s are 3/4″x3-1/2″ and not 3-3/4″
I built this LEGO Table for my Grandson’s Birthday, (he hasn’t seen it
yet).
I ran the rails and legs through the router table to soften the
edges, and I added mover men feet to the legs to avoid scrapes and scratches to the floor.
The plans were easy to follow and as you can see, the table
turned out better than I could have hope for.
https://uploads.disquscdn.com/images/bbba75defeddfc618a7e099296dd2cb643f54155aa61a8cfb674e1711857cf5f.jpg