
Complete Guide to Lumber for DIY Projects
TL;DR — Quick reference
| Need | Buy |
|---|---|
| Indoor furniture (paint-grade) | Pine or poplar |
| Indoor furniture (stained) | Oak, walnut, cherry, or pre-finished plywood |
| Outdoor furniture | Cedar, redwood, white oak, or pressure-treated |
| Framing / structural | Doug fir or SPF (spruce-pine-fir) 2x lumber |
| Built-ins and cabinets | Maple, birch, or oak plywood with hardwood face |
| Beginner project, low budget | Pine 1x or 2x dimensional lumber |
The shortest version of this whole guide: most beginners overthink species and underthink board selection. Pick a project-appropriate wood from the list above, then spend your time picking straight, dry boards at the store. That second part matters more than the first.
Why lumber knowledge matters more than tools
I get a lot of “what tools should I buy” questions. It’s the wrong first question.
You can build a beautiful piece of furniture with a circular saw, a drill, and a $30 sander. What you cannot do is build a beautiful piece of furniture from twisted, wet, knotty boards. Lumber is the difference between “this looks like real furniture” and “this looks like a kid’s school project.”
Spending an extra ten minutes at the lumber rack — and an extra $40 on better material — does more for the quality of the final piece than upgrading your saw. I learned this the hard way on my first few builds, when I’d grab the first 1×6 I saw and end up with a tabletop that looked like a hammock by the time it dried out.
The build starts at the lumber yard, not at the workbench.
The two buckets: hardwood vs softwood
Every piece of lumber you’ll ever buy falls into one of two categories. The names are misleading — it’s not really about hardness — but they’re the foundation of every other decision.
Softwoods come from coniferous (cone-bearing, evergreen) trees: pine, fir, spruce, cedar, redwood. They grow fast, are widely available, and are cheap. They’re what you’ll find stacked at Home Depot and Lowe’s in the dimensional lumber aisle. About 80% of beginner builds are softwood, and that’s fine — softwood is what most “rustic” or “farmhouse” furniture is built from.
Hardwoods come from deciduous (leaf-dropping) trees: oak, maple, walnut, cherry, poplar, ash. They grow slower, are denser, and cost more — sometimes a lot more. You’ll typically find them at a dedicated lumber yard or specialty store rather than a big-box. Hardwoods are what you reach for when you want a stained, fine-furniture look or when the piece needs to take a beating.
The “hardness” thing is approximate, not a rule. Balsa is technically a hardwood (deciduous tree), and it’s softer than basically every softwood. Yellow pine is technically a softwood but it’s harder than poplar. The bucket name describes the tree, not the wood.
For a deeper breakdown, see hardwood vs softwood explained.
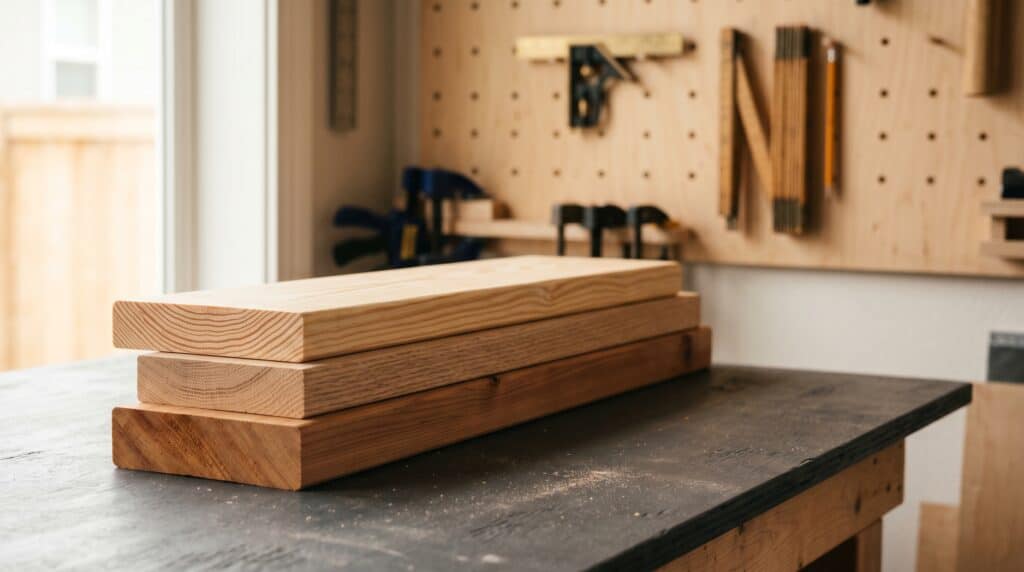
The lumber you’ll actually use
There are hundreds of commercial wood species. You’ll use about six of them.
Pine
The default. Sold everywhere, cheap, lightweight, easy to cut and join, takes paint well. Pine is what we use for the bulk of our painted farmhouse-style builds. It’s also what most beginners’ first projects are made of, and there’s no shame in that — pine looks great when it’s properly finished.
Downsides: it dents if you look at it wrong, it’s prone to warping if not stored well, and the knots can bleed through paint without a stain-blocking primer (Kilz or BIN are the two we keep on the shelf). Pine is also the species most likely to give you sap problems if you’re working with a fresh-cut board.
If you’re stained-finishing pine, expect blotchy results unless you pre-treat with a wood conditioner — that’s the trick to making it work. For outdoor pine, a stain-and-seal product (especially a semi-transparent or solid stain) hides the blotchiness and protects the wood at the same time. We do stained-pine projects regularly, just not without the right prep.
Poplar
Pine’s better-dressed cousin. Poplar is technically a hardwood but it’s soft enough to work easily, takes paint better than pine (no knots), and is dimensionally more stable. We use poplar for built-ins, trim work, and any painted piece where the surface is going to be visible up close.
Downsides: it’s not pretty when stained — has weird greenish streaks. Always paint poplar. The price premium over clear (S4S) pine is small — maybe 20-30% — and for most painted furniture it’s worth it. Compared to standard dimensional pine the gap is bigger, but you’re also getting a higher-quality board.
Oak
The default hardwood for stained furniture in most U.S. shops. Red oak is the cheaper, more available option; white oak is more expensive but more weather-resistant and has a cleaner grain. Both stain beautifully, are forgiving to work with for hardwoods, and come in widths up to 12+ inches at most lumber yards.
If you’re new to working hardwoods, oak is the gentlest introduction. The grain is very forgiving, and tear-out at planer/jointer steps is rare compared to harder species.
Maple
Harder than oak, finer grain, much lighter color. We mainly use maple for cabinet doors and face frames — it paints beautifully and holds a crisp edge. It’s also the standard for cutting boards, butcher-block tops, and anything that needs to take impact without showing it. Most production cabinets you see in stores have maple doors for the same reasons we use it.
Downsides: it’s harder on tools, prone to burning at the saw if blades are dull, and stains unevenly without a conditioner (similar problem to pine). Most maple builds we do get a clear finish or whitewash, not a dark stain.
Walnut and cherry
The “fancy” options. Both are gorgeous, both are expensive, both reward careful work with stunning results. Walnut darkens to a deep chocolate; cherry is reddish and continues to deepen with sun exposure for years.
Use these for heirloom pieces, small decorative builds where the cost of material is small, or featured panels on a larger piece (a walnut tabletop on a painted oak base, for example). Don’t waste them on a first project.
Cedar and redwood
Outdoor specialists. Both are naturally rot-resistant, lightweight, and weather to a silver-gray over time if left unfinished. Cedar is the cheaper and more available of the two; redwood is more common on the West Coast. They smell incredible when you cut them.
Use cedar/redwood for outdoor benches, planters, fence projects, raised beds, and anything that’s going to live in the rain. Don’t use them indoors unless you want your house to smell like a sauna for a year.
For deeper breakdowns of which species fits which project, we have full guides on pine vs oak vs poplar and pressure-treated vs cedar vs redwood for outdoor builds.
Why a 2×4 isn’t actually 2×4
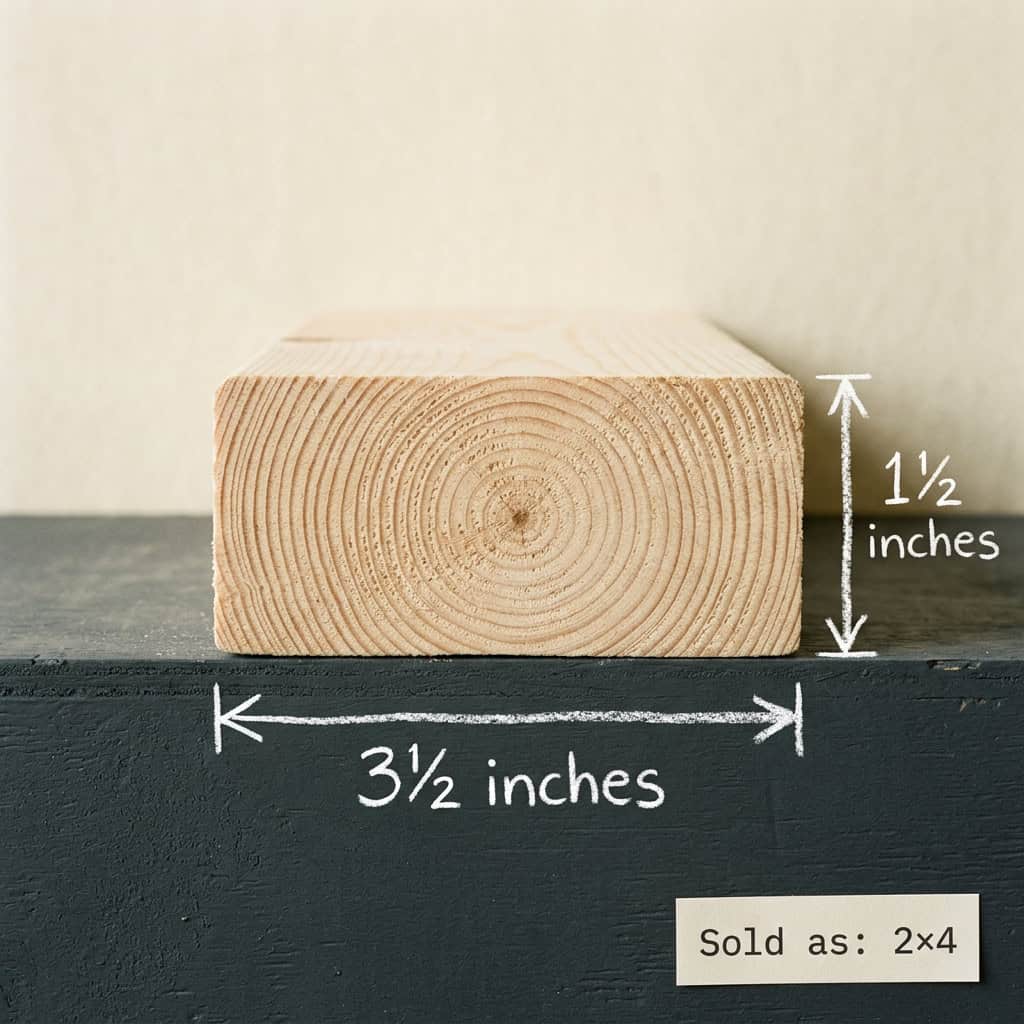
This catches every beginner. You buy a 2×4 expecting two inches by four inches, get home, measure it, and find it’s actually 1.5″ x 3.5″.
The 2×4 isn’t lying — it’s just describing the rough (sawmill) dimension before the board is dried and surfaced. By the time it gets to the store, it’s been through a planer that takes off about a quarter inch on each face. The naming convention stuck because it’s been that way since the 1920s and changing it now would break every blueprint ever drawn.
The actual dimensions for common dimensional lumber:
| Nominal | Actual |
|---|---|
| 1×2 | 0.75″ x 1.5″ |
| 1×4 | 0.75″ x 3.5″ |
| 1×6 | 0.75″ x 5.5″ |
| 1×8 | 0.75″ x 7.25″ |
| 1×10 | 0.75″ x 9.25″ |
| 1×12 | 0.75″ x 11.25″ |
| 2×2 | 1.5″ x 1.5″ |
| 2×4 | 1.5″ x 3.5″ |
| 2×6 | 1.5″ x 5.5″ |
| 2×8 | 1.5″ x 7.25″ |
| 2×10 | 1.5″ x 9.25″ |
| 2×12 | 1.5″ x 11.25″ |
Length, on the other hand, is honest — an 8-foot 2×4 is actually 8 feet long (give or take an eighth of an inch).
This matters because every plan you’ll ever follow uses actual dimensions, and if you don’t know the difference, your cut list will be off by a quarter inch on every joint. We have a full breakdown in why a 2×4 isn’t actually 2×4 — required reading before your first build.
Outdoor lumber: cedar, redwood, pressure-treated, or white oak
If the project is going outside, you have a few real options, and they’re not interchangeable.
Cedar and redwood are naturally rot-resistant. They contain oils and tannins that bugs and fungus don’t like. They cost more than pressure-treated but look better, weigh less, and are safer to handle (no chemicals). Use these for benches, chairs, planters, anything you’ll touch a lot or anything where appearance matters.
Pressure-treated lumber is the workhorse outdoor option. It’s regular dimensional lumber that’s been treated with preservatives under pressure, which makes it resistant to rot, insects, and fungus for decades. It’s cheap, structurally identical to untreated pine, and once it’s properly dried and finished it can look genuinely good — we’ve built outdoor benches and tables out of pressure-treated that hold up beautifully and cost a fraction of cedar. Use it for anything in ground contact (deck posts, raised-bed frames), structural outdoor work, or budget-conscious outdoor furniture where you’re willing to do the prep right. A few practical notes: it ships heavy because it’s still wet from treatment, the chemicals can irritate bare skin until the boards weather a bit, and you should never burn the offcuts.
White oak is the underdog outdoor option. It’s naturally rot-resistant (the same reason it’s used in whiskey barrels and boat building), takes finish beautifully, and has none of the chemical-handling concerns of pressure-treated. It’s pricier and harder to find than the other three, but for a high-end outdoor piece — Adirondack chairs, an outdoor dining table — it’s worth considering.
Untreated lumber with a film finish is also fair game if you’re willing to maintain it. A pine bench with a quality outdoor finish (spar urethane, marine varnish, or a penetrating oil like Penofin) will hold up fine outside — but you’ll need to reapply every 1-3 years depending on sun exposure. Don’t skip the maintenance and expect it to last.
Don’t mix metals. The chemicals in modern pressure-treated lumber are aggressive against regular steel — they’ll corrode standard fasteners in months. Always use stainless steel or hot-dipped galvanized screws and brackets with pressure-treated. The fastener boxes will be labeled “for ACQ-treated lumber” or similar; that’s what you want.
Let pressure-treated lumber dry before finishing. The old “wait six months” rule is more conservative than it needs to be. What actually matters is the wood’s moisture content — most finishes want lumber under about 18% MC, ideally 15% or lower for paint and stain. A moisture meter (cheap ones run $25-40) gives you the real answer; if you don’t have one, a few weeks of dry weather is usually enough for above-ground projects, and a quick water-bead test is a workable proxy: sprinkle water on the board — if it absorbs in a few seconds, it’s ready; if it beads up, give it more time. The “kiln-dried after treatment” (KDAT) lumber sold at some yards is ready to finish immediately.
The full decision tree on outdoor wood selection is in pressure-treated vs cedar vs redwood.
Lumber grades — what to care about, what to ignore
Every piece of dimensional lumber gets stamped with a grade somewhere on it. The grading systems are different for softwood and hardwood, but you mostly don’t need to memorize them.
For softwood dimensional lumber at a big-box, the relevant tiers are:
- Select / Premium — the best appearance, fewest knots, straightest. Costs about 50% more.
- #1 / #2 Common — what you’ll usually buy. Some knots, generally straight, fine for most projects.
- #3 / Utility / Stud — cheaper, more knots, more imperfections. Acceptable for hidden framing or very rustic pieces.
For most painted projects, #1 or #2 common is fine. For stained or fine-finish work in pine or poplar, pay the upcharge for select.
For hardwood at a lumber yard, the system uses letters: FAS (firsts and seconds, the best), Select, then #1 Common and below. Furniture-grade work generally calls for FAS or Select. #1 Common is usable for parts that won’t be visible, or for paint-grade builds.
What to ignore: most of the additional letter codes (S4S, KD, HT, etc.). The two that matter for woodworking:
- KD = Kiln Dried — the lumber has been dried in a controlled oven to ~10-12% moisture. This is what you want for indoor furniture. (Why this matters →)
- S4S = Surfaced 4 Sides — the board has been planed smooth on all four sides. Most lumber-yard hardwood is sold S4S. Big-box softwood usually is too.
Where to buy: big-box vs lumber yard
Two very different worlds. Both have their place.
Big-box (Home Depot, Lowe’s, Menards):
- Pine, fir, SPF dimensional lumber in standard sizes
- Pressure-treated, cedar (sometimes redwood)
- Construction-grade plywood, MDF, melamine
- Pre-cut shelf boards
- Convenience: open late, near everything, you can grab a single 2×4 on a Saturday morning
What they’re bad at: hardwoods (very limited selection, often poor quality), thicker dimensional stock, kiln-dried-and-surfaced specialty lumber, and patient expert advice.
Lumber yard (local hardwood specialist):
- Wide hardwood selection (oak, maple, walnut, cherry, etc.) sold by the board foot
- Rough-sawn or S4S options
- Better quality control — straighter, drier boards
- Knowledgeable staff who’ll spend 10 minutes helping you pick boards
- Often, custom milling services
What they’re bad at: pricing transparency (you have to ask), online inventory (mostly call-and-ask), Saturday-night convenience.
For a beginner’s first builds, the big-box is fine. As your projects get more ambitious — stained hardwood pieces, larger panels, anything you want to last — the lumber yard becomes worth the trip. We have a full breakdown of when to use a big-box vs a lumber yard.
How to pick boards in person
This is the skill that separates good builds from frustrating ones, and it takes about 30 seconds per board to get right.
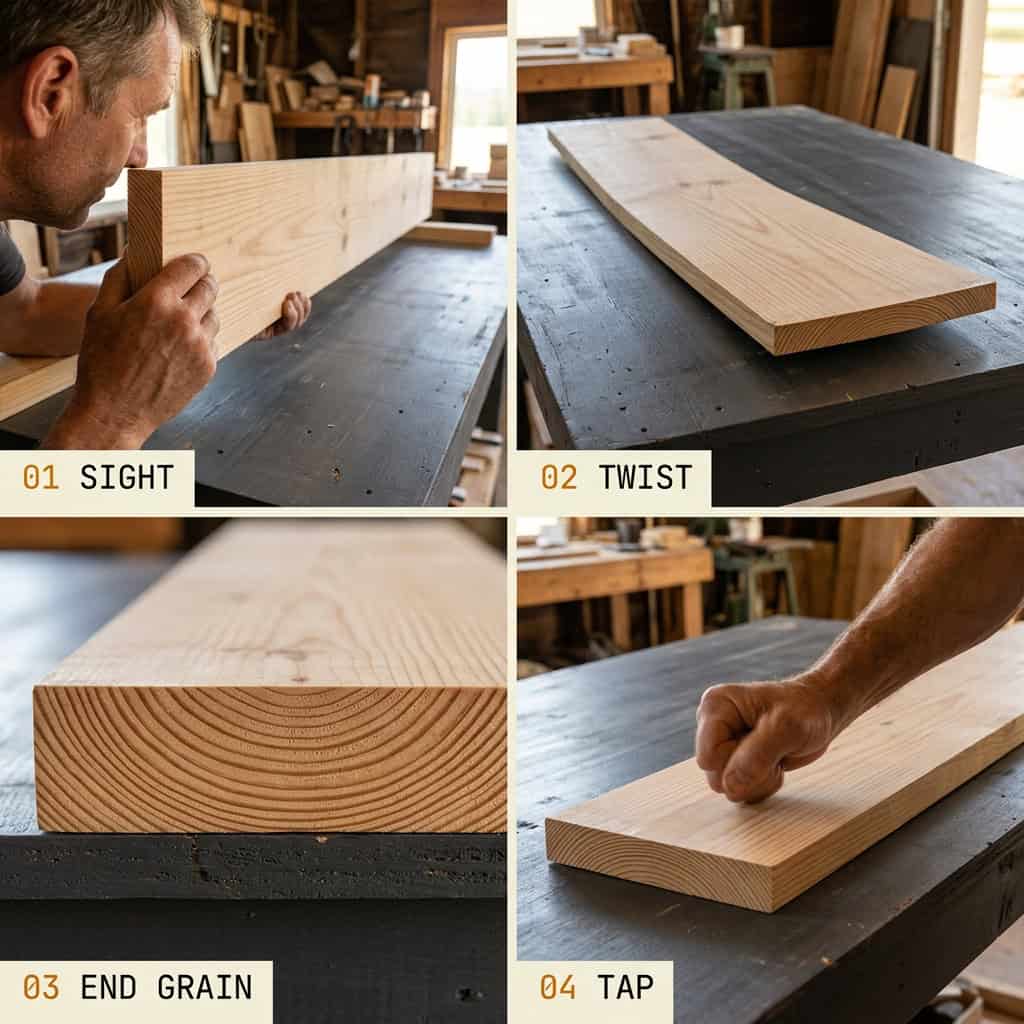
For every board you’re about to buy, run through these four checks:
1. Sight it for straightness. Pick the board up and hold one end at eye level, looking down its length. Rotate it. Do this on both axes (look down the face, then look down the edge). Crooked boards bend in two directions: bow (lengthwise curve) and crook (edgewise curve). A little bow is workable; a crook is harder to fix. Reject any board with significant crook unless you’re cutting it into short pieces — a crooked 8′ board can still yield four good 24″ pieces if you cut around the curve.
2. Check for twist. Lay the board flat on the floor or on the cart. If it doesn’t sit flat — rocks like a four-legged stool — it’s twisted. Twist is the worst defect because it can’t be jointed out. Reject twisted boards.
3. Look at the end grain. The growth rings on the end of the board tell you how it’ll move. Tight, parallel rings (quarter-sawn) = stable, won’t cup much. Wide, curved rings (flat-sawn) = more movement, more likely to cup. Both are usable, but for a tabletop or anything with a wide flat surface, tighter rings = better.
4. Tap it. Knock the board with your knuckle. A dry board has a high, clean ring; a wet board has a dull thud. This is a rough check — the moisture meter at the lumber yard is the real answer if you’re being precise — but it weeds out the wet ones.
Don’t feel bad about going through 20 boards to pick 4. Every experienced woodworker does it. The lumber yard staff expects it. The big-box staff has resigned themselves to it. Pull out the bad boards, restack them neatly when you’re done, and keep moving.
For a deeper walkthrough with photos, see how to pick straight boards at Home Depot.
Before you build: storage and acclimation
Lumber is alive. It expands and contracts with humidity, and if you build with boards that are at a different moisture level than the room they’ll live in, the joints will move after the project is done.
Two rules that prevent 80% of dimensional-stability problems:
1. Store lumber flat and supported. Stand boards on edge against a wall and they’ll bow. Lay them across two cinder blocks and the unsupported middle will sag. The right way: lay them flat on a surface that supports them every 16-24 inches, with stickers (small spacer strips) between each layer if you’re stacking, so air can move between them.
2. Acclimate for at least 3-7 days before building. Bring the lumber into the room or shop where you’re going to build, and let it sit in that humidity for several days before cutting. The wood will gain or lose moisture until it equalizes. Cut and join it in the equalized state. The piece is then dimensionally settled for the environment it’ll live in.
Skip these steps and you’ll get tables that wobble in winter, drawers that stick in summer, and panel joints that crack as the wood moves. Done right, none of those things happen.
Quick decision matrix
When you’re standing at the store and need to make a call:
| Project | Use |
|---|---|
| Painted furniture (table, bench, bed) | Pine 1x for accents, 2x for structure; or poplar for premium feel |
| Stained furniture (rustic) | Pine with conditioner, or oak |
| Stained furniture (fine) | Oak, maple, walnut, or cherry |
| Outdoor bench / chair | Cedar, redwood, white oak, or pressure-treated |
| Outdoor structural (deck post, raised bed frame) | Pressure-treated |
| Built-in / cabinet | Plywood (oak, maple, or birch) for boxes, hardwood for face frames and doors |
| Cutting board / butcher block | Maple, walnut, or cherry — never pine or oak |
| Shelving | Pine 1x for paint, oak or walnut for stain |
| Kid’s project / first build | Pine, every time. Cheap to mistake-proof. |
Now go build something
The goal of this guide isn’t to make you a lumber expert — it’s to make you a confident customer at the store and a careful inspector at the lumber rack. Those two skills will save you more time, money, and frustration than any tool upgrade.
If you want a printable cheat sheet of the species table, the dimensional-lumber chart, and the four-step board inspection — we made one. [Lumber Buying Cheat Sheet PDF coming with the newsletter integration — placeholder for now.]
Now go pick some good boards.

Build with a real plan
Stop second-guessing. Get a plan that’s already been built.
190+ Rogue Engineer plans — all designed in 3D before they ship, with exact cut lists, shopping lists, and step-by-step diagrams. Built in our shop, tested in our home, finished in your driveway.
Browse all plans →