
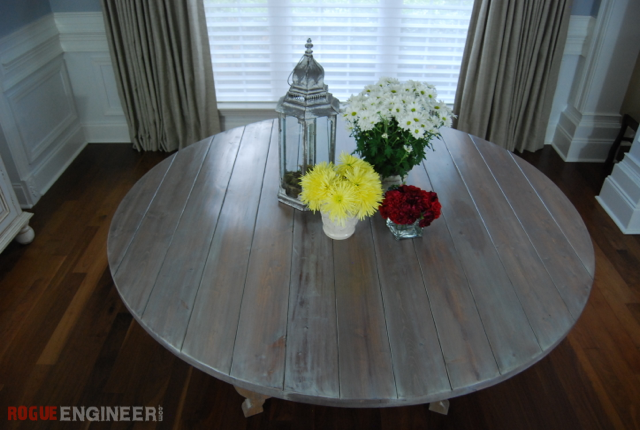
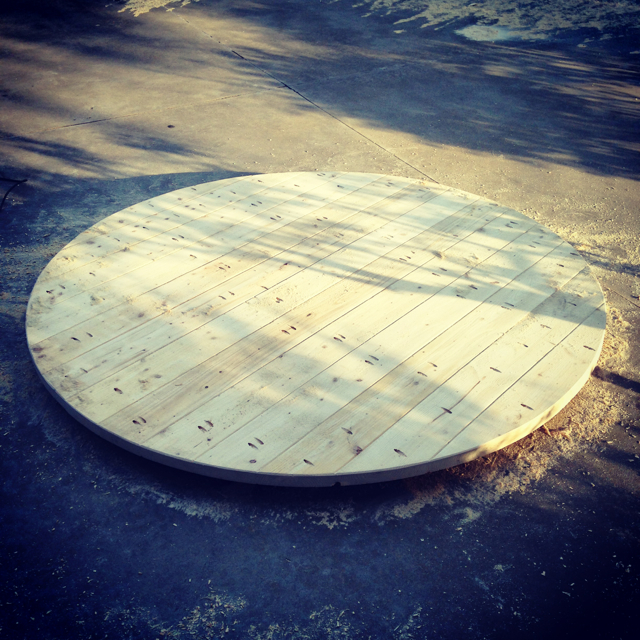
70 Inch Round Table Top
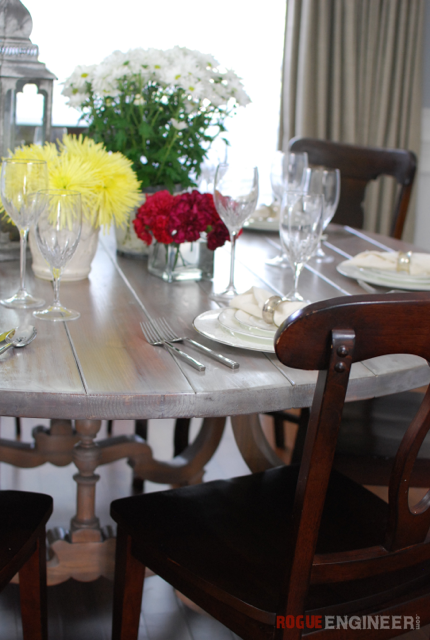
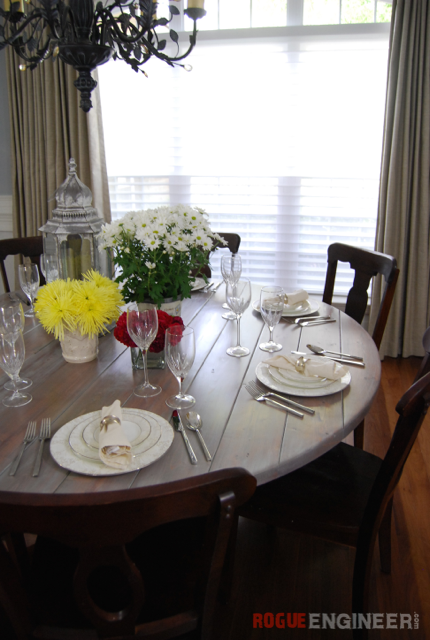
So a neighbor of mine had an old table that she really loved the legs on but she wanted to make a circular table top for, to fit in her dining room. Not to mention that the current top was pretty much ruined. Since I had not done a round top before, nor had I seen it done, I really wanted to give it a shot. So here is me giving it a shot. Hope this is helpful/entertaining for you!

Required Tools
- Table Top
- Option 1: Router + Jig = Perfect Circle
- Circle Saw or table saw (to cut wood used for jig)
- 1″-1-1/2″ diameter wood bit
- Router
- Spiral Upcut Router Bit (1/2″ Shank or 1/4″ Shank)
- Option 2: Jig Saw + Pencil = Almost Perfect Circle
- Jig Saw
- String
- … and a prayer
- Pencil
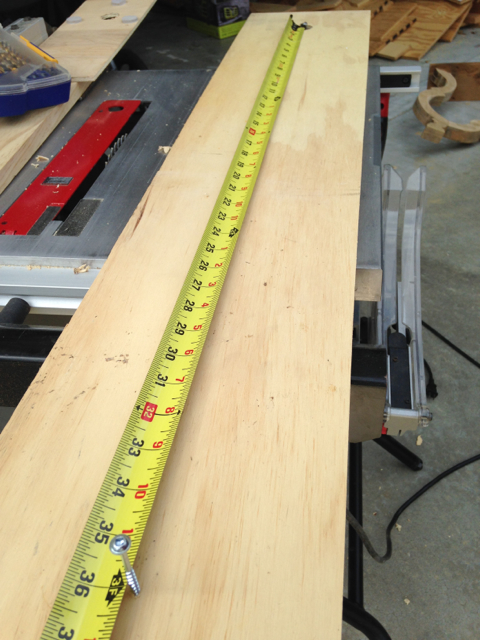
- Tape Measure
- Eye Protection
- Hearing Protection
Materials
- Table Top
- 11x 2 x 6 x 10′
- 2-1/2″ Pocket Hole Screws
- Router Jig
- 3/4″ x 7″ x 40″ plywood (I used scraps)
- adhesive sliders
Cut List
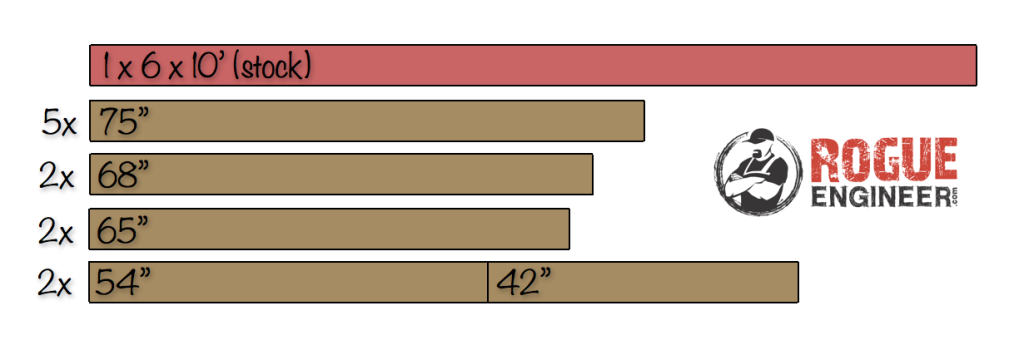
70″ Round Table Top Plans
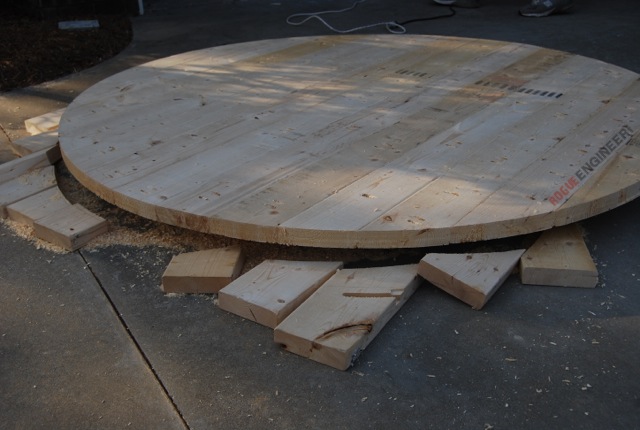
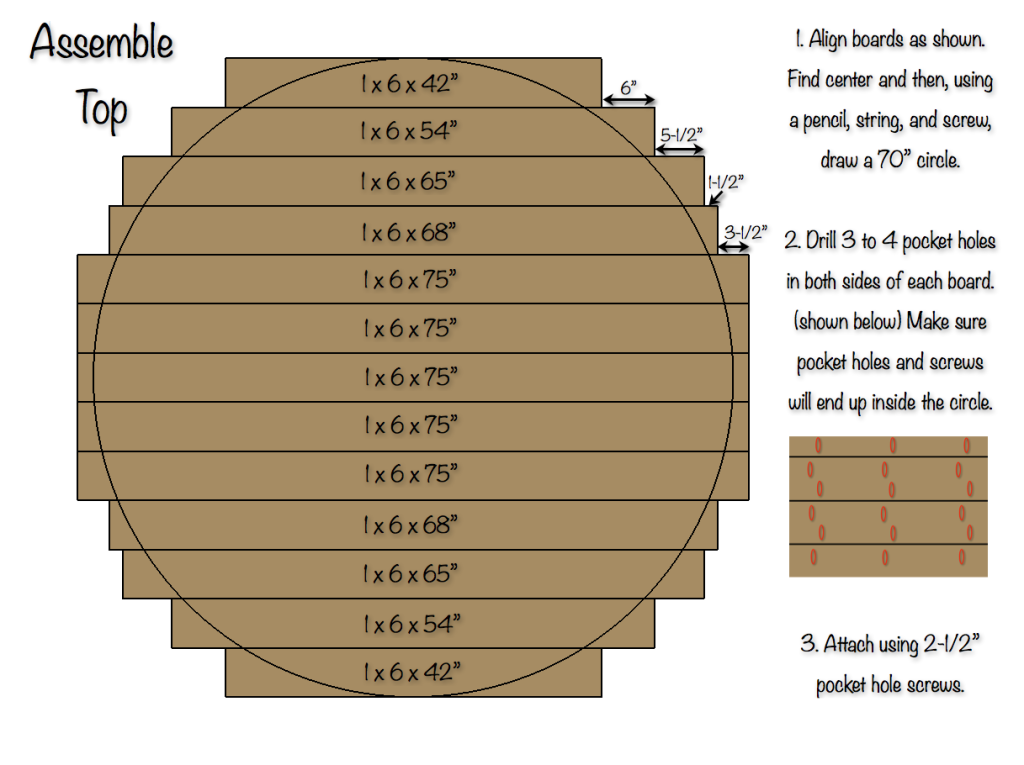
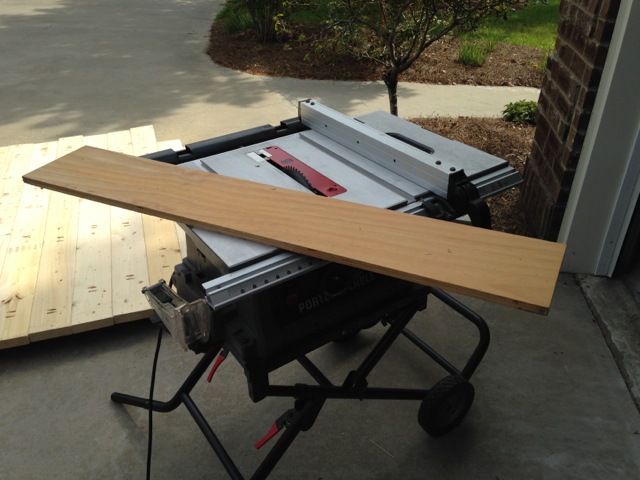
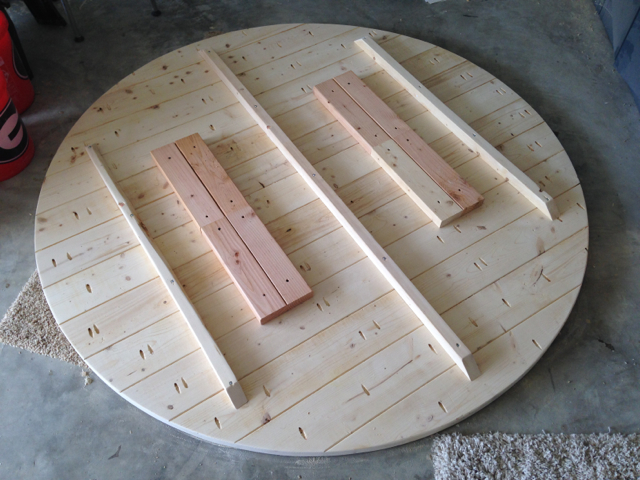
Assemble Boards for Table Top
Circle Cutting with a Jig Saw
I did want to note that you could cut your circle out with a jig saw but I’ve never trusted my jig saw with a task this important. The blade seems to always wander and never turns out quite as nice. But if you’re too intimidated by the router, go for it and just take your time and plan on sanding quite a bit when your done.
Circle Cutting Router Jig
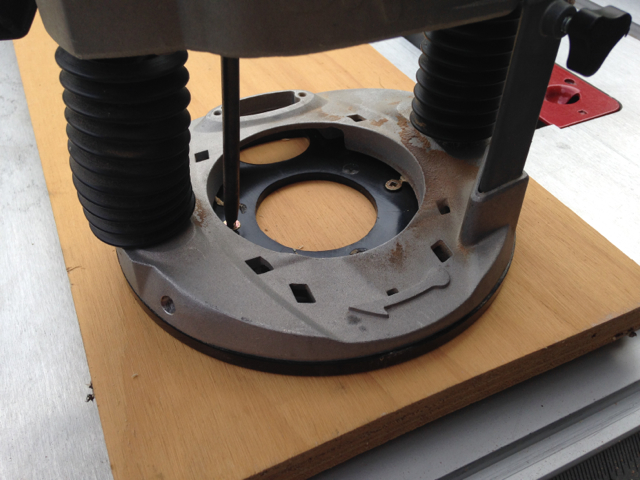
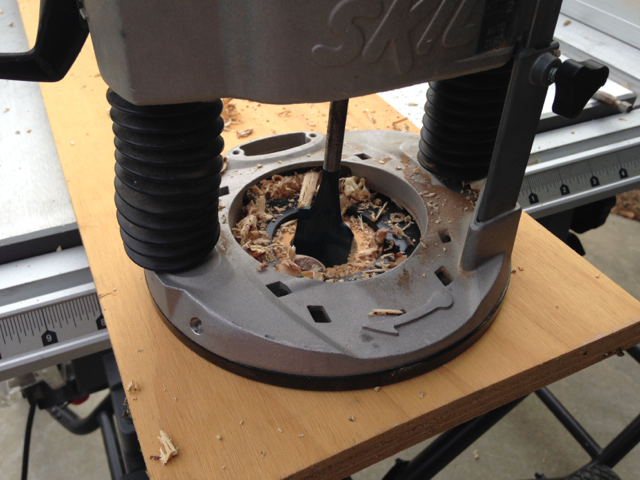
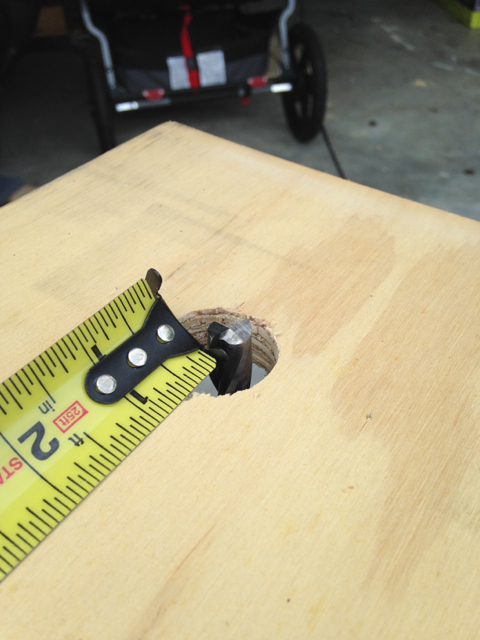
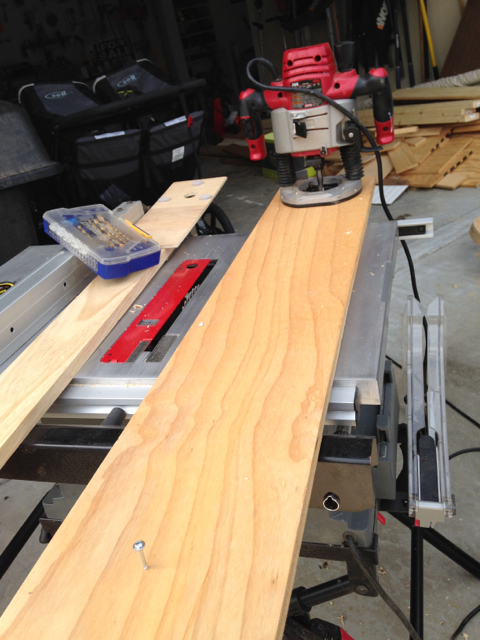
Cutting the Circle
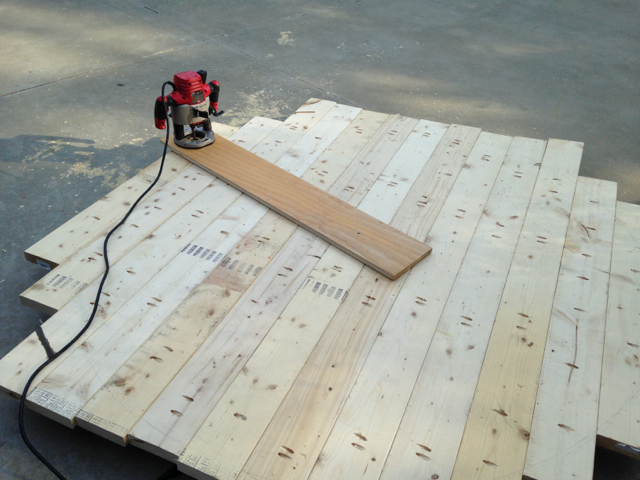
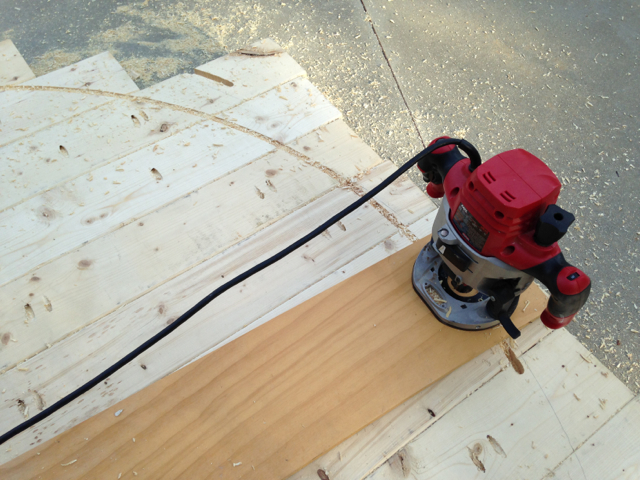
Here’s a short clip of the actual cutting so you can get a feel for what you’re in for..
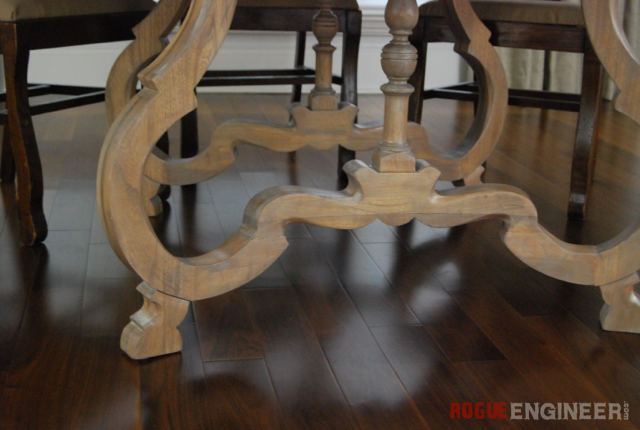
Base Options
As I said before, the legs used on this table were some that were recovered from an old table. You may or may not be in the same situation. If not and you need ideas for a base, here are a few:
Comments
As always if you have any questions don’t hesitate to comment below and especially don’t forget to post pictures of your finished products in the comments! ENJOY!
I’m new to woodworking and this was really helpful! Thank you for such detailed instructions. I love the finish you used on the table. Would you mind also sharing how that was achieved?
Thanks Meagan! I am glad you found it helpful. It was my first go at a round table and I think it turned out well. I will be posting soon on the finish I used for this table… stay tuned! As always, if you run into any issues when building feel free to contact me.
Thanks so much for all of the handy info. I have been wanting to make a 48″ diameter plank wall clock and these instructions will definitely help!
Awesome Janice! Glad I could help. I would love to see how it turns out so be sure to post a picture when your done!
Did you ever post a tutorial for this finish? I’m finishing a table right now and I love this look. Thx!
Stephanie, I haven’t yet. I’m a total slacker I know. But I’ll let you know when we get around to it!
I wanted to check and see if you ever got around to doing a tutorial for the finish? I saw in the comments you used kona and weathered grey, could you give a brief description of how they were applied and also if you finished with wax, poly, etc? Thanks so much!
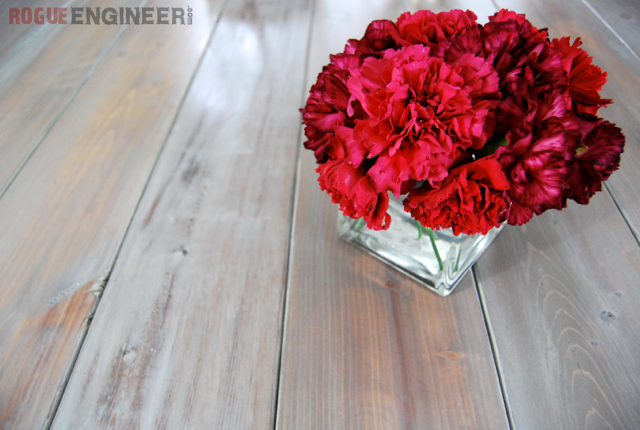
Ashley, no we have just been so busy that my wife hasn’t gotten around to completing the finish for this one yet. But I can tell you that she applied Kona using a foam bush and wiped off. Then once that was dry she applied a coast of the weathered gray and wiped off, the used a poly for the top coat. Hope that helps!
Hi my husband built this table and im trying to do the same finish. Can you please share? Thanks!
Jamie,
For the finish we used a base coat of Rustoleum Kona with a top coat of Rustoleum Weathered Gray.
Hi Jamison! I just wanted to say thank you for the tutorial and jig pictures and video! We just did the table top and your post was so helpful! Jen
That’s awesome Jen! I’m glad I could help.
I would like to try a table top like this, but I have one question first. I have a Dewalt router that can use either sized shank. Do you have a suggestion for which size is better? I’d prefer to make the investment in this bit only once 😉 thanks!
Either would be fine. The 1/4″ bit is way cheaper so I would say go with that! Good luck!
Just what I was looking for, but would like to know how to modify to make it be a 60″ table. I have a smaller space, but really want a round table for it. Looks very doable. I feel I can build this from your plans and video. Thank you for inspiring us.
No problem Grace, you can modify this jig to make a 60″ table by placing the center screw 30″ from the router bit instead of 35″.
Hello,
I too have a round table base which I really like and would like to salvage. Unfortunately the original glass top broke and I would like to replace with a wood tabletop. I wanted to know if this is something I can use outdoors if I use a sealer or varnish? Also, what type of wood would you recommend? Thank you
Thats a bummer. If you’re using this as an outdoor table I would suggest using a spar varnish or building out of cedar. For indoor use pine would be sufficient.
Hey Jamison. Great info. I just wanted to clarify on the wood that you used. It says 2x in the materials list and 1x in the cut list. What were the actual dimensions of the lumber that you used? Did you just use pine?
Seth, sorry about that mix up. I used pine 2×6’s as stated in the materials. It must have been a late night when I was putting together the cut list.
That’s what it looked like, but wanted to double check. Thanks! Just got a new Dewalt router and ready to give this a go! Just have to decide on a pedestal now.
Jamison — any time I try to select one of the steps for more detail it simply returns me to the main plan page. I’ve tried a few different browsers (IE, Firefox, Chrome) but all give the same result. I’m specifically interested with how you mounted your router to the jig. Any help?
Hey Brad, I just corrected that, it should be all visible now.
Jamison – This was a great article, and I am planning now on building a similar table top. One issue I have though, is my router is a fixed base, not plunge. Is there a way to modify the jig for this, or a different technique for using the router? Thank you.
Robert, I actually didn’t even use my plunge feature. With the jig screwed into the middle of the table I lifted the router end up slightly, started the router and sunk it down into the wood. Routing out only 1/4″ at a time and with such a large diameter this was actually quite easy.
Thanks Jamison, that makes plenty of sense!! Any suggestions for using the router to put a rounded or other edge on the table top after? Perhaps another idea for a jig? I’m afraid of free-handing and ruining the table top if I mess up.
Sorry I missed this. I would just make sure the top is sanded and the boards are very even. Any variations would cause your router to move vertically and could cause problems. Hope that helps!
Thank you for such clear & detailed instructions!
I’m ready to start & want your opinion on a modification I want to make. Do you foresee any cupping or twisting issues if I build with various LARGER board widths, such as 8, 10 or 12 inch?
I was hoping alternating the growth rings and not using glue would help, I’m also going for the distressed & not so perfect look so a perfectly smooth top is not my goal.
Thank you so much!
I think it would be fine but it really depends on your location, change in humidity, etc. One thing I would suggest is to make sure the boards are nice and dry before you start,
Had one question, do you think a sheet of 3/4 in ply wood screwed to the bottom would be a good enough support as opposed to the 2×2’s That you had used?
Yes, I think that would be strong enough to support the top. The only problem is ply wood is more expensive.
Love this tutorial!! So simple and easy. My husband and I will be doing this very soon. Just to clarify, did you use pine?
Thx
Thanks Tracy. Yes I used 2×6 pine boards for the table top. If you run into any questions along the way just shoot me a message! Happy building!
Was the pine the southern yellow pine from lowes? I so did you run through a planer?
Yes, southern yellow pine from HD or Lowes and no I did not run it through a planer.
Thanks. So you just picked out the straightest pieces? I’ve found that even the straightest pieces still have some variance.
Yes, they are definitely not perfect. I just did my best with a belt sander to level it all out.
You did not rip the sides of he 2×6’s correct?
That’s correct. I did not rip the sides on the 2x6s off.
Exactly which bit did you use? Type? Size? I tried using a jigsaw with jig but the blade kept bending. Didn’t work well. So I’ll try the router.
Link to the bit is in the required tools sections. The jigsaw will have quiet a bit of deflection but could be smoothed out with a belt sander and a little elbow grease. 🙂
Hey Jamison! I’m new to using power tools (but determined) and also horrible at math… If I wanted to build a table top that is 42″ in diameter would you know how many inches I would need to adjust my cut boards? Please don’t worry if you don’t have the time to figure this out… Thanks for such a detailed DIY!
Hey Megan!
For a 42″ diameter table you can subtract 28″ from the board length you see posted. Also you should only end up with 8 or 9 boards wide.
How much did this cost you to build?
Under $75 for the top. The base was recovered from an old table so it was free.
Do you have info like the 70″ table for a 60″ table top?
Changing the size of the tabletop is easy. In this case the jig would have a radius of 30″ vs the 35″ that I used.
What length router bit did you use?
I used a 4″ bit. There are links to those up in the required tools list.
Thanks Jamison, I just ordered one!
Hi Jamison,
Did you do any finish work to your stock 2×6’s (i.e. filling in the knots with wood-filler) and did you do any sanding to the top?
Great plans, by the way!
Thanks Russ, I did fill the imperfections with wood filler and sand the whole thing with
80->120->220 grit sandpapers to get a smooth finish.
Thank you so much for this project! I’m in the middle of it now, but I’m stuck. I still need to sand and stain, but wood filling is stalling me. Did you wood fill the knots, dents and seams or just leave them and let them fill with polyurethane? I bought Minwax wood filler and it looks like crap on some test pieces.
Thanks Jeff! That is very good info. Thanks for sharing!
Hey, new to the site and wood working in general. Thanks so much for your plans for the round table top(mine is 58″). Base is 1″ black iron pipe. I will be following this site and building more (ladder, coffee table and office table is already on my list per the wifey).
Pic
That is awesome Heath!! Thanks so much for sharing and great idea on the base!
Totally awesome tutorial – I followed the directions and built an awesome table for my dining room (will post pictures later). But now my wood is starting to warp like crazy, the entire table is starting to slant in 2 spots. I was wondering if you did anything to prevent this? Or maybe I used the wrong wood? thanks!
Thanks Peter, and sorry you are having so much trouble. This is more than likely due to the fact that the wood was not dry enough before cutting. Wood needs to reach a point of equilibrium where it will remain the same and change form. To help reduce the chance of this happening again, after purchasing the wood let it sit for several days to weeks if possible until it’s nice and dry and then begin your project. I hope that helps!
Jamison, I have a strange question. I have a friend that is wanting me to build him this table but he wants Red Oak. Can I use 1X6 red oak, pocket screw it together, then screw it to a piece of plywood so that I have gotten the strength of a 2X6?
Absolutely. Honestly I think you’d be better off doing it that way. All the seams in the 2×6 top makes it flimsy in that one direction. The plywood would help that.
How did you do the stain on the table? What color stain/paint, did you whitewash at all, etc? It looks awesome!
Thanks Dana. It’s been so long, but I believe I used Rust-Oleum Kona wood stain then weathered gray stain overtop.
Hi Jamison, great plans, thank you! I’m just looking at starting this project, but I’d like to build a 72″ top. Would I just need to increase the router jig to 36″ instead of 35″? Do I need to alter any of the cut lengths on the 2x6x10s?
So I’m new to using a router, and I plan to use it for the first time to make a round table top. After doing some research, I have a safety question. I’ve seen some websites recommending when you use a router freehand that you clamp your work down to prevent kickback with the work piece. Is attaching the router to the longer piece of wood enough to prevent such kickback (i.e., in place of clamping the actual piece)? Thanks!
Since this is such a large table top, it is heavy enough that there won’t be any kick back.
Thanks for such a quick reply! I was just envisioning the whole table top lifting and smashing in my face ?
Ha ! No face smashing will happen!
Two questions – #1Any concerns over using a second pass with a chamfer bit (?) to put a nice edge on the top and bottom of the plank? #2 In the glue-up process, any advantage to using joiner and biscuits instead of the Kreg screws?
1. No I think it would be fine to add an edge. 2. No either one would work fine. The biscuit joiner would take a little more time. But either would be fine to use.
Thanks for posting these plans-exactly what I’ve been looking for. Do you think it would be too large for 3/8″ hairpin legs?
I think the hairpin legs would be fine for this, as long as you used proper support underneath.
Thank you for a great explanation for cutting out a perfect circle. highly appreciated https://uploads.disquscdn.com/images/e398acff119fd711c88a2a68034ab9b45ddfd374788350d2cfd3d80332458b72.jpg it. Picture is of a table I made out of African Mahogany using your method
Is there a plan for the base available
Thank you so much for the great tutorial. Just curious- did you do anything to the edge? It appears very smooth, so I was wondering if you used wood filler. Thanks!
Material list shows 2x6x10 but cut list (pink) shows 1x6x10. Am I missing something or is it an error?
I want to make this table from stock 1×6. I initially cut all my boards according to a plan I was looking at but when I put my screw in the middle of center(longest) board and used scrap wood at 30″, several of more boards were too short. I can salvage some. Any advice/suggestions would be great. Trying to build by myself 👩🏻🔧💙😳. My cut boards I have are 34″(2), 46″(2), 53.5″(2), 56.5″(2) and 60.5(1). Thank you in advance for your time:)
WOW, I just happen to come across to your webpage. I want to make a 72″ round outdoor table !!!!! So excited with your diagrams. Not sure what type of material I should use for outdoor weather here in Rochester. How about the maintenance free outdoor decking — not sure of the name(s) — Love that you are a Christian and not afraid to share it ! Blessings
So quick question. I followed your instructions and got a nice 70″ round table, but i want to know what is that paint technique that you used on yours? is that with like a chocolate stain with a watered down white on top?
Hi – getting ready to attempt this beautiful table top. Question: The plan states 2×6 and 1×6. The table does look like it’s 2×6. Can you clarify? Thanks so much. Lisa
Hi Jamison,
Love the DIY plans, looks achievable for my skill level and your end product looks great!
Question though, rather than getting Pine I have bought a whole bunch of 2″ Yellow Birch from a local mill at varying widths from 6″ to 10″ and this wood is quite heavy. I still need to get it planed and jointed which may reduce the weight of the individual boards a bit but I am still concerned about the weight / pocket screw method you show above. So, in your opinion do you think pocket screws with the additional cross board supports that you have will be strong enough for the thicker heavier wood? side note is I plan to get a pedestal from an old dining table that would be a dual pedestal of sorts, so two points of support rather than just one in the middle.
Let me know your thoughts and thanks in advance!