

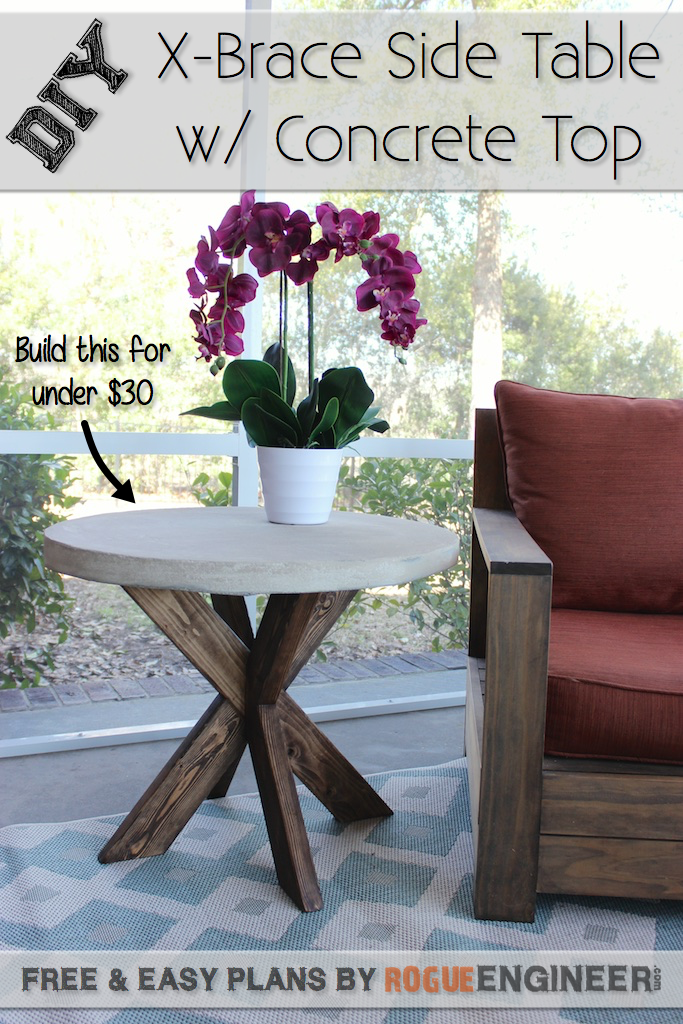
X-Brace Side Table w/ Concrete Top
We came across a side table with an X-brace base at a local furniture store and thought “that looks easy enough” but we wanted to do something a little different. We haven’t really experimented with concrete, so this was definitely a learn as you go kind of process. Luckily we had a few kid free hours to venture to Home Depot and figure out exactly how we were going to make this concrete X-brace side table work. So here you have it; our first ever concrete project! Built for under $20 and I think it goes great with our Belvedere Lounge Chair!
For sneak peeks of our upcoming projects from Rogue Engineer be sure to follow me on Facebook and Instagram. Also, follow me on Pinterest to get tons of projects plans from all around the web!
>> Click Here for Build Photos <<
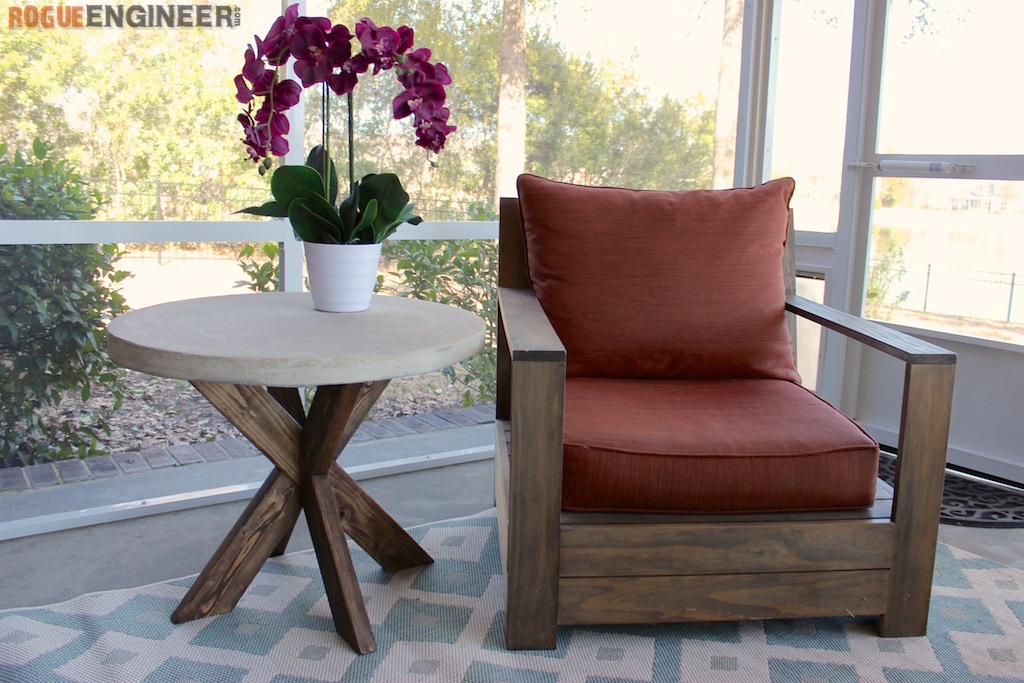
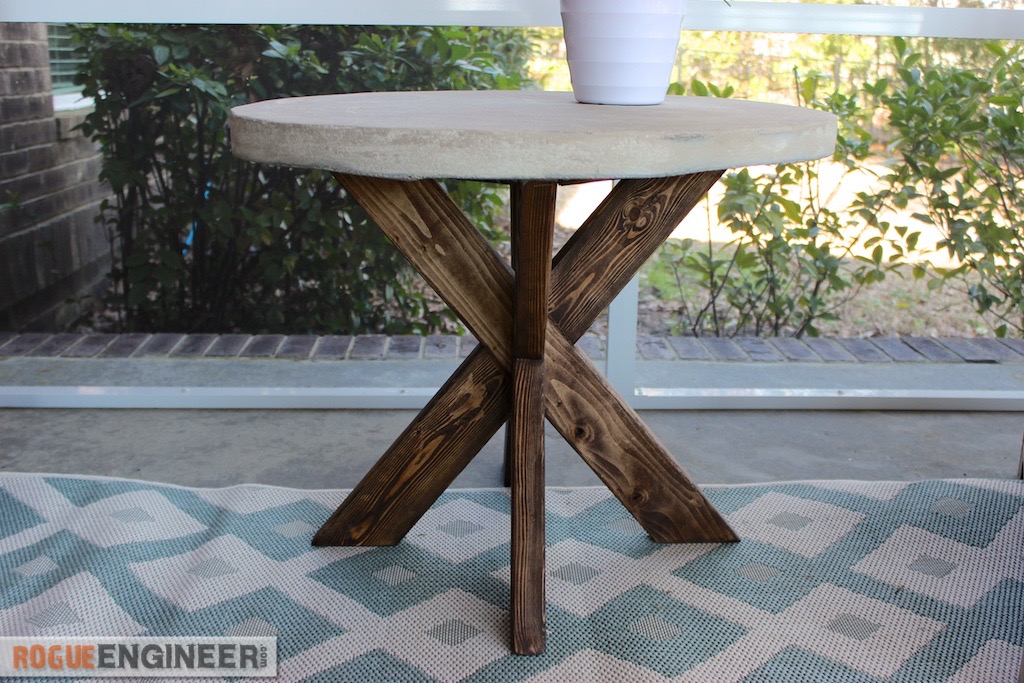
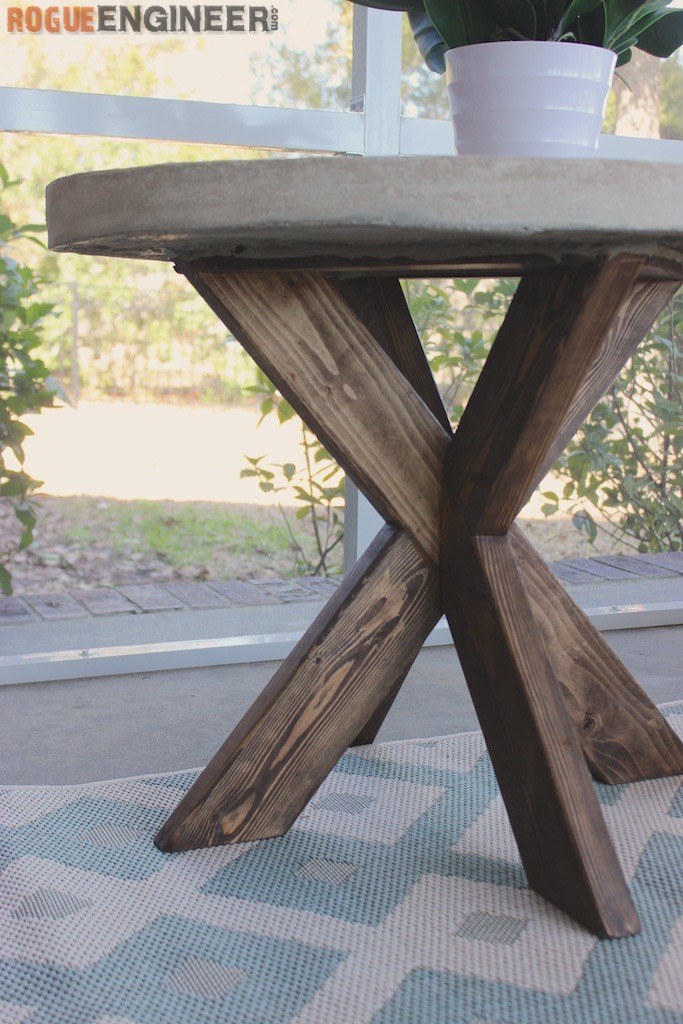

Disclosure: The links provided in the “materials” and “required tools” sections are affiliate links. If you would like to support our site and help keep our content free come find out more about how we can make money with no extra cost to you.
Tools Required
Materials
- 2x 2 x 4 x 96″ Premium Studs; SPF
- 1x 1 x 2 x 96″ Common Boards; Pine
- 80 lb bag of Quikcrete
- Melamine Panel or scrap plywood (min. 30″ x 30″)
- 2-1/2″ Kreg Pocket Hole Screws
- 1-1/4″ Kreg Pocket Hole Screws
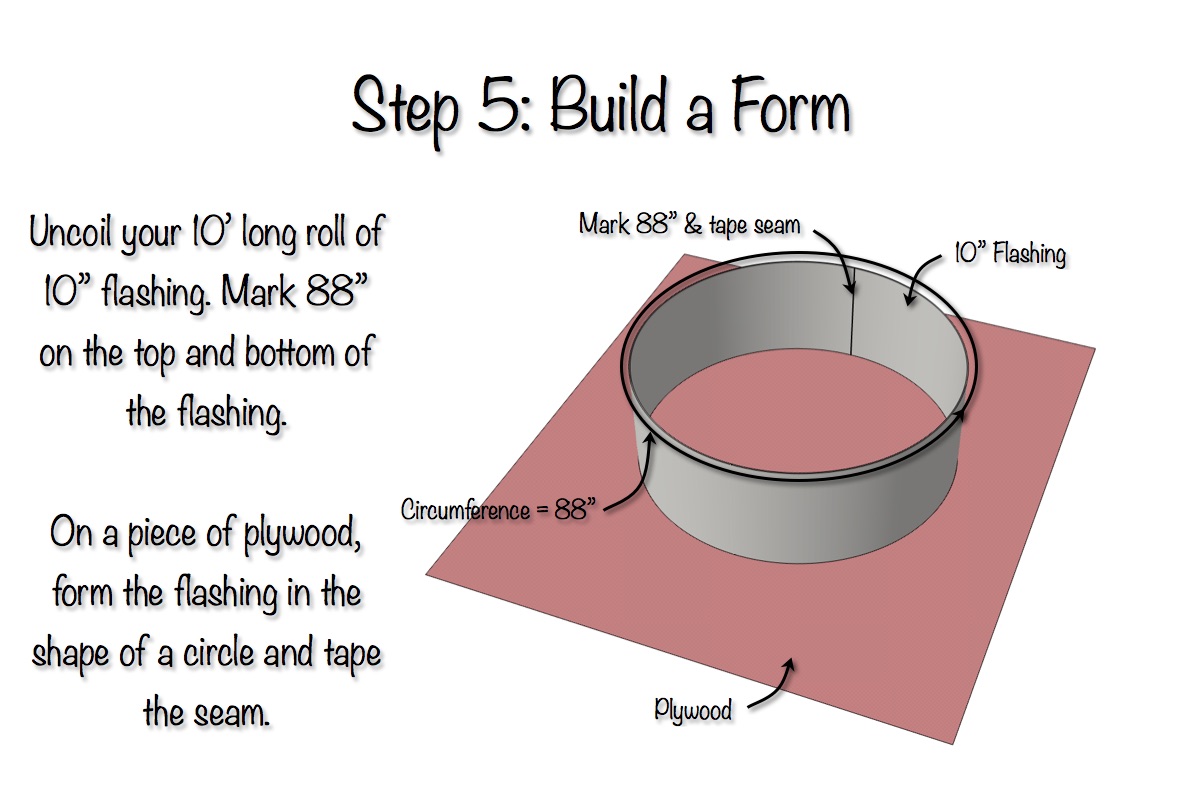
- 10ft of Galvanized Flashing (at least 3″ wide)
- Tape
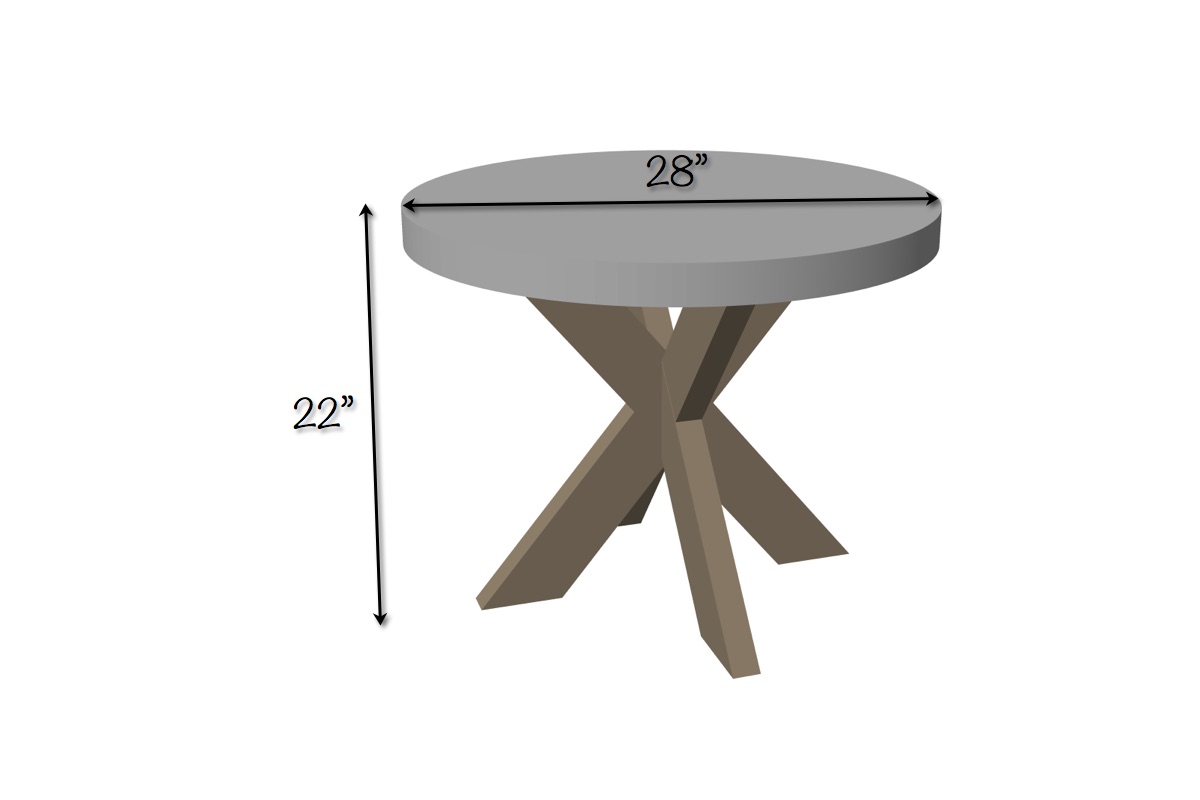
Dimensions
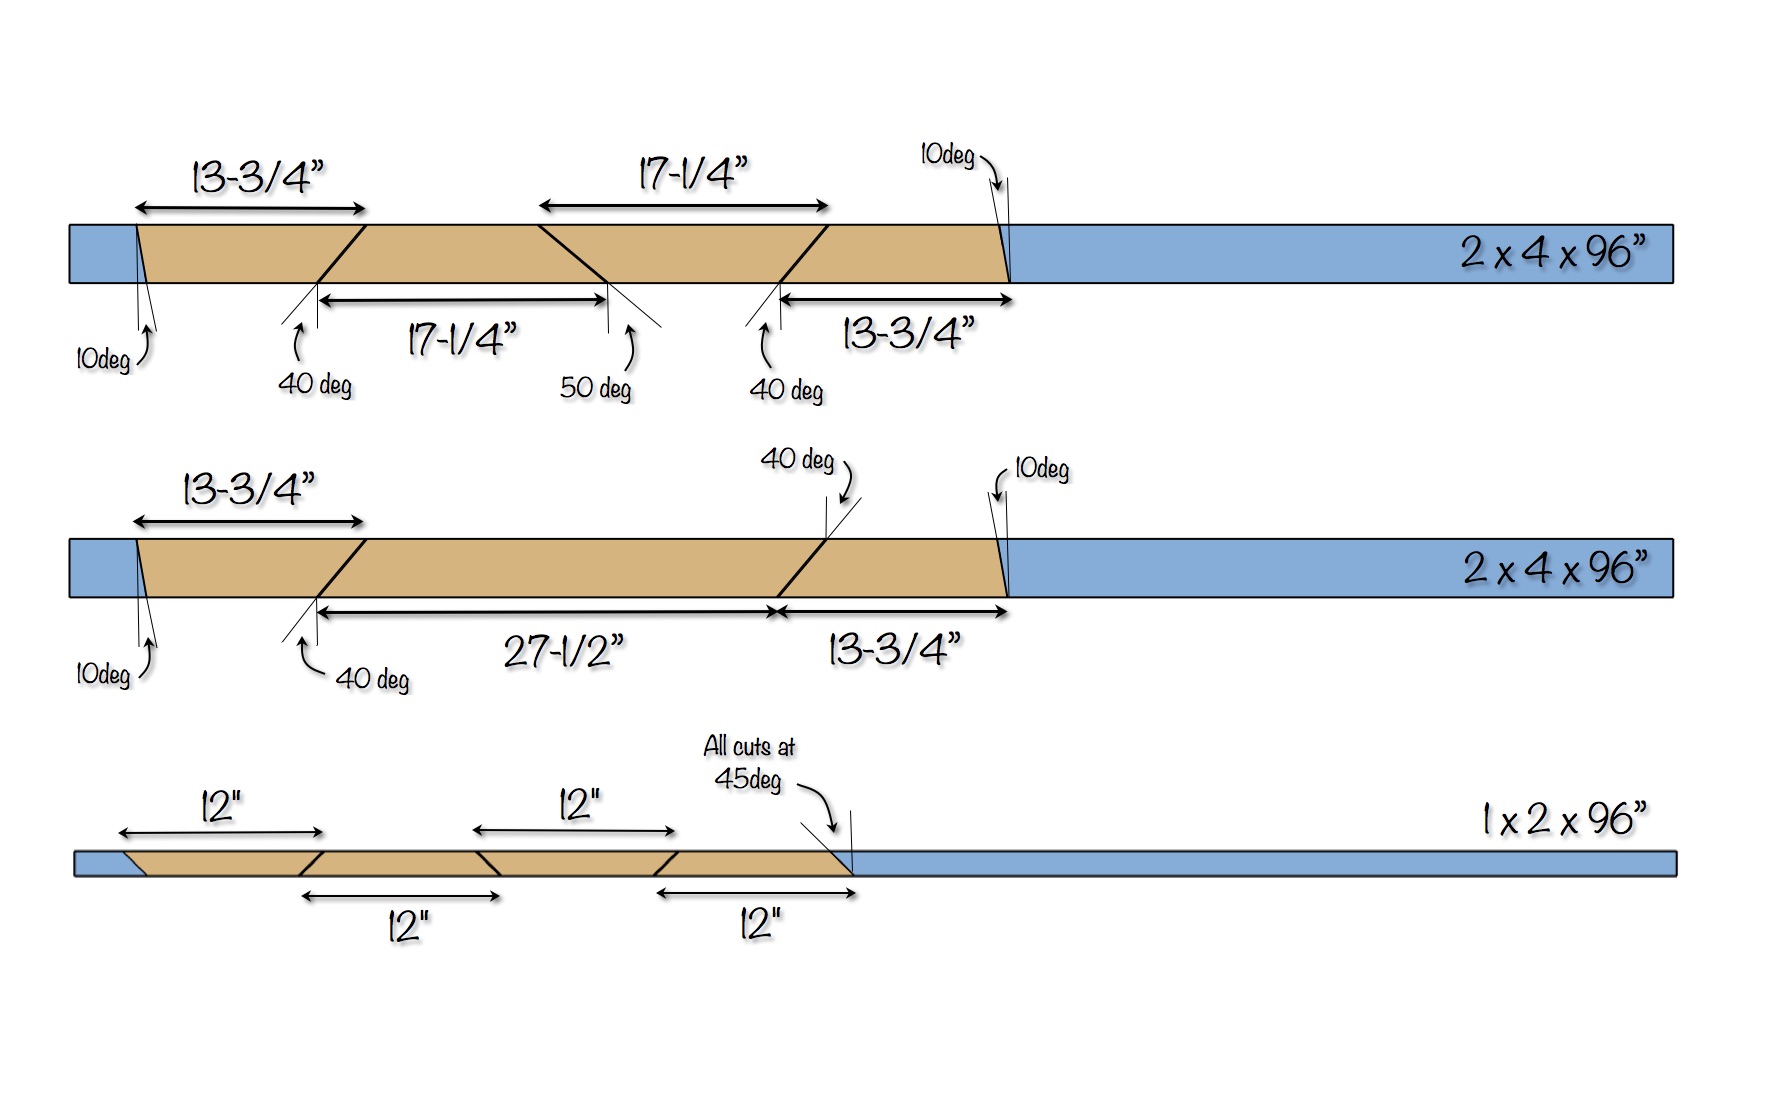
Cut List
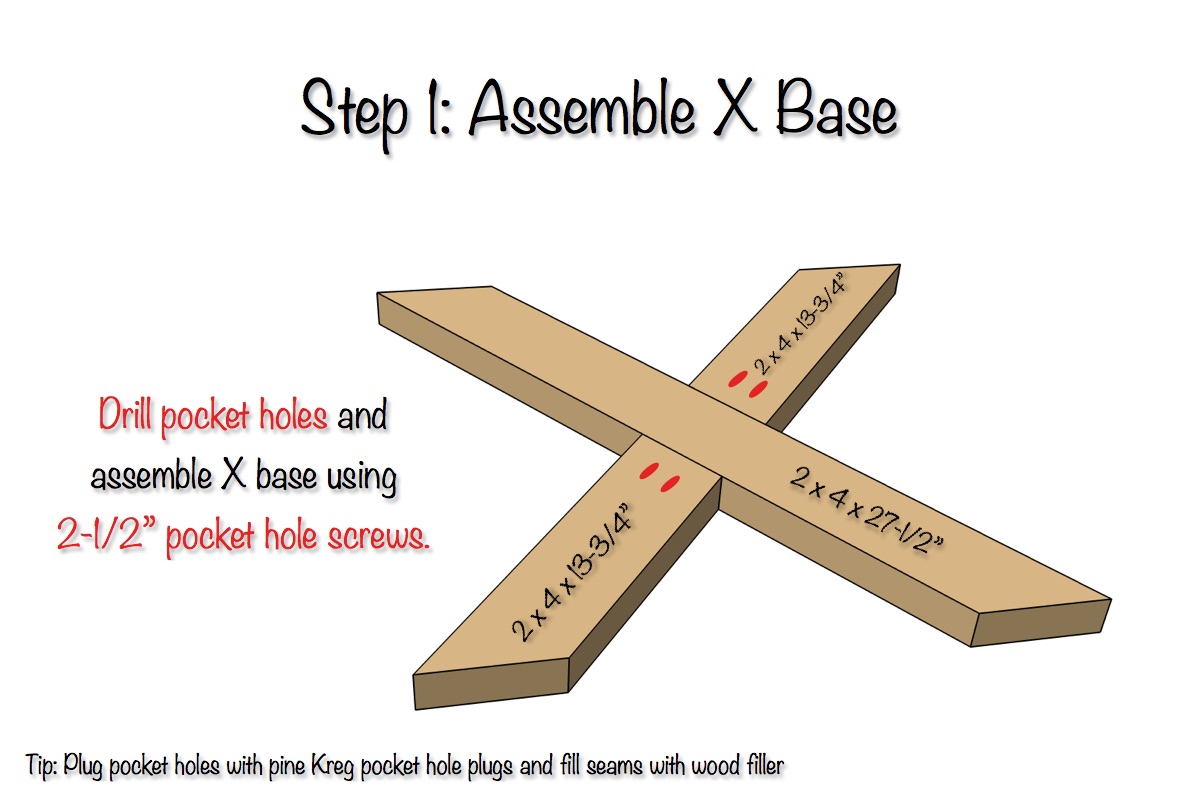
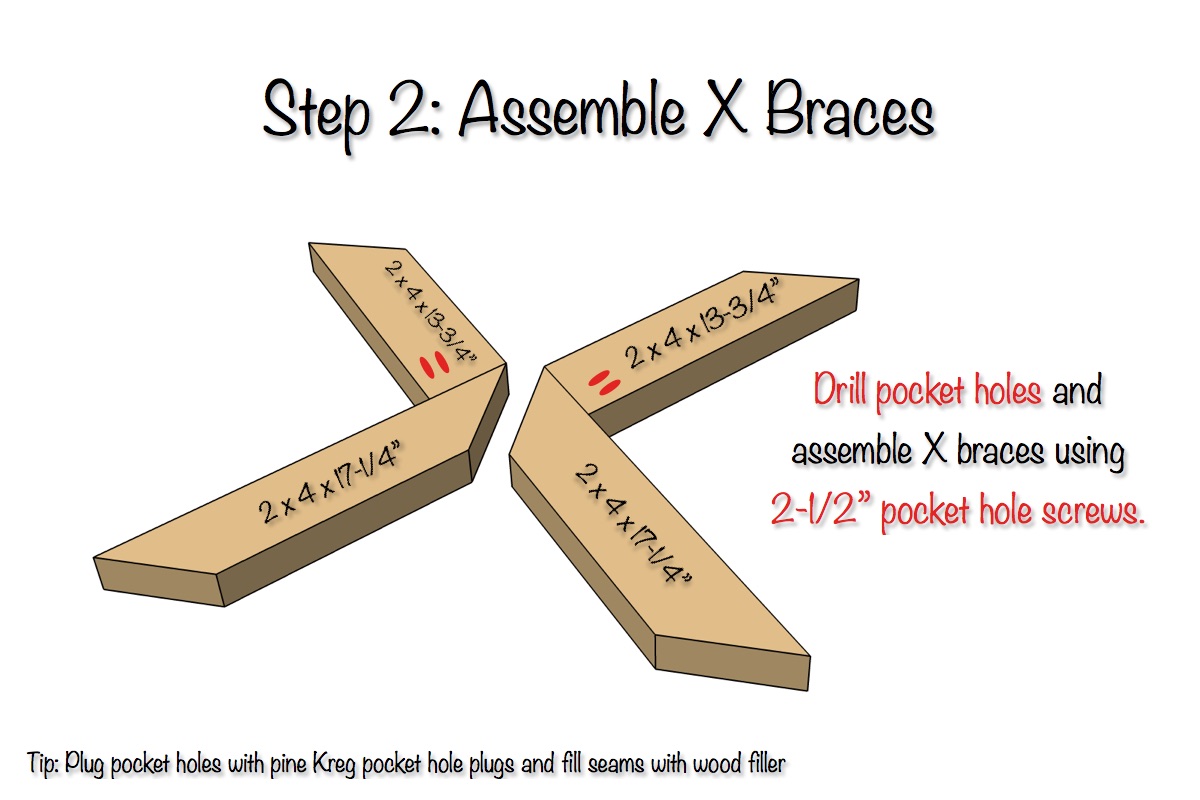
Side Table Plans
Finishing
To finish the base of this concrete x-brace side table we choose to go with Rust-Oleum Dark Walnut followed by 4 coats of Rust-Oleum in satin finish. To see more photos of this check out my post on Remodelaholic!
Questions? Comments?
As always, if you have any questions don’t hesitate to comment below and especially don’t forget to post pictures of your finished products in the comments! ENJOY!
Nicely done. Your plans and graphics are crazy good, thanks for sharing.
Thanks Jaime!
This is a great table. The concrete top is a wonderful addition.
Thanks Megan!
This is incredible! Can’t wait to build one!
Thanks Joyce!
Love it great work. I can’t wait to build some of your plans. Thank you for sharing your talent with others. Much appreciated
Thanks Tammy!
[…] Jamison of Rogue Engineer and his wife Jamie were shopping when they came across a table with an x-brace base. They thought it looked easy enough to make but decided to put a different spin on it with a concrete top. This was the couple’s first time working with concrete so don’t be deterred if you are a newbie too. And can you believe this table was made for under $20?!? […]
This is so beautiful, and I was stalking one almost identical to this at Pottery Barn (Abbott Concrete Top). Could your plans be used on 4x4s to make the Pottery Barn table? I can’t tell you how much I appreciate someone doing the “math” for me, it makes DIY so much more approachable.
Hey Sarah, yea funny thing is that it was a complete coincidence that this turned out just like the PB one. I do think this could be done with 4x4s but you might want to mirror the pocket holes on both sides of the 4x4s. Good luck!
Will a 5lb bucket be big enough to mix the concrete? Will you end up using all 80lbs of concrete.
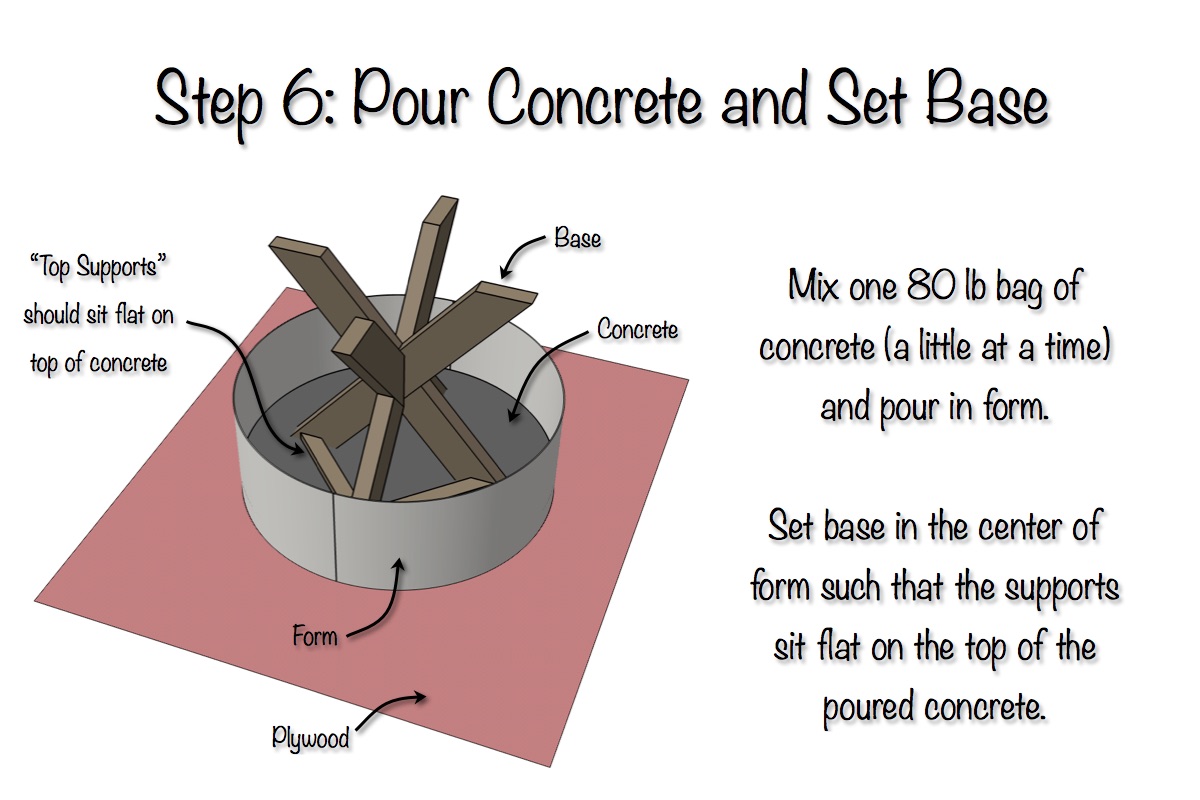
Yes, that’s what I used but you have to mix a little bit at a time. And yes, with these dimensions an 80lb bag of concrete will make a 2″ top.
Thank you for getting back to me, Jamison! My husband and I have just finished building, sanding and staining the legs. About how much water would you say you used overall when mixing the concrete? Neither of us have ever worked with concrete so we’re a little hesitant with this part of the project.
Good question, and I have no idea. Just add water until it’s a constant mixture and just easy enough to mix by hand. Don’t worry too much, if there is too much water it will just take a little longer to dry.
[…] table is super easy and super cheap to make with stock lumber and a bag of concrete. Jamison, the Rogue Engineer, has broken it down for you and provided a free plan. You'll be setting drinks on your new table by […]
This is exactly the table I have been looking for! Several questions…Does the concrete on top end up very smooth? Do you recommend melamine vs. plywood for form for the smoother finish? I also noticed in your photos on Remodelaholic that you used a paper layer underneath the concrete frame when you poured it. Is that important? Did you seal the concrete top at all? Is there a trick to make sure the table base is level before it sets? Thank you for your amazing plans…so helpful for a beginner!
I would say it’s not the smoothest top but melamine for the form would definitely help.
Don’t use the paper. That was a mistake on my part that caused some problems.
I didn’t seal my concrete top.
You can throw a level on the bottom of the legs when its setting up in the form to make sure its level.
Glad you like the plans. If you decide to give it a go I’d love to see how yours turns out!
[…] a sweet little concrete outdoor side table by Rogue Engineer. I love the element of concrete and …read […]
[…] table is super easy and super cheap to make with stock lumber and a bag of concrete. Jamison, the Rogue Engineer, has broken it down for you and provided a free plan. You’ll be setting drinks on your new […]
I cant wait to do this project. I ordered the materials already. One question.. did you stain the concrete? It looks light and has a beige tone to it
Hey Muzzi, can’t wait to see how yours turns out and no we didn’t stain the concrete.
Also, I forgot to ask. What size was the drill bit you used to create the pocket holes? What grit was the sand paper you used for the cement top?
I used the standard Kreg pocket hole jig and bit that comes with it. (Link in tools list) To wet sand it at the end I think we used a 120 grit but it shouldn’t matter to much, we weren’t going for a smooth finish, just wanted to knock down the rough stuff.
[…] a sweet little concrete outdoor side table by Rogue Engineer. I love the element of concrete and wood here, and of course the X […]
[…] your own concrete top x base table with Rogue […]
[…] your own concrete top x base table with Rogue […]
[…] your own concrete top x base table with Rogue […]
[…] DIY X-Brace Side Table With Concrete Base […]
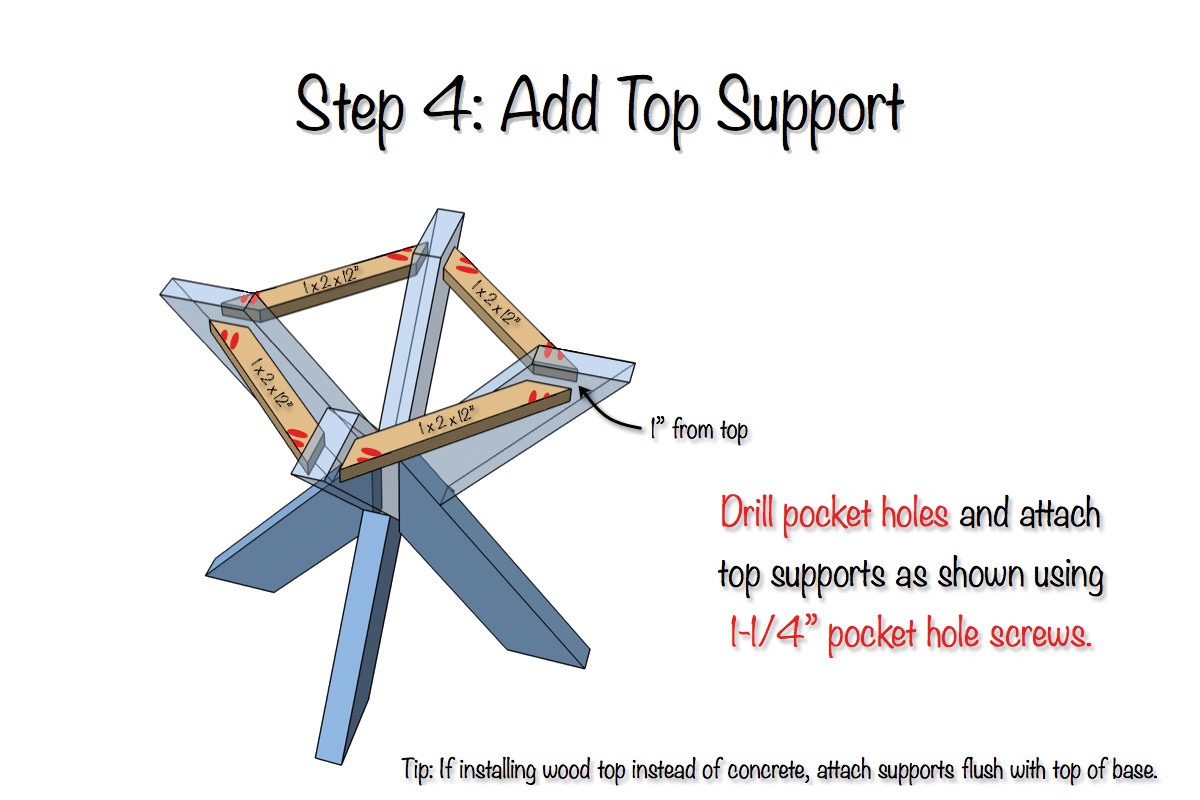
Thanks so much for posting the plans for this table – such a great design! I made two frames today and will do the concrete as soon as I get a chance. A couple questions for you – how did you manage to measure/clamp when assembling? With all the angles I couldn’t find a good way to hold it in place and when I put in Kreg Jig Screws it moved just slightly – one of mine is slightly off level for that reason 🙁 … and does the frame keep the base from sinking to the bottom of the concrete? Or do I need to put some nails or something in the top to hold it up when I do the concrete pouring.
Hey Traci, sorry about the issues you had. The 1×2 top supports should be sufficient for keeping the base from sinking in the top.
Great plans! I made the base, stained, sealed and that turned out really well. Concrete went smooth enough but I used the regular Quikrete which turned out to have too much gravel and didn’t end up being very smooth on the edges. There was also air bubbles in it. My wife was not too fond of the color.
I am going to break it apart and re-use the frame if possible but buy the Concrete Grade. My question is did you do anything for the color or is the finished color in the photo the natural color of the Commercial Grade Quikrete?
Search “concrete exchange” they give very detailed instructions on what to use for concrete countertops
[…] more traditionally-styled table was built with the help of pine boards by Rogue Engineer. This may be the most thought out DIY and tutorial we’ve ever […]
[…] X-brace Side Table with Concrete Top from Rogue Engineers […]
[…] tag was $100 and I was busy with other things, so I never tried to make my own…Until I found this tutorial. AND, now I had a reason to make one. The bad news is that this plan made the table […]
How would i alter these plans to make a top that is more in the 18-20″ range for smaller side tables?
The problem with making it smaller is either the top would have to be lower or the base would have to change. Therefore the angles would have to change and would have to be cut with a circular saw. I wouldn’t know the angles off hand. Sorry I couldn’t be more help. This base is difficult to modify. If you went with another base that would solve the problem.
[…] Rogue Engineer […]
My wife loves this table, so of course, I took on and built it. I am now in the process of waiting for the concrete to set. How long did you wait? Did you sand yours down, as it looks very smooth? Thanks for the great plans. I built your night stands as well. Truly appreciate your work and generosity to share with others.
Thanks Chris! I probably didn’t wait long enough. I think I only waited 24-48hrs and I think they recommend 72hrs. I’m a little impatient. I hit it with a sander all over to knock down the sharp edges but overall it came out pretty good on its own. I would love to see how yours turns out when you’re done.
My wife loved the design but didn’t like the concrete top and thought one of the premade 18 inch wooden tops would have been better. It took a few tries and lots of measuring to get the angles right but I think I managed to get it close. Great plans! Thanks for the inspiration!
Wow this turned out great! I like the modification of the wooden top. I’m sure it a heck of a lot lighter than the concrete 🙂
Hi Jamison,
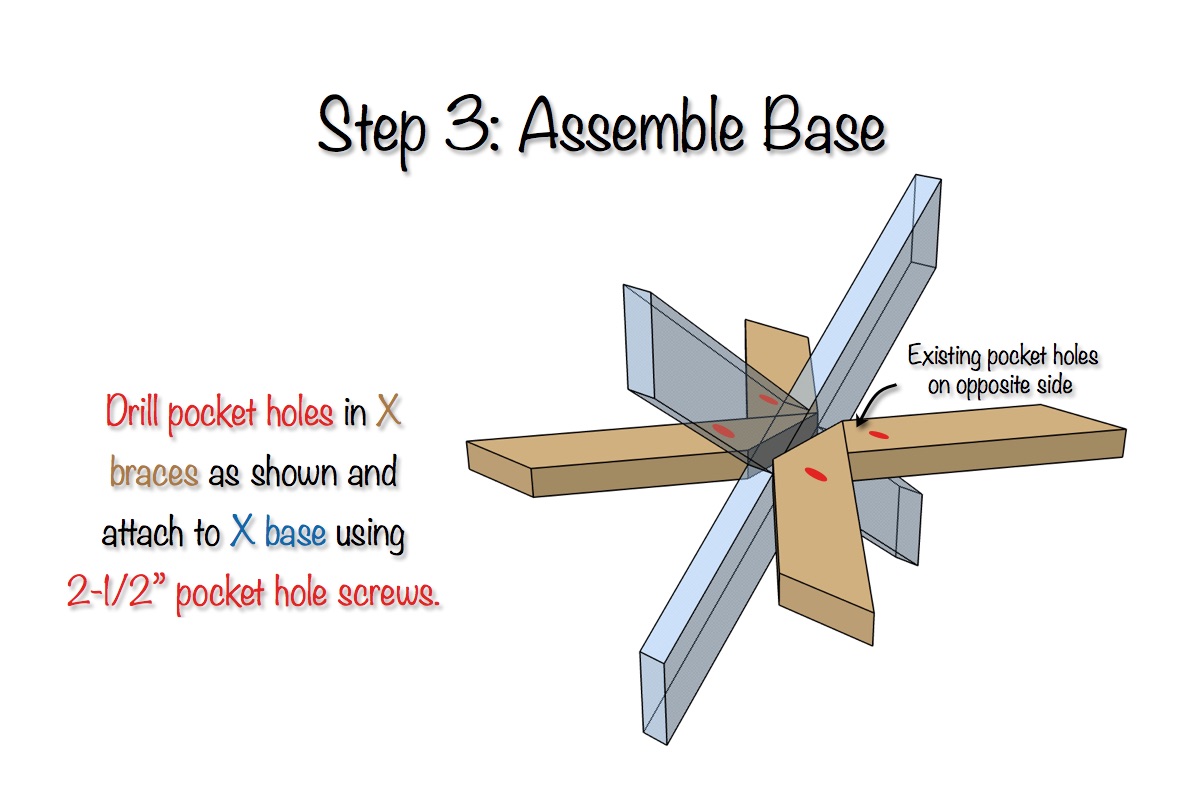
Great plans. Did you have precise measurements for where the pocket screws are supposed to go specially on steps 1 & 3. Do I just figure out where the centre is for the first step? How about step 3, is it just about trying to level it up so all 4 sides are on same level? Thanks so much. Kiri
Hey Kiri. There are no precise measurements for where the pocket holes need to be placed in steps 1 and 3. As long as they get the job done, it won’t make a huge difference on exact measurements. Also you want to keep level in step 3 so when you attach the supports in step 4 the top will be level.
[…] dresser plans how to build a diy wooden dresser table timelapse video of the construction of a. Diy xbrace side table w/ concrete top free &. Free and easy diy plans that will show you exactly how to build an xbrace side table with a […]
[…] tag was $100 and I was busy with other things, so I never tried to make my own…Until I found this tutorial. AND, now I had a reason to make one. The bad news is that this plan made the table […]
Hi there,
I want to make this base to attach to a table top that is 25″ across also round. Will I need to make any angle modifications? What do you think?
Thanks, Jasmin G.
Hi, do i have to change the angle cut if i go taller and wider?
My wife loves this table, so of course, I took on and built it. I am now in the process of waiting for the concrete to set. How long did you wait? Did you grind yours down, as it looks very smooth? Thanks for the great plans. I built your night stands as well. Truly appreciate your work and generosity to share with others.
I borrowed your idea and made a 54 inch patio table out of a reclaimed redwood deck. Thanks for the tips https://uploads.disquscdn.c… https://uploads.disquscdn.c…
How would you modify measurements to make a 30″ tall cafe table?
I know this post is old but maybe my opinion will be usefull for anyone in the future. I found that the pieces of 2x4x17 1/4 are short, in order to the pieces to be adecuate to te rest of pieces the length should be 2x4x17 3/4. If you are very meticulous 2x4x17 13/16 is the exact length.Thank you for sharing the idea.