

How to Build an Outdoor Lounge Chair
Quick build An outdoor lounge chair, the long reclining kind you actually stretch out on, takes one 4×4 and nine 2x4s in Douglas fir or cedar and comes together with pocket-hole joinery and about $75 in lumber. The back adjusts on a carriage-bolt pivot with a notched support arm, wheels are optional, and a weekend gets you a pair. Free dimensions, all 11 steps, and the curved-support template below. Printable plans are $10. Documented by Jamison Rantz, October 2026.
Prefer to watch? The full build is on YouTube.
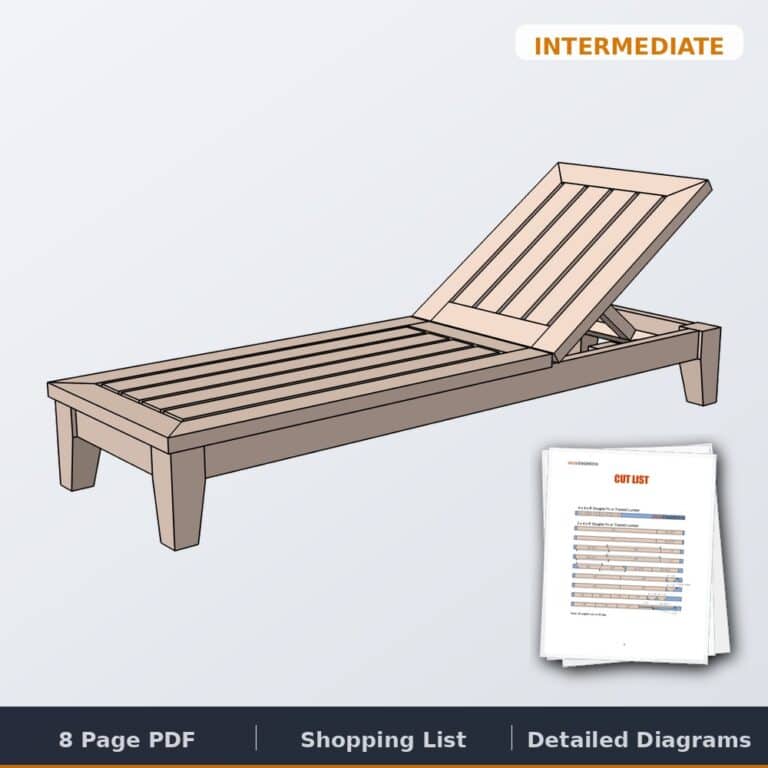
Want the ad-free, printable version?
Everything below in one organized, print-ready PDF: cut list, dimensions, step-by-step diagrams and shopping list. Perfect for the shop wall or your phone.
Jamie wanted lounge chairs for the back deck. One afternoon I found her lying flat on the deck boards trying to catch some sun, and that settled it.
Retail is where this gets silly. A solid-wood or powder-coated lounger runs into the hundreds, and the budget versions are resin with a sling that fails in two summers. Ten off-the-shelf boards and a weekend gets you two of these, in real wood, with a back that actually adjusts. Build the second one while the glue dries on the first.
The reason this beats a plain deck chair is the pivot. The back is hinged at the base and held by a support arm on a carriage bolt, so it moves between flat and upright instead of sitting at one fixed angle.
Building out the rest of the deck? The easy modern Adirondack chair is the fire-pit companion to this pool-deck lounger, and the outdoor bench plans cover seating for everyone who shows up after you finish. Everything we sell for the yard is on the outdoor furniture plans page.
Outdoor Lounge Chair Dimensions
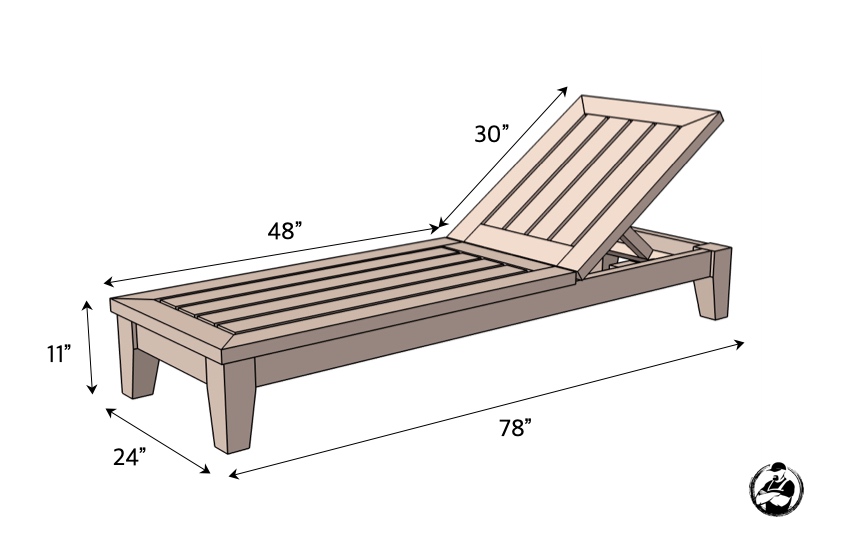
78″ long, 24″ wide, 11″ to the seat frame. The seat section runs 48″ and the back is 30″. That is sized to lie down on, not to sit up in.
How to Build
Taper the feet (optional)
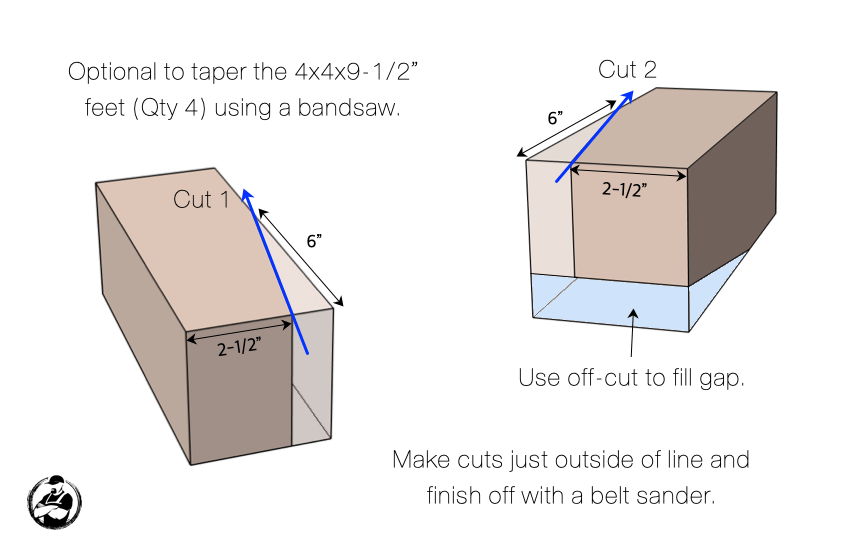
Two bandsaw cuts take each 4×4 x 9-1/2″ foot from a block to a taper: 6″ long, 2-1/2″ in. Cut just outside the line and finish with a belt sander, and save the off-cut to fill the gap on the second cut. It is genuinely optional, but four tapered feet are what keep a 78-inch box of 2x4s from reading like a shipping pallet.
Assemble the base
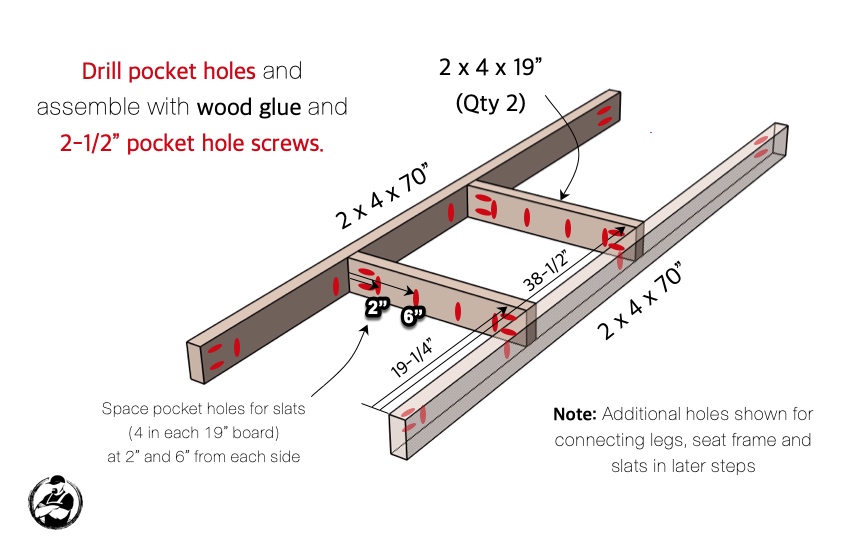
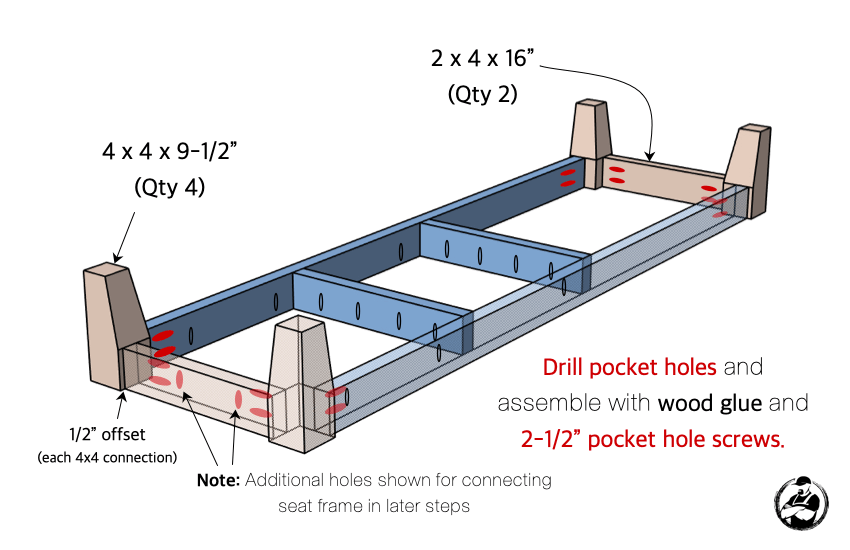
Two 2×4 x 70″ rails and two 2×4 x 19″ cross members, glued and pocket-screwed with 2-1/2″ screws. Space the slat pocket holes now, four in each 19″ board at 2″ and 6″ from each side, because you cannot reach them once the frame closes up.
Add the legs and end rails
The four tapered 4×4 x 9-1/2″ legs and two 2×4 x 16″ end rails close out the base. Each 4×4 connection gets a 1/2″ offset, which is what makes the legs look intentional rather than flush-stuck-on. Glue and 2-1/2″ pocket screws again.
Build the seat frame and back
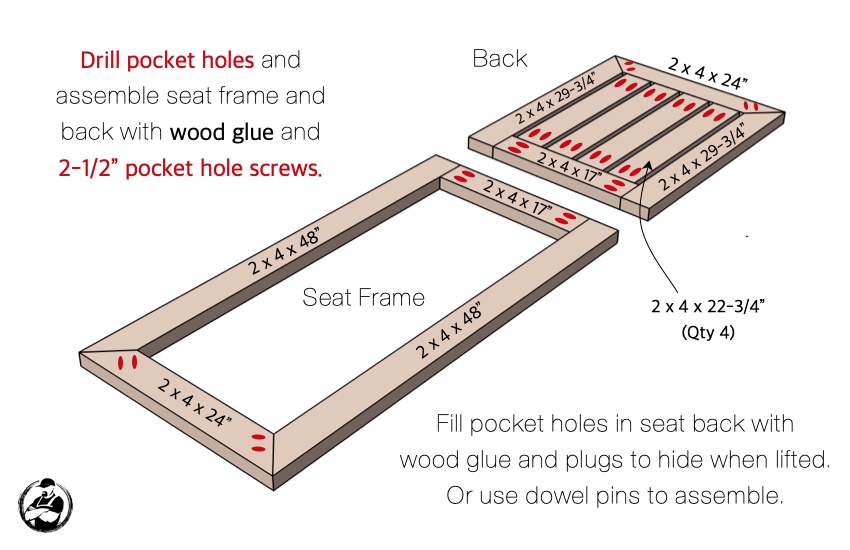
Two separate rectangles. The seat frame is two 2×4 x 48″ sides with 2×4 x 24″ and 2×4 x 17″ ends. The back is 2×4 x 29-3/4″ sides with a 24″ end, four 22-3/4″ internal pieces, and a 17″ rail. Fill the pocket holes on the back frame with glue and plugs, or use dowel pins instead, because those holes end up facing the sky every time somebody raises the backrest.
Attach the seat frame
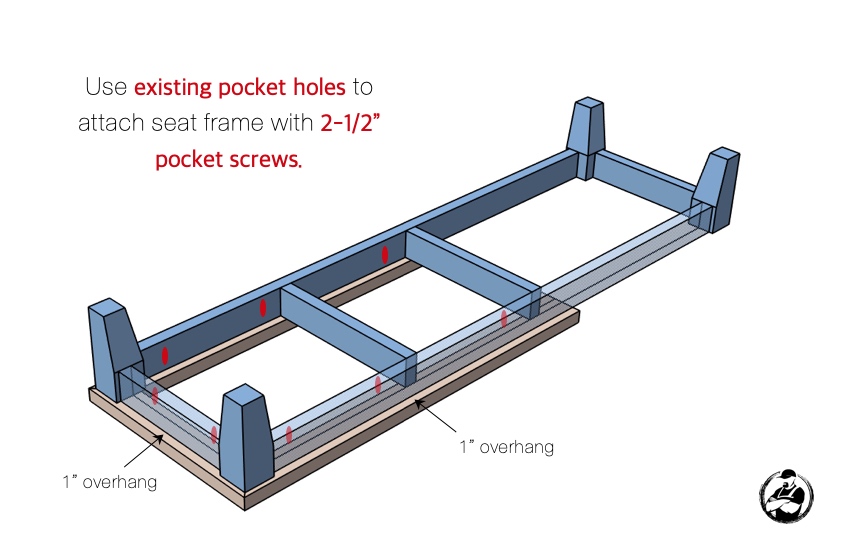
Drop the seat frame onto the base using the pocket holes you already drilled, 2-1/2″ pocket screws, 1″ of overhang on each side. Leave the seat slats off for now. Painting a chair with the slats installed means brushing into 40 inches of 5/8″ gaps, and you will regret it about six minutes in.
Cut and install the curved supports
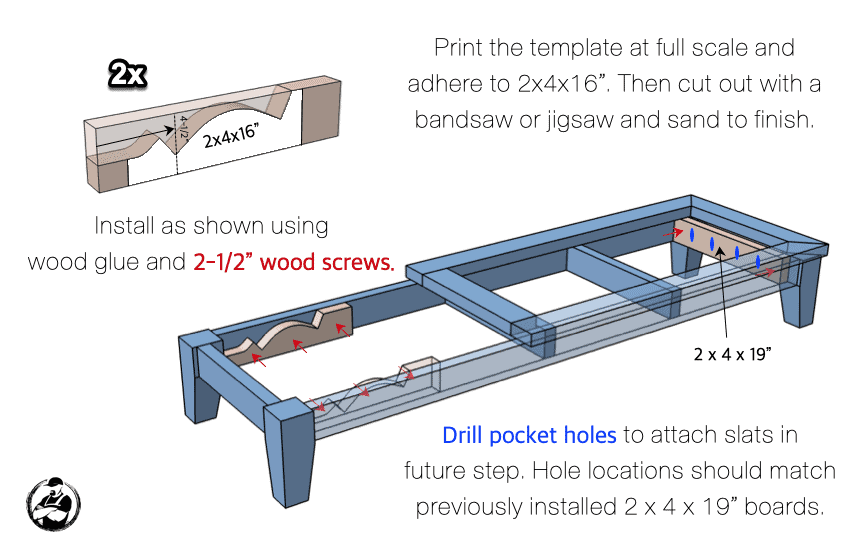
Print the free template at full scale, spray-adhere it to a 2×4 x 16″, and cut the curve on a bandsaw or jigsaw. Two of them, installed with glue and 2-1/2″ wood screws. The curve is the backrest ramp, so cut both from the same template rather than eyeballing the second one. Drill the slat pocket holes now, matching the positions on the 2×4 x 19″ boards from step 2.
Drill the support-arm holes
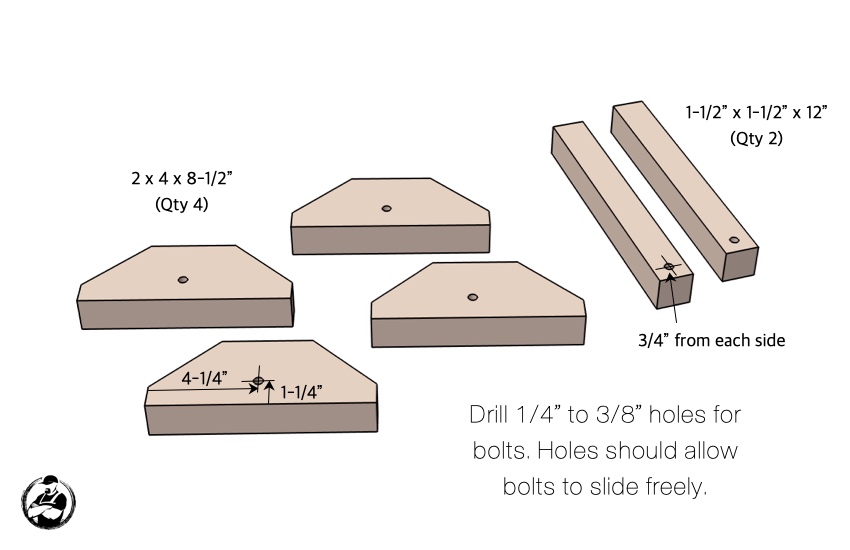
Four 2×4 x 8-1/2″ support blocks, each with a hole 4-1/4″ in and 1-1/4″ up, plus two 1-1/2″ x 1-1/2″ x 12″ arms drilled 3/4″ from each side. Drill 1/4″ to 3/8″ so the bolts slide freely. Tight holes here are the difference between a backrest that swings and one you have to wrestle with two hands.
Attach the supports to the back
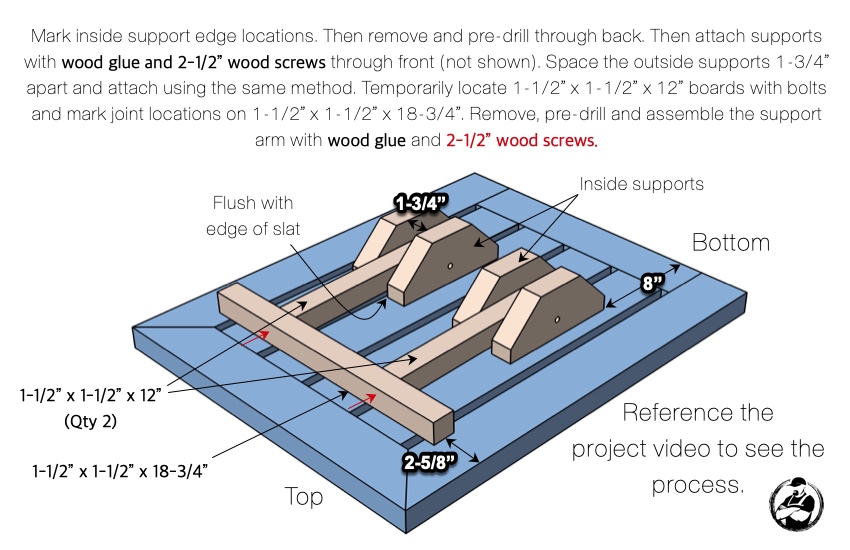
Mark the inside support locations, remove them, pre-drill through the back, then attach with glue and 2-1/2″ wood screws from the front. Space the outside supports 1-3/4″ apart. Temporarily bolt the 12″ boards in place to mark where they join the 18-3/4″ arm, then remove, pre-drill, and assemble. Dry-fit this one before glue. It is the only assembly on the build where geometry, not measurement, sets the position.
Prep and paint
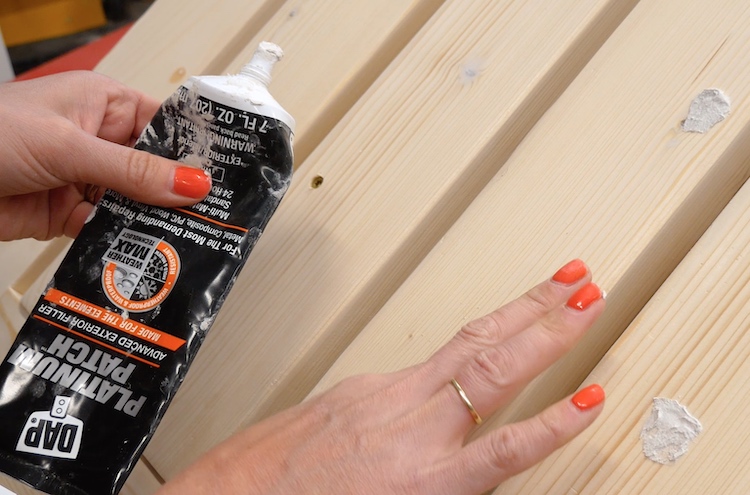
Fill every imperfection first: DAP Platinum Patch if you are painting (it is rated for exterior), Premium Wood Filler if you are staining. Prime bare wood, always. Ours is Behr exterior in Gladiator Gray, satin. This is the step that decides whether the chair looks built or bought, and it is a lot easier with the slats still off.
Install the seat slats
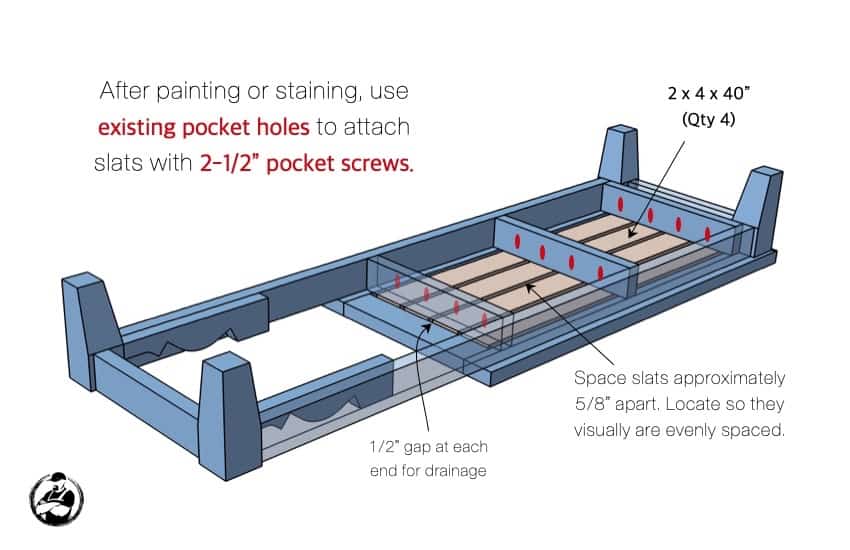
Four 2×4 x 40″ slats into the pocket holes you drilled back in steps 2 and 6, 2-1/2″ pocket screws, roughly 5/8″ apart. Leave a 1/2″ gap at each end for drainage. Space them by eye for even appearance rather than by tape measure, because the frame is what it is and the eye notices the difference.
Install the back
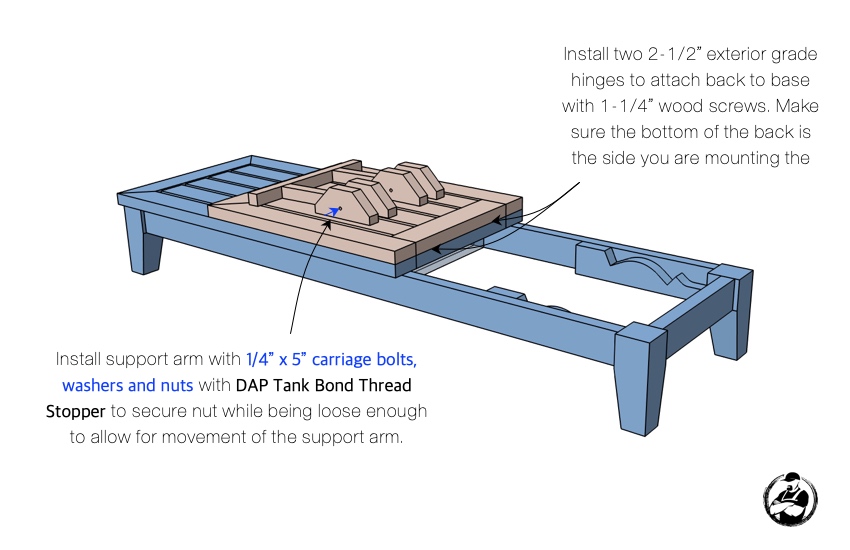
Two 2-1/2″ exterior-grade hinges attach the back to the base with 1-1/4″ wood screws. Check which face of the back is the mounting side before you drive anything. Then hang the support arm on 1/4″ x 5″ carriage bolts with washers and nuts. Do not overtighten. Too much friction and the arm will not swing, so hand-tighten and use DAP Tank Bond Thread Stopper on the threads. It holds the nut without locking it, and you can still back it off later.
Final Result
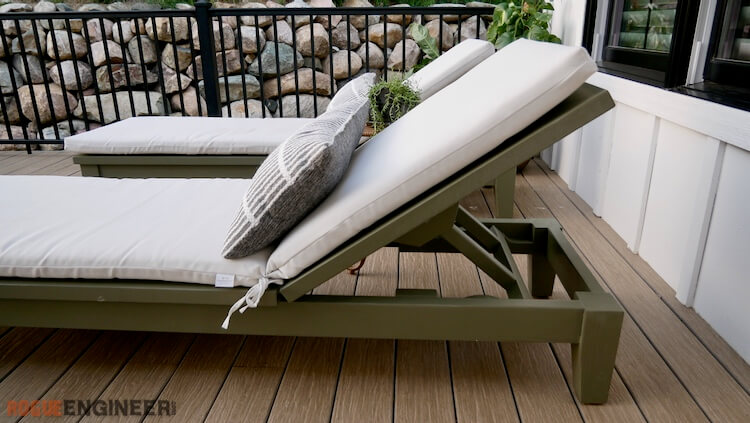
A pair of outdoor lounge chairs with a back that adjusts, built from ten boards and finished in exterior paint. Long enough to actually lie down on, light enough to move solo, and cheap enough that building two never felt like a decision.

FAQ
What is the best material for outdoor lounge chairs?
Cedar if you want to skip the finish schedule and let it gray, Douglas fir if you are painting anyway and want to save half the lumber cost. We built ours in fir and painted it, which is the right call when the design has this many flat surfaces to fill and prime. Avoid untreated whitewood or spruce. It will cup on you inside a season.
How can I make an easy DIY chair?
Pocket holes and off-the-shelf 2x4s. Nearly every joint on this lounger is glue plus a 2-1/2″ pocket screw, which means no mortises, no dowels, and no clamps holding a joint square while you pray. The only shaped part is the curved backrest support, and there is a free full-scale template for it so you are tracing, not designing.
How do you make homemade patio furniture?
Start with something long and simple rather than small and fussy. A lounger, a bench, a table: they are all a base, a top, and fasteners you drive from underneath. Buy exterior-rated screws, glue every joint, gap your slats for drainage. Those three habits are most of the difference between furniture that lasts ten years outside and furniture that lasts two.
What are the best outdoor lounge chairs?
Honest answer: the ones sized to your body and your deck. Retail loungers are built to ship flat, which is why so many are short and shallow. This one is 78″ x 24″ with a 48″ seat because that is what fits a person who wants to fall asleep out there. If you want a sit-up chair instead, build the [Adirondack](https://rogueengineer.com/easy-diy-modern-adirondack-chair-plans/).
How does the adjustable back work?
The back is hinged at the base with two exterior hinges and propped by a support arm that pivots on a 1/4″ x 5″ carriage bolt. The shaped blocks on the underside catch the arm at different points, which is what moves the back between flat and upright. The whole mechanism is four blocks, two arms, and two bolts. The only thing that breaks it is overtightening the nut, which turns a free-swinging arm into one you have to fight.
Your Move
Buy the ten boards, print the template at full scale, and cut everything on Saturday morning. Build both chairs at once. The setup is the slow part and doing the second one costs you maybe two extra hours. Then leave the slats off until the paint dries, which is the one instruction on this build that people skip and then email me about.
The first cut is the hardest. After that, the build practically does itself.
Be safe and happy building, Jamison
Where do i find the template
There’s a “download” link at the very top of the article, after the first paragraph and disclosure. I agree it’s not that obvious. A button would be better, and having an additional button at the end of the article, after I know this is a project I want to do, would be an improvement.And apparently this “free content” costs $5 to get the plans. 🙁
The free template download is now available in step 6. Sorry I forgot to attach that initially.
Hey Jamison, I don’t see it there
Sorry about that. I completely forgot to upload the free template. It is now available in step 6.
I downloaded the plans but I’m confused a bit. In the cut list the 4 x 4 legs show a length of 9 1/2”. In the instructions for the taper, it shows the legs at 11” in length. Does it matter?