

How to Build an Attached Deck
Quick answer: An attached deck ties into the house through a ledger board fastened with structural timber screws, then stands on concrete footings poured below the frost line — 6×6 posts, a doubled 2×10 beam, 2×8 joists on hangers, and pressure-treated southern yellow pine decking. Every step below has a framing diagram and build photos, and the connector schedule follows the American Wood Council’s deck construction guide. Built and documented by Jamison Rantz.
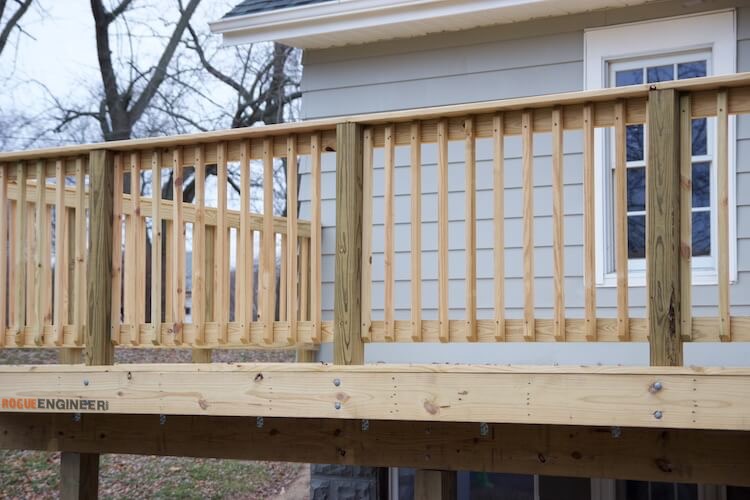
If you’ve been following along then you probably noticed that Jamie and I purchased a house to flip a while back. It needed a lot of help, and while it was an okay size house, it lacked entertaining area. So we replaced the dining room windows with a door wall leading onto a new deck. Lucky for me, I have good friends over at Simpson Strong-Tie® who pointed me to the right deck building guides and connectors — and sent the Quik Drive® PROSDD multi-purpose combo system (with the Makita 3500 RPM screwdriver motor), which you have to see in action. Game. Changer.
This deck needed to add a lot of entertaining area on a flip-house budget, so we built it from pressure-treated southern yellow pine (SYP) — inexpensive, strong, durable, and local. Not attaching to a house? A floating deck skips the ledger, the frost footings, and (in many areas) the permit.
If you take this on, research your local deck codes first. The steps below are the order I built my deck, not the end-all guide — every deck is different and codes change. The American Wood Council’s Deck Construction Guide is what most local authorities base their codes on: very detailed, covers most configurations, and worth reading before you dig.
Size your deck
Every deck is a different footprint, so instead of guessing at lumber, punch yours in: the calculator spits out the ledger, footing and post schedule, joists and hangers, decking boards, and the guardrail parts — using the exact spacing rules from this build (and the floating version, if you flip the toggle).
Deck Material Calculator
Punch in your deck size and get the full framing spec: beams, posts, joists, deck blocks or footings, decking boards, fasteners, and a complete shopping list — for a floating or attached build.
Your deck
Your deck spec
| Item | Spec | Amount |
|---|
Your deck, to scale
📩 Email me my deck spec
Get this exact framing spec and shopping list for your 20 ft × 12 ft deck sent to your inbox, with the build guide — free.
Deck sizing FAQ
Floating or attached — which should I pick?
Floating skips the ledger, the frost footings, and (in many areas) the permit — but keep it under ~30″ above grade. Attached is a structural addition: expect a permit, footing inspections, and a code guardrail. The calculator specs both from the matching build guide.
Why does it default to 16″ joist spacing?
Nearly every composite decking product requires 16″ OC or tighter. Wood decking allows 24″, but framing at 16″ now is a few boards and hangers — cheap insurance if you ever want a composite re-deck without sistering in joists.
Where do the span and footing-spacing numbers come from?
The attached-deck math follows the AWC Prescriptive Residential Wood Deck Construction Guide (DCA 6): Table 2 joist spans for pressure-treated southern pine 2×8s, cantilever limited to span/4, and Table 3A beam spans setting the footing spacing. It’s the document most local codes are based on — but your inspector always has the final word.
Affiliate links above may earn this site a small commission at no extra cost to you. Tool by Rogue Engineer — measurements match our deck build guides.
Tools & materials
Dimensions
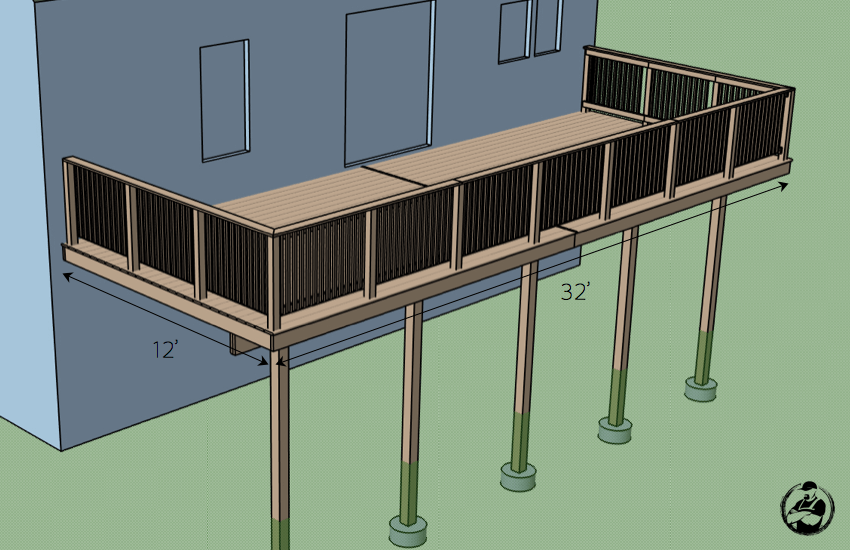
The finished deck is 12 feet deep by 32 feet long — a full-width entertaining platform off the back of the house, wrapped in a 36″ guardrail. At 12 ft deep, our joist span worked out to 10 ft, which is what drove the 2×8 joist size and the footing layout below.
How I built an attached deck
Step 1: The footings
Before anything touches dirt: zoning compliance from the zoning department, then a building permit from the building department. Attached decks get inspected, and the first inspection happens with open holes — so dig, then wait for approval before pouring.
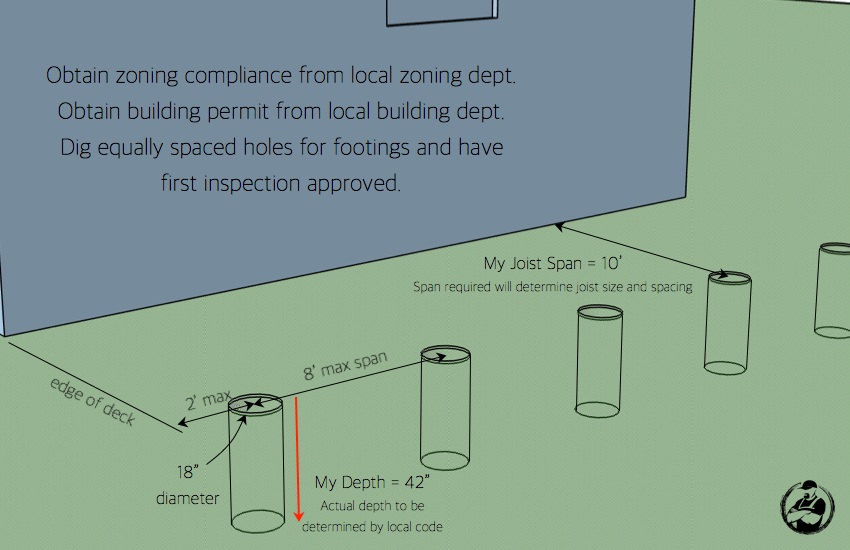
Our footing holes were 18″ in diameter and 42″ deep — but that depth is our local frost requirement, so let your code set yours. Layout rules from the plan: footings equally spaced, no more than 8 ft apart, with the outside footings no more than 2 ft from the edge of the deck. Our joist span came out at 10 ft — the span you need is what determines your joist size and spacing, so nail this number down before buying lumber.

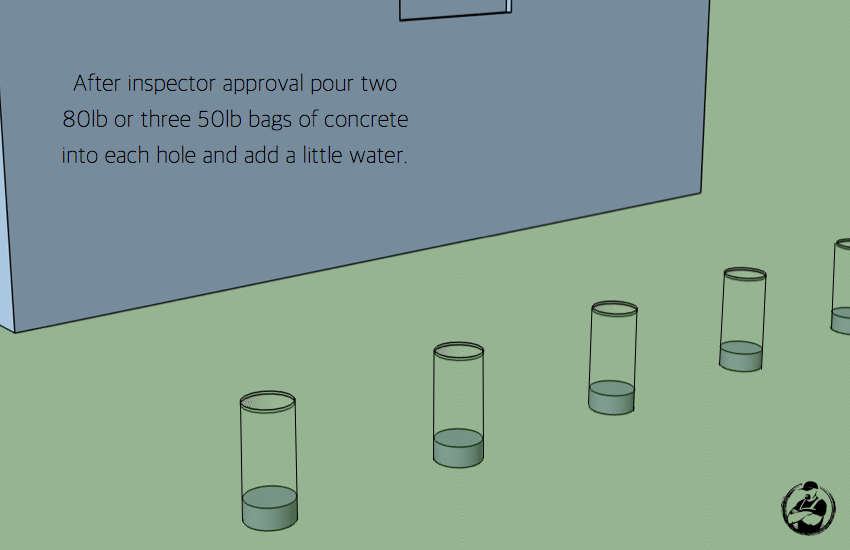
After the inspector signed off on the holes, each footing got two 80 lb (or three 50 lb) bags of concrete mix poured dry into the hole with a little water added. At this scale it’s faster than wheelbarrow-mixing eleven batches, and plenty strong once cured.
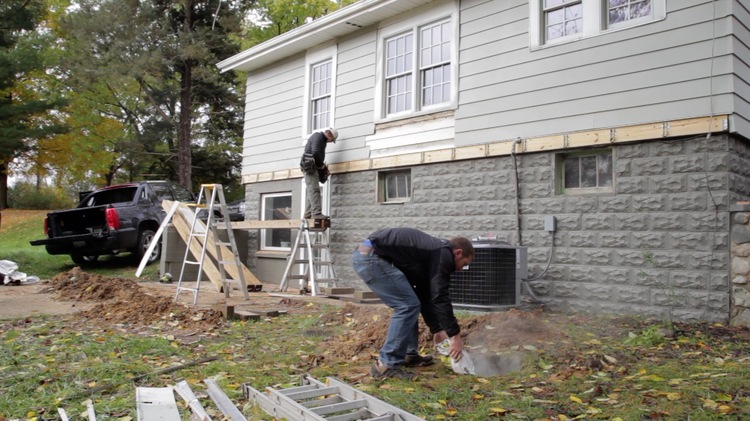
Step 2: Setting the ledger & posts
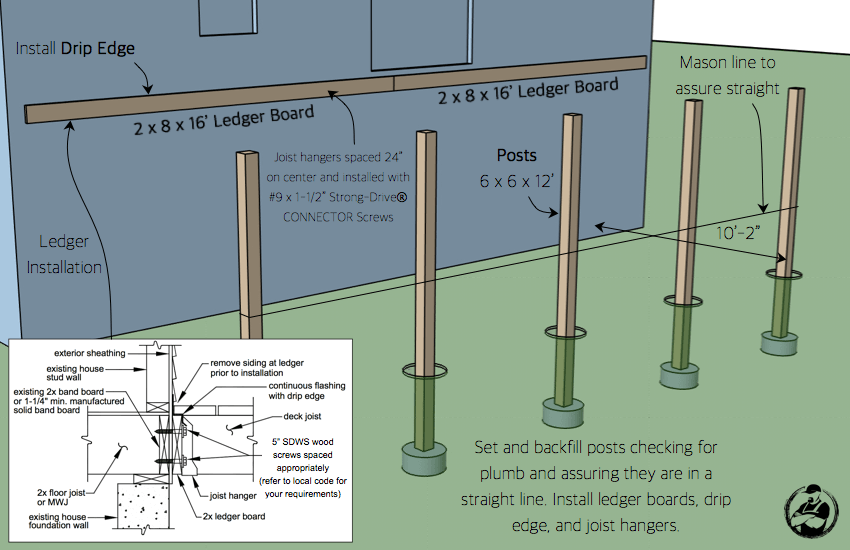
The ledger is two 2x8x16 boards fastened through the sheathing into the house band board with Simpson SDWS timber screws (5″ in our case — length depends on your band board; spacing per your local code). The detail drawing above is the part most DIY decks get wrong: remove the siding at the ledger first, and install continuous flashing with a drip edge over it so water can never sit behind the board. Your band board needs to be solid 2x material (or 1-1/4″ minimum manufactured band board) — if it’s not, stop and talk to your inspector.
With the ledger up, we laid out joist hangers 24″ on center and installed them with #9 x 1-1/2″ Strong-Drive connector screws — hanger nails’ stubbier, structural cousin. Then the 6x6x12 posts went into the footing holes: backfilled, checked for plumb, and lined up dead straight with a mason line. Per the footing layout in step 1, the posts sit 8 ft apart max along the beam line, just over 10 ft out from the house.


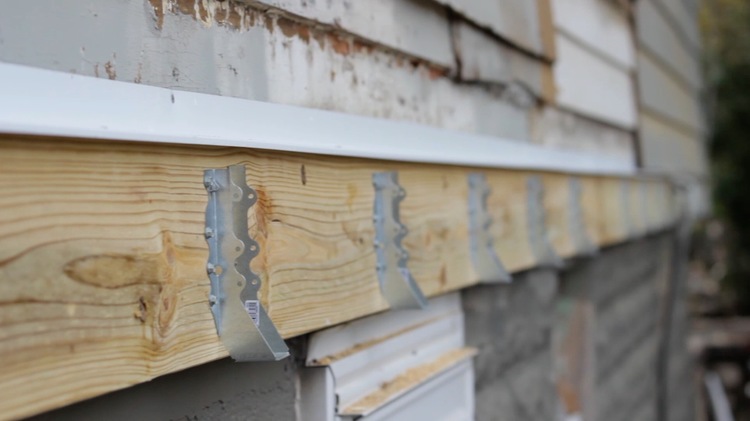
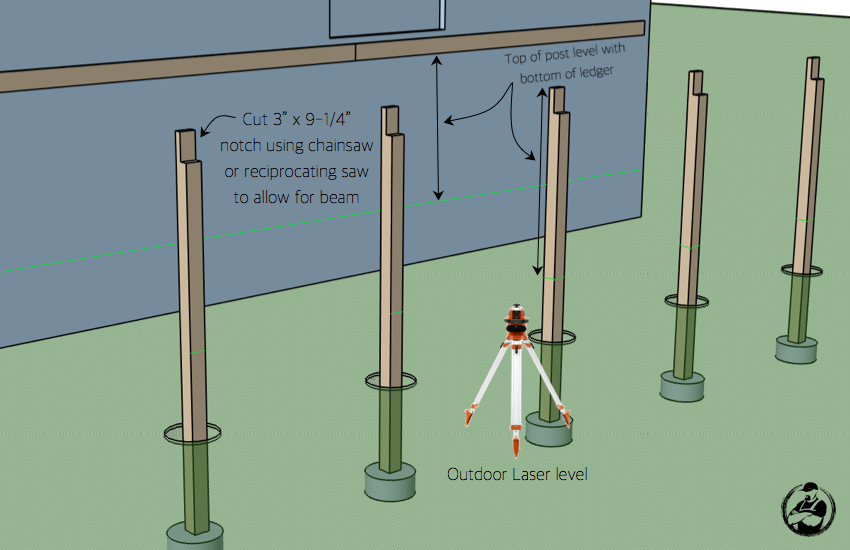
Here’s the trick that makes the beam bombproof: mark each post level with the bottom of the ledger (an outdoor laser level makes this a one-person job), then cut a 3″ x 9-1/4″ notch in the top of each post with a chainsaw or reciprocating saw. The beam sits IN the post on a solid wood shelf, not beside it on bolts alone.


Step 3: Setting the beam
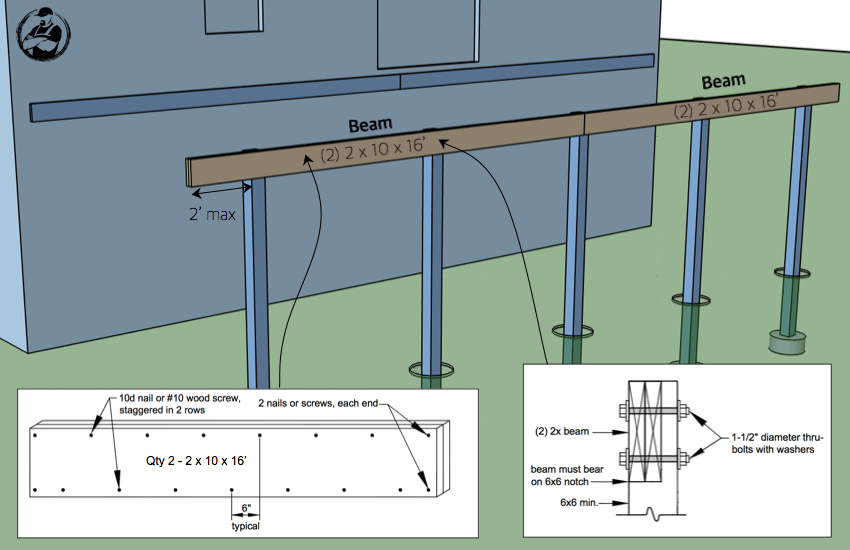
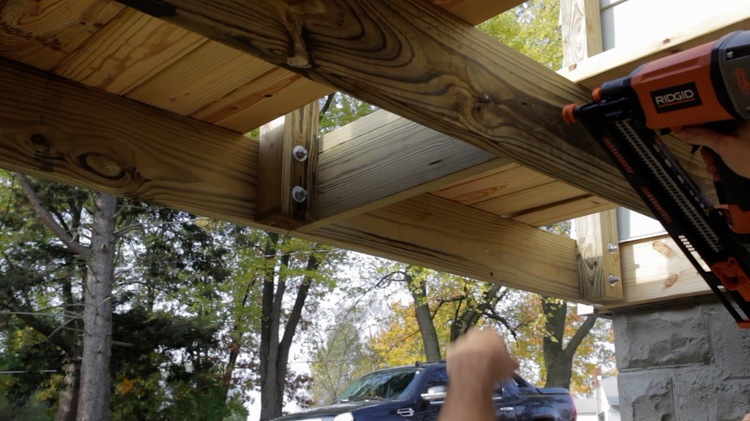
The beam is two 2x10x16s laminated together — 10d nails or #10 wood screws staggered in two rows about every 6″, with two fasteners at each end. Each beam segment drops into the post notches so it bears on wood, then gets locked to the post with 1/2″ galvanized through-bolts and washers. Keep any beam overhang past the last post to 2 ft max.


Step 4: Installing the joists
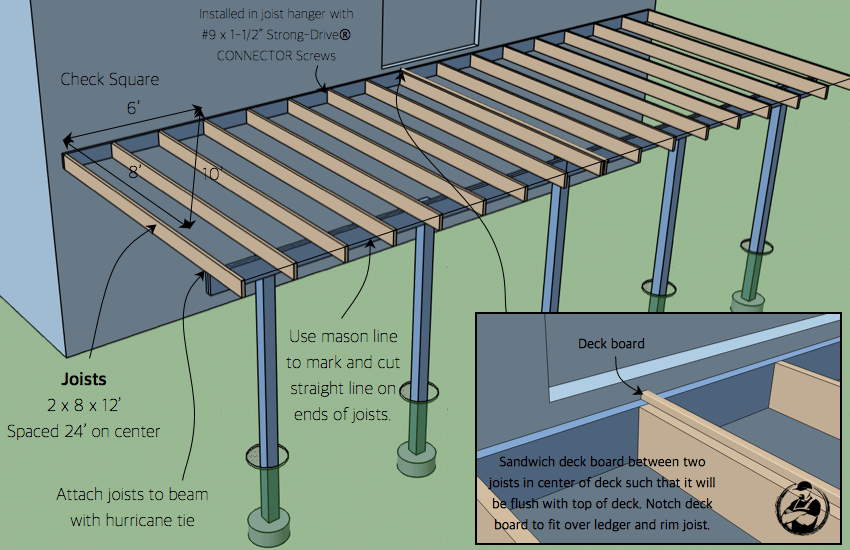
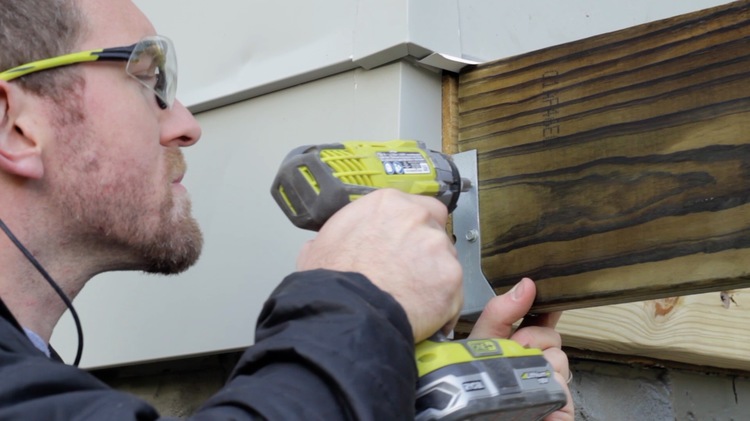
The 2x8x12 joists drop into the hangers at the ledger (fastened with the same #9 x 1-1/2″ connector screws) and tie to the beam with a Simpson H2.5AZ hurricane tie at every crossing. Check the frame for square early with a 6-8-10 triangle — measure 6 ft down the ledger, 8 ft down an end joist, and the diagonal should be exactly 10 ft. We ran the joists long, then snapped a mason line and cut all the ends in one straight pass.
⚠ Builder’s note from Jamison, years later: I spaced my joists 24″ on center, which is fine for 5/4 wood decking on this span — but I wish I had gone 16″ on center. Nearly every composite decking product requires 16″ OC (or tighter), so my spacing locked this deck out of a future composite re-deck without sistering in extra joists. The lumber difference is a few boards and a few more hangers — cheap insurance. If there’s any chance you ever want composite, frame at 16″ on center now.
One more 32-ft-deck detail: since deck boards come in 16 ft lengths, we sandwiched a deck board vertically between doubled joists at the center of the deck, flush with the joist tops and notched over the ledger and rim joist. It reads as a clean divider strip in the finished decking and gives both 16 ft runs of boards solid bearing at the seam.


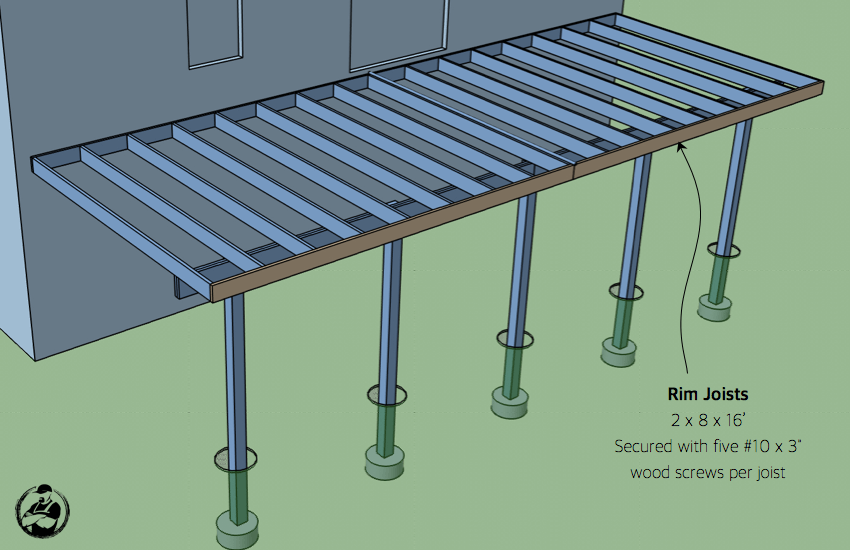
The frame closes with 2x8x16 rim joists across the joist ends, secured with five #10 x 3″ wood screws into each joist.
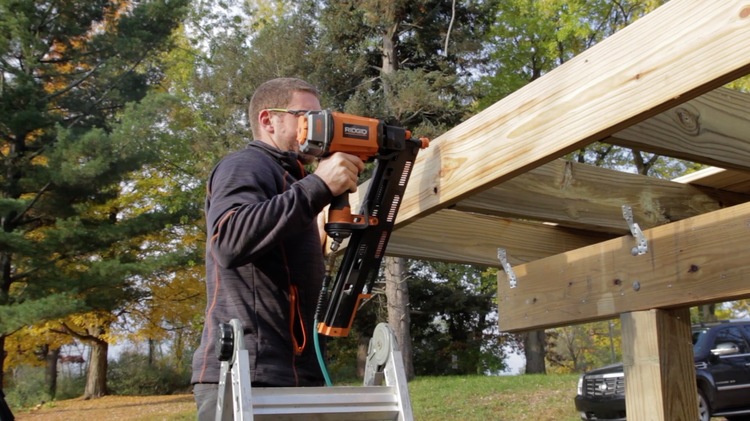
Step 5: Guard rail posts
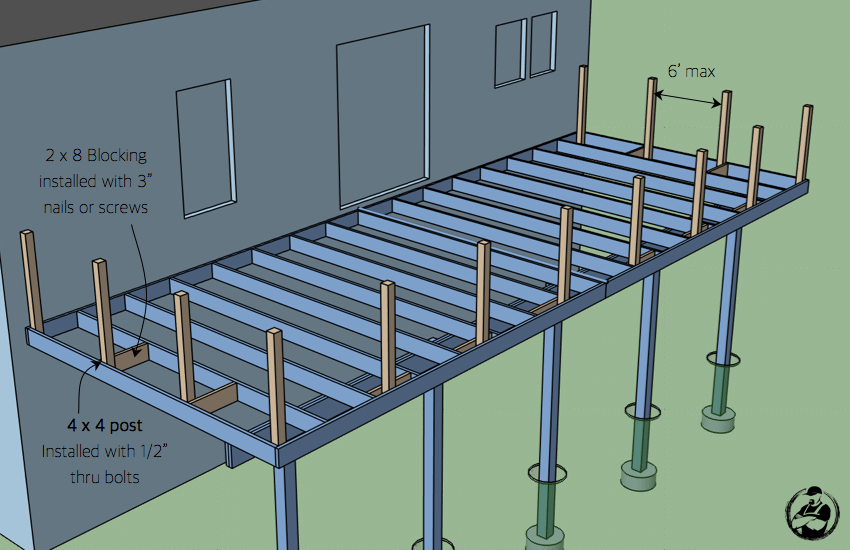
The 4×4 guard rail posts bolt to the frame with 1/2″ through-bolts — never lag screws or nails for a rail that has to stop a falling person — spaced 6 ft max. Where a post lands between joists, we added 2×8 blocking (3″ nails or screws) so every post clamps to solid framing on both faces.


Step 6: Laying the decking
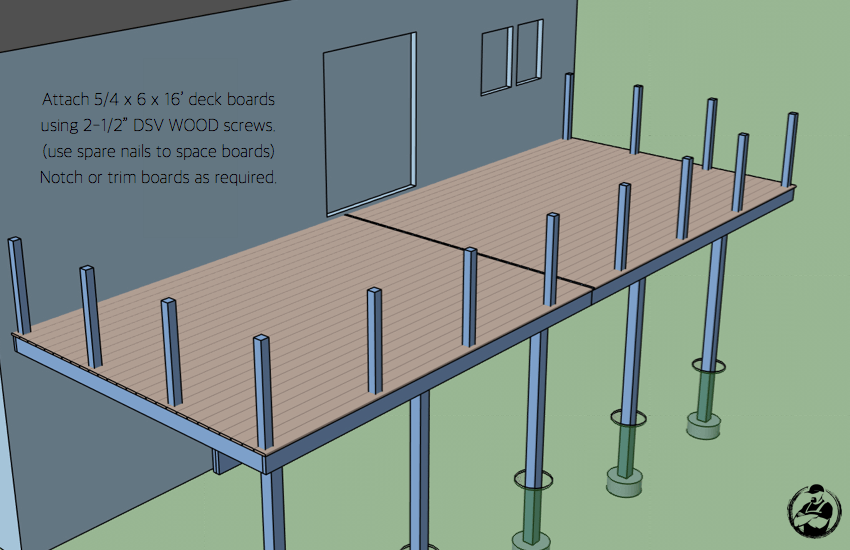
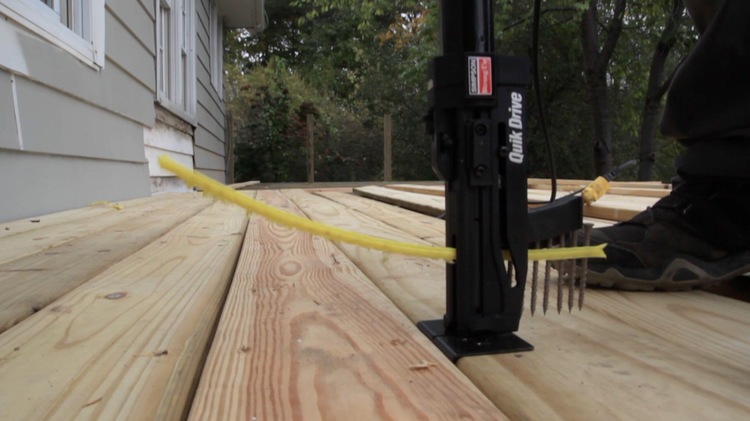
Decking is 5/4x6x16 pressure-treated boards fastened with 2-1/2″ Deck-Drive DSV wood screws — two per joist crossing. The plan’s spacing trick: drop a spare 8d nail between boards as a spacer as you go; wet PT lumber shrinks, so a nail’s width now becomes a proper drainage gap later. Notch and trim boards around the posts as required.
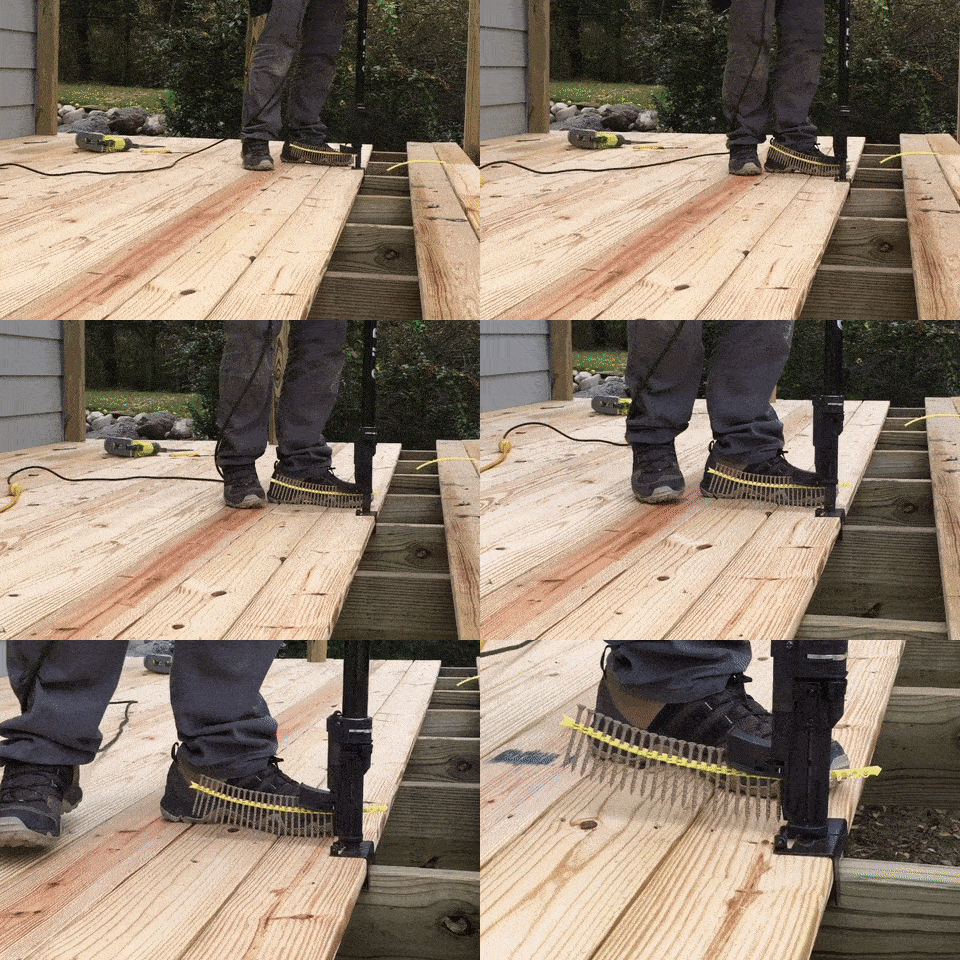
One more decking note: pressure-treated lumber needs to dry out before it takes a finish — when it’s ready, our deck staining guide covers the two-toned semi-transparent + solid method we used on the floating deck.


Step 7: Installing the guard rail
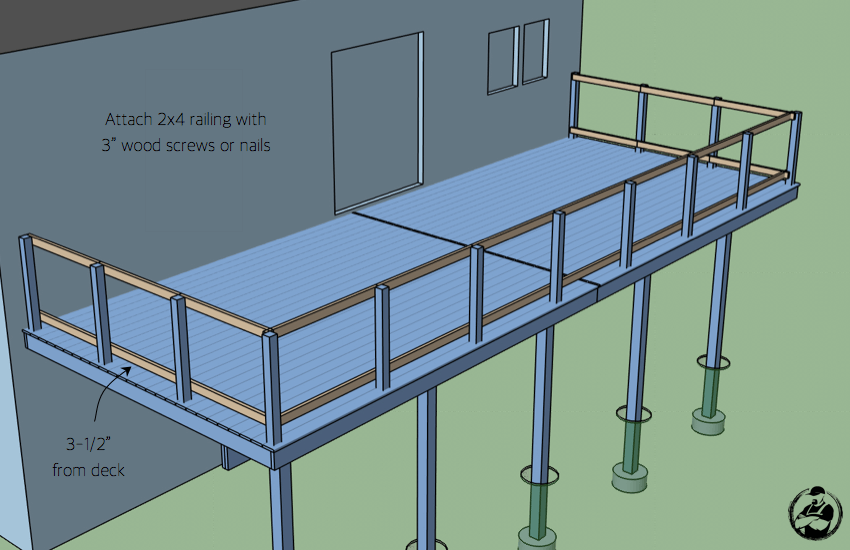
Rails are 2x4s on the flat, run between posts and attached with 3″ wood screws or nails — the bottom rail held 3-1/2″ off the deck surface (a 2×4 on edge makes a perfect spacer).


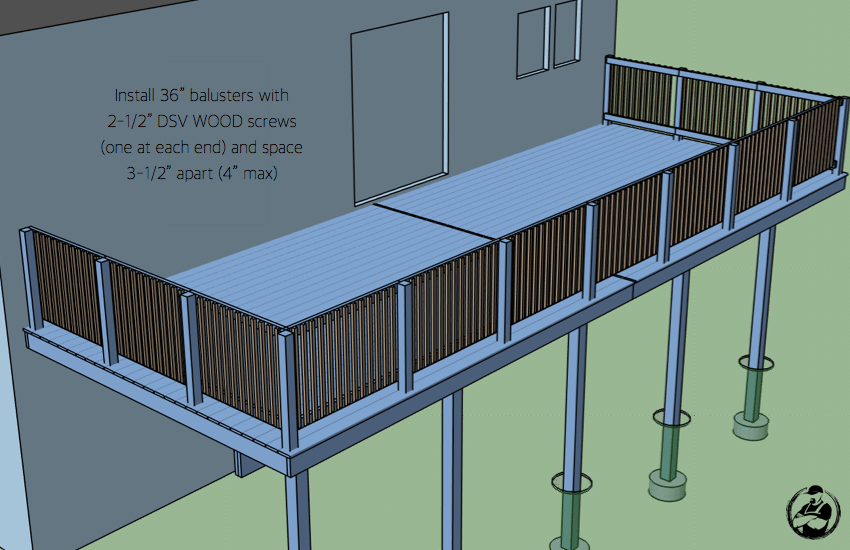
The 36″ balusters go on with a 2-1/2″ DSV screw at each end, spaced 3-1/2″ apart. Code allows a 4″ maximum gap (the “4-inch sphere” rule) — 3-1/2″ means a scrap 2×4 is your spacing jig and you never drift over the limit.


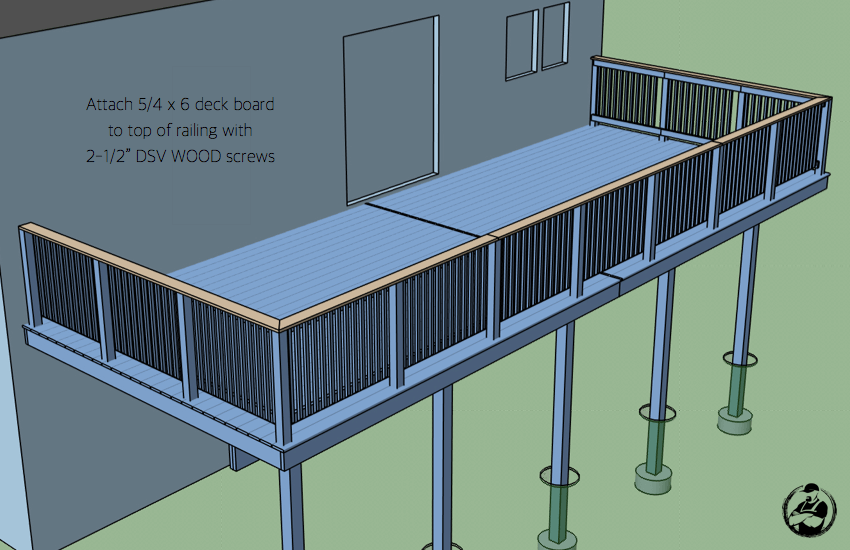
The cap that finishes it: a 5/4×6 deck board laid flat on top of the railing, screwed down with 2-1/2″ DSV screws. It sheds water off the rail assembly and gives you the drink-and-elbow shelf every good deck rail owes its owners.


Attached deck questions, answered
Do I need a permit to build a deck attached to my house?
Almost always, yes. Attached decks are structural additions — expect your jurisdiction to want a permit, footing inspections, and code-compliant guardrails. The AWC Deck Construction Guide (DCA 6) linked above is what most local codes are based on, so building to it makes inspections uneventful.
How does the deck attach to the house?
Through a 2×8 ledger board fastened to the house band board with Simpson SDWS structural timber screws (length depends on your band board thickness), with the joists hanging off it in LU28 joist hangers. The ledger carries roughly half the deck, so this connection — and keeping water out of it — is everything.
How deep do deck footings need to be?
Below your local frost line, which your building department will tell you. If footings stop short, frost heave lifts the deck while the house stays put — that differential movement is exactly why our freestanding floating deck could skip poured footings but this one could not.
What size beam and joists does a deck need?
Ours used a doubled 2×10 beam on 6×6 posts with 2×8 joists at 24″ on center — sized for our 10 ft span using the AWC guide’s span tables. Look those up rather than copying any build blindly, ours included. And one hindsight tip: frame at 16″ on center even if wood decking allows 24″ — composite decking requires 16″ OC, and tighter framing now keeps that option open later.
Keep building outside
Questions? Comments?
If you have any questions, drop them in the comments below — and when your build is done, post a picture. That’s the good part.
Love following your YouTube channel. Thanks for sharing all your projects! A question on this deck build. How do you make sure the concrete beds are level at the bottom of the holes? I assume the concrete dries before setting the posts, so how do you ensure a level base?
Hi video is great, very informative. I noticed your beam has a 2’ overhang max on corner post. I’m building a second story deck as well but don’t have much head room so I’m using a flush beam. The deck is 16×16, Can I have to same max overhang with a flush beam as well?
dd