

Trestle Desk
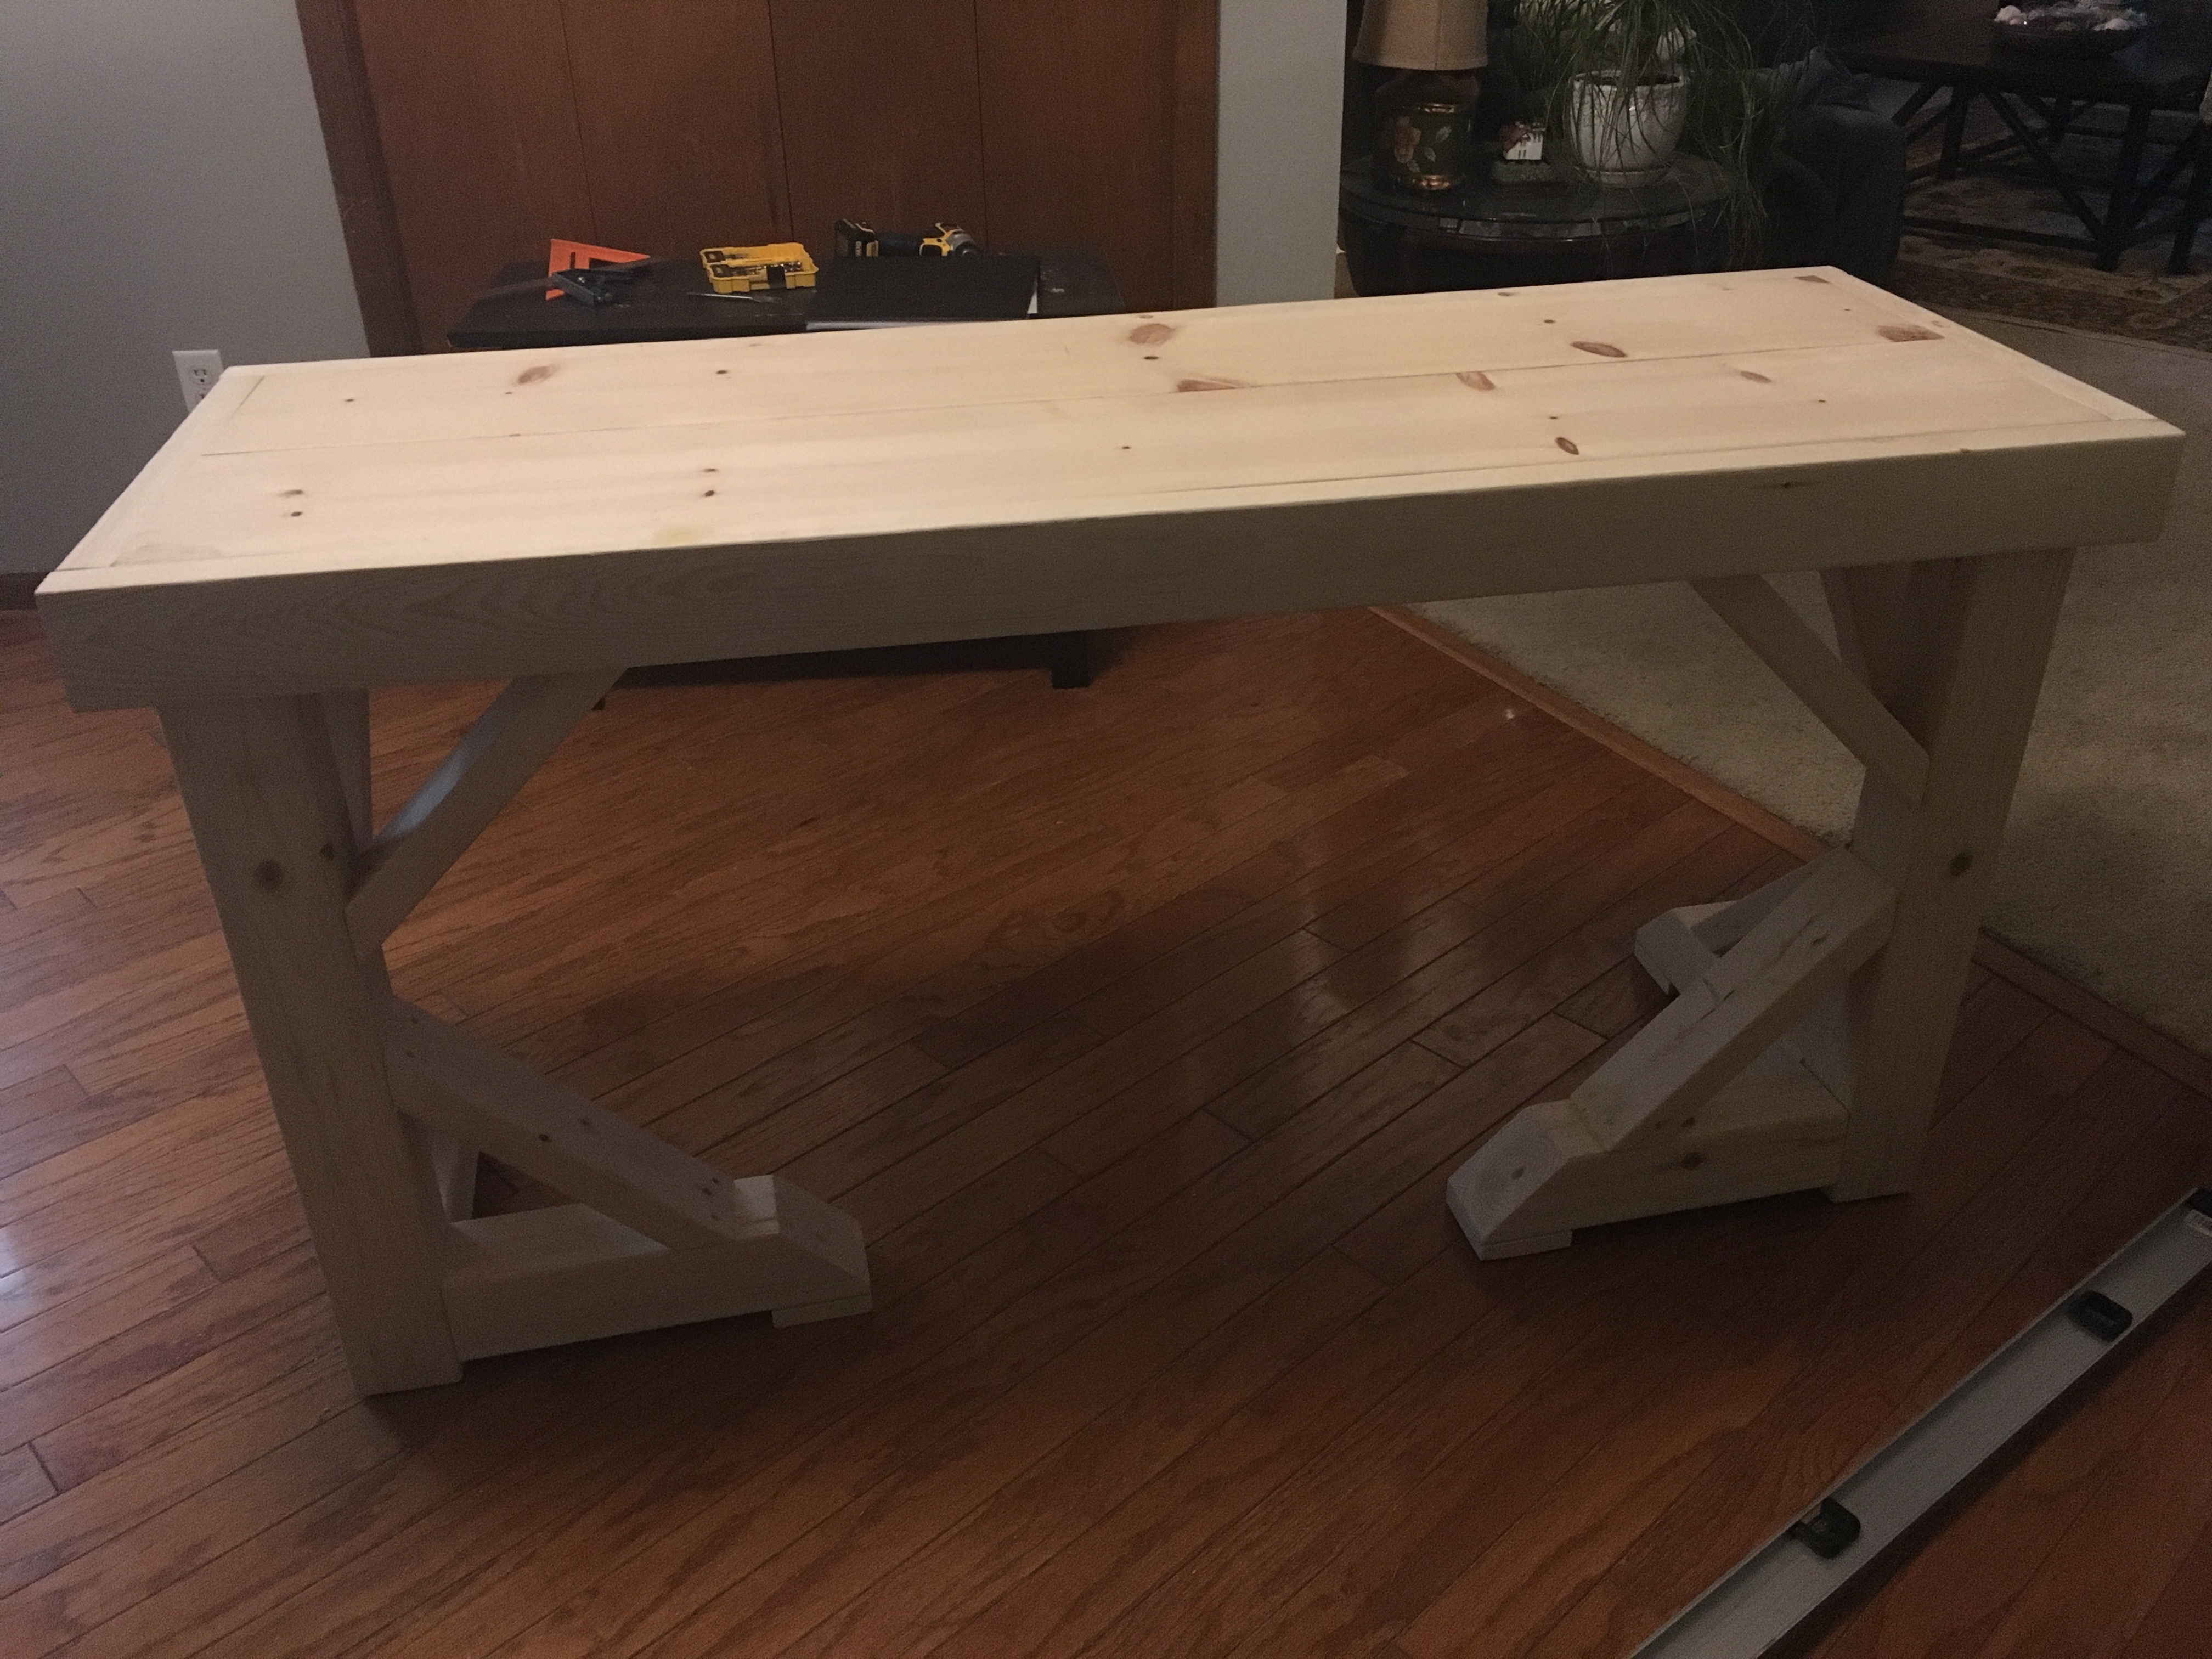
Ashley from Shanty2Chic came to me and asked if I would come up with a design for a desk for her master bedroom. She said she was tired of working from a laptop in the living room and wanted a place with some peace and quiet where she could get away from it all. She told me how much she loved her Restoration Hardware inspired dining room table and wanted the desk to resemble that. After a couple iterations I think I nailed it and it can be built for under $75. But let me know what you think. The trestle bracing on this desk is not just for looks either, it’s putting in some serious work! Make sure you go check out Ashley’s post to see photos of the build!
For sneak peeks of our upcoming projects be sure to follow me on Facebook and Instagram. Also, follow me on Pinterest to get tons of projects plans from all around the web!
Disclosure: The links provided in the “materials” and “required tools” sections are affiliate links. If you would like to support our site and help keep our content free come find out more about how we can make money with no extra cost to you.
Tools Required
Materials
- 1x 1 x 4 x 72″ Pine; Common Board
- 2x 1 x 10 x 72″ Pine; Common Board
- 5x 2 x 4 x 96″ Premium Studs
- 2x 4 x 4 x 96″ Untreated Pine
- 1-1/4″ Kreg Pocket Screws (Coarse)
- 2-1/2″ Kreg Pocket Screws (Coarse)
Dimensions
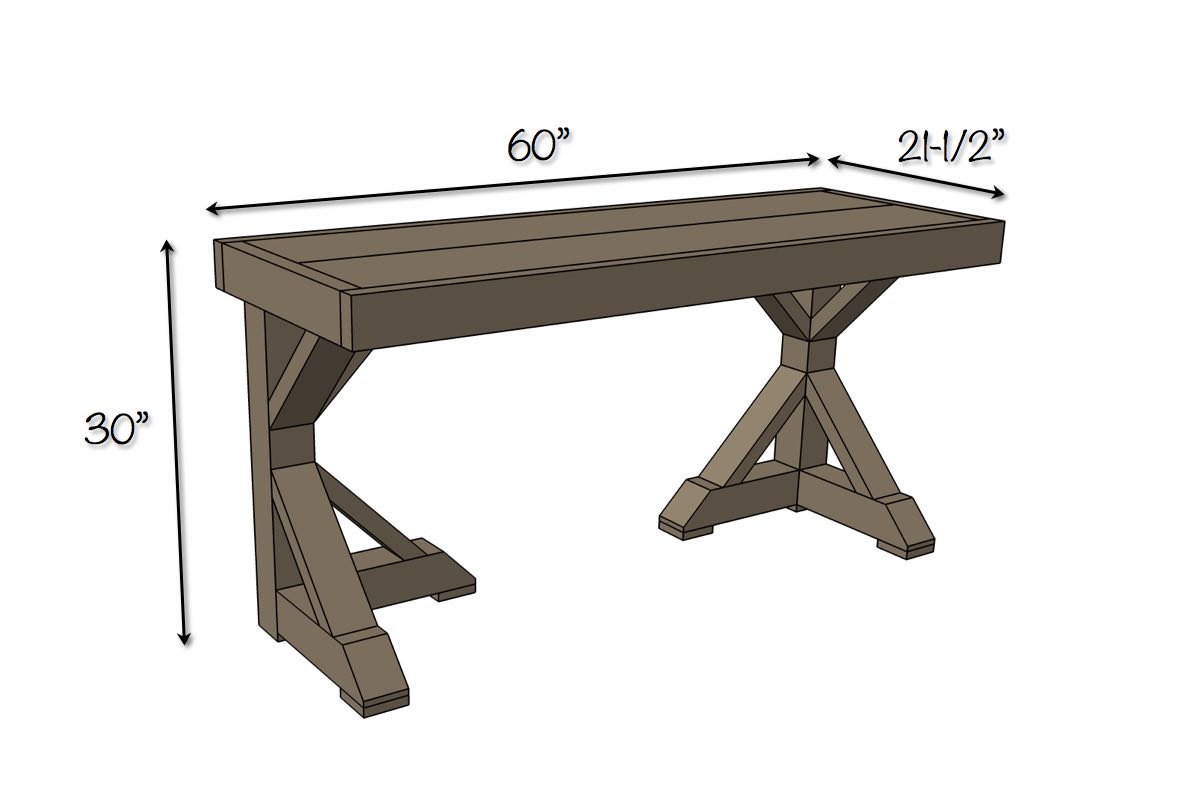
Cut List
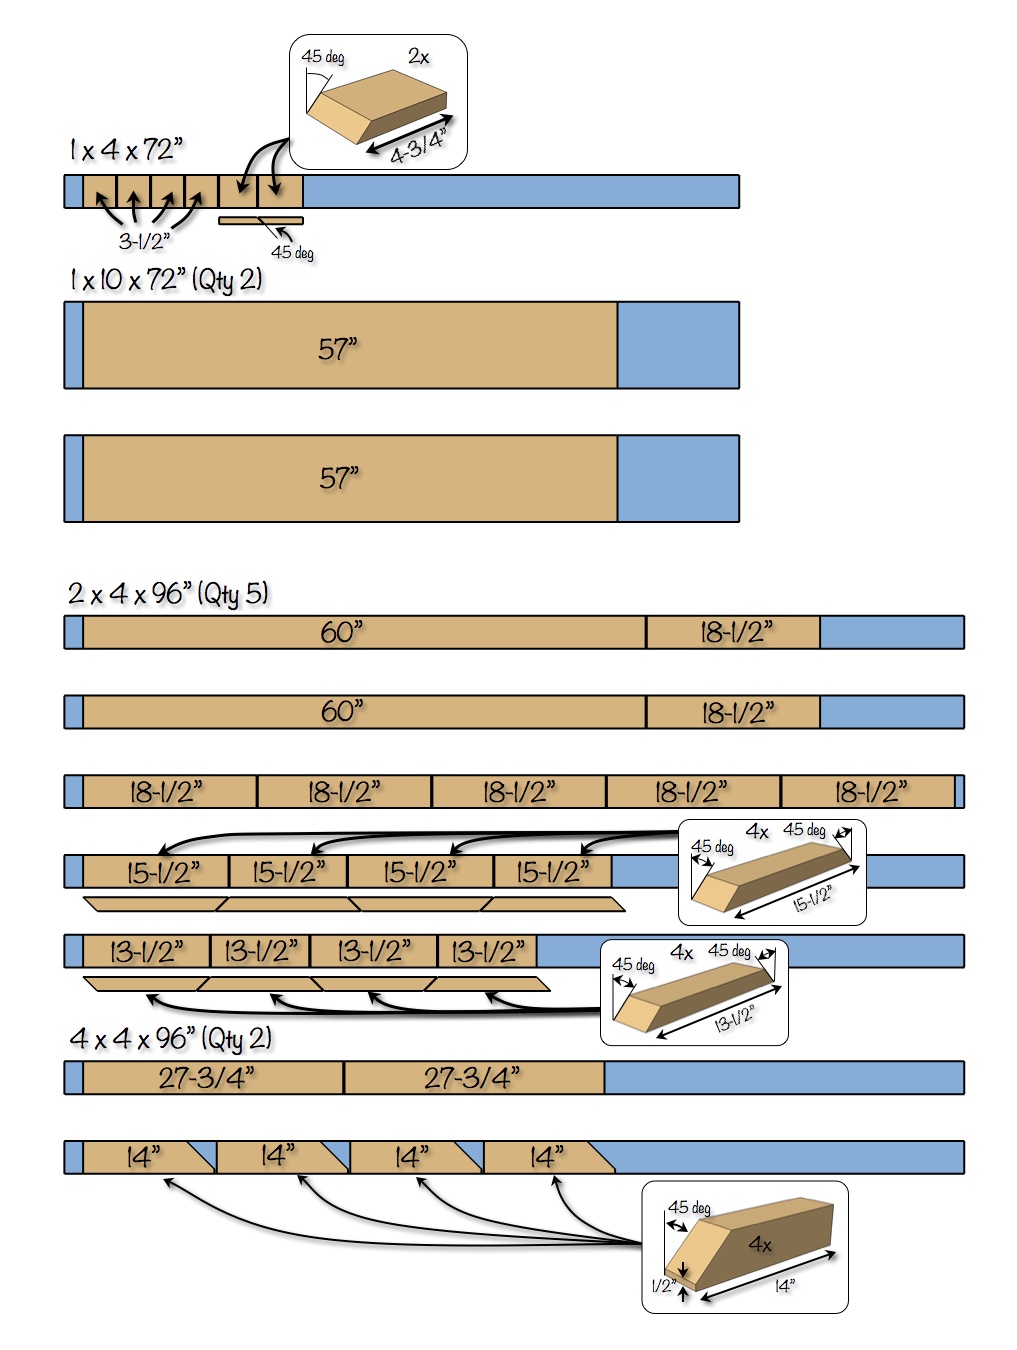
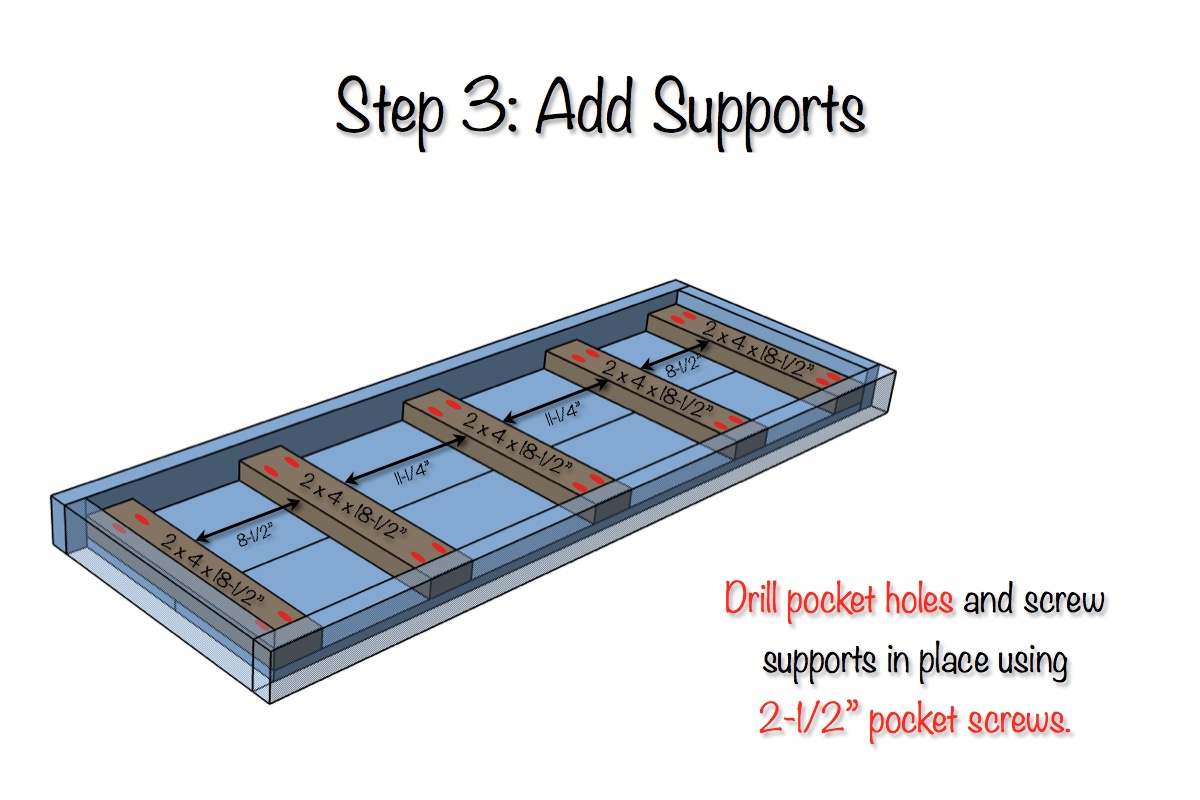
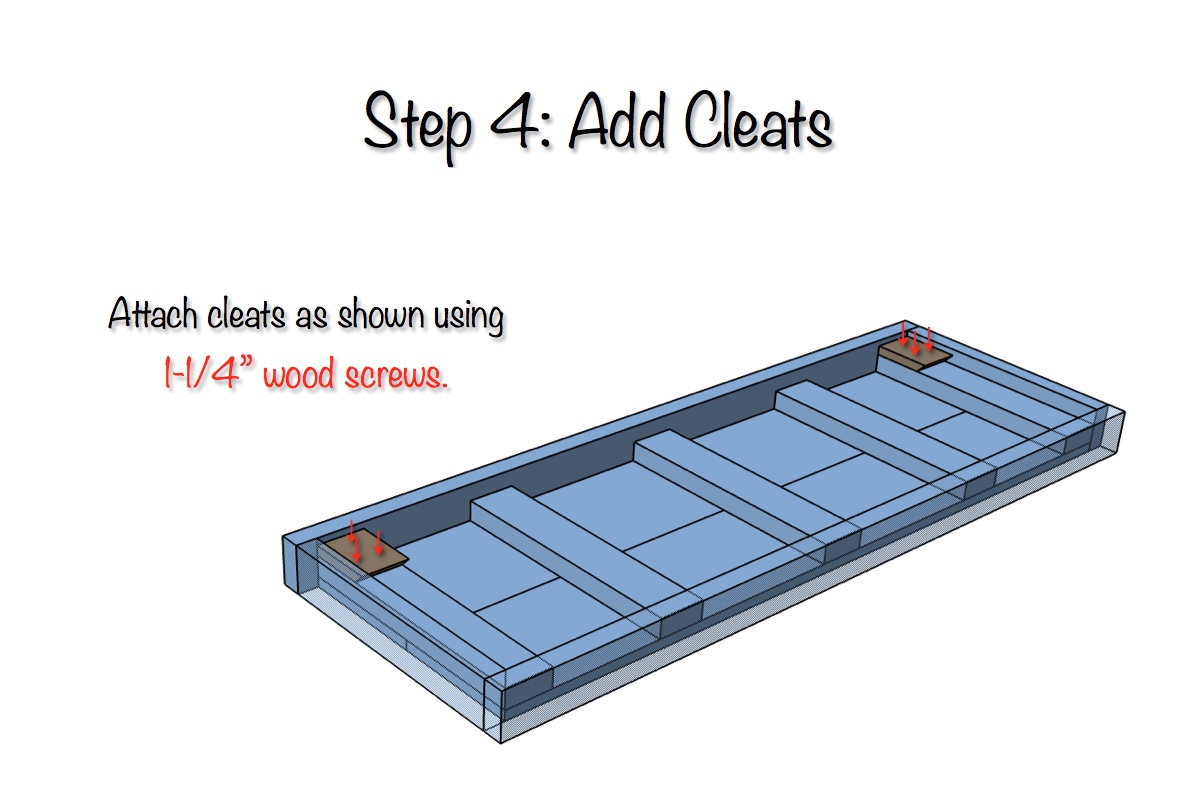
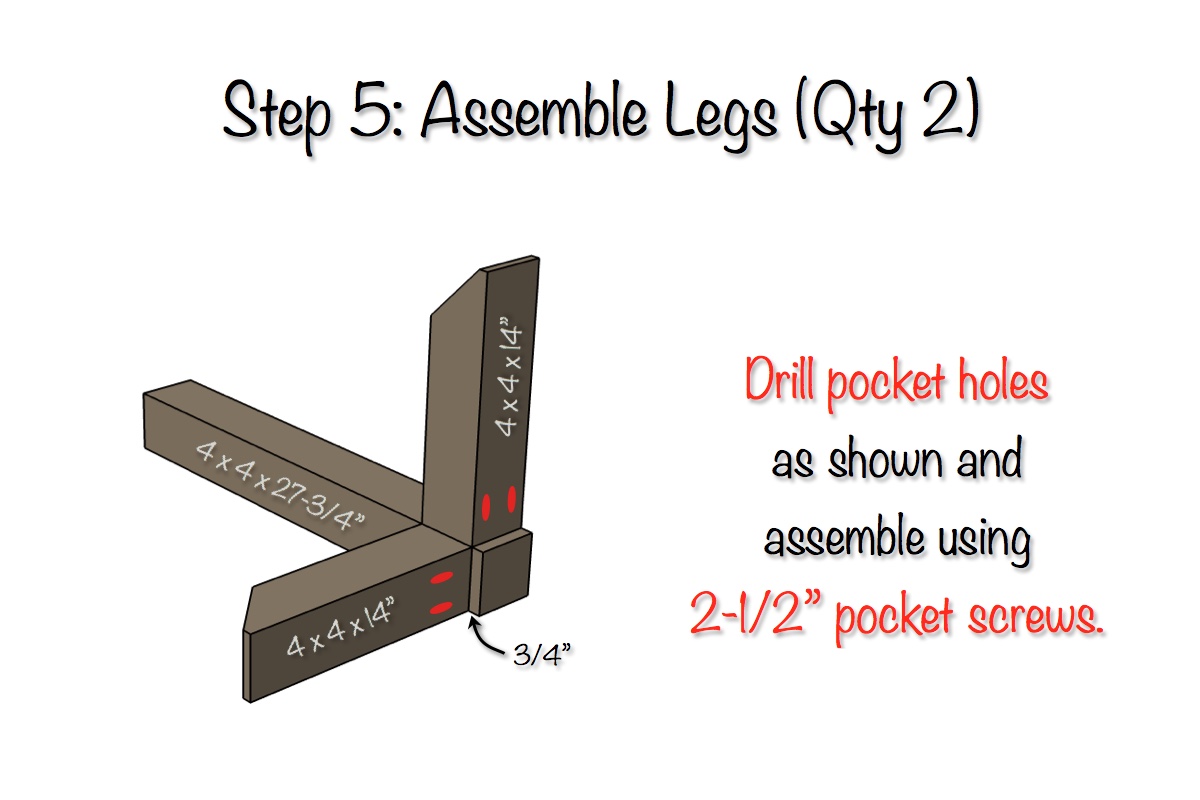
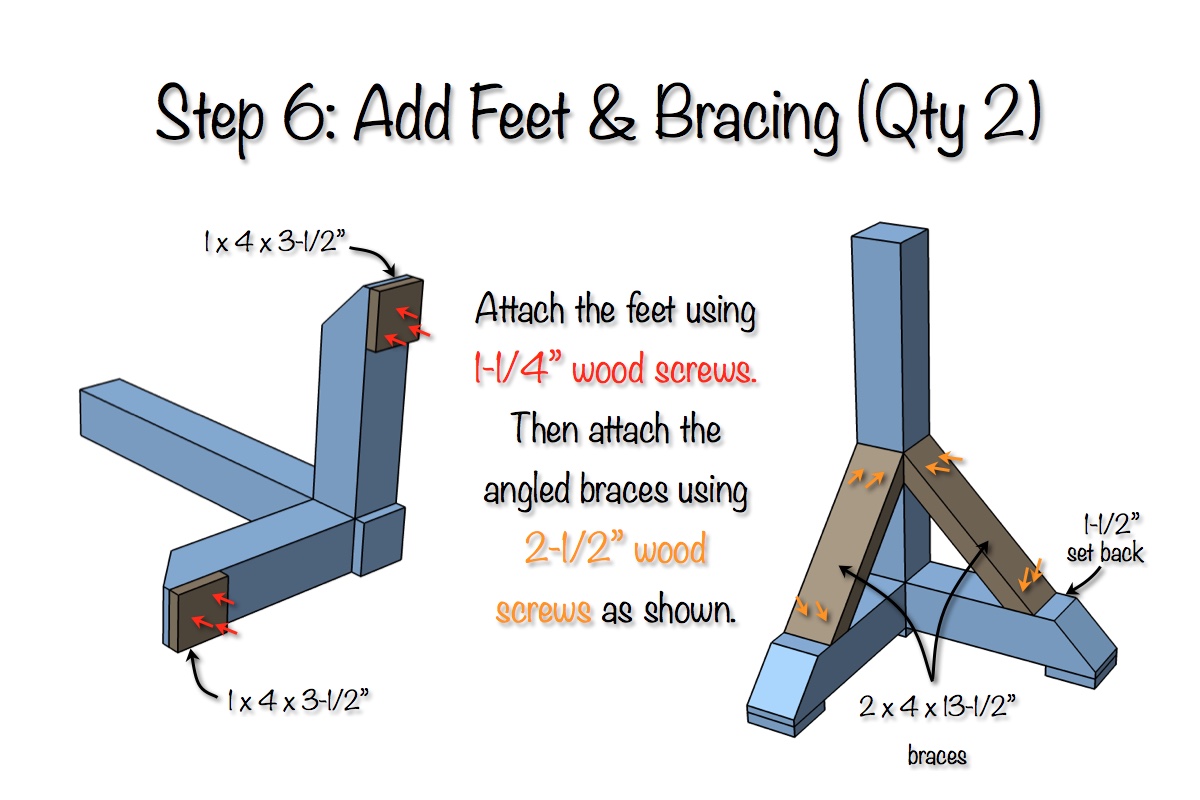
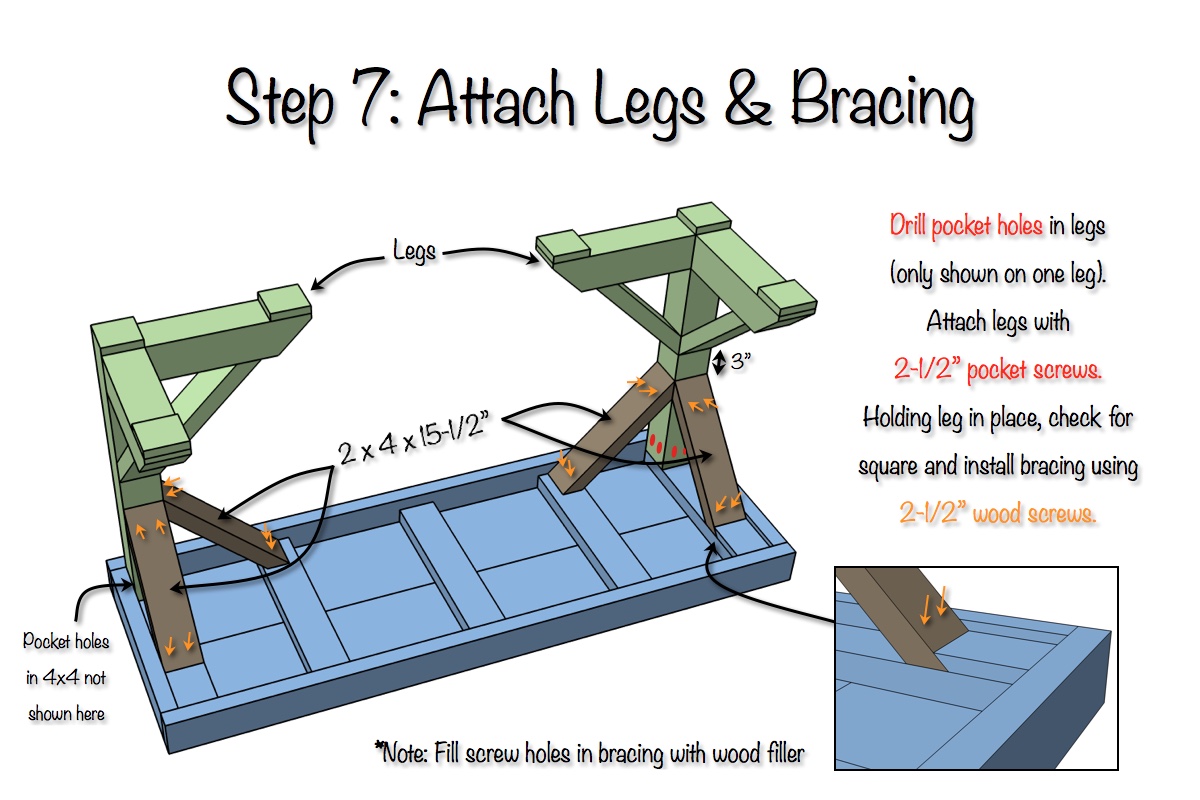
DIY Tresle Desk Plans
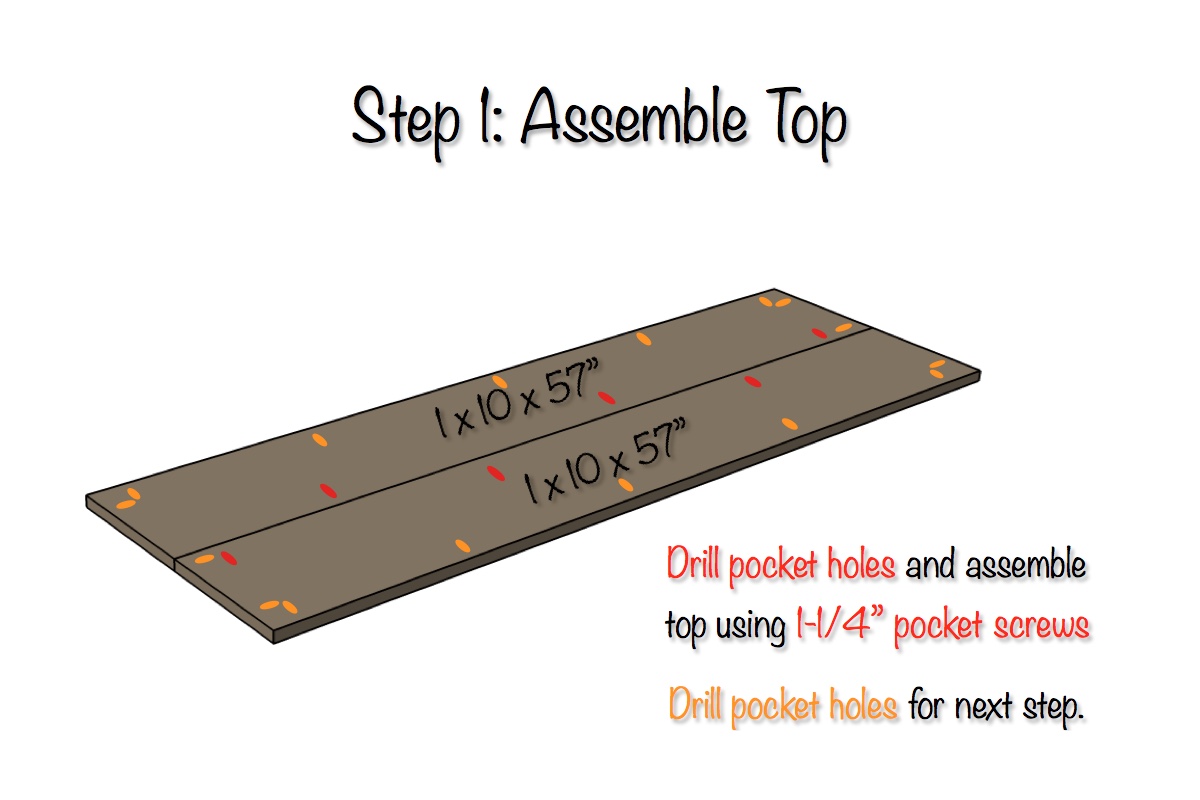
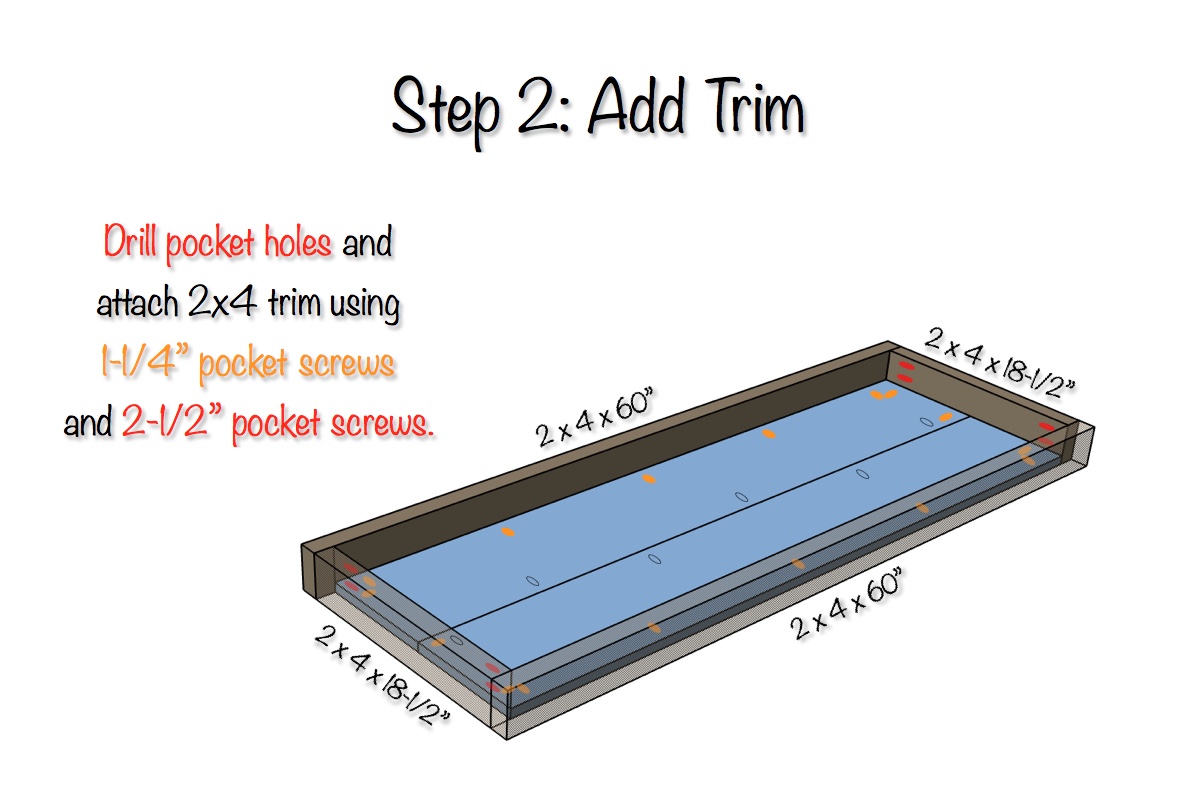
Questions? Comments?
As always, if you have any questions don’t hesitate to comment below and especially don’t forget to post pictures of your finished products in the comments! ENJOY!
Beautiful desk! I love this and am looking forward to building it. 🙂
Thanks Karen! I’m looking forward to seeing how yours turns out!
[…] can see HERE. I love it so much that I decided to build a desk very similar. I hit up our friend, Jamison a.k.a. Rogue Engineer to design the plans and he did an AMAZING JOB! We created this 5 ft. long desk for only $70 in […]
Hey Jamison,
Do you think I can add one more 1×10 to the top and just extend the desk’s base a little longer as well to accommodate a larger desk top? I have two large monitors for work and i’m afraid the 21 inch top will leave me blind if I sit too close. I’m thinking i need to be 8+ inches further away so a total of 29+ inches deep.
Also, thank you for sharing the plans and I appreciate the detail that goes in to your work. I arrived here from Shanty2Chic and I’m glad I did. I look forward to building more!
Thanks @Corey, and I’m glad you found me too!
Yes, I think you could add another 1×10 to the top to make it deeper but to be honest I think it would be difficult to make the base to much deeper with the angles and all. However, I think the base that would be sufficient as is. You would just need longer supports under the top and cleats.
I’d love to see how it turns out!
Thank you Jamison! I’ll post some pictures after I build it. Going to be a while since I’m moving to a new home this weekend but hopefully within a couple weeks I can knock it out. I appreciate your response and look forward to the build!
Thanks,
Corey
Hi!
I wanted to do the extra 1X10 also after reading your comment; however, I felt that might be a little too big. Ultimately, while I didn’t do it, I think (2) 1X12s would be perfect for the desk. Just my thoughts! Good Luck!
I would like to build this with a height of 40″. Do you recommend extending the legs from 27-3/4″ to 37-3/4″ and keeping everything else the same?
Yes I think that would work fine Robert.
My 24 year old daughter whose a RN asked me to build this desk for her as she attends grad school to become a Nurse Practitioner. Your nice plans make it look easy. Thanks for sharing!
Awesome. This would be the perfect desk for her. Best of luck to her and to you and your building. If you run into any questions along the way be sure to shoot me a message and I will offer any help I can.
Thanks
Thanks for the plans! A coworker asked me to build him a desk to fit in a specific spot in his new home, and I’m using these plans, but adjusting them to his specifications (46″ long, add shelving on one side). Seeing how everything came together made it possible for this non-engineer to figure out what I need to modify to make it work!
Awesome! Would love to see pictures of the finish piece.
I saw Shanty Chic’s post on Pinterest; clicked the plans, so how well organized they are and thought ‘that’s a beautiful desk and it looks super easy’.
About one hour into the cuts I hated myself.
Of course, I just bought this house and don’t have a workbench set up yet, etc. I also don’t have a table saw, which I’ve been putting off for too long (next project I do I’m buying one, that’s it!). Now the desk is all built, it’s imperfect, sure, but it looks OK and it’ll do the job it’s meant to do (which looking good is part of its job!). I only bled once, that’s always good… and they are definitely GREAT plans.
A couple notes for others planning to do it:
1. I have the Kreg Jr ($40) and had no intention on spending money to have multiple Kregs. I also used a 5 inch clamp I had laying around from a brake job years ago. A little more tedious, but I saved money (part of my misery was working hard tho, so if you have it, spend some money to get everything!). In the absence of multiple Kregs, I put pocket holes on the bottom AND TOP of the feet. I only ended up putting on hole on the tops, but I’m glad I did. Also, in my opinion, kreg screws are terrible; that extension spins in those screws like crazy. T20 are much better, maybe try to find an extension and just get T20 screws.
2. I used an entire box of 2.5″ Kreg pocket screws ($5.75 and the depot).
3. My local Home Improvement ‘wont’ sell you straight boards’ Depot did not have ‘untreated’ 4X4s. I bought the treated ones because my buddy was with me (it’s his truck to get the stuff) and I didn’t feel like making him make more trips. We’ll see how they stain.
4. One guy wanted to put (3) 1X10’s and I really wanted to do that; but I decided against it because I didn’t want it to be ‘too’ big. I kind of do wish it was a little bigger tho, and I’m thinking using (2) 1X12s would be perfect.
4. I ran a torch across the top for effect; found it on pinterest (about 60% down on this page: http://www.homedit.com/20-diy-desks-that-really-work-for-your-home-office/)
5. I’m super mega so incredibly grateful to Rogue Engineer for these plans… I’m also super mega so incredibly tired after it took me about 8 full hours. I really thought it was would be much quicker, he made it look so easy in the plans!
6. Now I have to find the will power to go stain and finish it. Who wants to bet that won’t be tonight?!?
OK, I’m done. These are great plans. Buy straight wood, if HD doesn’t have the untreated 4X4s go to Lowes (my buddy was there today and sent me a picture showing they had them; too bad I had already cut my treated ones already!). Thanks Rogue Engineer!!
Oh, I also made it 34″ high by adding 4″ to each leg.
Guess I had it in me after all 🙂 sanding will have to wait until tomorrow tho!
Reattaching photo that was removed
Darrell, thank you so much for the detailed post! Your desk looks awesome and I dig the torched look. I know a lot of folks will appreciate you taking the time to provide your thoughts. Again, great work on this!
Reattaching photo that was removed:
Looking forward to building this desk. I have one question though. Did you use kreg jr pocket jig for attaching the legs and if so how did you set it? Thanks
Yes, the pocket holes in the legs could be drill with the Kreg Jr R3.
Do you set it the same as you would for 2 x4 ‘s
Yes.
I meant kreg r3 pocket hole jig
My wife was wanting a desk for the space just outside our kitchen, and this one fit the bill. I picked up most of the materials at Home Depot (Canada), but couldn’t get the untreated 4×4’s there. There’s a local lumber mill nearby that made one up for me though – I just used a single 10′ piece instead of two 8 footers (saved a few bucks there since it was custom milled anyway), and you can make all the cuts on a 10′ piece with less waste.
This was my first build, but it turned out pretty well. My wife ended up wanting it to be an ‘antique white’ so she got some Annie Sloan Chalk Paint and wax (a bit pricey but turned out nicely). See the pic for how it looks in our house!
Thanks for the plans, looking forward to doing some more in the near future.
Dude, that is awesome! Thank you so much for sharing. I really dig the color. I have the same problem here with the untreated 4x4s here and I had to go to a local mill as well.
Reattaching photo that was removed:
[…] quickly, despite the fact I only have a single Kreg Jig mini. I used both the plans and tips from Rogue Engineer and Shanty2Chic. After some mistakes I made on another project, I understood how to adjust the Kreg […]
Hello
This looks great. For my home office I have two large monitors and need room for a phone and a printer. If I wanted to make this two or three feet longer will the legs as designed be sufficient support?
Yea it should be plenty fine. You might want to look at making the desktop a little deeper as well, with all the equipment.
I’m making one of these for my husband this weekend (right after I finish putting my workbench together. Gonna finish that tomorrow morning, hopefully). We were looking for a desk for him on craigslist and the like, but nothing was really quite right. So I figured I could just make one that would fit his needs, and this one does! Nice and long, plenty of legroom, and good looking (that’s my requirement)! I’ll post it here when I’m done. I’ve really enjoyed seeing everyone else’s versions! It helps to see so many real photos.
Can’t wait to see how it turns out!
It took a lot longer than I thought, but it’s finally done! The stain is Rustoleum’s Kona, and it’s got a wipe on poly finish in satin. Hubby is very happy with it, and I’m glad t have it done and in place. Thanks for the great plans!
That looks awesome! Excellent work. Thanks for sharing.
Just finished the project for the wife for when she works from home. Went with a distressed antique white base with dark walnut and poly top. Everything went together pretty well. My only recommendation would be to drill the pocket holes into the top of the 4x4s before adding the side pieces to the bottom. With the KregHD, the bottom pieces block off access so your drill doesn’t have enough room to make the holes. I found a work around, but it would have been easier to do before they are attached. Thanks for the plans.
That looks awesome Rick. Thanks for sharing! I like how you finished it. Thanks for the tip about the pocket holes.
Reattaching photo that was removed.
Reattaching photo that was removed
Jamison – Great work on your DIY projects! Question about the trestle desk…is it solid or tippy? My wife wants me to make one a foot longer. Just wanting to make sure it will be stable. Let me you know your thoughts.
This is a very solid table. I think adding another foot to the length would be fine.
Appreciate the feedback! Thanks
I need to add another 1×10 to make 31 1/2″ deep. What would all the new dimensions and cuts be? Thanks.
Just add another 9-1/4″ to all the boards that run that direction. The base will stay the same.
Im thinking of making this and planning everything out. I plan on adding another 2 1x10s to make an L shape desk. With Angle Supports, do you need to use wood Screws or can you just fire up the nail gun and use the brad nailer?
Wood screws are going to make it more secure.
Just finished the desk. When I got to Step 7 the brace that fit in the cleat did not line up evenly with the other brace. The 3 inch space was only about 2 inches. I checked all my cuts and it looks like I followed the plan but I ended up having to make the braces that fit into the cleat about an inch shorter. It is driving me crazy trying to figure out where I cut wrong. Any thoughts?
Interesting, not sure what could have gone wrong there.
How can this be modified for a “L” shaped desk? I saw someone build it and refer back to your plans, but I’m not a woodworker or engineer so I have no idea how to modify the corner to work and be supported by one brace. I would love to try. Can you help? Please and thanks!
I am in the process of making an L-Shaped desk. The long side is just under 46” and the short side is just under 32”. Each side is about 18 3/4” deep. I used pallet wood and repurposed 2×4’s. The pallet wood top and the 2×4 edges are connected with 5/16” dowels. The supports underneath are connected with pocket screws. Thank you Rogue Engineer for the awesome plans!https://uploads.disquscdn.c… https://uploads.disquscdn.c…
Just finished a modified version of this desk! I had an existing table top that I wanted to use instead of the 1*10’s, and I used extruded aluminum instead of wood for the braces. All in all, for my first real furniture build, I’m very happy!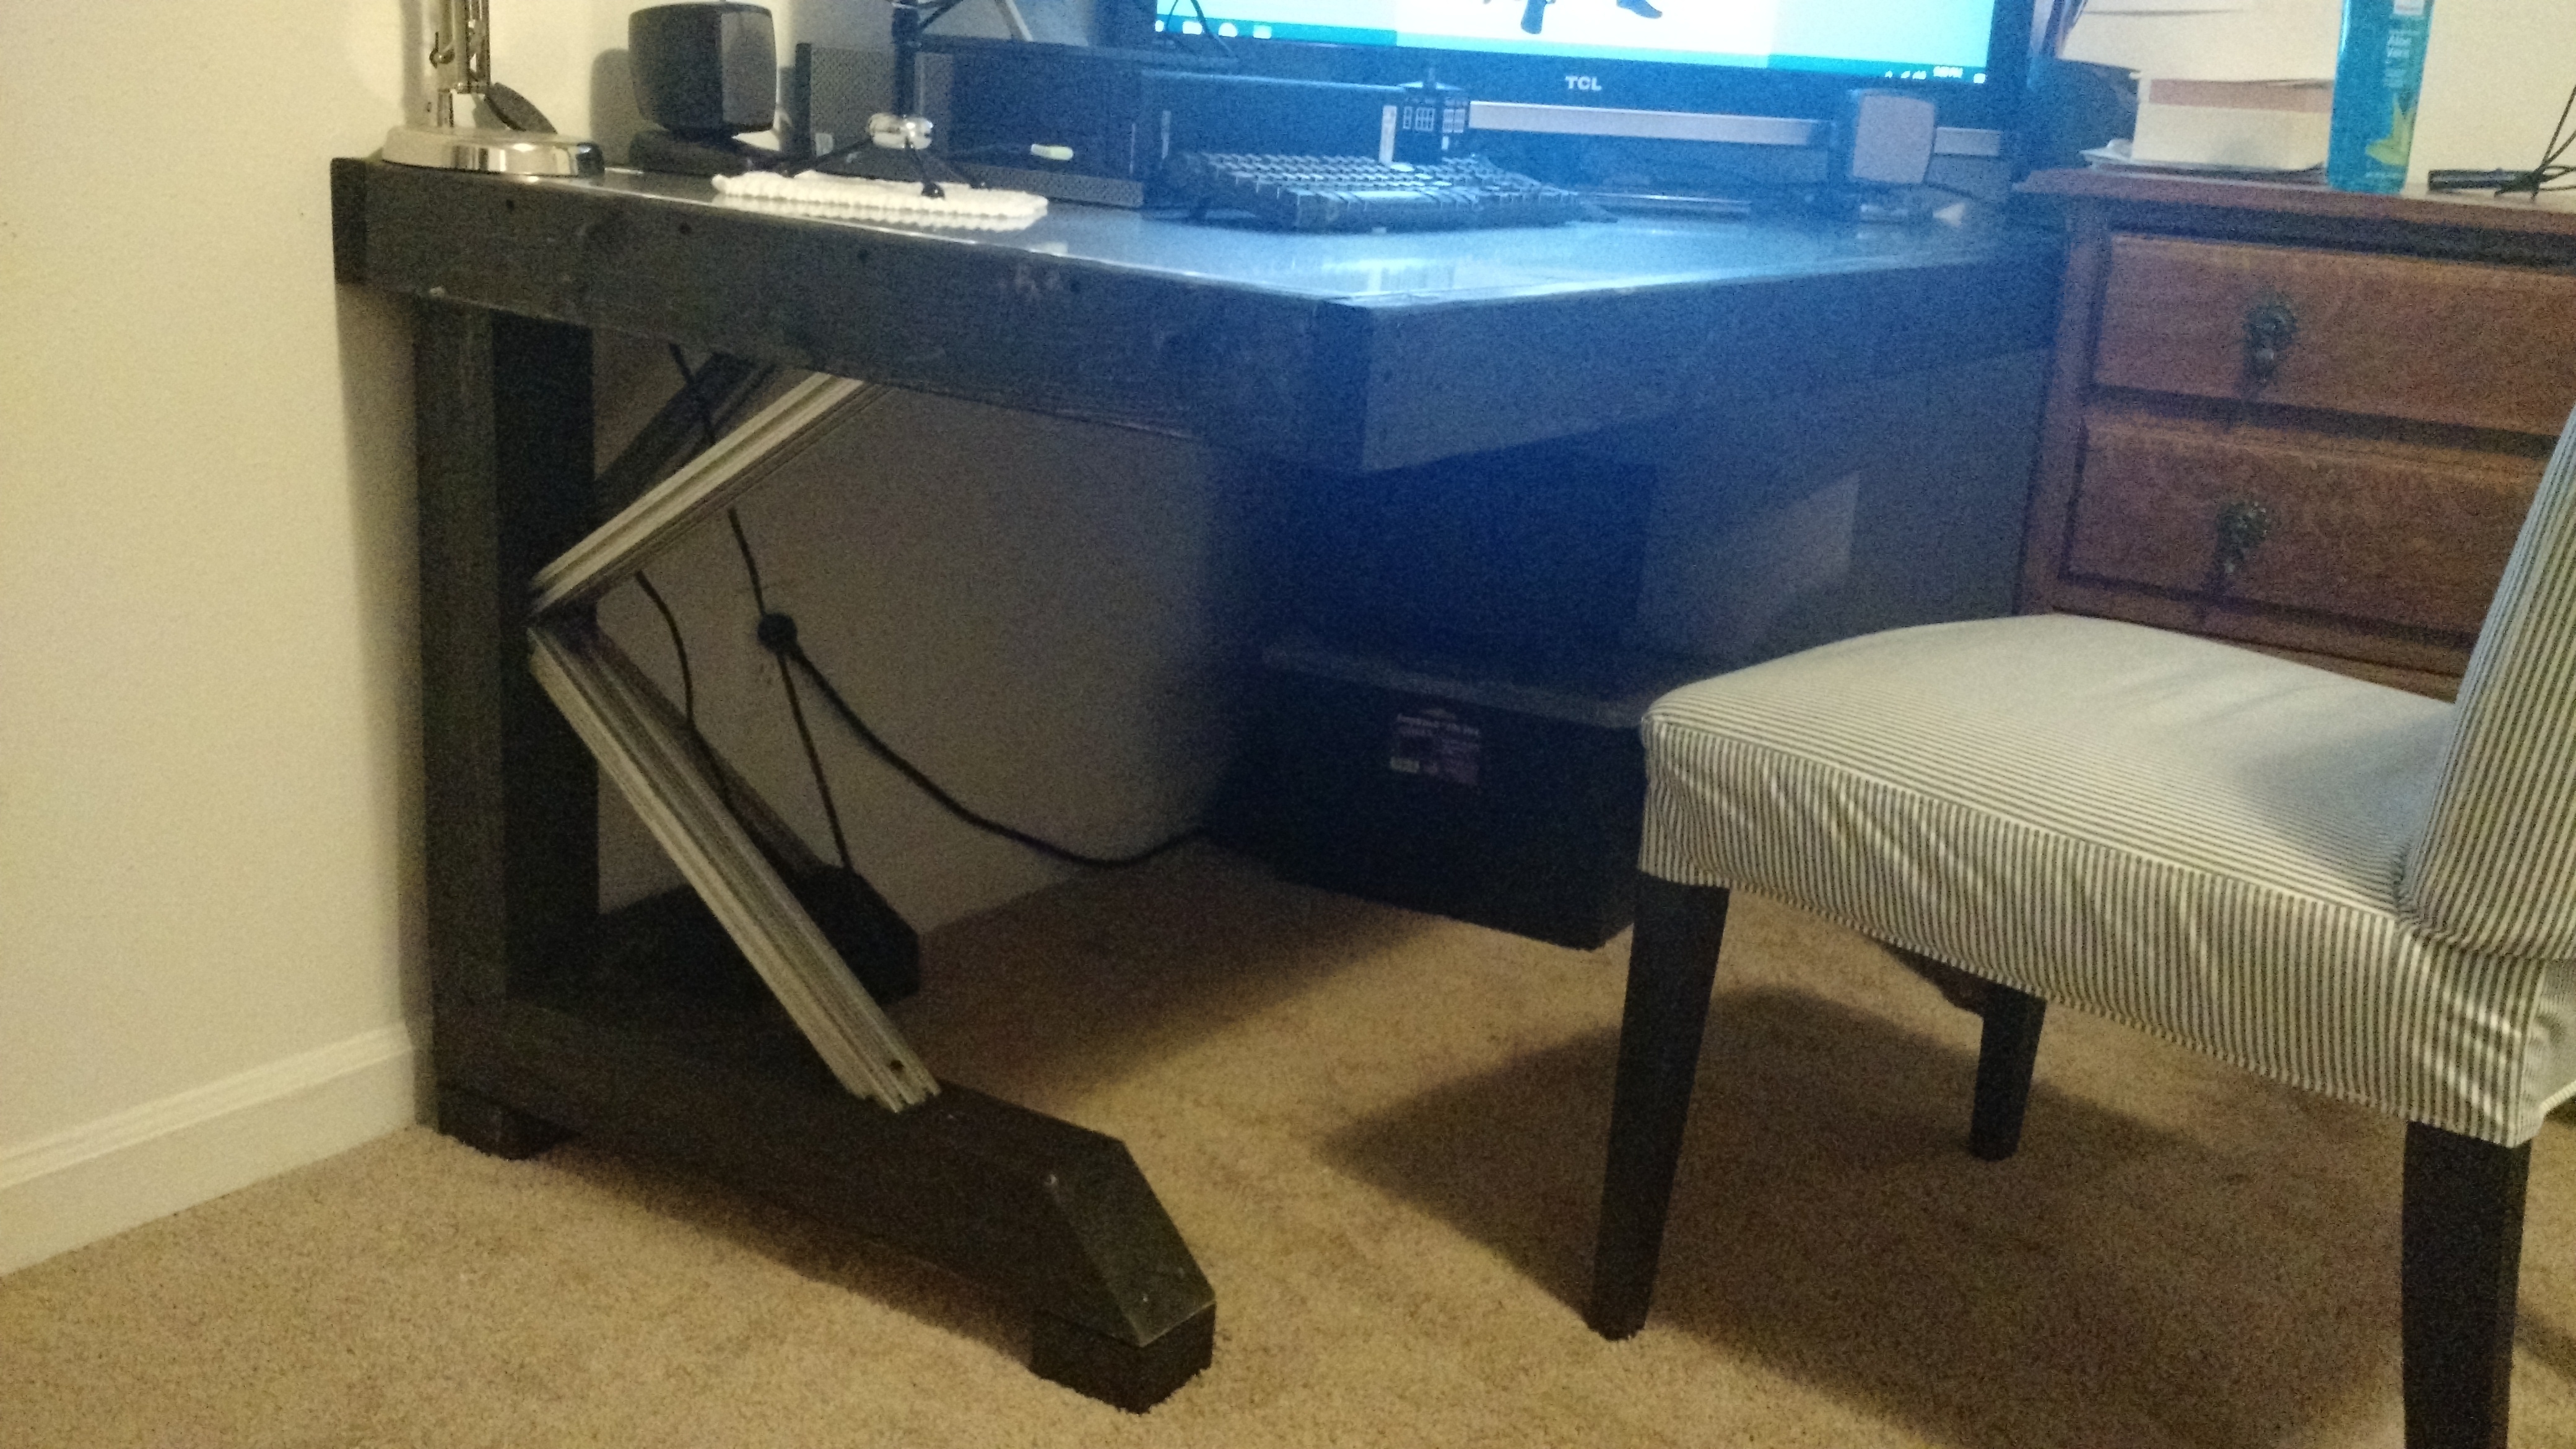
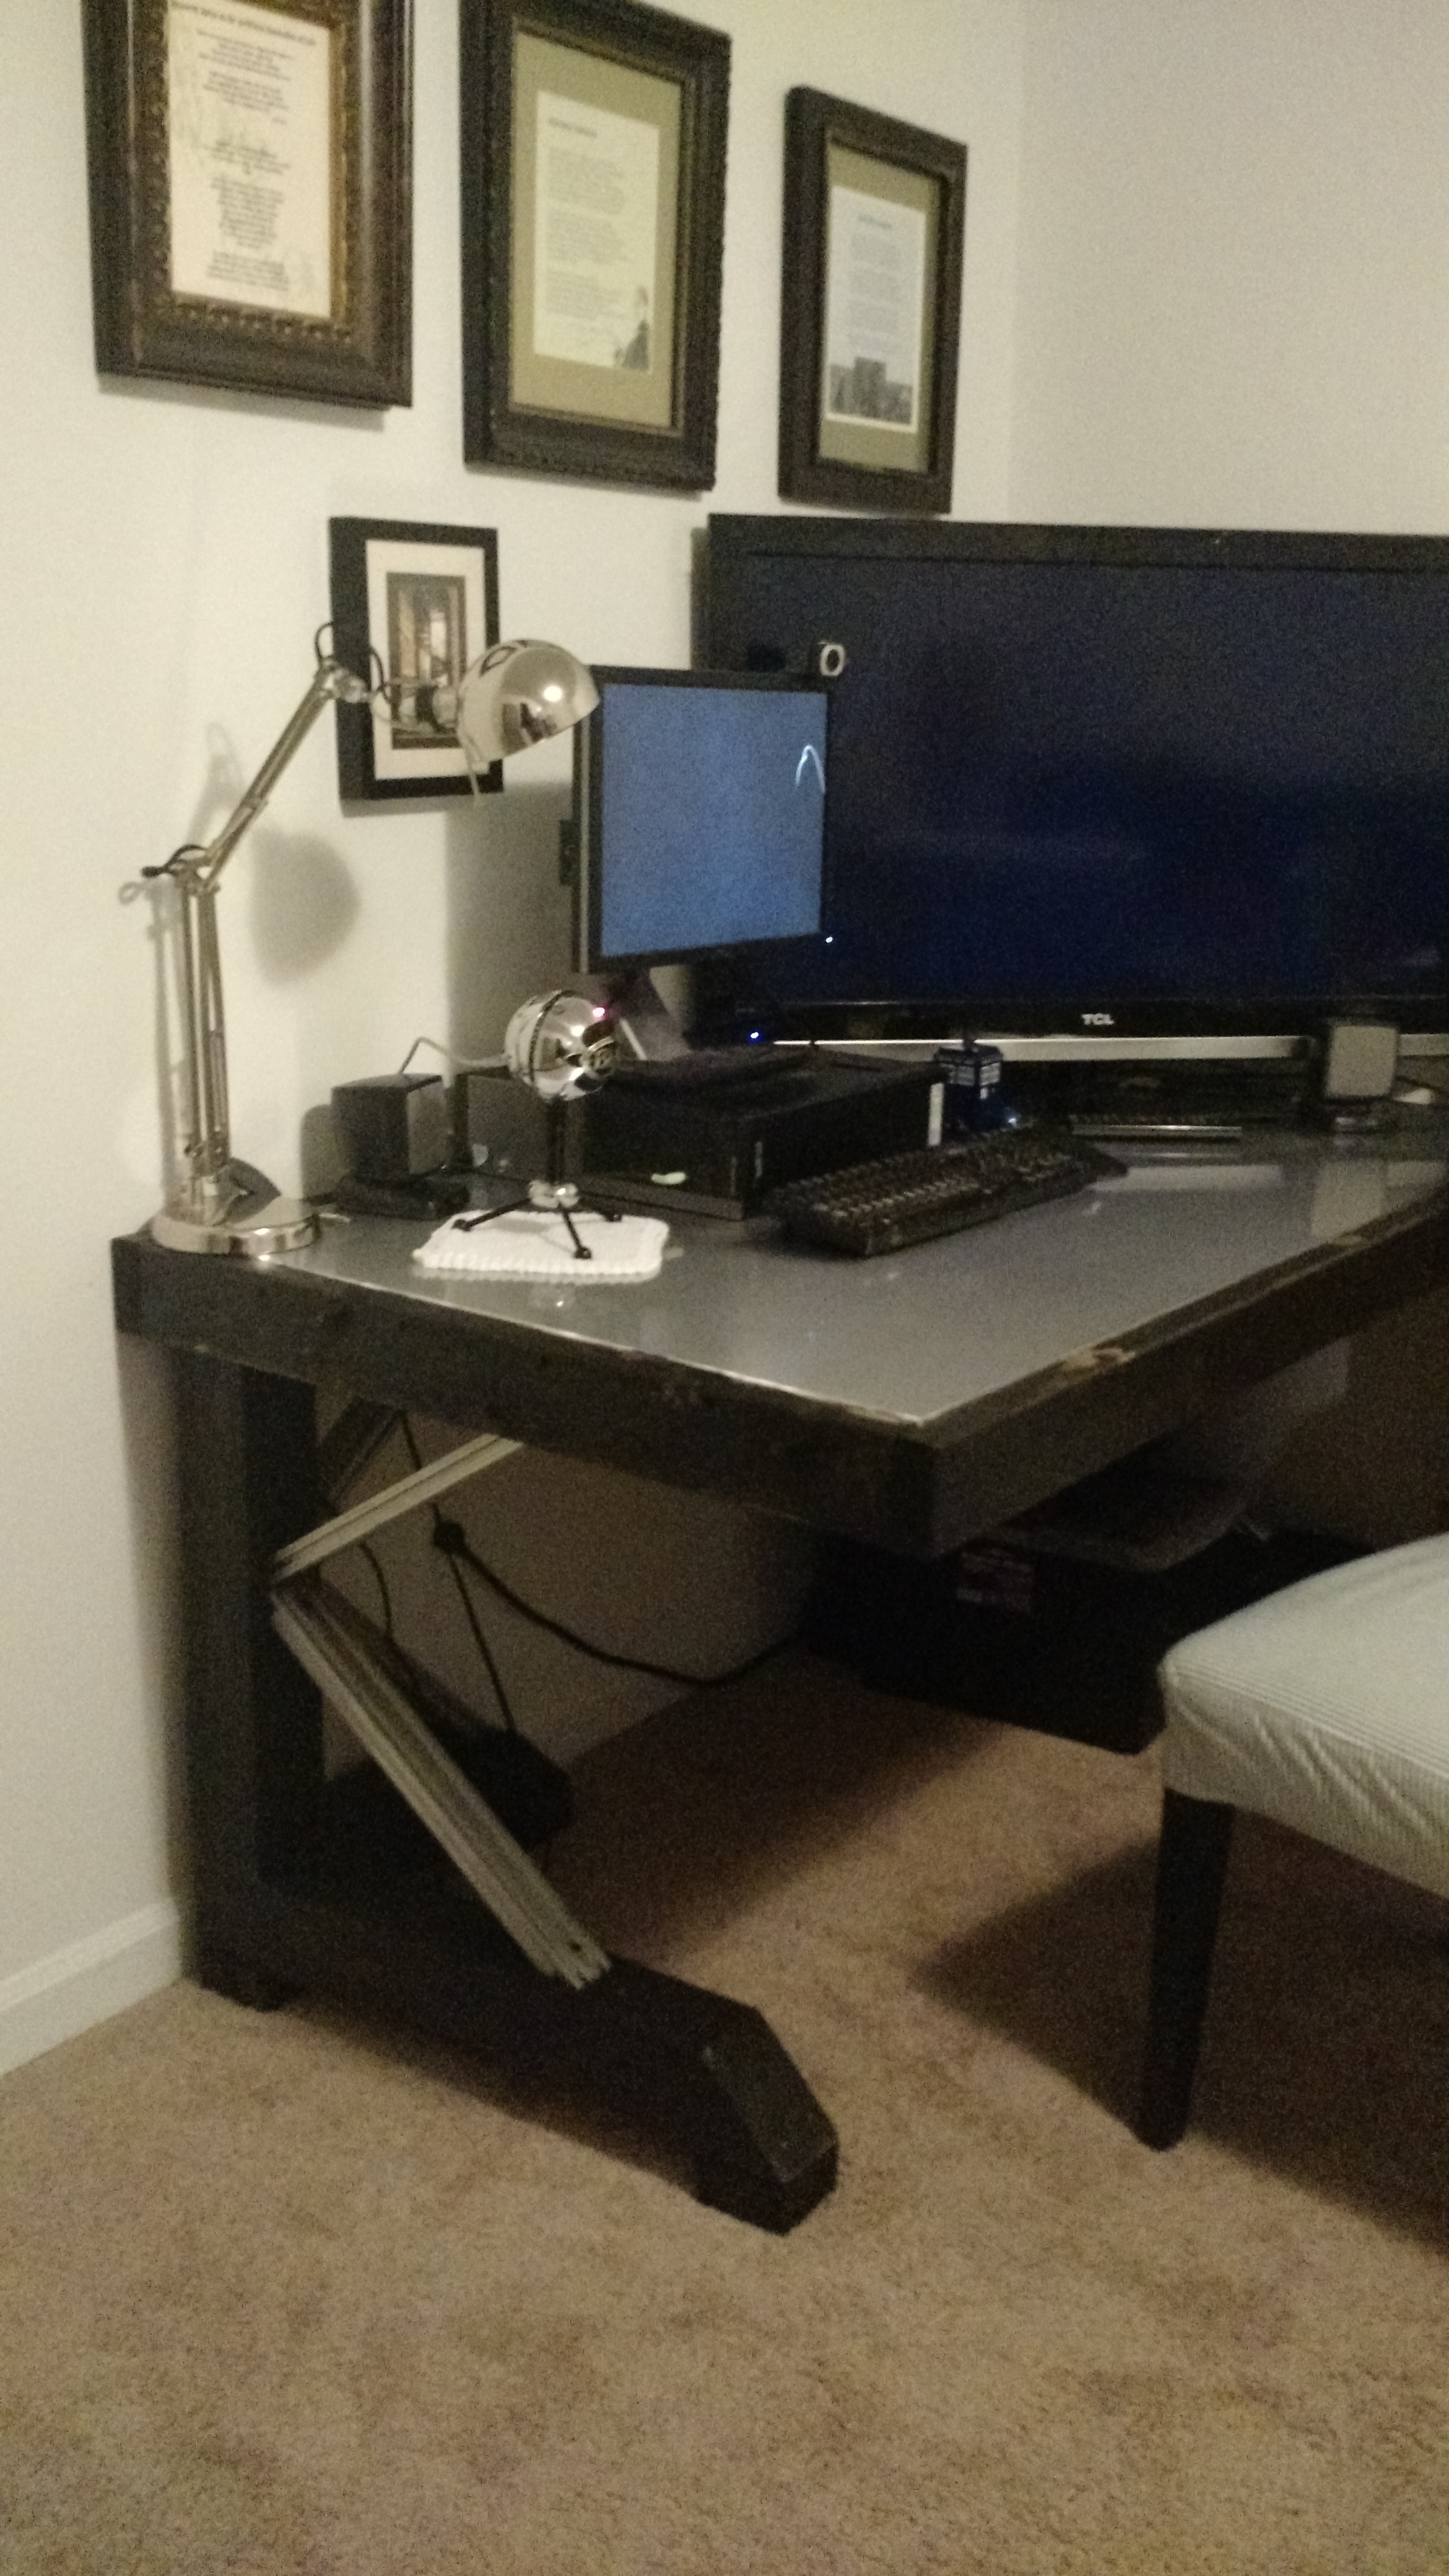
Thanks for the plans. This was my first furniture project and it turned out great. Plan is to stain it a rich walnut.
Two questions. Is there a suggested method for hiding the wood screws on the braces? And if my wife wants the top to be a smooth as possible, to keep kids from jamming crayon in the small gaps, would a paintable and stainable wood filler suffice or is epoxying the top a better method?
Th lad
How is your desk not 24″ deep? With the two 1x10s and the 2x4s as the frame on each side? Also how do you figure it’s 60″ wide if the top 1x10s were cut at 57″ length, with the two 2x4s on the ends of those as the frame, your measurements would be a desk that is 61″ wide, am I missing something?
the actual dimensions of a 2×4 is 1.5″ x 3.5″ and a 1×10 is 3/4″ x 9-1/4″
Thinking of doing this project to use in a brew shed/office. Would like to make it standing height for a 5’8″ guy (me) and “L” shaped. Suggestions on height and stabilization? Do the feet need to be a little longer?
What stain should I use? I’ve never done any wood painting before so not sure what I need to do to prep the wood the paint or stain? Brands, colors, process, etc, very well appreciated
Thanks for the plans. I was looking for a computer desk and didn’t want to spend too much money on one. In store, the prices are ridiculous for even a chincey desk. I saw these plans and it gave me a good idea.
It took much longer than I had expected, not because of building, the building was quick. But, to finish it took a long time. Overall I am happy with how it turned out. I was going for a rustic look here. I stained the top with the american wood stain from Minwax. 4 coats of semi gloss polyurethane on top of that. For the legs I filled the screw holes with sandable wood putty. After sanding I primed it with a gray primer. On top of that, 2 coats of a Cotton Blossom by Behr in a flat finish. Then followed it up with a bunch of different sand paper to give the legs that roughed up old barn wood finish. My final step was drilling a 1.5″ hole on the top and putting a plug in for electrical plugs to go through it.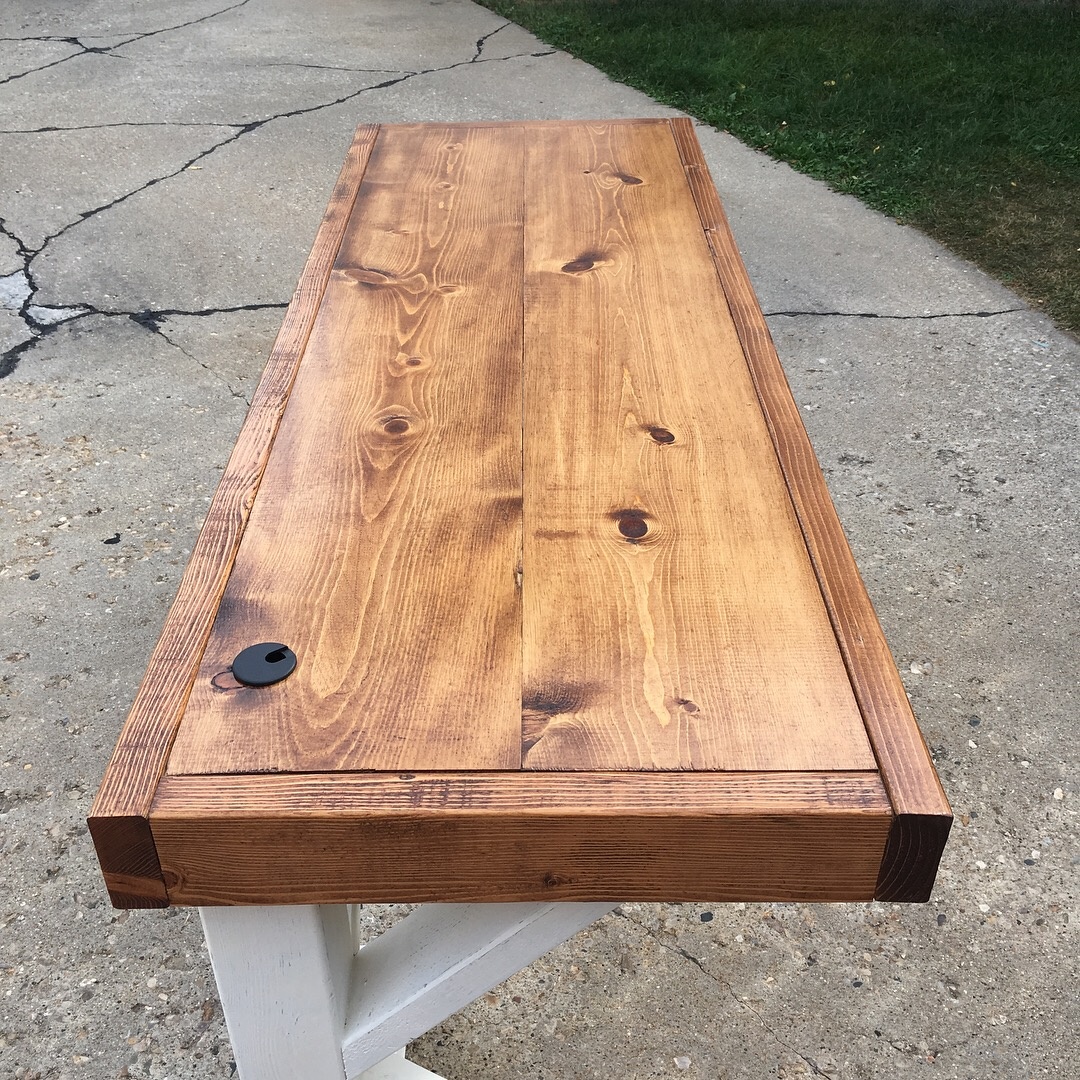
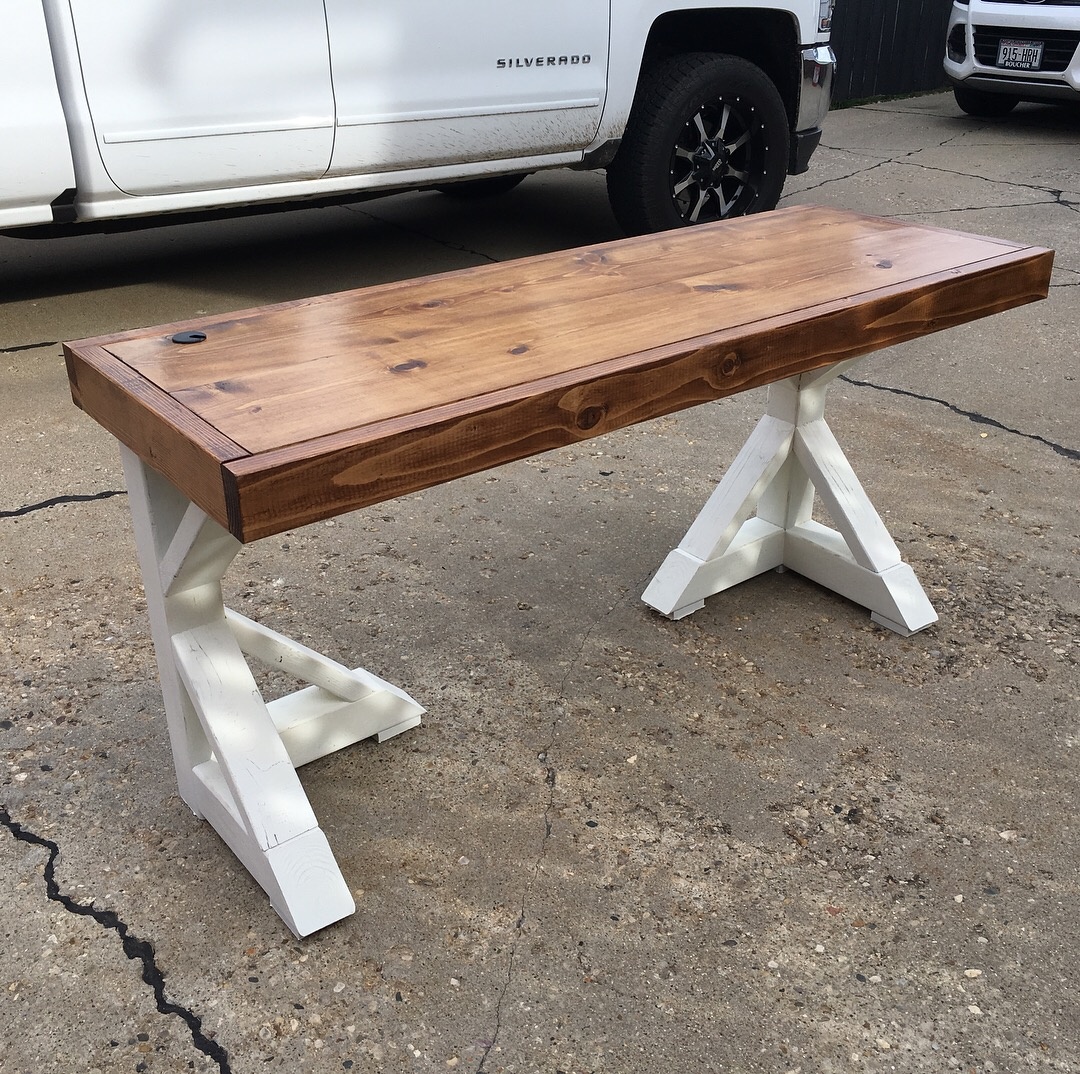
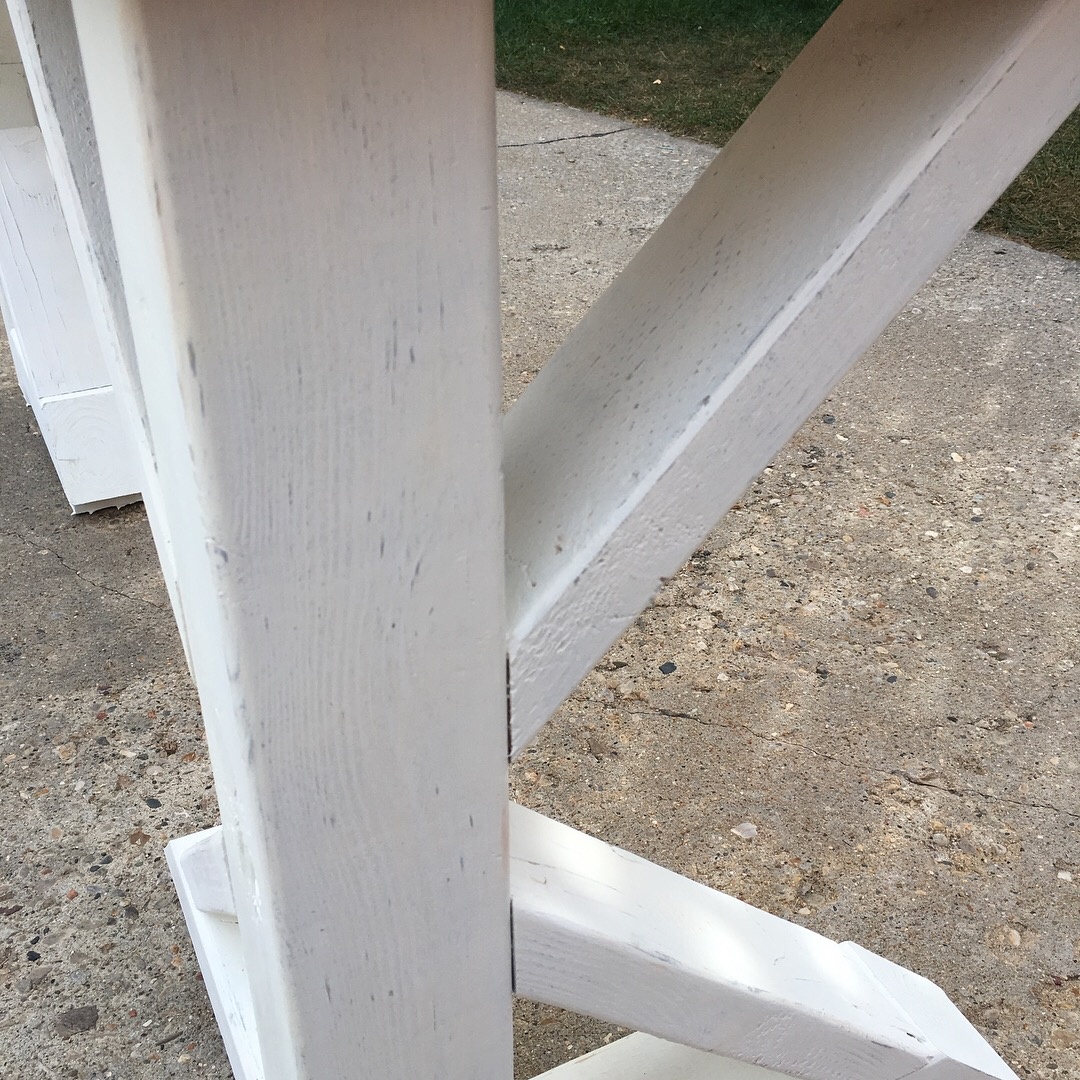
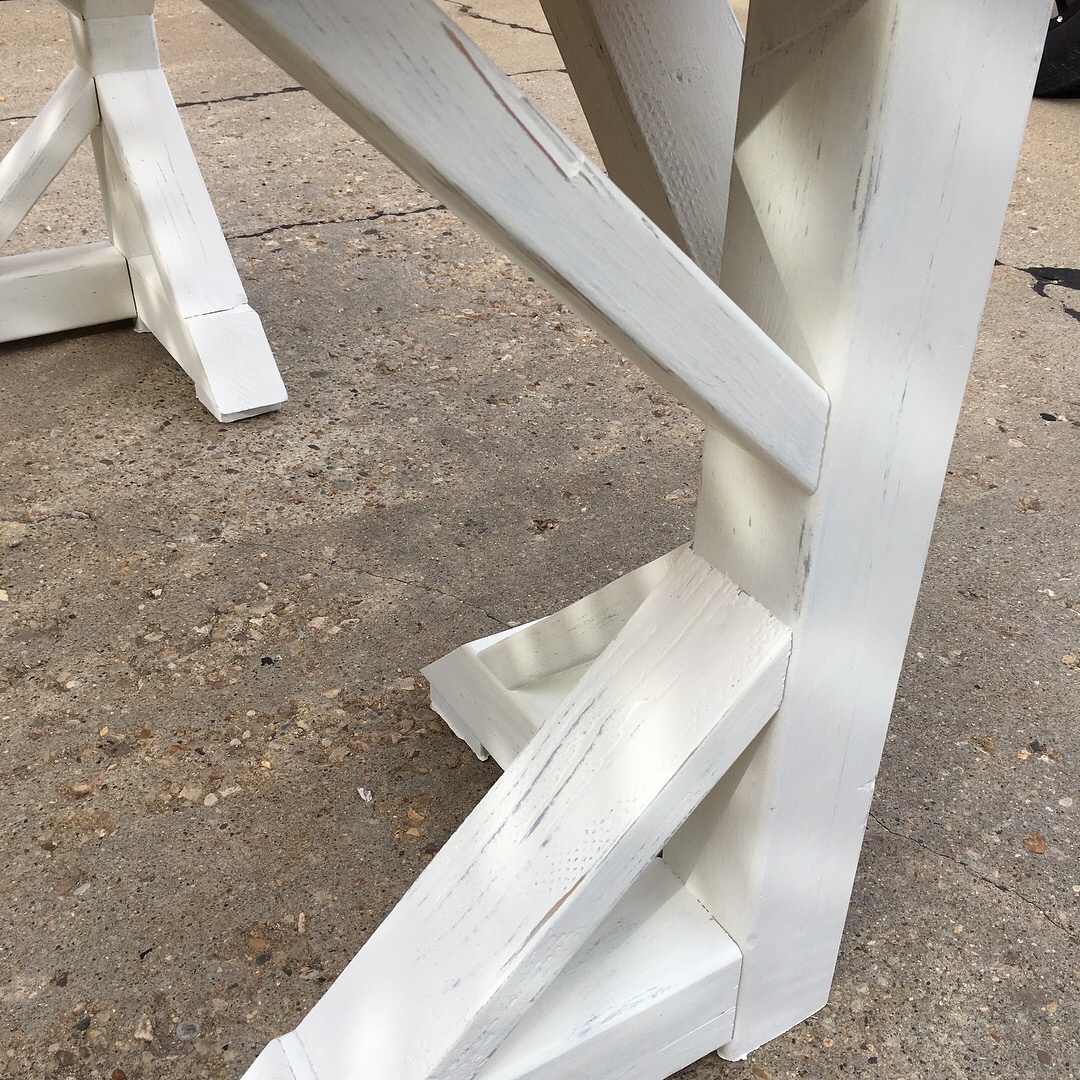
I sent my father-in-law the link to this page and asked if this would be difficult to build. 2 weeks later and he just showed up today with a delivery for me. I’m ecstatic and already looking at other ideas on this site to drop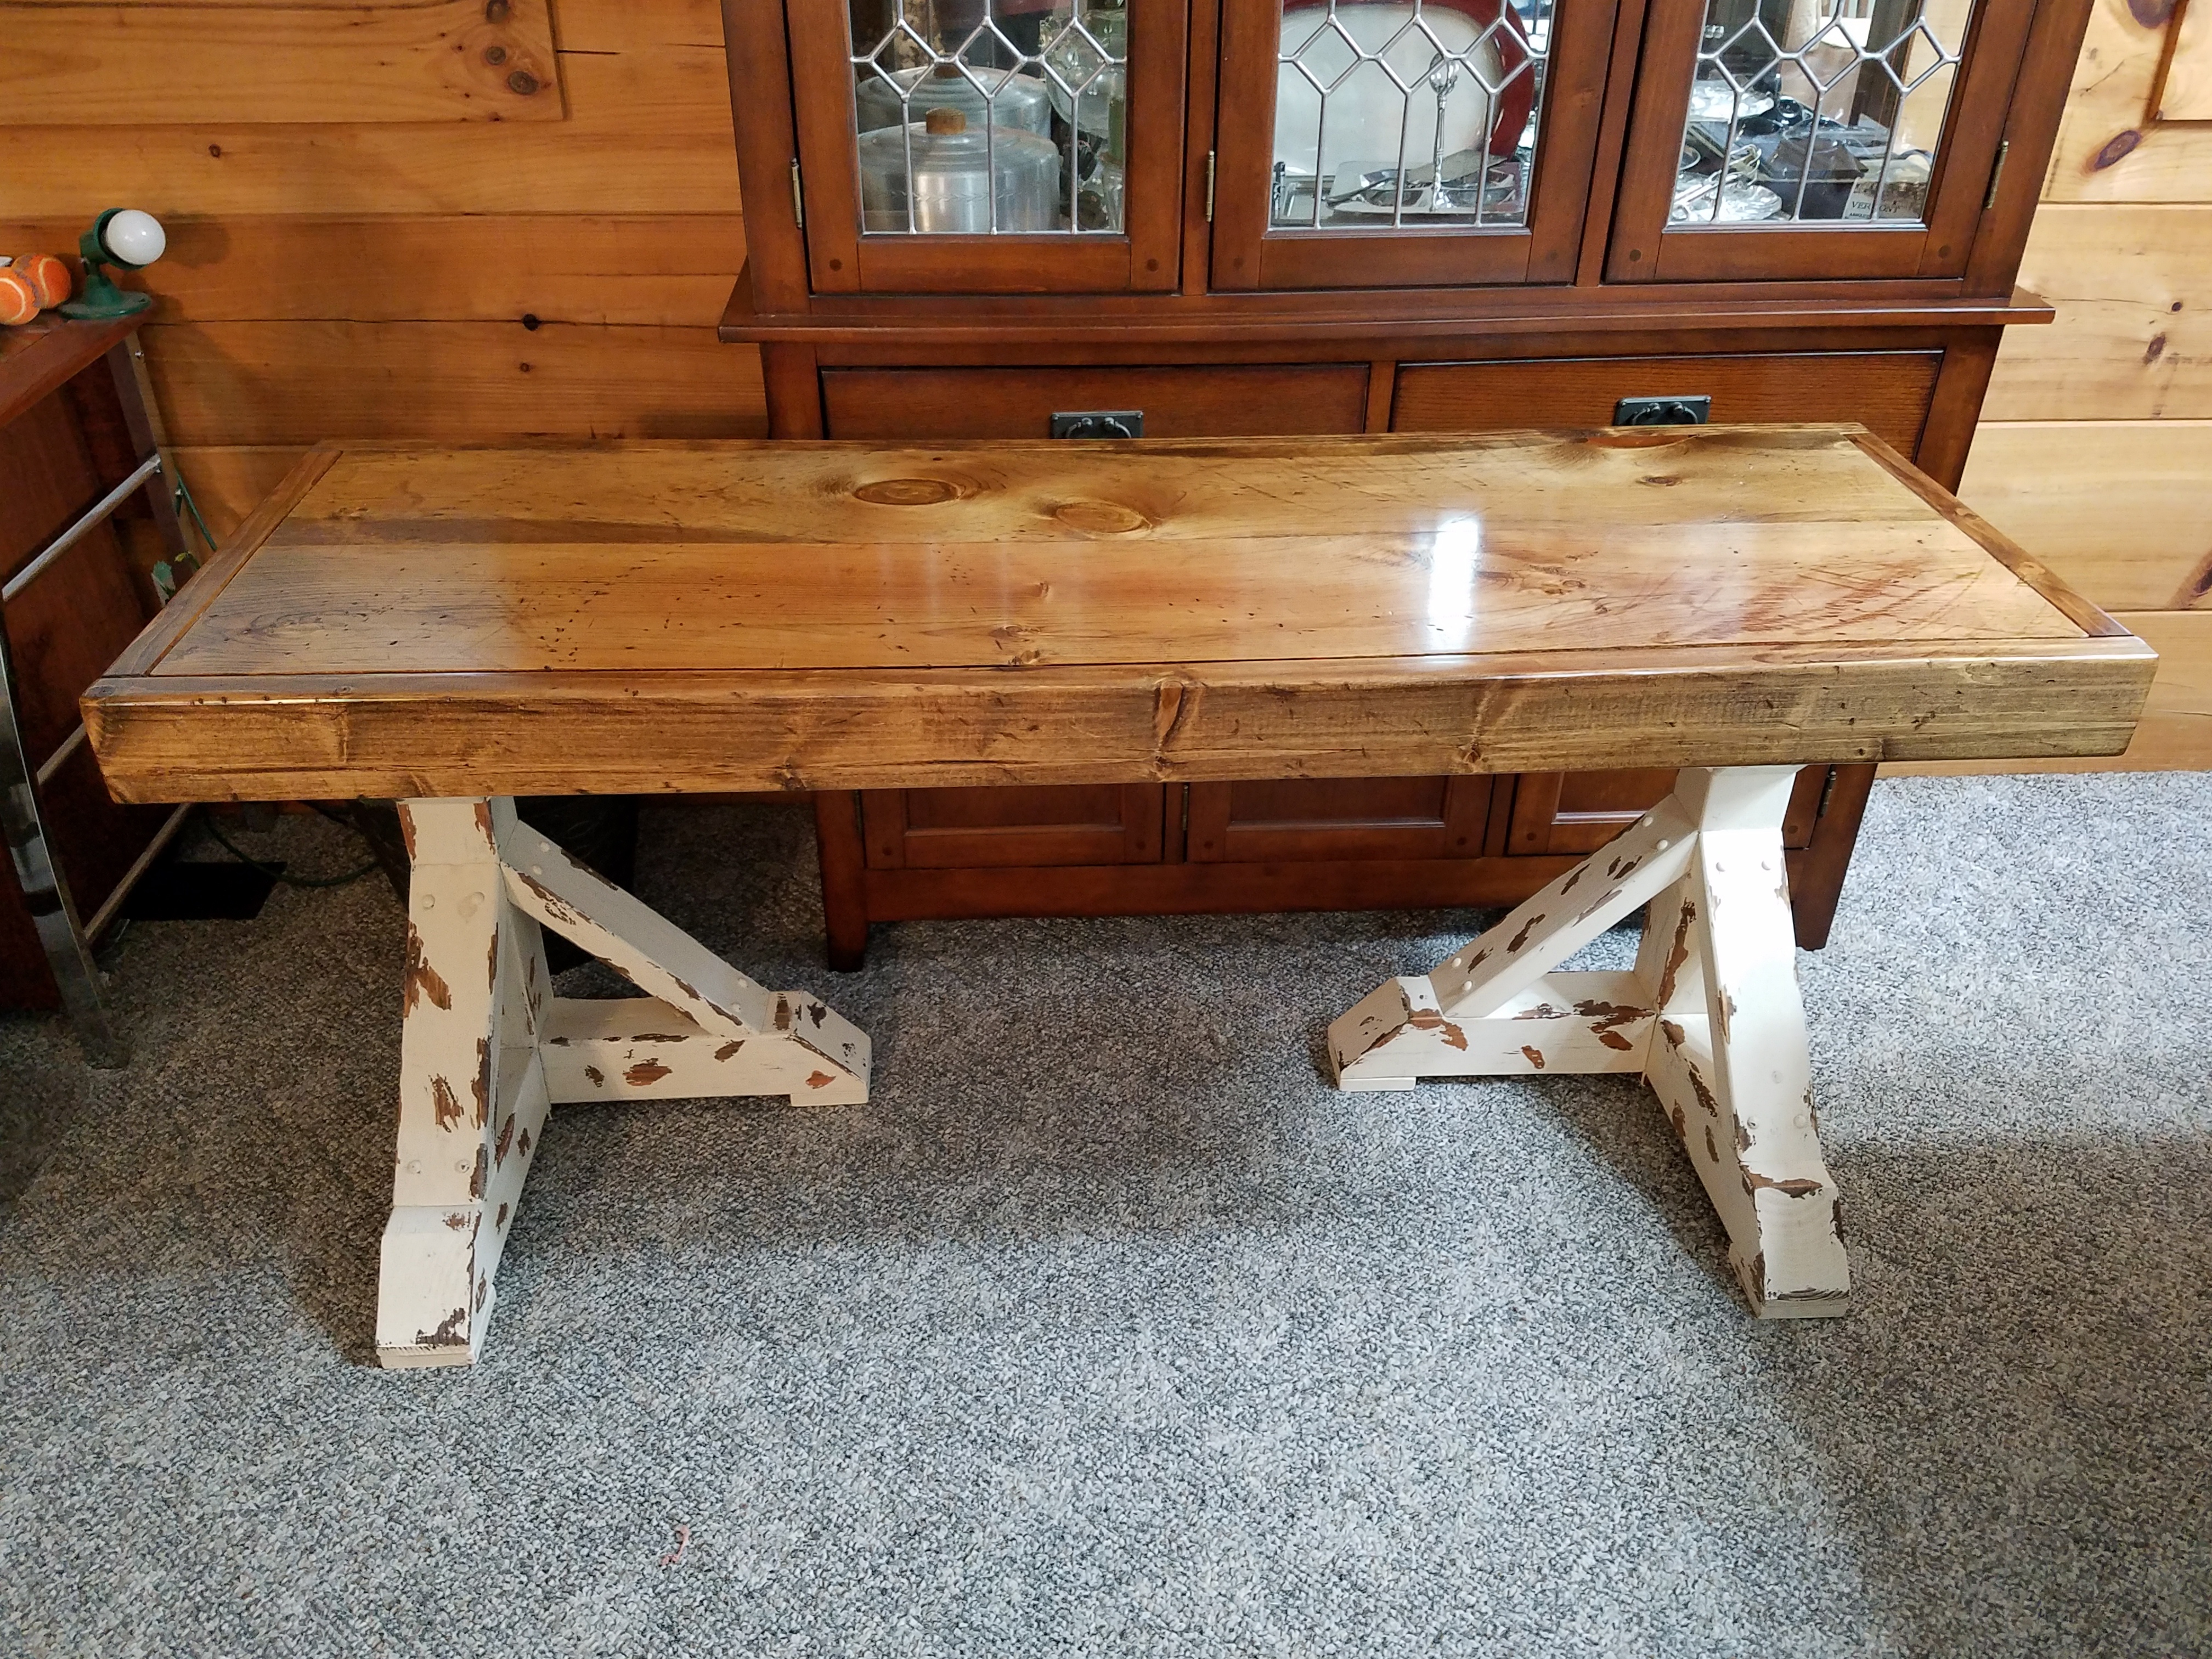 some hints about!
HI!! 🙂 Would adding shelving on top of the desk mess with the quality? I have an almost 1 year old who is beginning to walk.
Built this desk as a wedding gift for a friend! Thank you for the plans!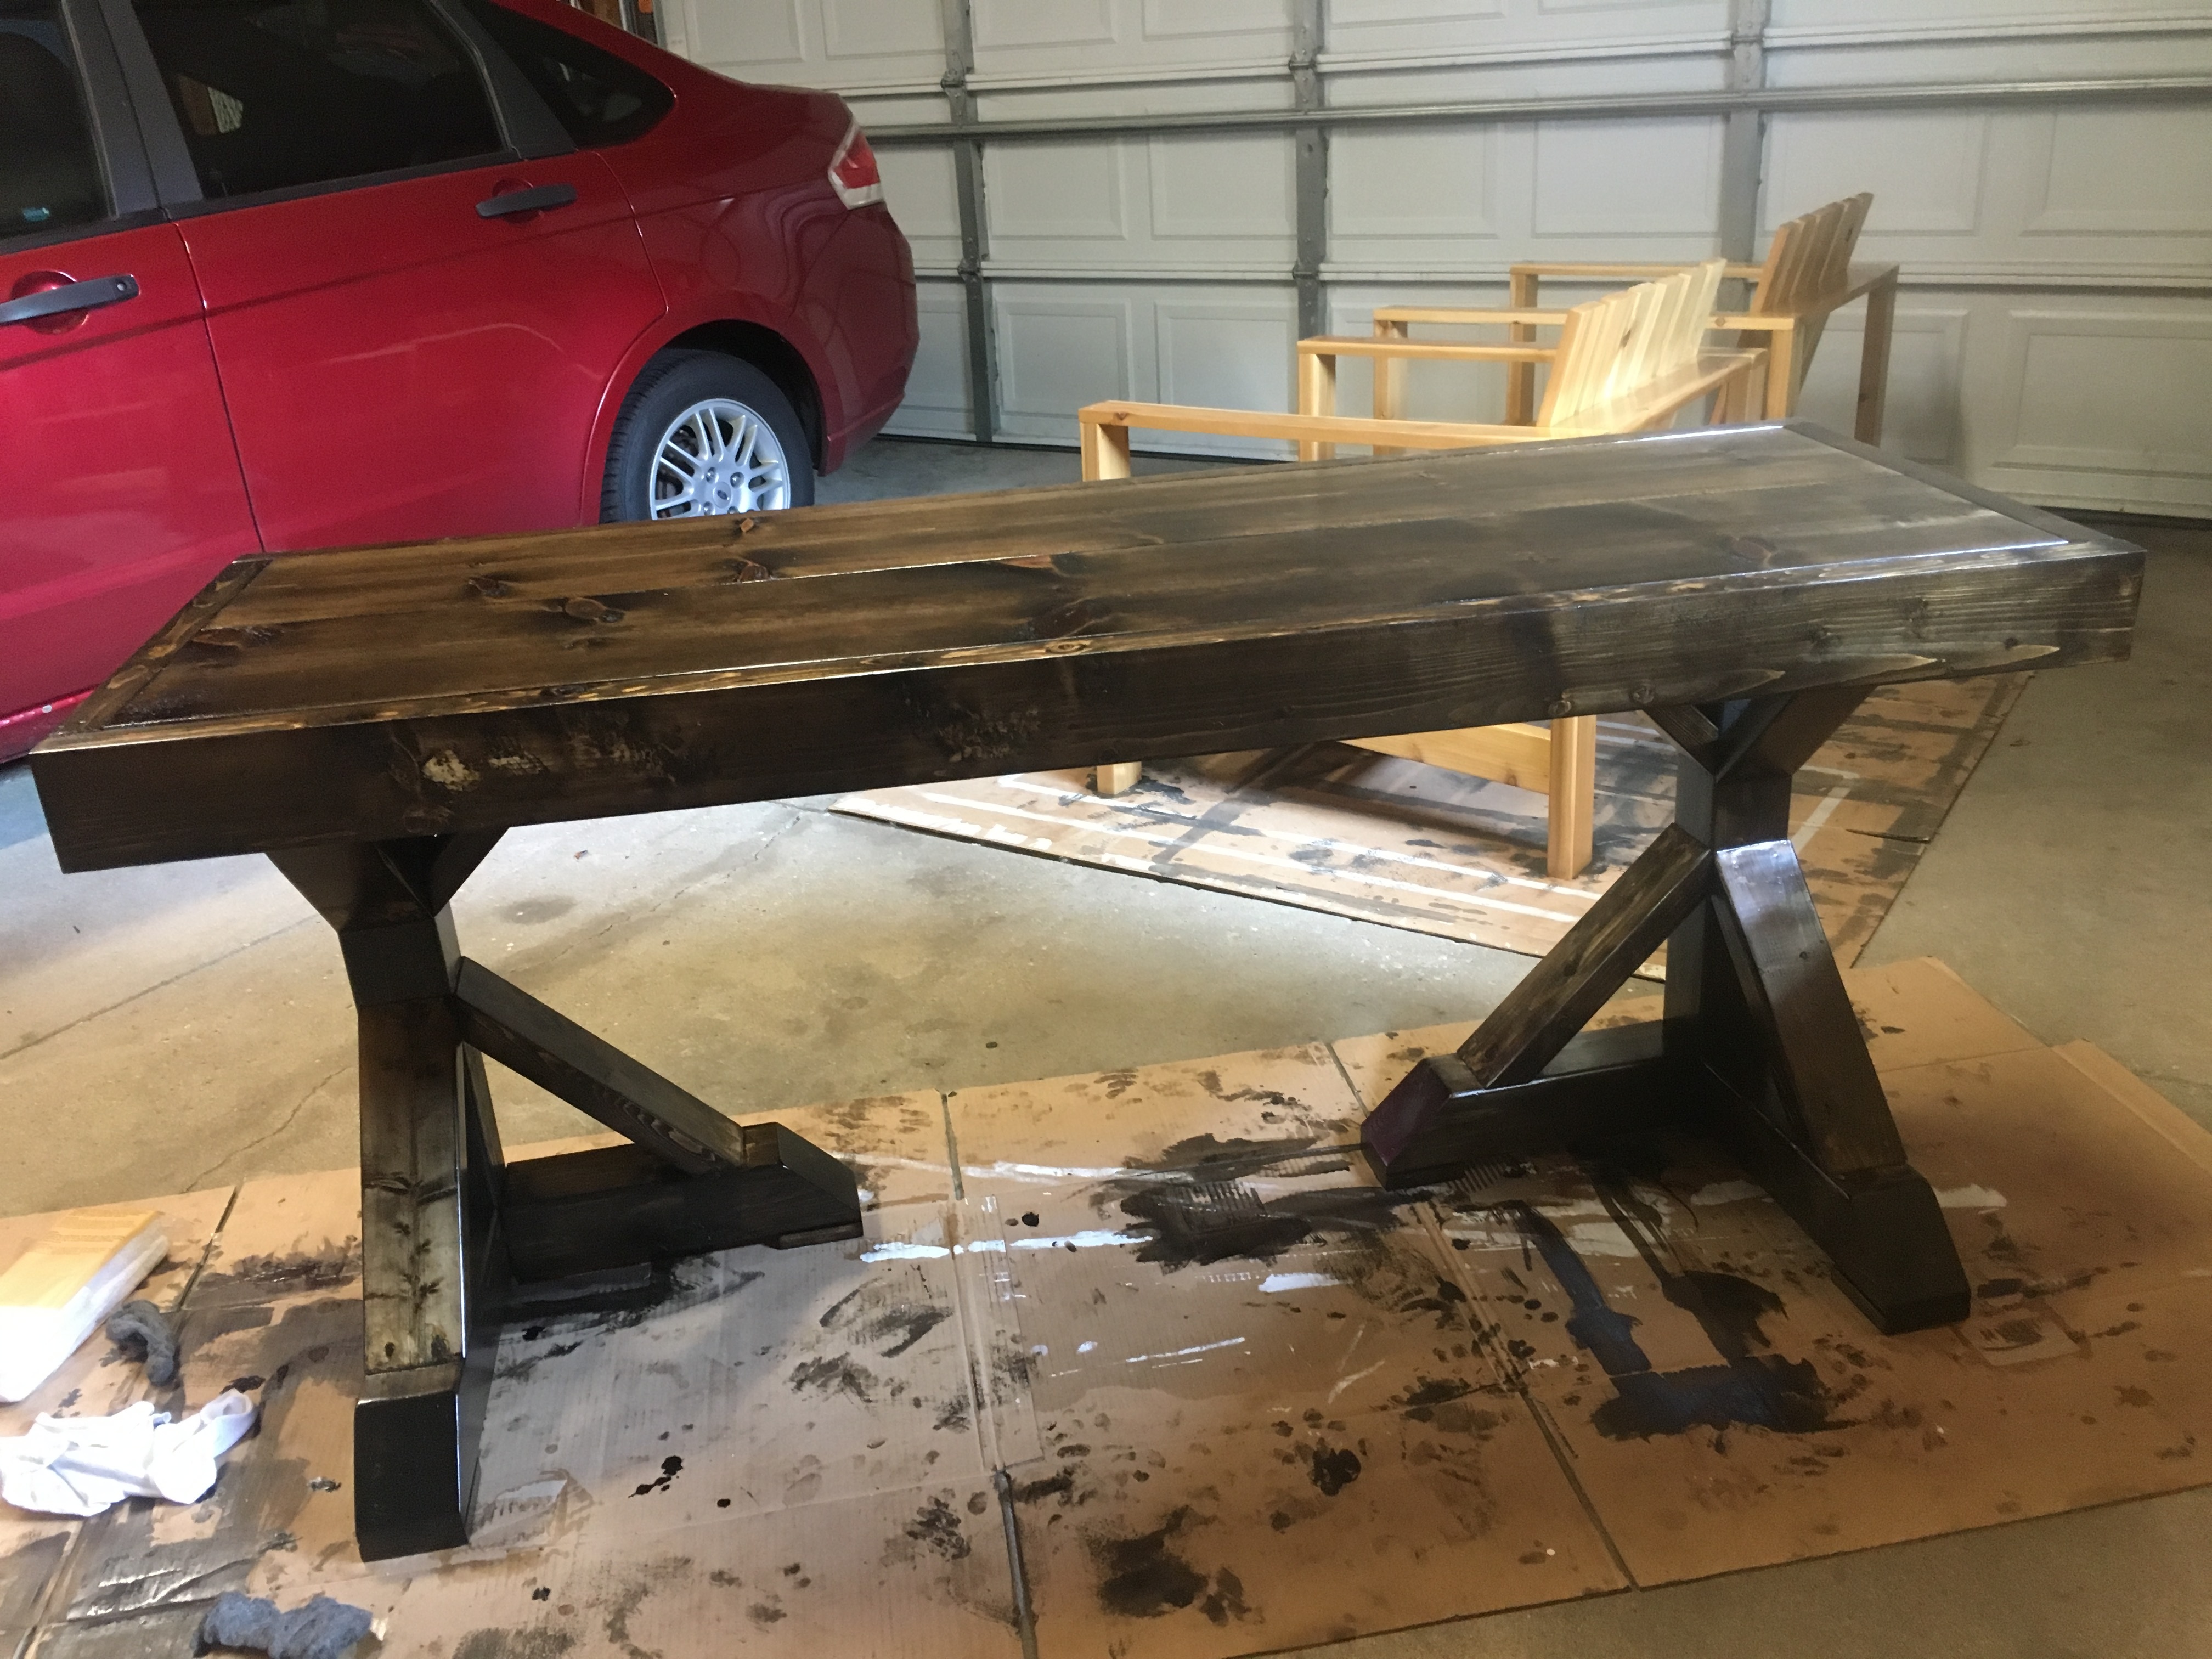
I’m wondering how the top holds up. I’ve been told that pine is too soft for a desktop. Like, eventually writing on it will start to create bumps, grooves, and other imperfections. I’m building a desk (totally different design) and looking for some ideas on how to make the top durable and strong. I’ve been told to buy hardwoods, but those are really expensive, and I’m not sure if they’re worth the cost. Then again, I’ll be using this desk frequently, and I want it to last for many years. Any advice would be appreciated! Thanks!
I think this desk would be perfect for my little laptop set up! Thanks for providing these plans, I get to build this in my shop class.
I saw Shanty Chic’s post on Pinterest; clicked the plans, so how well organized they are and thought ‘that’s a beautiful desk and it looks super easy’.
About one hour into the cuts I hated myself.
Of course, I just bought this house and don’t have a workbench set up yet, etc. I also don’t have a table saw, which I’ve been putting off for too long (next project I do I’m buying one, that’s it!). Now the desk is all built, it’s imperfect, sure, but it looks OK and it’ll do the job it’s meant to do (which looking good is part of its job!). I only bled once, that’s always good… and they are definitely GREAT plans.
A couple notes for others planning to do it:
1. I have the Kreg Jr ($40) and had no intention on spending money to have multiple Kregs. I also used a 5 inch clamp I had laying around from a brake job years ago. A little more tedious, but I saved money (part of my misery was working hard tho, so if you have it, spend some money to get everything!). In the absence of multiple Kregs, I put pocket holes on the bottom AND TOP of the feet. I only ended up putting on hole on the tops, but I’m glad I did. Also, in my opinion, kreg screws are terrible; that extension spins in those screws like crazy. T20 are much better, maybe try to find an extension and just get T20 screws.
2. I used an entire box of 2.5″ Kreg pocket screws ($5.75 and the depot).
3. My local Home Improvement ‘wont’ sell you straight boards’ Depot did not have ‘untreated’ 4X4s. I bought the treated ones because my buddy was with me (it’s his truck to get the stuff) and I didn’t feel like making him make more trips. We’ll see how they stain.
4. One guy wanted to put (3) 1X10’s and I really wanted to do that; but I decided against it because I didn’t want it to be ‘too’ big. I kind of do wish it was a little bigger tho, and I’m thinking using (2) 1X12s would be perfect.
4. I ran a torch across the top for effect; found it on pinterest (about 60% down on this page: http://www.homedit.com/20-d…
5. I’m super mega so incredibly grateful to Rogue Engineer for these plans… I’m also super mega so incredibly tired after it took me about 8 full hours. I really thought it was would be much quicker, he made it look so easy in the plans!
6. Now I have to find the will power to go stain and finish it. Who wants to bet that won’t be tonight?!?
OK, I’m done. These are great plans. Buy straight wood, if HD doesn’t have the untreated 4X4s go to Lowes (my buddy was there today and sent me a picture showing they had them; too bad I had already cut my treated ones already!). Thanks Rogue Engineer!!
Thanks for the plans. This was my first furniture project and it turned out great. Plan is to stain it a rich walnut.Two questions. Is there a suggested method for hiding the wood screws on the braces? And if my wife wants the top to be a smooth as possible, to keep kids from jamming crayon in the small gaps, would a paintable and stainable wood filler suffice or is epoxying the top a better method?Thanks,https://uploads.disquscdn.c…
I sent my father-in-law the link to this page and asked if this would be difficult to build. 2 weeks later and he just showed up today with a delivery for me. I’m ecstatic and already looking at other ideas on this site to drop https://uploads.disquscdn.c… some hints about!
https://uploads.disquscdn.c… I loved using this plan. I decided to use a 1×12’s rather than 1×10’s for the top. I also wanted a corner desk which could be split into two as we scale into a larger home in the near future. I love your work!
Hi! Thank you so much for posting this, it’s so thorough! Would you mind helping with some dimensions for a 30” top? I’m mostly concerned with the legs being able to support the weight, should they be positioned to the middle at that size and any suggestions on that if so! Thank you so much in advance if you are able to help!
I’m wanting to make this table but need it to be 6ft instead of 5ft. I want the top to still be able to handle weight. Do I need to add an extra support in the middle or will the extra foot not make too much difference?
Note: By extra weight I mean total like 40-50 lbs.
This is exactly what we’re needing for our office. We need three workstations to fit along an 8′ x 10′ room. Thinking of doing a 45 degree angle top, in the corner. How would you change measurements and leg placements though?
my husband made this desk for me, and I absolutely love it! Can’t wait till my new computer comes in, and I will finally have a space to do my work! https://uploads.disquscdn.c…
Thanks for the concept on building the desk with those legs… I liked it… I modified the design to create corner desk… I had lowered the flat surface on top of desk to install old 5/16″ thick hardwood flooring (that i pulled out from the office). Spoke with WoodCraft store staff about the desk support at the corner section. Here’s what I came up and came out beautiful!! Topped with epoxy resin.https://uploads.disquscdn.c… https://uploads.disquscdn.c… https://uploads.disquscdn.c… https://uploads.disquscdn.c… https://uploads.disquscdn.c…
I love the look of this table and would be the first big build of mine! I was wondering if it is possible to add a drawer and keyboard tray? If so, what would be the best way of doing so ? Also, I will need to make this slightly shorter in length. Is there anything glaring in the plan change I would need to be worried about besides just the top piece?
Thank you!
Yes, I totally agree! I’m begging my dad to build this for me but I also want some drawers and a keyboard drawer and there’s no way he’ll even attempt it without plans. I also think it would be amazing to have plans for a little hutch along the back (with little slots for sorting mail and little drawers to hold some things), but I would be ecstatic for plans for the regular side drawers and keyboard drawer. PLEASE!!!
Easy to build. Modified it by using dowels in addition to the pocket screw on the 4×4 legs. Also used dowels for the angled support then flush trim saw.https://uploads.disquscdn.c… https://uploads.disquscdn.c…
As a DIY woodworker and now working from home due to COVID, I was wanting to build a simple desk and my wife loved this design. Yet, I wanted to modify it and make it taller for a standing desk. You being the engineer, I wanted to ask what your thoughts are if I made it 42″ high? Will it be stable enough? Too top heavy? Thanks for the great work you do!
So I modified your your plan for a 45 degree desk. I am very happy with the result and I feel very accomplished with my first ever furniture build. Thank you. I hope I did your proud. https://uploads.disquscdn.c… https://uploads.disquscdn.c…