Disclosure: The links provided in the “materials” and “required tools” sections are affiliate links. If you would like to support our site and help keep our content free come find out more about how we can make money with no extra cost to you.
As always, if you have any questions don’t hesitate to comment below and especially don’t forget to post pictures of your finished products in the comments! ENJOY!
If I’m doing a shelf that’s 4 feet wide, how deep would you guess the max these shelves could go? (Assuming I will attach into at least two studs if not three.) I am considering using this approach for some A/V equipment that would weigh 25-30 pounds, but I don’t want a receiver crashing to the ground. I figure I would need about 16 inches depth to leave room for cables. (I won’t hold you liable for your response.) 🙂
Aaron, I think you’d still be fine at a depth of 16-18 inches.
One way to strengthen the shelf would be to decrease the spacing of the short 2x4s to help distribute the load. Also, making sure to screw the box into the back rail that’s screwed into the wall would assure you it won’t come tumbling down.
Other than that, the best advice I have to offer is to test it. Tie it into as many studs as you can and with 2-3 screws in each and put some weight on it overnight. You could possibly see it sag over time but I doubt it will come down.
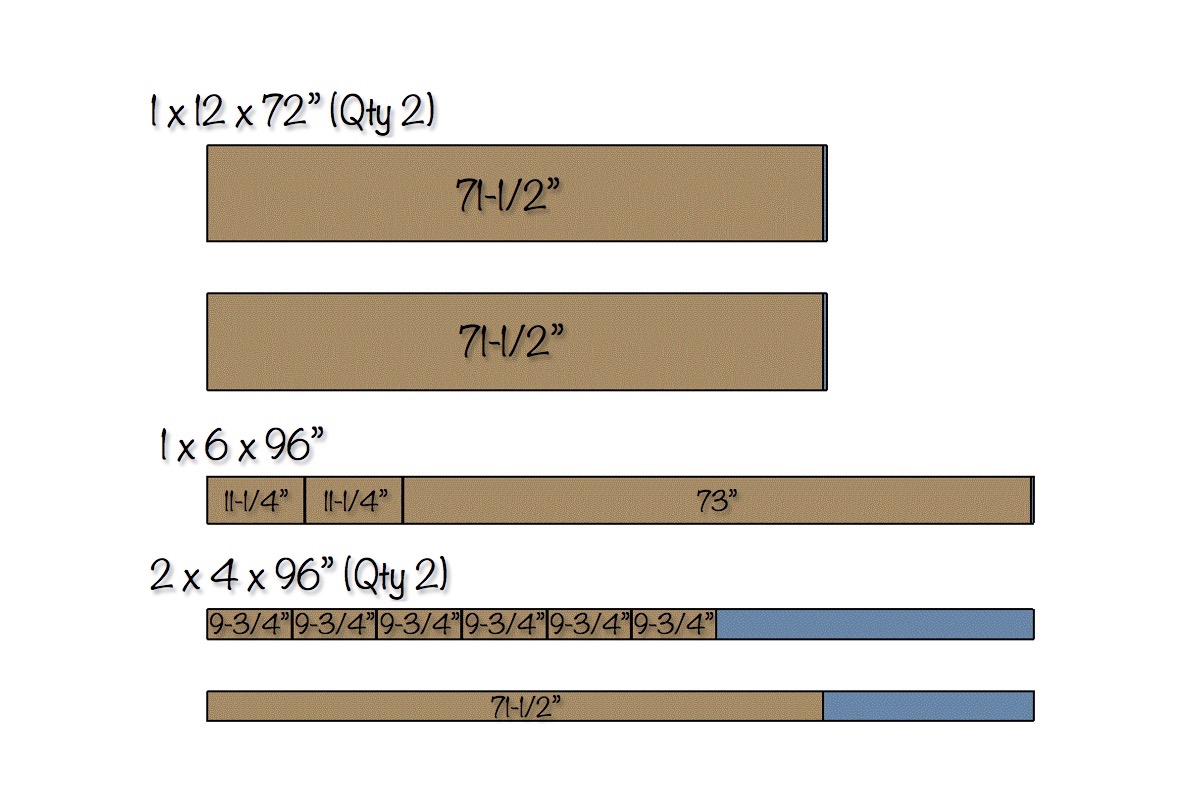
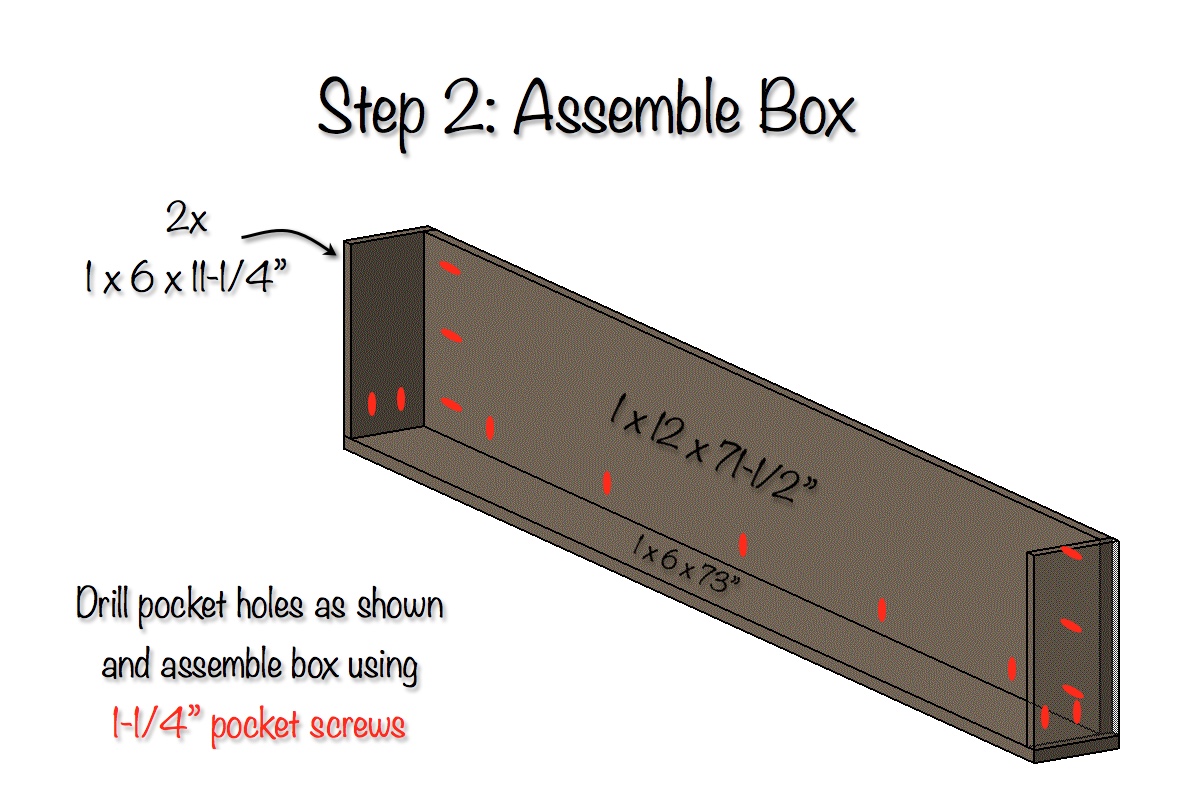
Thanks for the plans. But I believe there is an error in the plans with the 1×6’s at 11 1/4. Think it should be 12 inches not 11 1/4. When putting together the shorter side pieces at 1×6’s at 11 1/4 they were short as when attaching it. Shouldn’t it be flush to match the 1×12’s) since they both sit atop of the long 1×6 at 73 inches. The pictures made me think so, as well. I made two and the second shelf, I matched with the 1 x 12 (so I used 1×6’s with 12 inch length) And it worked perfectly. To fix my other shelf I just inserted a 3/4 cut of the 1×6 and glued in, as I was trying to complete this in a timely fashion and it was in the back corner mounted within a nook, so it was barely noticeable. Other than that, I think this was a great project.
Ahhh… that makes sense. I do realize there are sizing differences in precut, but it didn’t translate and confusion ensued. Had I used precut 1×12’s, I wouldn’t have had issue. I used oak plywood for the tops and bottoms and cut them to 12 inches exactly. lesson learned : ) Next shelf project I am using precut, so I am thankful you clarified my issue.
These plans made amazing shelves…although i didn’t realize the material list was for one shelf, I intended to make four but quickly realized I only had materials for two…
These shelves are the first things I’ve ever built! (I did 4 – 6′, 4′, 3′, and 2′ for a gigantic wall in our living room.) I love them, thanks so much for making such clear plans to follow for a newbie! I’m working on a combo secret/simple floating shelf right now as a media shelf. We’ll see how it turns out!


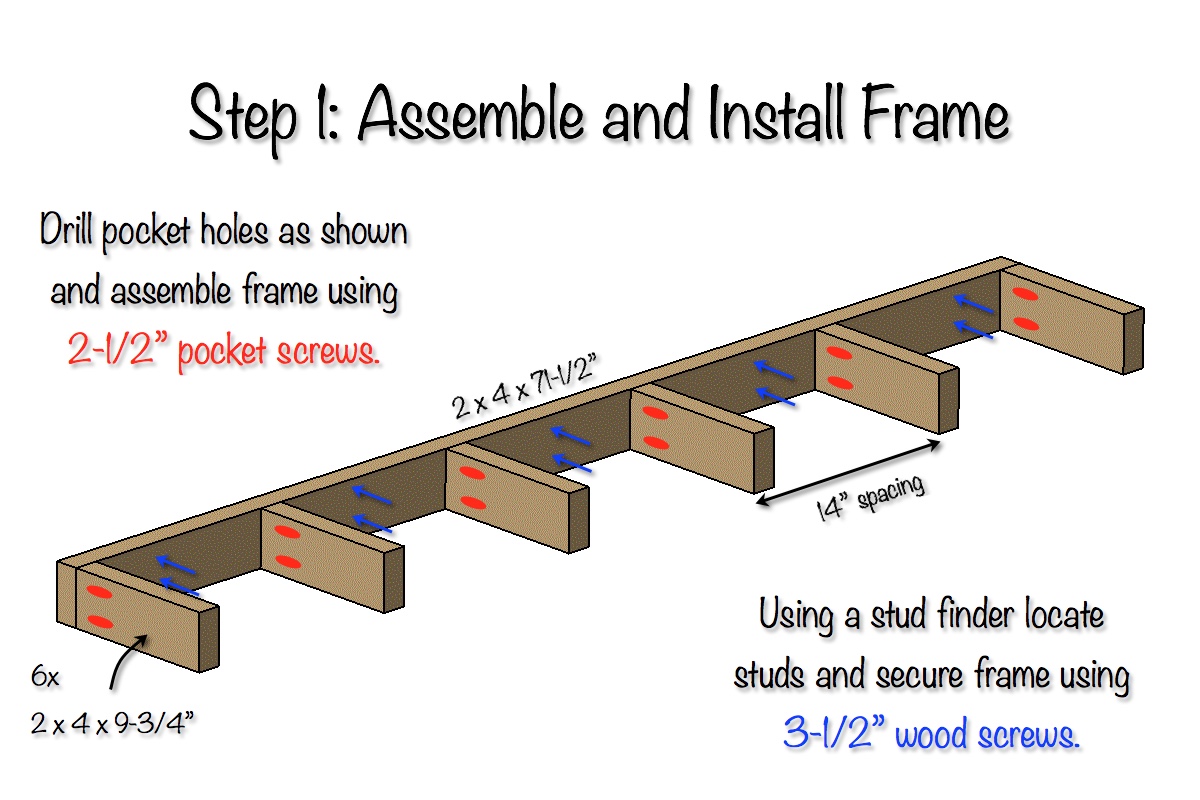
If I’m doing a shelf that’s 4 feet wide, how deep would you guess the max these shelves could go? (Assuming I will attach into at least two studs if not three.) I am considering using this approach for some A/V equipment that would weigh 25-30 pounds, but I don’t want a receiver crashing to the ground. I figure I would need about 16 inches depth to leave room for cables. (I won’t hold you liable for your response.) 🙂
Aaron, I think you’d still be fine at a depth of 16-18 inches.
One way to strengthen the shelf would be to decrease the spacing of the short 2x4s to help distribute the load. Also, making sure to screw the box into the back rail that’s screwed into the wall would assure you it won’t come tumbling down.
Other than that, the best advice I have to offer is to test it. Tie it into as many studs as you can and with 2-3 screws in each and put some weight on it overnight. You could possibly see it sag over time but I doubt it will come down.
This is awesome! I need to post pictures of the pieces I’ve built from yours and Shanty’s site. Thank you for these great, clear plans!!! 🙂
Thanks Rebecca! And please do. We love to see how these projects turn out for others!
Thanks for the plans. But I believe there is an error in the plans with the 1×6’s at 11 1/4. Think it should be 12 inches not 11 1/4. When putting together the shorter side pieces at 1×6’s at 11 1/4 they were short as when attaching it. Shouldn’t it be flush to match the 1×12’s) since they both sit atop of the long 1×6 at 73 inches. The pictures made me think so, as well. I made two and the second shelf, I matched with the 1 x 12 (so I used 1×6’s with 12 inch length) And it worked perfectly. To fix my other shelf I just inserted a 3/4 cut of the 1×6 and glued in, as I was trying to complete this in a timely fashion and it was in the back corner mounted within a nook, so it was barely noticeable. Other than that, I think this was a great project.
Thanks Kris. A 1×12 board (nominal lumber) is actually 3/4″x11-1/4″. Sorry for the confusion, but I’m glad it came out okay!
Ahhh… that makes sense. I do realize there are sizing differences in precut, but it didn’t translate and confusion ensued. Had I used precut 1×12’s, I wouldn’t have had issue. I used oak plywood for the tops and bottoms and cut them to 12 inches exactly. lesson learned : ) Next shelf project I am using precut, so I am thankful you clarified my issue.
I figured you had to be using plywood. Glad I could add some clarity. I probably should add a note in the cut lists from now on.
Thankyou for the fantastic plans and ideas. What an amazing site.
Thanks. And thank you for taking the time to check out the site. I love having awesome readers!
just finished my shelves. Thank you for these plans .
Thank you for the great tutorial! I used it to build a great floating shelf for my laundry room – linked back to you on my blog post :). http://thetarragonahouse.com/2016/01/12/thelaundryroom/
Thanks Christy! Looks great!
These plans made amazing shelves…although i didn’t realize the material list was for one shelf, I intended to make four but quickly realized I only had materials for two…
Thanks Kiah and sorry that wasn’t more clear.
These shelves are the first things I’ve ever built! (I did 4 – 6′, 4′, 3′, and 2′ for a gigantic wall in our living room.) I love them, thanks so much for making such clear plans to follow for a newbie! I’m working on a combo secret/simple floating shelf right now as a media shelf. We’ll see how it turns out!
Awesome Becky! Welcome to the club.
First one of your plans I did. I have now done at least 5. Thanks for the inspiration. Looks amazing under my TV.
AWESOME! Glad you are building tons of stuff. It gets addicting!
what stain did you use I like it!
Jacobean by Minwax. I think its 3 coats, but possibly only 2 I can’t remember.