

Bar Cabinet
This bar cabinet is a great addition to any wine lover’s home. The decorative sheet metal inserts in the door add a great contrast to the distressed chunky wood top. Inside this cabinet you’ll be able to house all your wine glasses, tumblers, 6 wine bottles, and a drawer to hold your bottle openers and accessories. The lower open shelf can store a variety of other things and can you believe this was built for under $150!
This has been a long time coming but is our first of many builds to come from our reader project idea submissions. I get ideas for projects from readers on a daily basis but to be honest, while many are great, it’s hard to keep track of them and to prioritized based on what I think you all would want to see. That is why I created the Future Projects page. This is where you can go and submit your project ideas and vote on others for a chance to have project plans created from your idea. If you haven’t checked it out yet, you should! For sneak peeks of our upcoming projects be sure to follow me on Facebook and Instagram. Also, follow me on Pinterest to get tons of projects plans from all around the web!


Required Tools
Materials
- Qty 1 – 3/4″ x 4′ x 8′ Plywood
- Qty 1 – 1/4” x 2’ x 4′ Plywood
- Qty 1 – 2 x 10 x 8′
- Qty 3 – 2 x 2 x 8′
- Qty 3 – 1 x 4 x 8′
- Qty 2 – 1 x 2 x 8′
- Qty 1 – 1/4” x 5-1/2” x 36” Board
- Qty 1 – 1/4” x 2-1/2” x 36” Board
- Qty 2 – 3/4” x 3/4” x 36” Dowel
- 2-1/2″ Kreg Pocket Hole Screws (Coarse)
- 1-1/4″ Kreg Pocket Hole Screws (Coarse)
- 1-1/4″ Brad Nails
- 2″ Wood Screws
- Wood Glue
- Qty 2 – Handles
- Qty 1 – Campaign or Chest Pull (For drawer)
- Magnetic Catch
- Decorative Sheet Metal
Disclosure: The links provided in the “materials” and “required tools” sections are affiliate links. If you would like to support our site and help keep our content free come find out more about how we can make money with no extra cost to you.
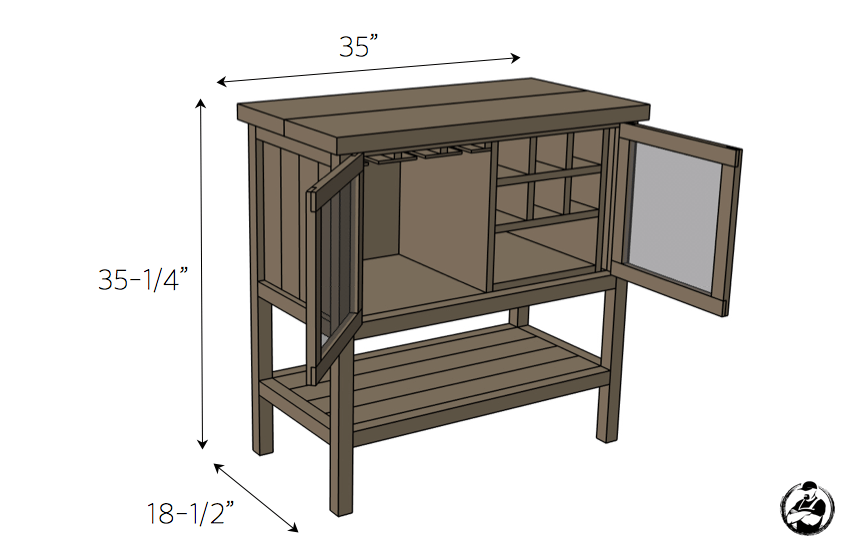
Dimensions
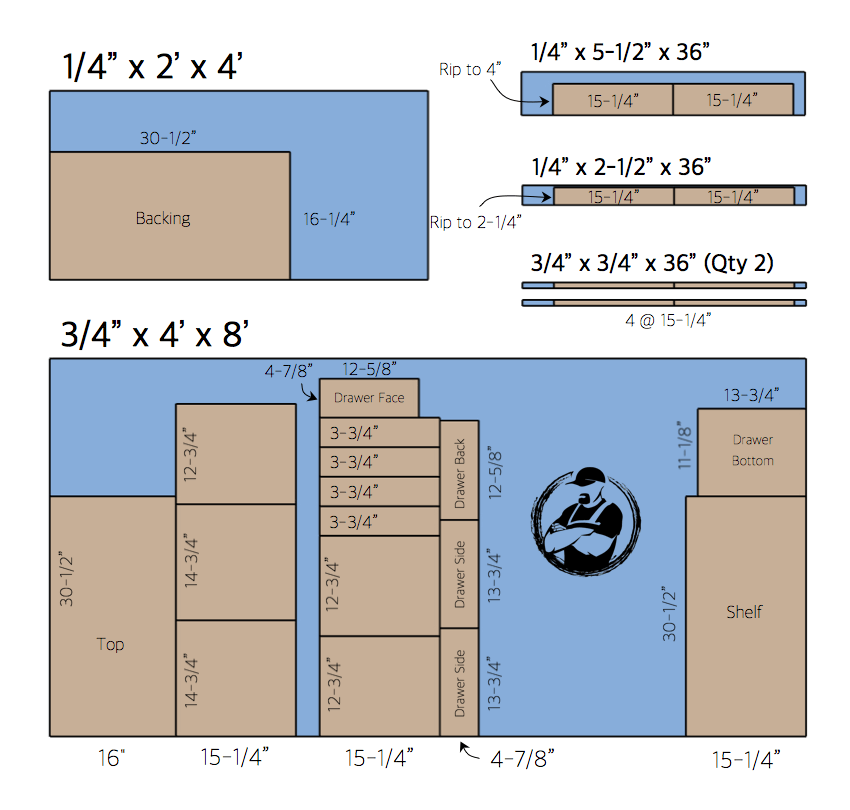
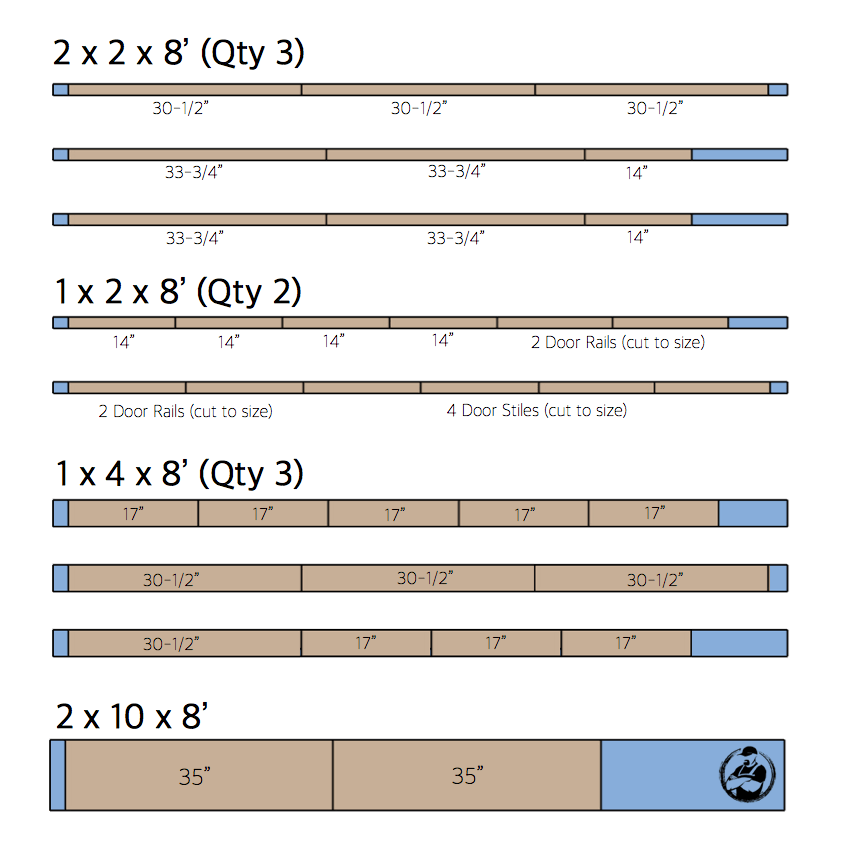
Cut List
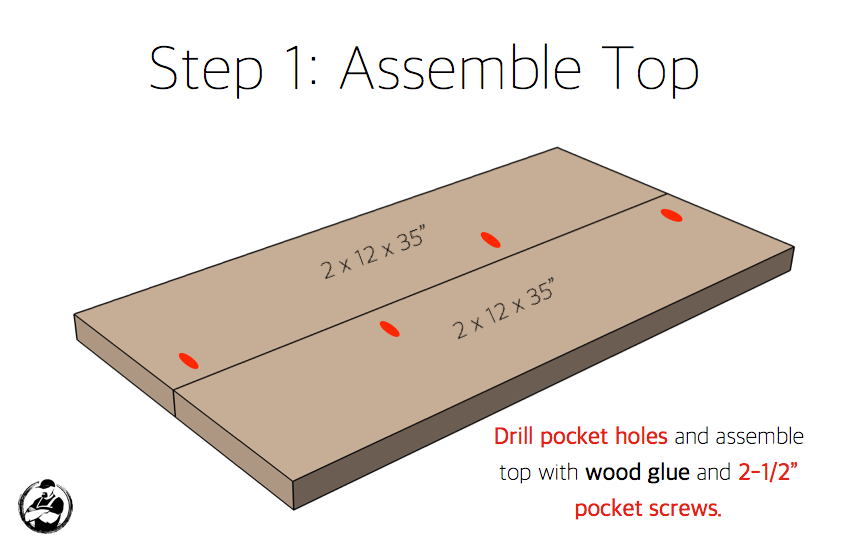
How to build a Bar Cabinet
For tips on how I distressed this top check out my post on 5 [natural looking] techniques to distress wood.
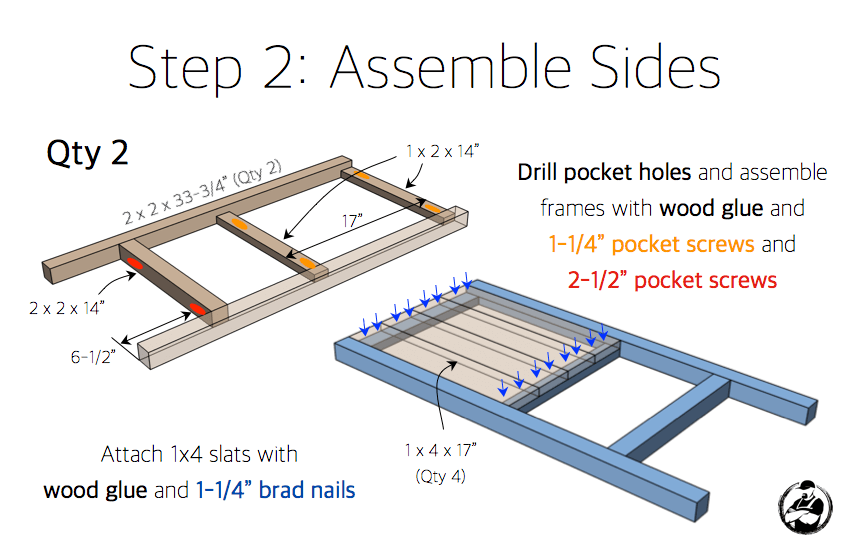
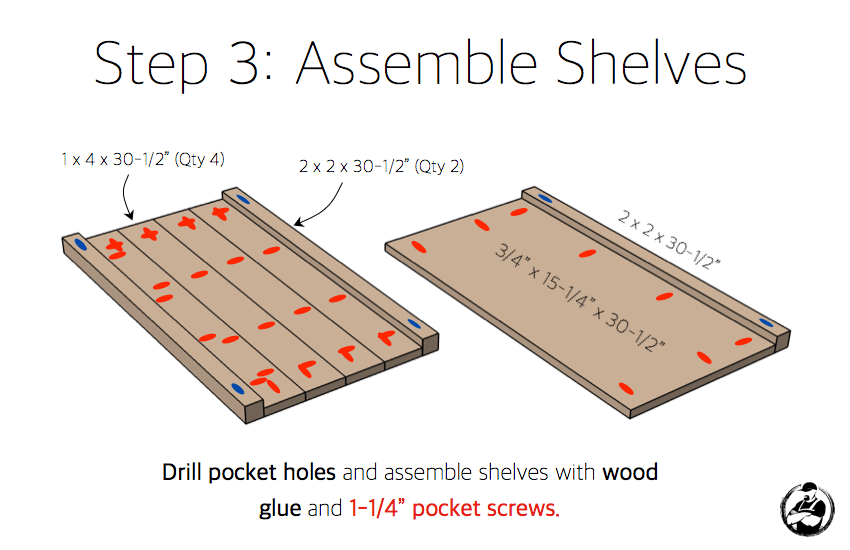
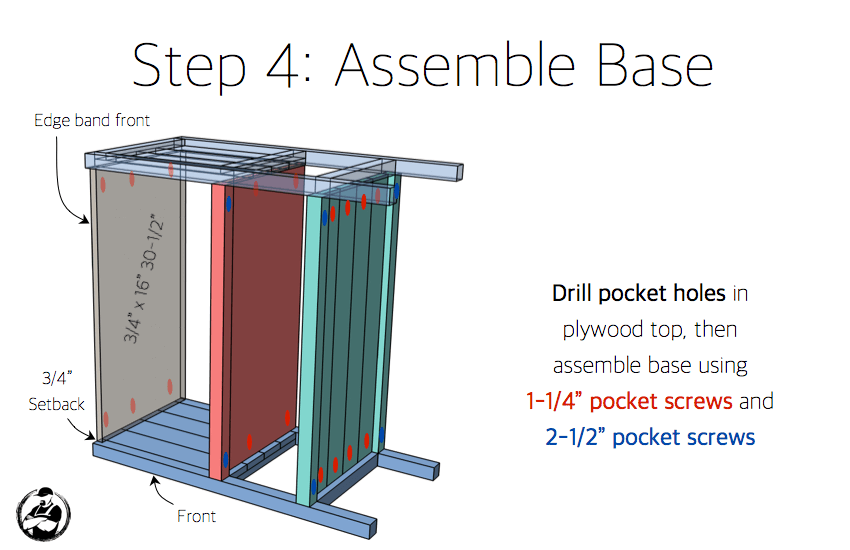
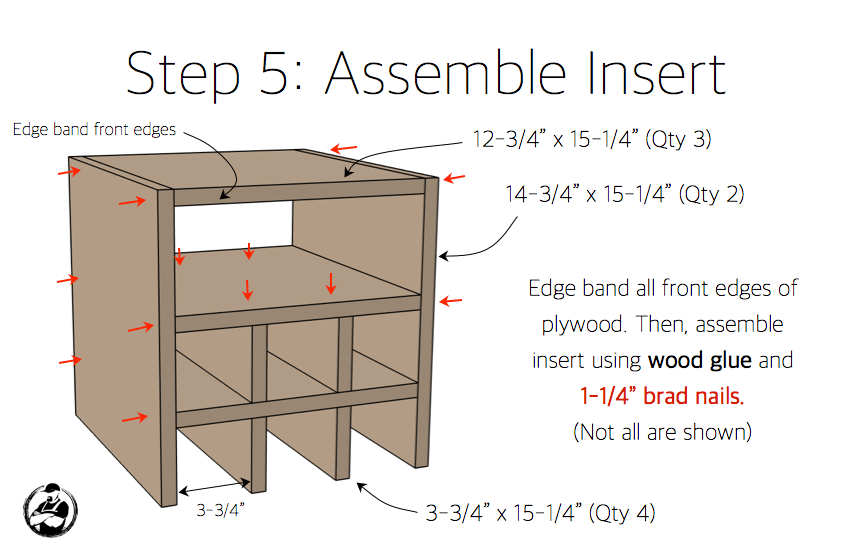
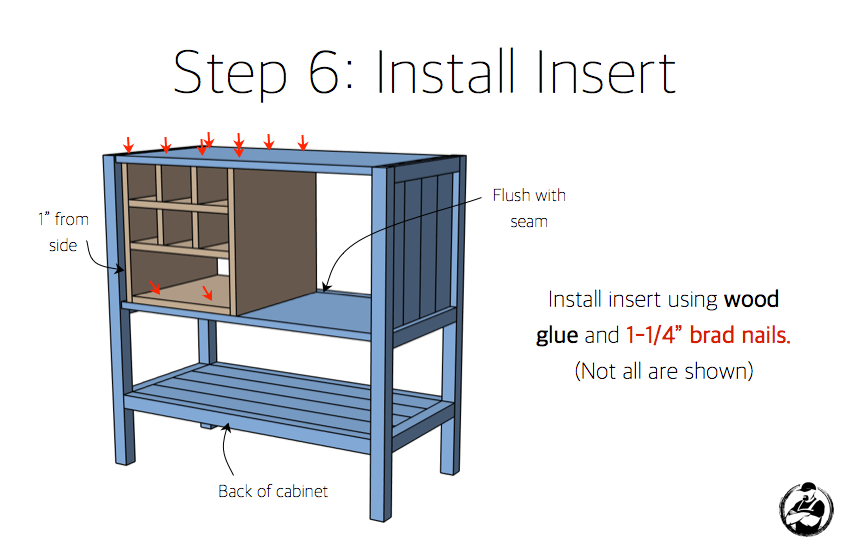
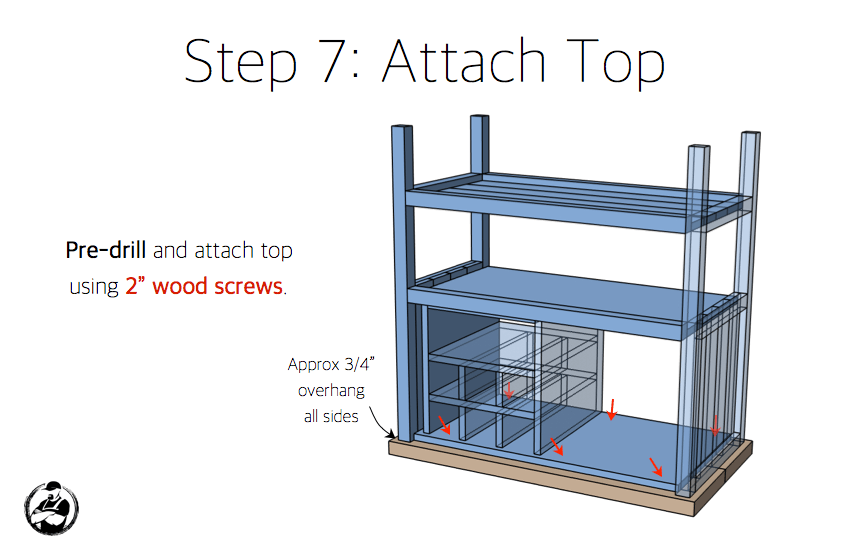
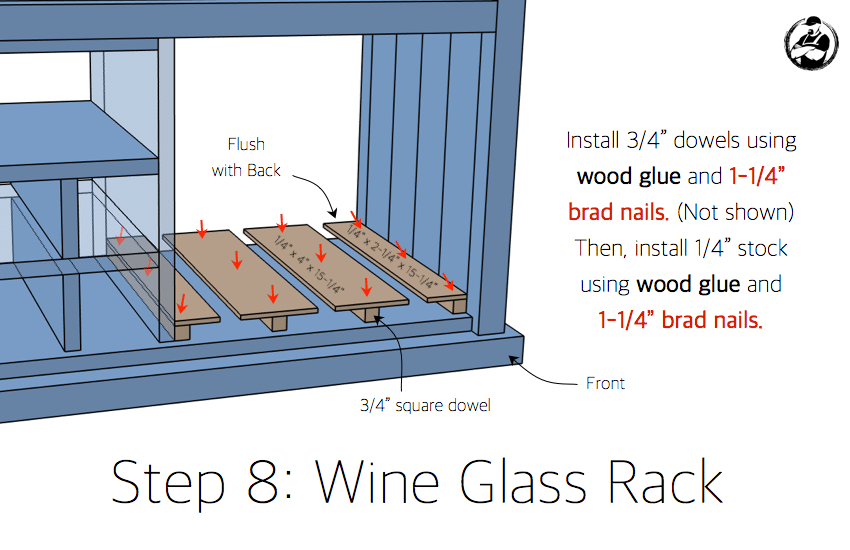
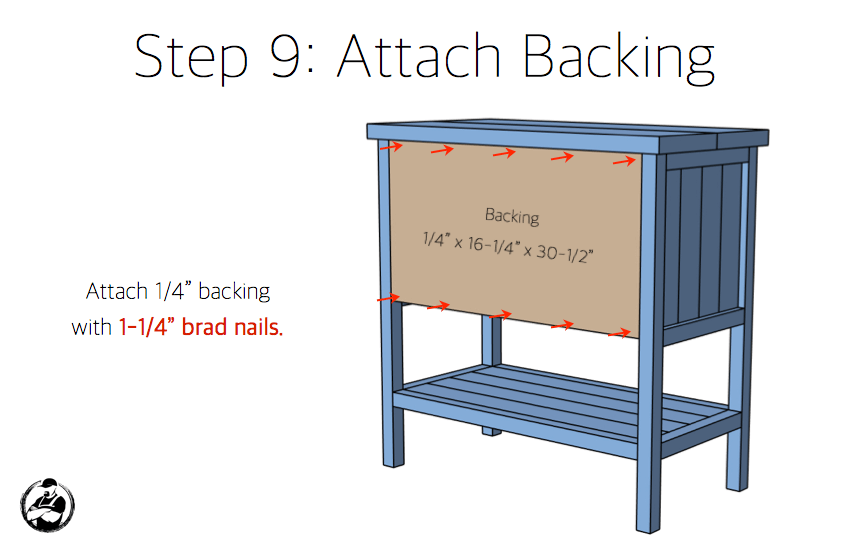
Questions? Comments?
As always, if you have any questions don’t hesitate to comment below and especially don’t forget to post pictures of your finished products in the comments! ENJOY!
Love this one! I have built many of your projects (beginning with your farmhouse table) and they all rock. Moreover I admire your guts to leave your steady job and make this your full time…awesome inspiration.
Thanks a lot Gary! I appreciate the kind words.
Jason, what color of stain did you use? looks great!!!
I believe it was dark walnut from Varathane.
It is Kona. I saw that while watching the video. Very close to Dark Walnut just a little darker.
What type of lacquer did you use on the top? I see it in the video but can’t make out what type it is. Did you use it on the whole thing? Thanks for such a great website!
Jamison, Nice looking cabinet. This will be my second time to build from your plans. Thanks for all the hard work putting this together. I know how much time this takes. Hopefully the beni’s are making it worthwhile. One note: Update step 1 to list 2×10 instead of 2×12.
Thanks Stephen!
Hey, beauty cabinet here, can’t wait to make it. Thanks for putting these plans together! I have been making more and more pieces from yours and other DIY sites, but have yet to buy a table saw…Is getting one a good idea for this piece? I’m sure the money I spend on one I’ll save the more and more I build my own furniture…
Thanks for the free plan. I made for friends of our that just bought a new house. It was a lot of fun building it. I did alter the plans because I don’t like the way plywood looks. They loved it. I’d love to post some pictures.
what did you use in place of plywood
1×4 for the bottom shelf and the insert. I used plywood for the back and the inside bottom
Thanks for the awesome plans! I’m in the middle of building this! Where did you purchase the black drawer pull? I really like that design and it looks very low profile (which is of course necessary due to the door being in front of it)
Thanks for the plans and the inspiration I altered them a bit to accommodate more bottle storage on one side. Still waiting for the drawer pull to arrive Thanks again
I love this plan so much! however due to my space constraints, would you be able to help me modify this to fit in a corner space? I would appreciate that so much!
Looks like link to the plans on this isn’t working. Are the plans still available?