

DIY Mudroom Lockers with Bench
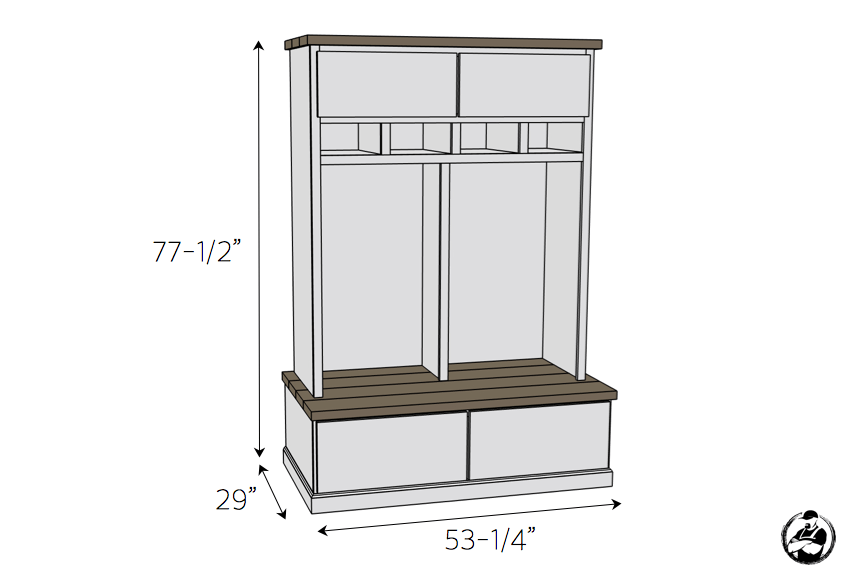
Quick build These DIY mudroom lockers are 77-1/2 inches tall, 53-1/4 wide and 29 deep, built from three sheets of 3/4 inch birch plywood, four 2x8s and five 1x2s. Two deep drawers under a bench seat, two open bays with hooks, four cubbies, two upper cabinets. One long weekend and roughly $600 in materials. Cut list, twelve illustrated steps and the wall-anchor spec below. Documented by Jamison Rantz, October 2026.
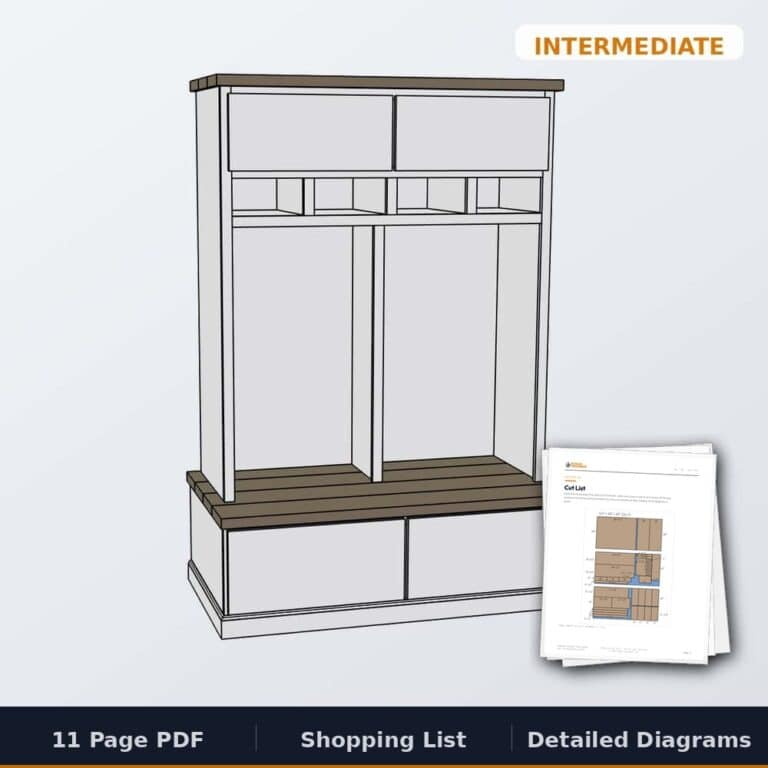
Want the ad-free, printable version?
Everything below in one organized, print-ready PDF: cut list, dimensions, step-by-step diagrams and shopping list. Perfect for the shop wall or your phone.
Our coat rack got out of control. Narrow entryway off the garage, four people, everyone taking their shoes off in the same three square feet. So the lockers went in the garage, where the shoes were already coming off.
That’s why the layout is what it is. One hook and one cubby per person, so nobody has to negotiate. Two big drawers under the bench, one for toys and one for kids’ shoes, because a drawer hides mess and an open bin advertises it. Upper cabinets for what you touch twice a year.
A cabinet shop starts around $3,000 for this footprint. This is $600 in sheet goods and hardware and one weekend. If you can’t give up 29 inches of depth, build it in instead: the built-in mudroom bench with drawers and the built-in mudroom lockers that sit on top of it are the two-part built-in version.
One thing before you start: this is a 77-1/2 inch cabinet with hooks at kid height. It gets anchored to studs. Step 14, not optional.
DIY Mudroom Lockers: Dimensions
77-1/2 inches tall, 53-1/4 wide, 29 deep overall. The locker carcass is 18-3/4 inches deep; the extra ten is the bench box and seat overhang. Measure your ceiling, and measure the doorway you have to carry the finished carcass through.
Cut List
Three and a quarter sheets of 3/4 inch plywood, half a sheet of 1/4 inch, four 2x8x10s, five 1x2x8s. Lay the sheets out on paper first. Yields are tight and a wrong rip costs a whole sheet.
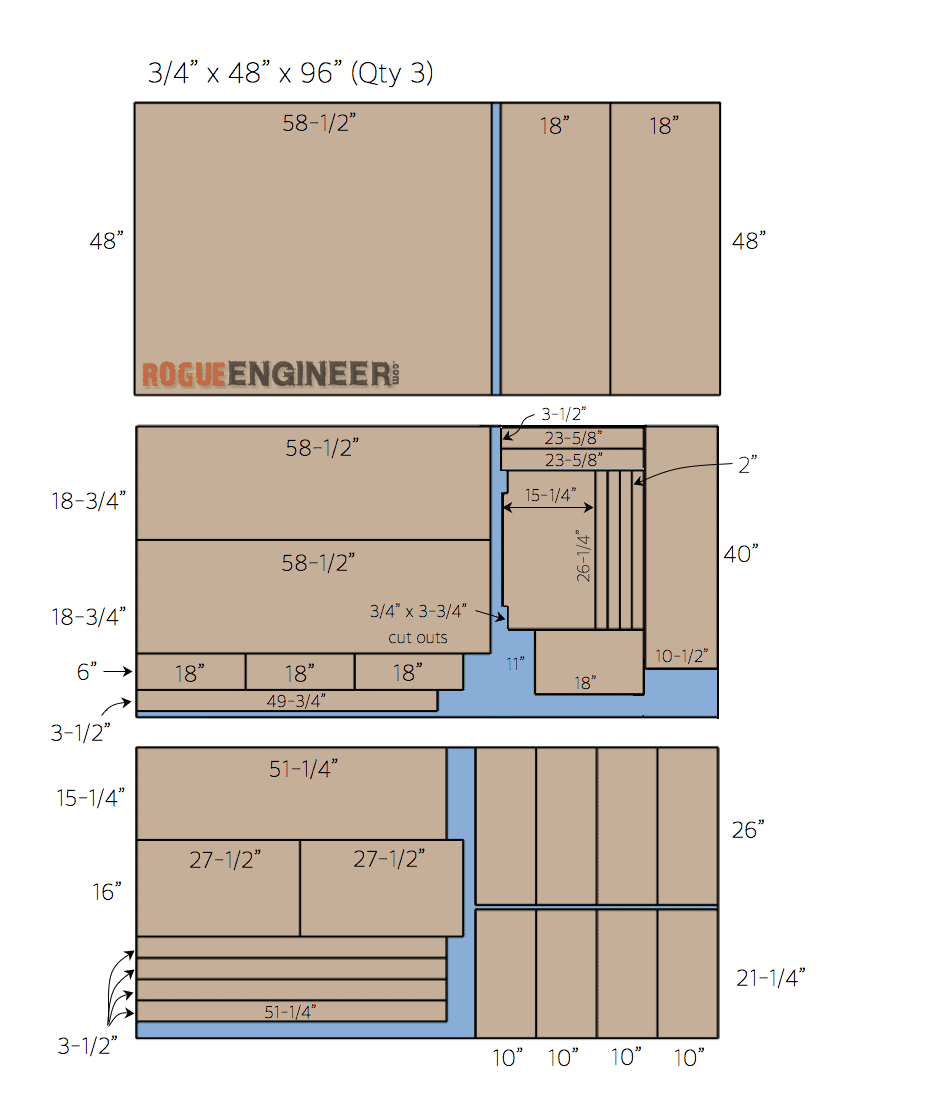
Updated October 2026: the plans and cut list were corrected, including the drawer divider (now 15-1/4″ x 26-1/4″). If you bought the printable plans before, re-download them from your account to get the corrected version.

How to Build
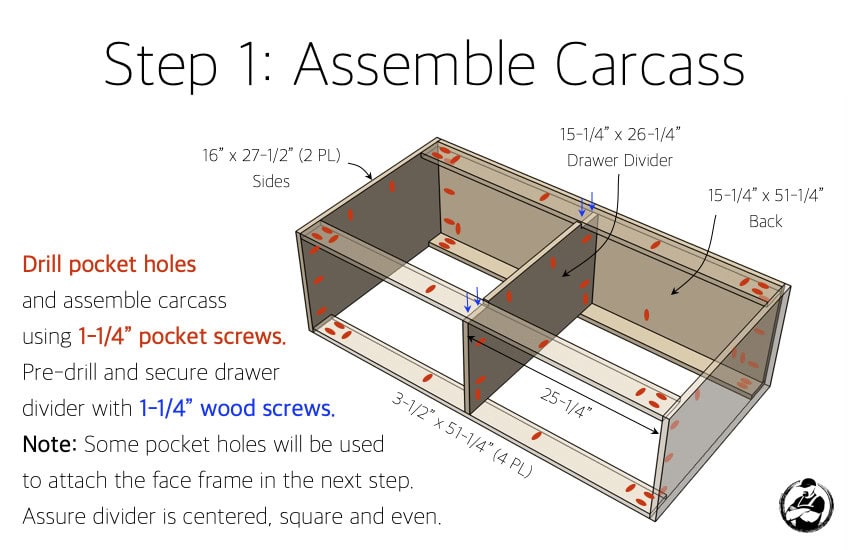
Assemble the bench carcass
Pocket-screw the bench box together with 1-1/4 inch screws: two 16 by 27-1/2 inch sides, a 15-1/4 by 51-1/4 back, four 3-1/2 by 51-1/4 rails. Pre-drill and set the drawer divider centered and square, because both drawers reference off it. Leave the front-edge pocket holes alone; the face frame uses them next.
Install the bench face frame
Build the frame flat: 1×2 at 49-1/4 top and bottom, 1×2 at 16 inches each end, an 11 inch center stile, the 3-1/2 by 49-1/4 bottom rail. Glue and pocket-screw it, then attach through the holes you left in Step 1. Flat on the bench is the only way it comes out square.

Assemble the drawers
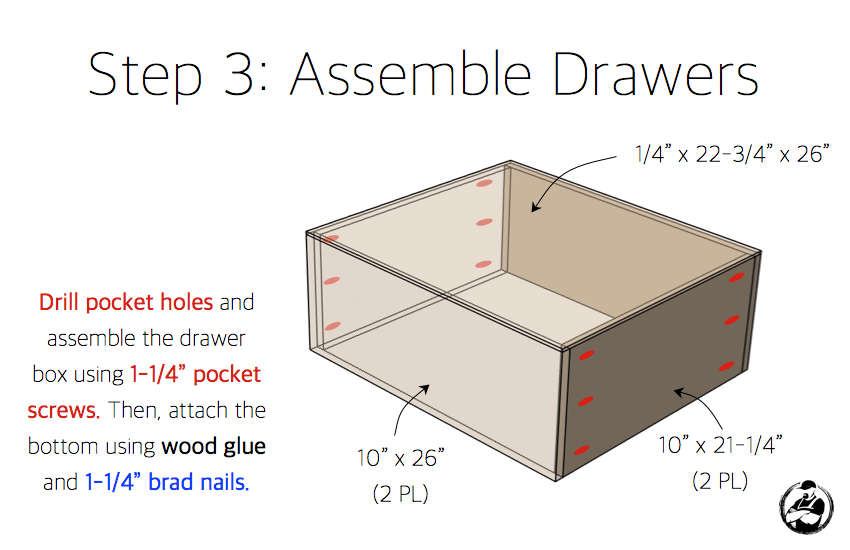
Each box is two 10 by 26 inch sides, two 10 by 21-1/4 ends and a 1/4 inch bottom at 22-3/4 by 26. Pocket screws for the box, glue and brad nails for the bottom. Check the diagonals before the glue sets; out-of-square drawers bind in the slides and nothing fixes that later.
Install the drawer slides
Glue and brad-nail the four 2 by 25-1/4 inch slide supports 3-1/2 inches off the ground, then mount slides with 1-1/4 inch wood screws. Set the drawer on 1/4 inch shims under the front, extend the slides, drive one 3/4 inch screw in the first hole. Pull the drawer nearly out, shim under the back, finish the screws. The shims are what stop the drawer drooping.

Start the locker carcass
Assemble the 48 by 58-1/2 back, two 18-3/4 by 58-1/2 sides, the 18 by 48 bottom, three 6 by 18 cubby dividers on 11-7/16 spacing, and two 3-1/2 by 23-5/8 rails. Pocket holes go on the back side so none show. Running lift-up hinges? Notch the 3-1/2 by 23-5/8 boards now so they clear the face frame later.

Add the locker shelf and center divider
Install the 18 by 48 inch shelf with 1-1/4 inch pocket and wood screws, then set the 12 by 40 divider between the bays. The shelf is what stiffens the cabinet against racking, so glue it and don’t be shy with screws. The divider turns one wide closet into two spaces people respect.

Assemble the locker face frame
Two 1×2 at 58-1/2 for stiles, three at 46-1/2 for rails, three at 5-1/4 and one at 9-1/2, all glued and pocket-screwed flat on the bench. Dry-fit the whole frame against the carcass before glue. Cheaper to find a 1/8 inch error now than after.

Attach the locker face frame
Glue it on, tack with 1-1/4 inch brad nails, then add the 1×2 at 40 inches on the center divider. Fill the nail holes and sand smooth while the cabinet is still on its back. Doing it now instead of after it’s standing saves a lot of ladder time.

Assemble the tops
Glue up two slabs with 2-1/2 inch pocket screws: three 2x8s at 51 inches for the upper top, four at 53-3/4 for the bench seat. Clamp across the joints so the faces come out flush and sand them flat before they go near the cabinet. The bench seat is the surface everyone touches.

Attach the tops
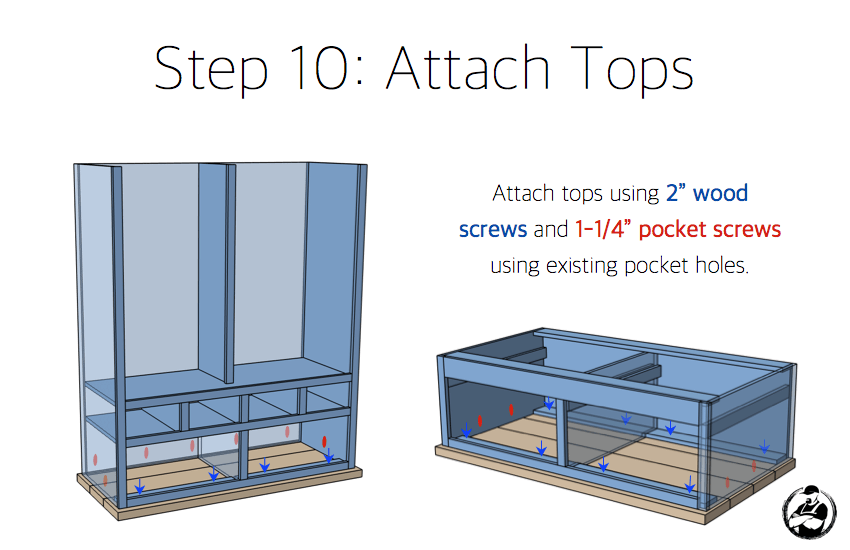
Fasten both slabs with 2 inch wood screws and 1-1/4 inch pocket screws through the existing holes, driving up from underneath wherever you can so the seat face stays clean. Shim any gap before you draw the slab down tight, or you’ll cup it.
Set the lockers on the bench
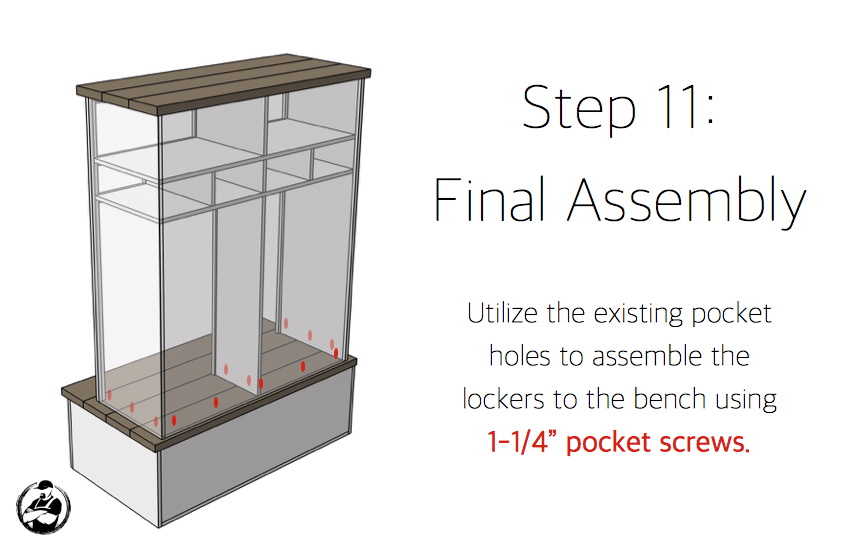
Stand the locker carcass on the bench box and join them with 1-1/4 inch pocket screws through the holes already there. Two-person step. The locker section is tall, awkward, heavy enough to hurt someone, and it wants to walk off the front edge while you line up the back.
Doors, drawer fronts, trim and hardware
Cut the doors, drawer fronts and baseboard trim to the openings you actually have, not to the plan. Inset, deduct 3/16 inch from the opening; overlay, add 1 inch. Hinges, supports and doors go on with 3/4 inch screws, drawer fronts get driven from inside the box with 1-1/4 inch screws, then pulls and hooks.

Fill, sand, prime and paint
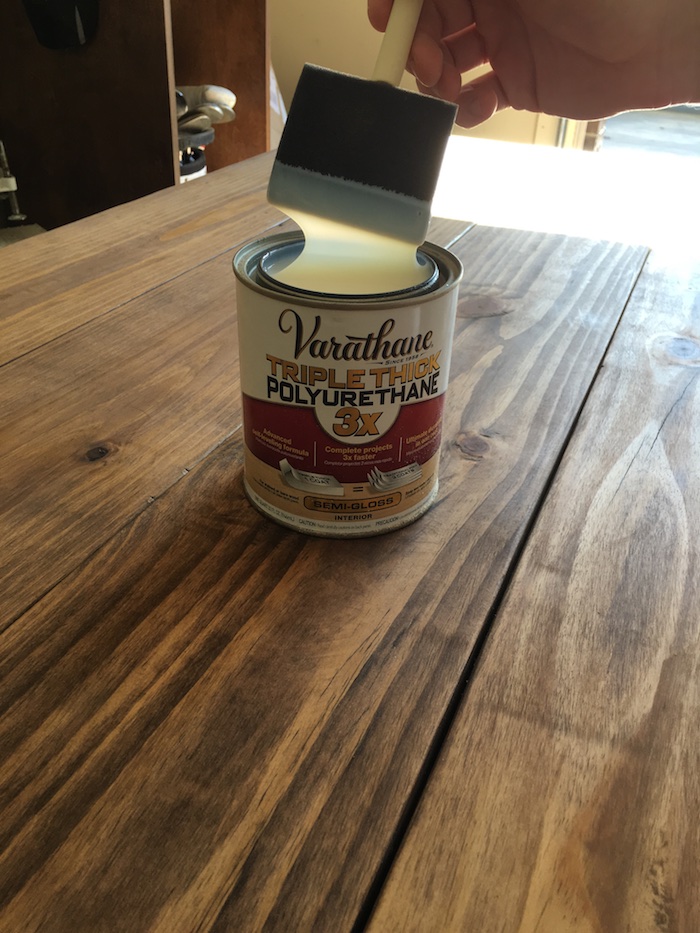
Fill every nail hole, sand to 220-grit, prime. I painted the plywood in Behr Polished Pearl semi-gloss so wet coats and boots wipe off instead of soaking in. The 2×8 tops got Varathane Dark Walnut and Varathane Triple Thick semi-gloss polyurethane. Flat paint photographs beautifully and looks terrible in a mudroom by February.
Anchor it to the wall studs (do not skip)
Find two studs behind the upper carcass and mark them. Drive at least two #10 x 3 inch cabinet screws with fender washers through the plywood back into two different studs, high on the cabinet, shimming behind each screw so you don’t bow the back panel pulling it tight. Drywall anchors are not an option. The Consumer Product Safety Commission’s Anchor It campaign exists because tall furniture tipping onto kids is a real and recurring injury. A 77-inch cabinet with hooks at 60 inches is a lever, and a kid hanging a backpack on it is the load. Loaded drawers help. They don’t make it safe on their own.
Final Result
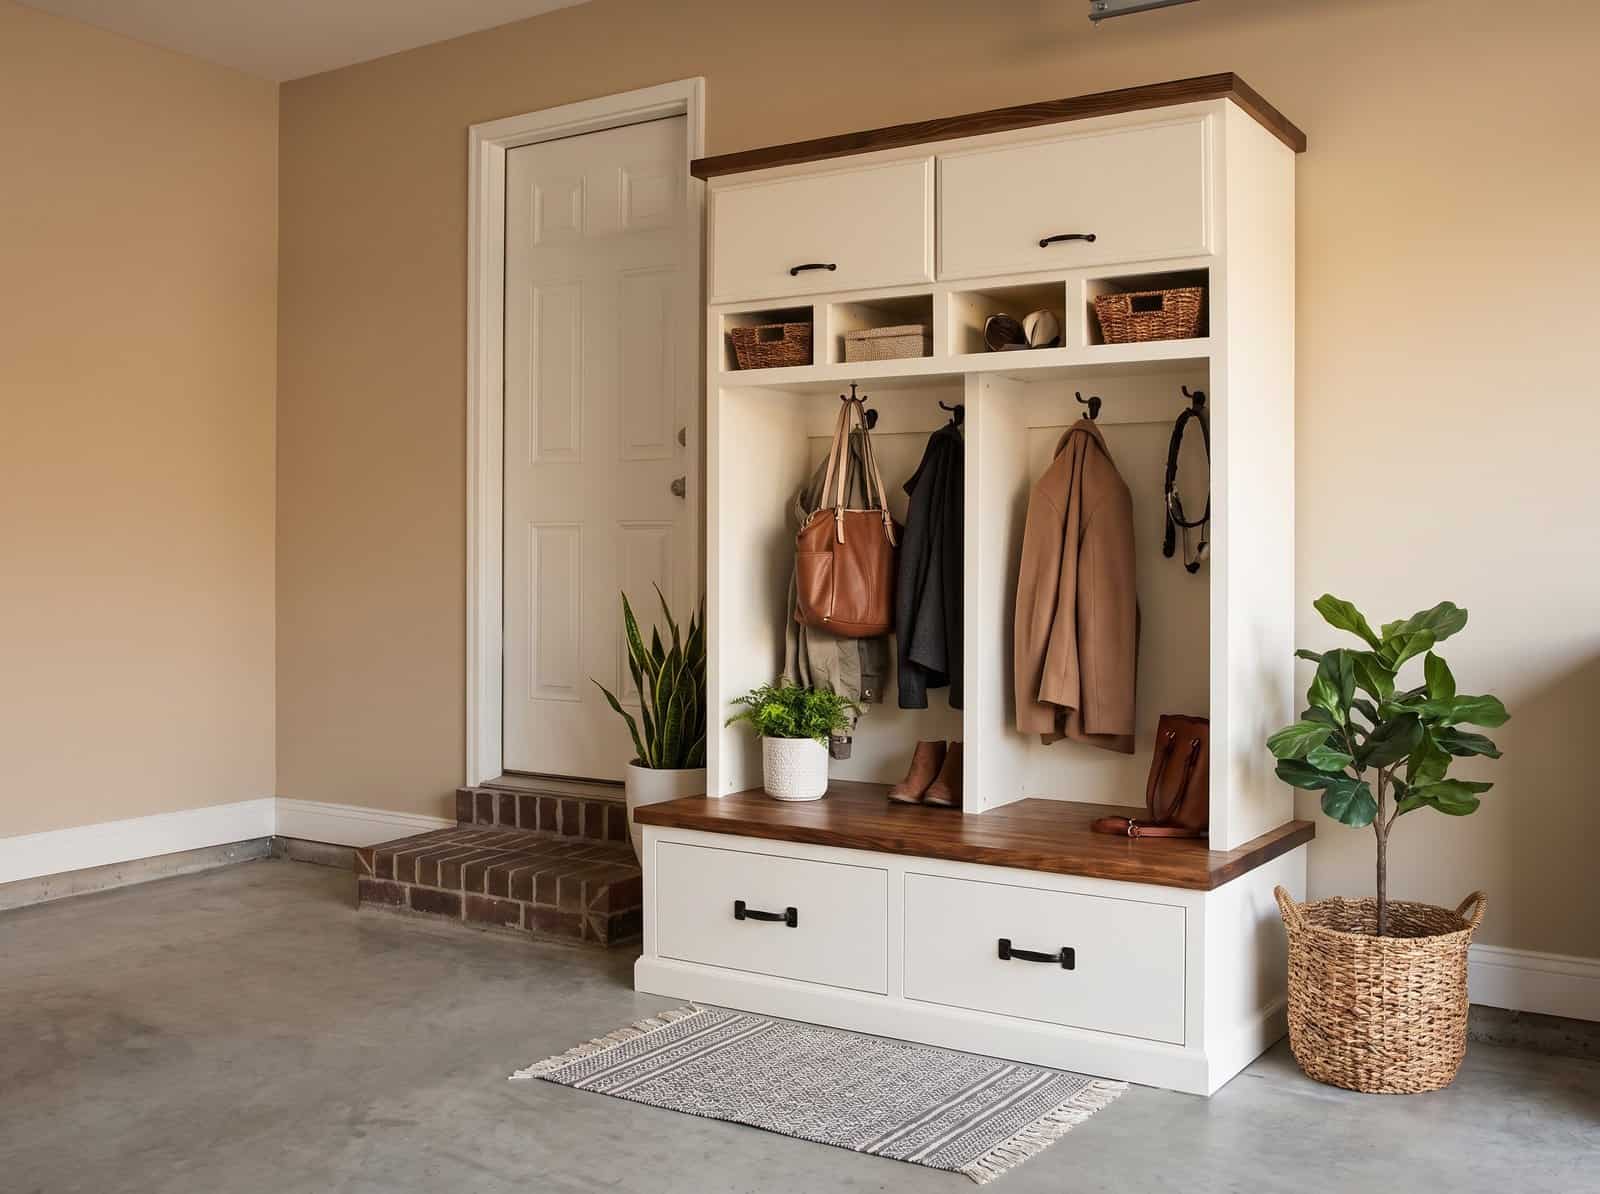
A hook, a cubby and a bay per person, two drawers deep enough to swallow the shoe pile, and upper cabinets for what you touch twice a year. Painted plywood wipes clean, the stained 2×8 seat takes the abuse, and the whole thing reads built-in once the baseboard trim goes on.

FAQ
What is the best material to use for mudroom lockers?
3/4 inch hardwood plywood for the carcasses, shelves and dividers. It holds a screw, it won’t sag across a 48 inch span the way particle board does, and the void-free core means the edges look fine under paint. Use 1/4 inch for drawer bottoms and backs, solid 1×2 pine or poplar for the face frames, 2×8 for the tops. Then prime and paint. Semi-gloss is the finish that survives wet coats and boots.
How much does it cost to build mudroom lockers?
Sheet goods are the whole story. Three sheets of 3/4 inch birch plywood at $85.73 each come to $257.19 (October 2026 pricing), and with half a sheet of 1/4 inch that is most of the bill. Add four 2x8x10s, five 1x2x8s, slides, pulls, hooks, hinges, fasteners and finish, and it lands around $600. Swap the hardwood plywood for sanded birch-faced sheathing and standard hinges for the lift-ups and you’re closer to $400.
How deep do mudroom lockers need to be?
14 to 18 inches for the carcass. This one is 18-3/4, the generous end, which is what lets a winter coat hang without shouldering into the face frame and a backpack sit on the cubby shelf without hanging out the front. Below 14 and coats bunch, doors stop closing, hooks push things back at you. Much past 18 and you’re trading hallway width for storage that gets lost at the back. The bench base runs 29 inches on purpose; a seat you sit on to pull boots off needs more depth than the cabinet does.
How do I fit lockers against a wall that isn’t square?
Assume it isn’t. Stand the unit in place, level it with shims under the base, then scribe: compass point on the wall, pencil on the face frame edge, run it down and cut to the line with a jigsaw or block plane. Baseboard trim and a bead of caulk hide the last 1/16 inch. Don’t fight the wall; the trim exists to absorb it.
What are some DIY ideas for mudroom storage?
One hook and one cubby per person is what stops the negotiating. Closed storage low for the ugly stuff, closed storage high for seasonal gear. If a full locker bank is too much, the [wall locker](https://rogueengineer.com/diy-wall-locker-plans/) is a single bay you hang on one wall, the [small entry bench](https://rogueengineer.com/diy-small-entry-bench-plans/) fits a hallway, and the [double golf lockers](https://rogueengineer.com/diy-double-golf-locker-plans/) are the same idea sized for garage gear.
Your Move
Go stand in your entryway tonight with a tape measure. Wall width, ceiling height, and the doorway you’d have to carry a 53 inch carcass through. 54 inches of wall and 78 of ceiling and you’ve got room for the whole thing. Less than that, scale the width and keep the layout.
Break down the plywood Saturday morning. Sunday you’ll be screwing hooks in. Just don’t quit before Step 14.
Be safe and happy building, Jamison
Shouldn’t the Plywood description on the top of the cut list read 3/4″ x 48″ x 96″ (now it reads 3/4″ x 24″ x 48″)
Good job. Looks very nice.
It absolutely should be. Thanks for the pick up.
I loved this plan and am super excited to share my project. Made some modifications, but technique and structure were all based on your plans. Awaiting more baskets for the top section. I went to the ceiling in my mudroom and used crown molding to finish the top off. Also had to work around switches and alarm pad. Used a 5/4″ piece of pine stained and poly’d for the top (actually it is 2 pieces that I joined together with glue and pocket screws – you actually can’t tell).
WOW! that looks awesome. Thanks for sharing. Glad to see people take my plans and make it work for their needs. Turned out great!
Anyway you can send the dimensions of this and what you changed and how much extra wood you needed via email? amberbreidel@gmail.com
Did you ever get the dimensions of the modified project? I’d love to do the same but it would be super helpful to have more info.
Hi, I’m pretty new to working with wood and really appreciate these plans. I have one question: on the cut list the drawer divider is 23 1/2 inches long, but on step 1 of the assembly detail its listed as 26 3/4 inches long. The piece I cut at 23 1/2 definitely doesn’t fit so I think the detail measurement of 26 3/4 is the right one.
Should I try to join a piece to my divider to get to 26 3/4 inches since it’s an interior piece or go out and buy another sheet of plywood and cut it correctly?
Thanks again for the plans and for the advice!
Good catch Paul, and I’m sorry the cut list steered you wrong. The assembly detail’s 26 3/4″ is the right length; the cut list’s 23 1/2″ was a typo and the plan will be corrected. On your cut piece: rather than joining a scrap on, I’d cut a fresh divider at the right length and save the short one for another part of the build. Sorry again for the confusion.
Quick correction to my reply above: the drawer divider is 15-1/4″ x 26-1/4″, not 26-3/4″. Both the cut list and step 1 are updated now. If you already cut one at 26-3/4″, trim it to 26-1/4″. Sorry for the mix-up, and be safe and happy building.
Hi, I’m pretty new to working with wood and really appreciate these plans. They are an excellent tool! I have one question: on the cut list the drawer divider is 23 1/2 inches long, but on step 1 of the assembly detail its listed as 26 3/4 inches long. The piece I cut at 23 1/2 definitely doesn’t fit so I think the detail measurement of 26 3/4 is the right one.
Should I try to join a piece to my divider to get to 26 3/4 inches since it’s an interior piece or go out and buy another sheet of plywood and cut it correctly?
Thanks again for the plans and for the advice!
the drawer divider and the locker divider are both different dimensions. Wish I figured that out before making all the cuts! Ah well, more scrap to fix mistakes with!
Trent, sorry those mismatched dimensions cost you some cuts. The plans were updated in October 2026 and the drawer divider and locker divider now match between the cut list and the step diagrams. The drawer divider is 15-1/4″ x 26-1/4″. If you bought the printable plans, re-download them from your account for the corrected version. Be safe and happy building.
Your plans inspired me to fill my back room entrance – Made a simple shoe rack / coat hanger / seat 🙂
Thanks for the encouraging plans !!
https://uploads.disquscdn.com/images/ff32a28fa8e1
502f76b3dbfdb0bf4744eb6e034baf4a38305593a56dadce81d3.jpg
Awesome plans! Expanded them a bit and got a lot of great storage.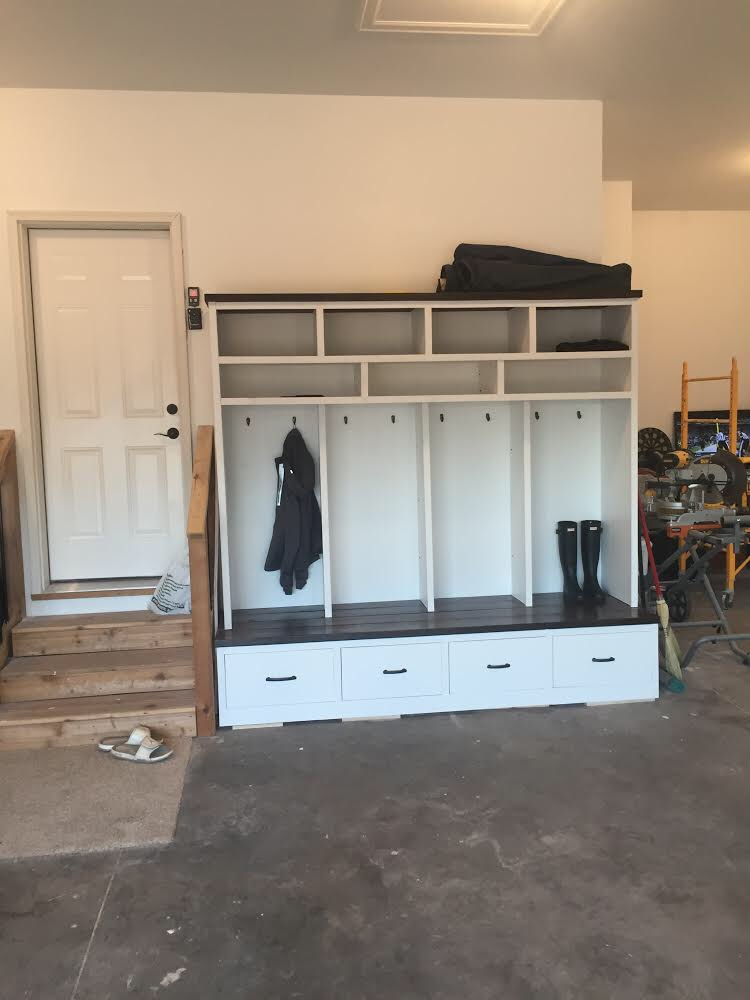
Awesome! I am wanting to do the exact thing (4 openings). Did you happen to make up plans for this?
Unfortunately I put them on a scrap piece of paper as I went, which ended up in the dumpster. I mainly just doubled everything Jamison did. I had to make a few adjustments so it would fit the width of my wall and I made the top 67” tall instead of 58 1/2” so longer coats wouldn’t drag on the bench.
Thanks so much for your reply!
Thanks for the great plans!
Please be aware you have 2 different dimensions for the draw divider on the cut list and diagram for step 1. The 26 3/4 inch long piece shown in step 1 is correct.
Yeah the cut list got me messed up a bit! Also the divider for the top part says 10 1/2 x 40, but down low it has 12 x 40. Same thing with the drawer peices. 2 inch down in the picture but 2 1/2 up top. good thing I bought 4 boards!
Paul and Ken, thanks for flagging these, and sorry it took this long to fix. The plans were updated in October 2026 and the cut list and step diagrams now match, including the locker divider and drawer pieces Ken mentioned. The drawer divider is 15-1/4″ x 26-1/4″, so not 23-1/2″ or 26-3/4″. If you bought the printable plans, re-download them from your account for the corrected version. Be safe and happy building.
Your plans inspired me to fill my back room entrance – Made a simple shoe rack / coat hanger / seat 🙂

Thanks for the encouraging plans !!
I modified the plans a little to make some more space, but it turned out ok!! Thanks for the plans Jamison! https://uploads.disquscdn.c…
This is sweet. Pretty much exactly what I’m thinking. Want the 4x because we have the space and want one for each family member.
What is the estimated cost for this project?
I modified the plan. Only 48″ wide due to space limitation and shelf instead of doors up top.
Thank you so much for this inspiration and your plans!
I Extended them a bit to have space for the whole family.
Awesome project – thank you very much! I expanded your plans a little bit and built a locker with 4 openings. I wrote a small blog post (in german) about my project. https://uploads.disquscdn.c…
Thanks so much for your building plans. Here is my rendition. Just finished this weekend. Cheers, kind stranger. https://uploads.disquscdn.c…
Could I ask how much this might have cost? My wife would like one of these for our entryway, and we’re on a tight budget as I’m a Youth Pastor and she’s a teacher.
About $200 in materials but that was a couple of years ago. Lumber costs have gone up, so expect materials to cost more, maybe as much as $300 total.
When I click get the downloadable pdf I get page not found. Any help in getting the pdf would be appreciated.