

Easy Modern Adirondack Chair Plans
Quick build These modern Adirondack chair plans use two board sizes, 5/4×6 treated deck boards and a treated 2×8, cost about $48 in lumber, and take about an hour of beginner-level work with a drill, circular saw and jigsaw. Straight tapered legs instead of the traditional curved stringers, so nearly every cut is a straight line. Finished chair is 36 inches tall, 32 wide, 34 deep. Cut list with angles and nine illustrated steps below. Documented by Jamison Rantz, October 2026.
Prefer to watch? The full build is on YouTube.
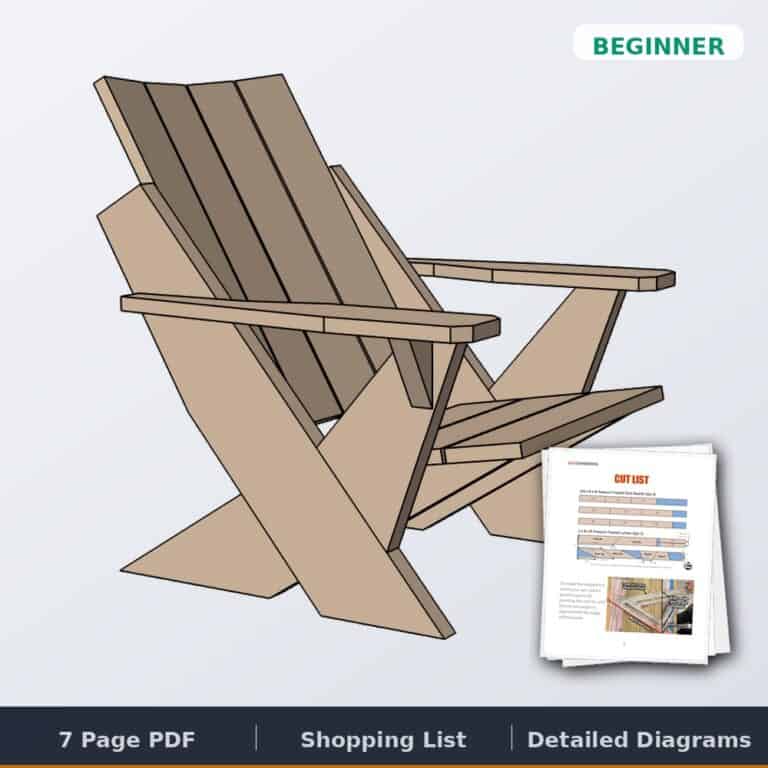
Want the ad-free, printable version?
Everything below in one organized, print-ready PDF: cut list, dimensions, step-by-step diagrams and shopping list. Perfect for the shop wall or your phone.
There are two different chairs hiding behind the phrase “adirondack chair plans,” and it’s worth knowing which one you want before you buy lumber.
The traditional Adirondack is the fan-back: a curved back of shaped slats, a scooped seat, curved stringers underneath, and a lot of template work. It’s beautiful and it’s a real project. The modern Adirondack, which is what this is, keeps the low recline and the wide flat arms but swaps the curves for straight tapered legs. I borrowed the leg geometry from our outdoor bench with a back and tilted it to Adirondack angles. Two jigsaw cuts survive, for the back supports and the armrest notches. The rest is straight lines off a circular saw.
That’s the whole pitch. A traditional Adirondack is a weekend and a stack of templates. This one is an hour, five boards, and a chair you can sit in that afternoon.
Want the rest of the set? The outdoor chaise lounge and the outdoor club chair use the same lumber and the same tools.
Adirondack Chair Plans: Dimensions
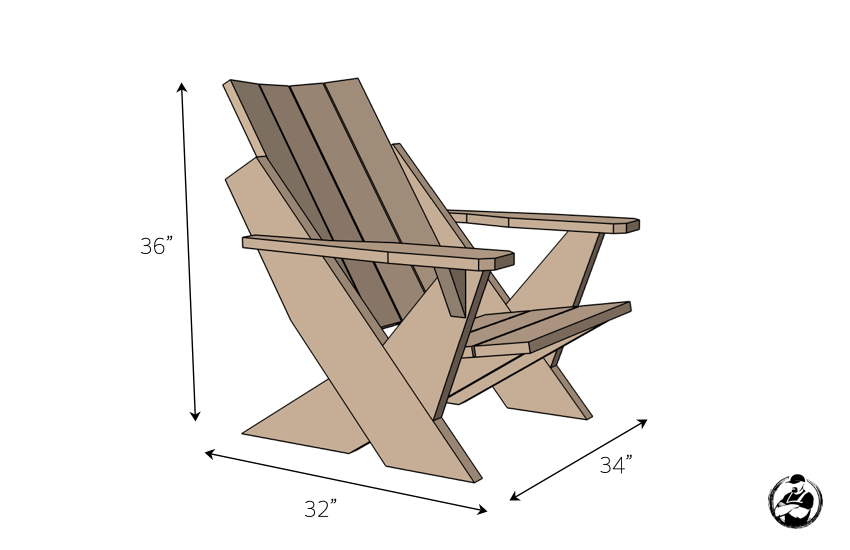
36 inches tall, 32 wide, 34 deep. That’s a low seat by design, which is the point of an Adirondack, and it’s the one thing tall readers raise in the comments. Bad knee? Add 2 inches of pad under the legs before you cut anything.
Cut List
Three 5/4x6x8 deck boards give you three pieces at 23 inches and six at 28. Two 2x8x8 boards give you both long legs, both short legs, both supports, and the two 23-inch pieces that get ripped in half to roughly 3-5/8 inches for the back supports. Cut one leg, then trace it for its mate. Faster than measuring twice, and the pair is guaranteed to match. No miter saw? Every angle here can be laid out with a speed square.

How to Build
Taper the long legs
Mark the taper 2-3/4 inches down and 15-3/4 inches along, connect with a straight edge, and run the cut with a circular saw. The taper is what makes this read as modern instead of a plank with an angle on it. Cut the first leg, trace it onto the second.

Assemble the legs
Mark a line on each long leg for alignment, set the short leg on top per the diagram (4 inches in from the front, with the 2-7/8 and 8 inch layout marks), and secure with 2-1/2 inch wood screws. Before you drive anything, lay a straight edge across the bottoms of both legs and confirm they’re even. If they aren’t, the chair rocks and you’ll never fix it later.

Cut out the back supports
Take the two 3-5/8 by 23 inch pieces, mark the three points from the diagram, connect them with a straight edge, and cut the curve with a jigsaw. The curve is small, and it’s the only thing making the back comfortable instead of flat.

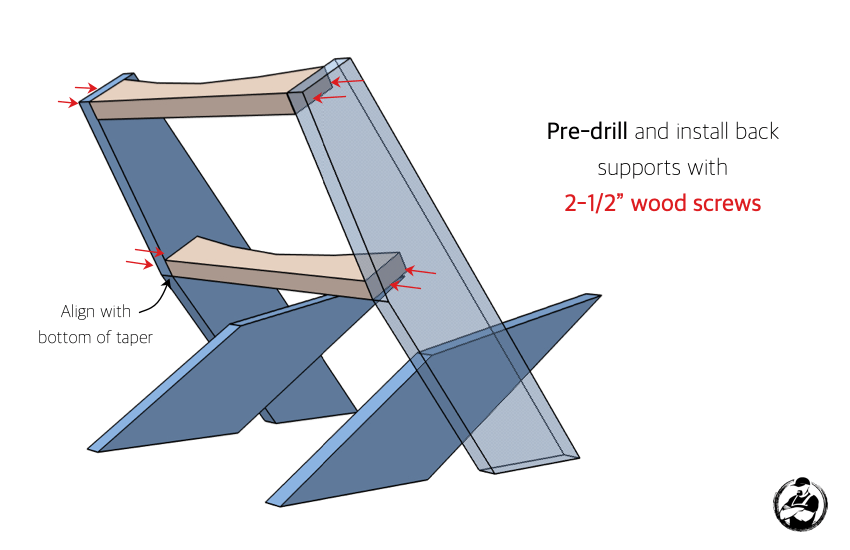
Install the back supports
Pre-drill, then install both supports with 2-1/2 inch wood screws, aligning the lower one with the bottom of the taper. Pre-drill the top of the leg especially. That’s the thinnest section and it’s where boards split. I know because I got lazy and mine split.
Taper the arm supports
Mark the line across each support (3-1/2 inches at the short end, 30 degrees one side and 20 the other) and cut with a circular saw. These are small parts. Clamp them down before you cut.

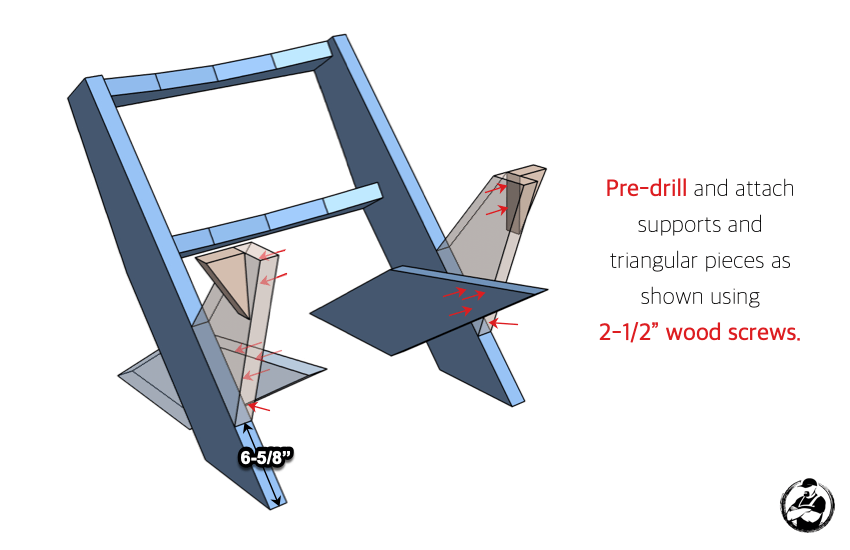
Install the arm supports
Mark the arm support height on the leg (6-5/8 inches off the reference line), pre-drill, and drive 2-1/2 inch wood screws. Then set the triangular pieces so their top is flush with the support and fasten. This joint is worth upgrading with glue or a carriage bolt, since there isn’t much surface where the support meets the leg.
Install the seat and back
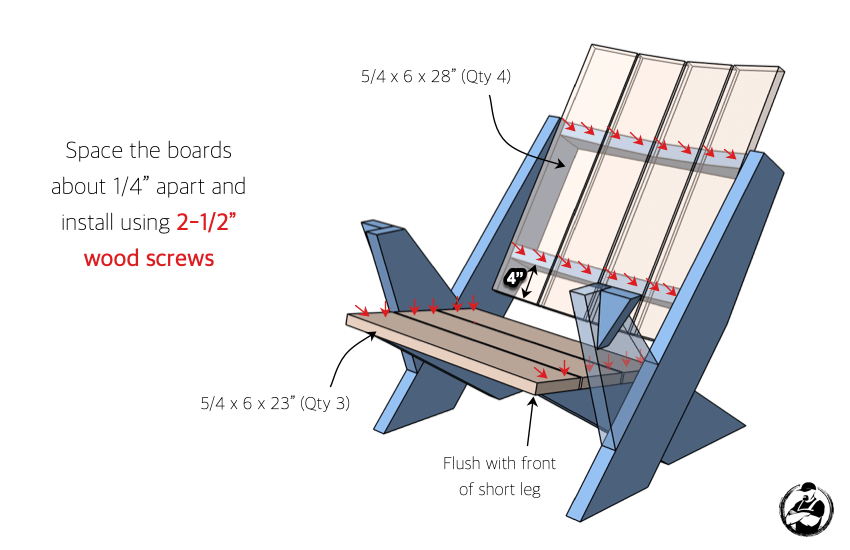
Four 28 inch deck boards make the back, three 23 inch boards make the seat, all fastened with 2-1/2 inch wood screws. Space them about 1/4 inch apart so water drains and the boards can move seasonally, and keep the front seat board flush with the front of the short leg. Pre-drill every hole; 5/4 stock splits at the ends.
Cut out the armrests
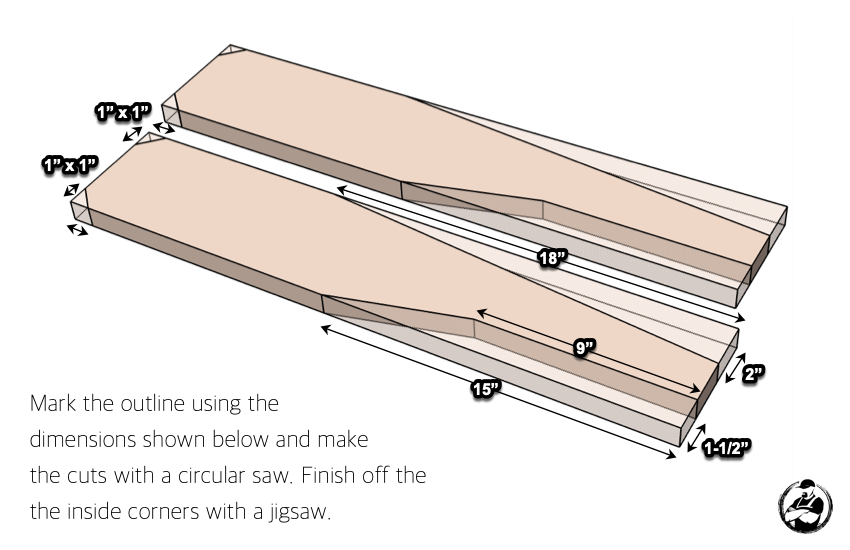
Lay out both armrests on the remaining 28 inch boards using the dimensions on the diagram. Make the long cuts with a circular saw and finish the inside corners with a jigsaw. Round the front corners if you want them less blocky. Readers who have done it all say it’s worth the two minutes.
Install the armrests
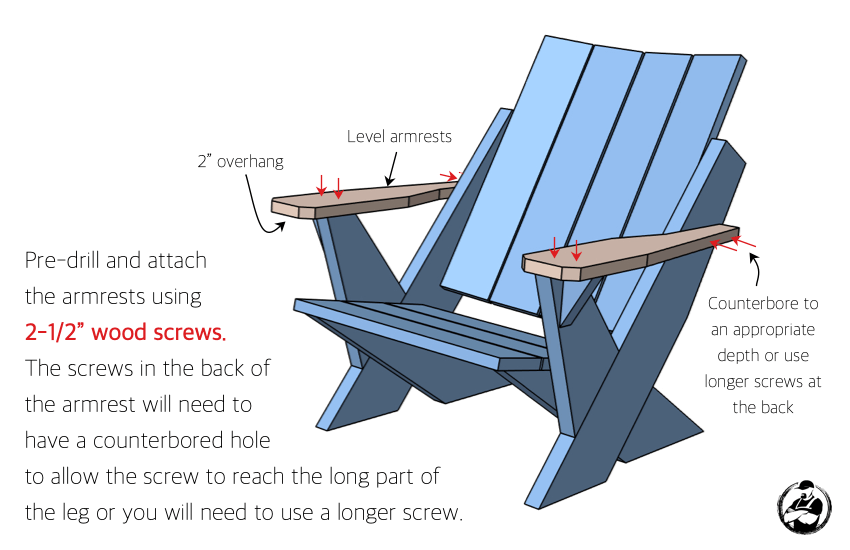
Set each armrest with a 2 inch overhang at the front, check it’s level, pre-drill and attach with 2-1/2 inch wood screws. The rear screws have to reach into the long leg, so either counterbore them to depth or buy longer screws. Do that math before you start driving, not after.
Final Result
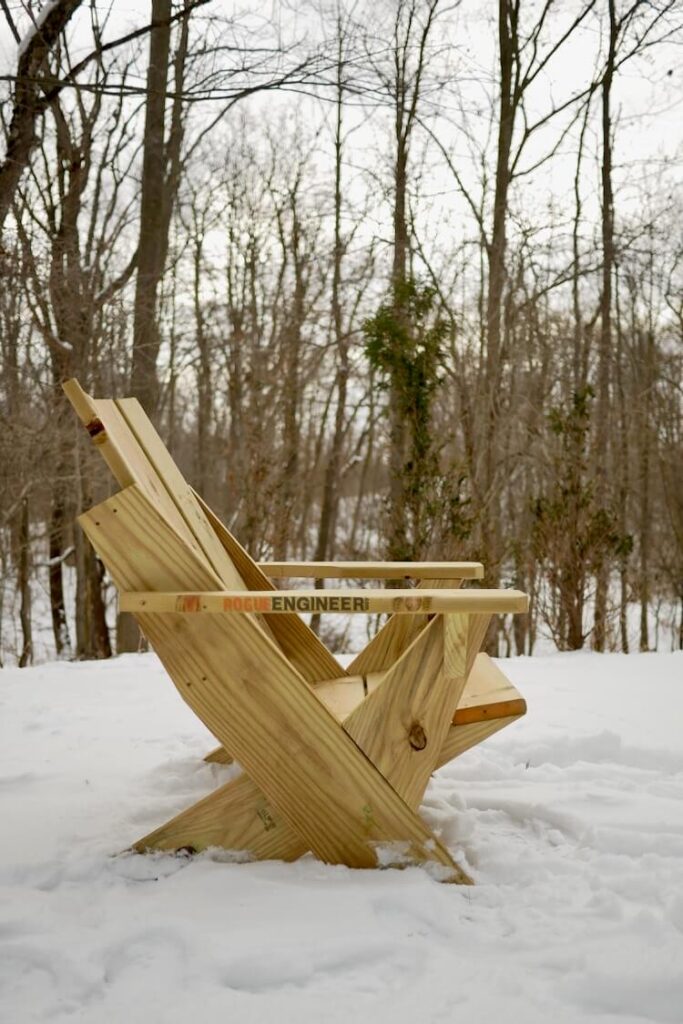
A low, wide-armed lounge chair that reads modern from across the yard and costs about $48 in lumber. Treated lumber means you can leave it out. It’ll silver over if you let it, or take a coat of exterior stain if you’d rather keep it warm. It’s heavy, which readers mention every time, and that turns into a feature the first windy afternoon.

FAQ
How much does it cost to build an Adirondack chair?
About $48 in lumber at October 2026 prices: three 5/4x6x8 treated deck boards at $7.48 ($22.44) and two 2x8x8 treated at $12.68 ($25.36), for $47.80, plus a handful of 2-1/2 inch ACQ-rated exterior screws. Prices move, so price those five boards at your store before you go. Retail modern Adirondacks run $150 to $400 apiece, so even at the high end of lumber pricing you’re building two for less than one bought one.
What kind of wood do you use to make Adirondack chairs?
This build uses pressure-treated southern yellow pine: 5/4×6 deck boards for the seat, back and arms, a 2×8 for the legs and supports. It’s the cheapest thing that survives outside. Cedar is the upgrade if you want it lighter and prettier, at roughly double the cost. Whatever you pick, if it’s treated you need ACQ-rated exterior screws. The copper in modern treatment chews through standard hardware.
Where can I find free Adirondack chair plans?
Right here. The cut list, dimensions, angles and all nine step diagrams are on this page at no cost, and they always will be. For more options: Ana White and Kreg’s plan library both host free traditional fan-back plans, Popular Woodworking has a classic curved-back version, and The Spruce Crafts keeps a roundup of a dozen free plans from around the web. Any of those will build you a chair. The only thing $10 buys here is the same plan as a printable PDF you can take to the shop without your phone sleeping every 30 seconds.
Is it difficult to make an Adirondack chair?
The traditional fan-back one, moderately. Lots of curved parts and template work. This modern version, no. Two board sizes, two circular-saw tapers, two jigsaw curves, and a pile of pre-drilled screws. If you’ve built anything with a drill and a circular saw, you can build this. It goes wrong in exactly two places: splitting the top of the leg (pre-drill) and legs that aren’t even at the bottom (check with a straight edge in Step 2).
Your Move
Grab five boards on the way home Friday. Cut the first long leg Saturday morning, trace it for the second, and you’ll be sitting in the finished chair before lunch. Then do the math on a second one, because nobody has ever built exactly one Adirondack chair.
The first cut is the hardest. After that, the build practically does itself.
Be safe and happy building, Jamison
Love the plans…..I’ve now made two.
They are quite heavy, but very comfortable.
I found that a pocket hole on the arm support to hold the support to the leg on the inside provided just a bit more support of the arm!
Thanks for the plans….My father-in-law now wants several for his cabin!
Easy to build, inexpensive materials. I am a tall guy with a replacement knee. I found the chair a bit on the low side for getting in and out. I added pads to the bottom and raised it up 2” (actually 2 5/4 pads) and now it is great. It is heavy indeed. I was worried about the connection between the leg and the arm support – not a lot of surface area there, but it does feel pretty sturdy. I did glue, screw, and bolt both that and the legs together.
I will definitely be rounding the arms on the front so they don’t look so blocky. I might also round the back for a more traditional Adirondack look.
Thanks for the plans, I needed another lawn chair
Hey Brian! Stoked you put it together so easily! Im curious what were the measurements for the “supports”? I cant seem to figure them out. I see the angles and the layout on the board diagram but im still unsure of the lengths of each side. Thanks you soo much!!!
Hey Awesome plans and great explanation! just one quick question for cutting the supports. I cant seem to find the measurements on the diagram. I see the angles but im not sure where to start the cuts. Thanks very much for your help!
Hi Brad, in the cut list (number 1) it shows a 20 degree cut, then measure 9″ from the shorter end and mark a 30 degree cut from there. Hope this helps!