

Rabbit Hutch
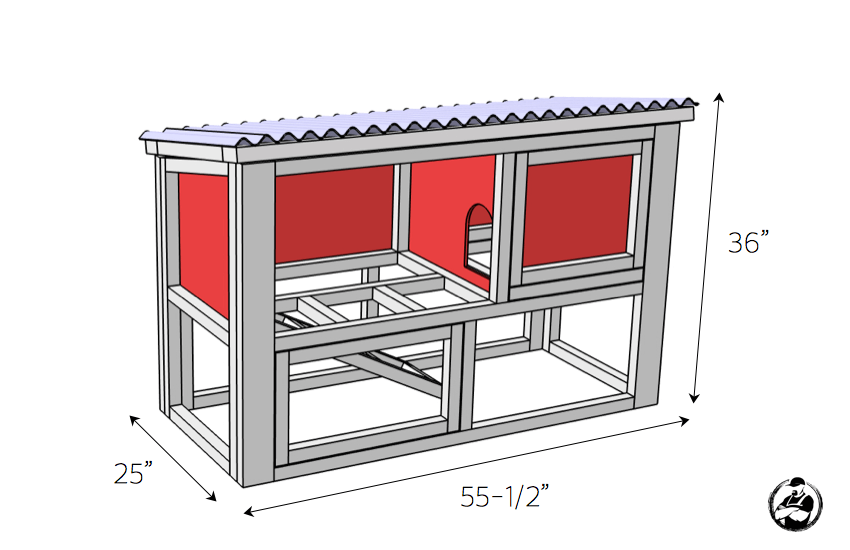
Quick answer: These free rabbit hutch plans build a 55-1/2″ × 25″ × 36″ outdoor hutch with an enclosed upper house, a ramp down to an open lower run, a hinged lid for easy cleaning, and two hinged doors. The frame is pocket-screwed 2x2s and 2x4s, skinned with weather-resistant composite panels and hardware cloth, under a corrugated roof. A beginner-friendly 2-day build. Full dimensions, cut list, and 11 illustrated steps below; the printable plans put it all in one PDF. Designed, built, and documented by Jamison Rantz.
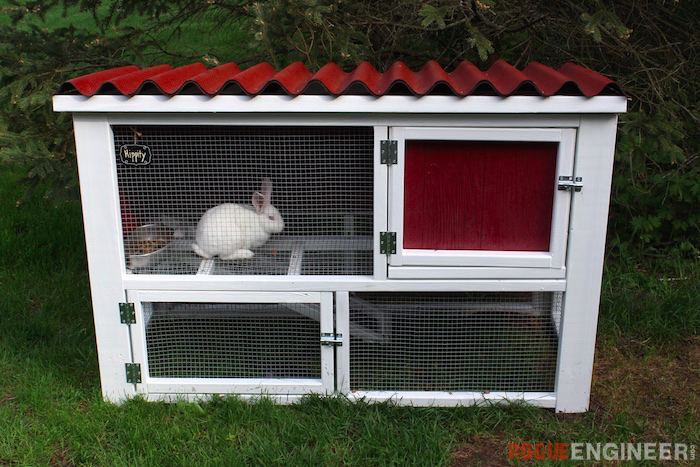
We took the kids to visit Talladay Farms and as soon as my daughter held a bunny we knew we were going home with one. Sometimes you just can’t say no to that sweetness! (I’m sure this will change once she’s a teenager) But after a week of having an indoor bunny we knew it was time for this rabbit to have a place of its own. A rabbit hutch plan was just what we needed!

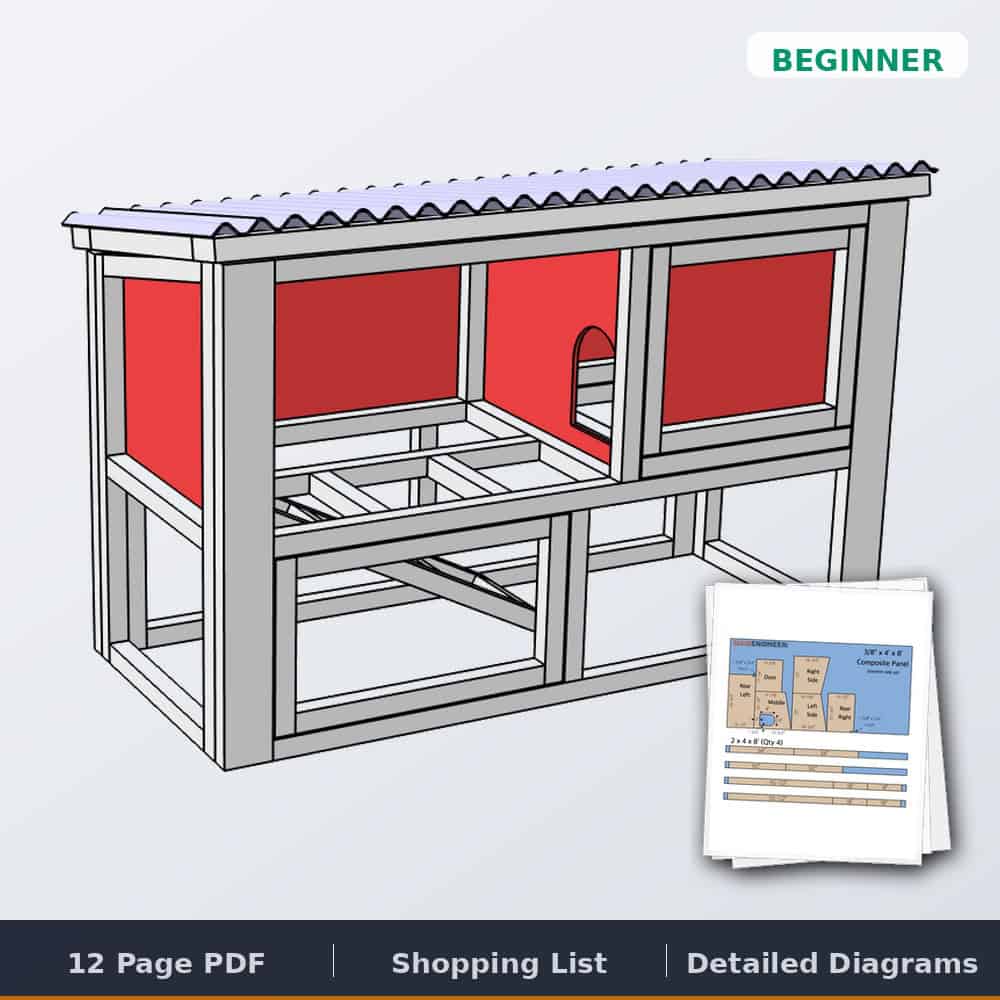
Tools & materials
Dimensions
Cut list


Rabbit hutch plans
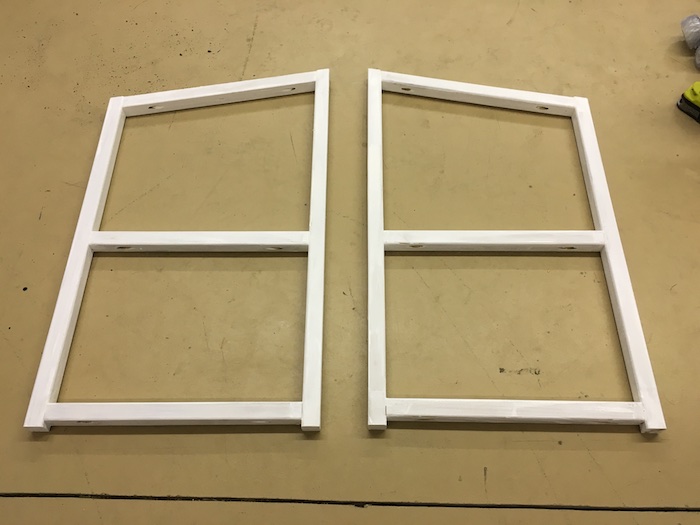
Step 1: Assemble the sides
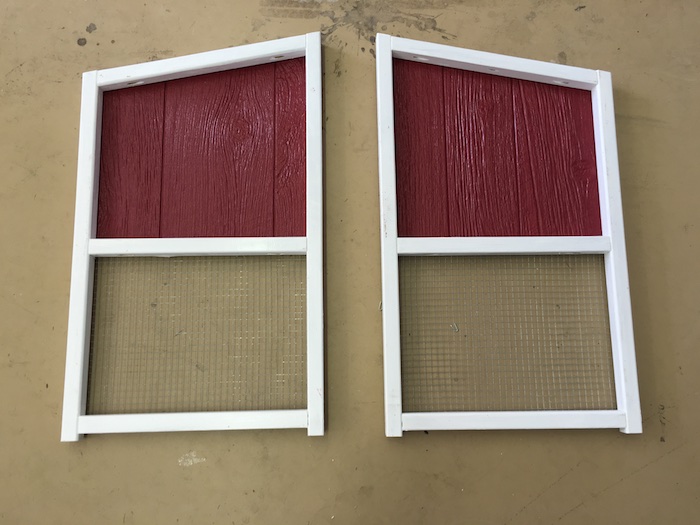
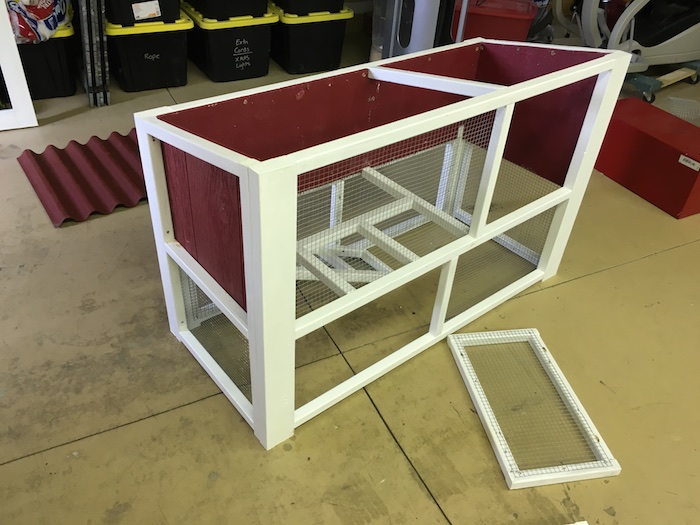
Drill pocket holes and assemble the two 2×2 side frames with 2-1/2″ pocket screws — the middle rail sits 12-3/4″ up to carry the floor of the upper house. Paint the frames and panels with exterior grade paint now, while everything is flat. When dry, attach the side panels with 1-1/4″ exterior wood screws (note the right side panel is the angled one), then cut and staple hardware cloth over the lower openings with 3/4″ poultry staples.

Step 2: Assemble the back
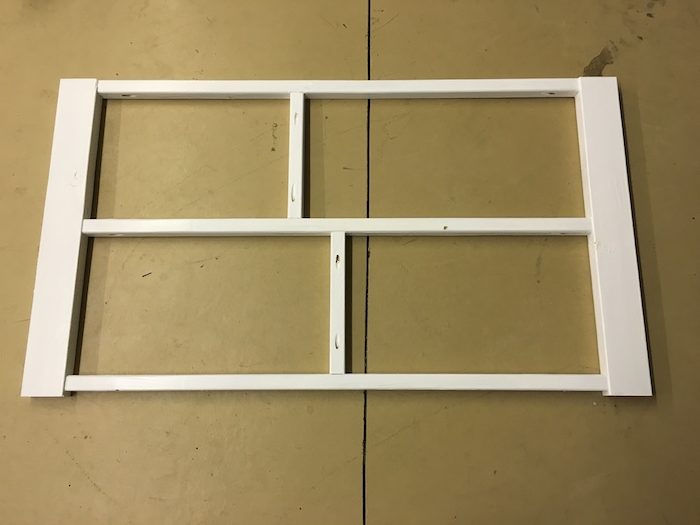
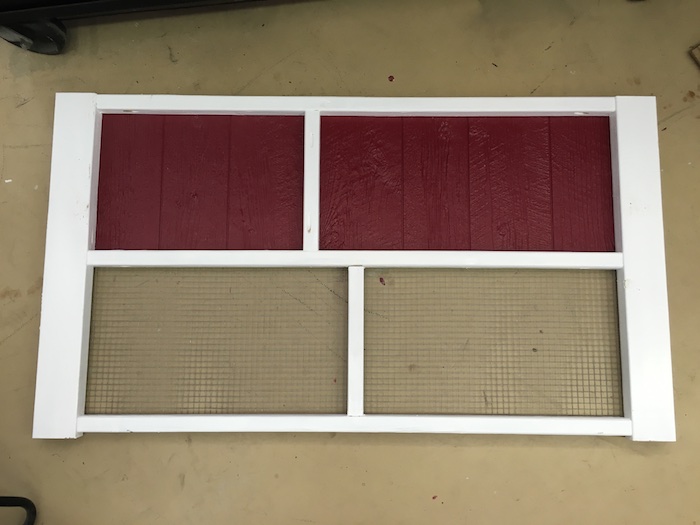
Build the back frame from a 2×4 × 30″ top rail, 2×2 × 46-1/2″ rails, and 2×2 × 12-3/4″ uprights with 2-1/2″ pocket screws. Paint, then attach the two rear panels over the upper openings with 1-1/4″ exterior screws and staple hardware cloth across the lower run.

Step 3: Assemble the front
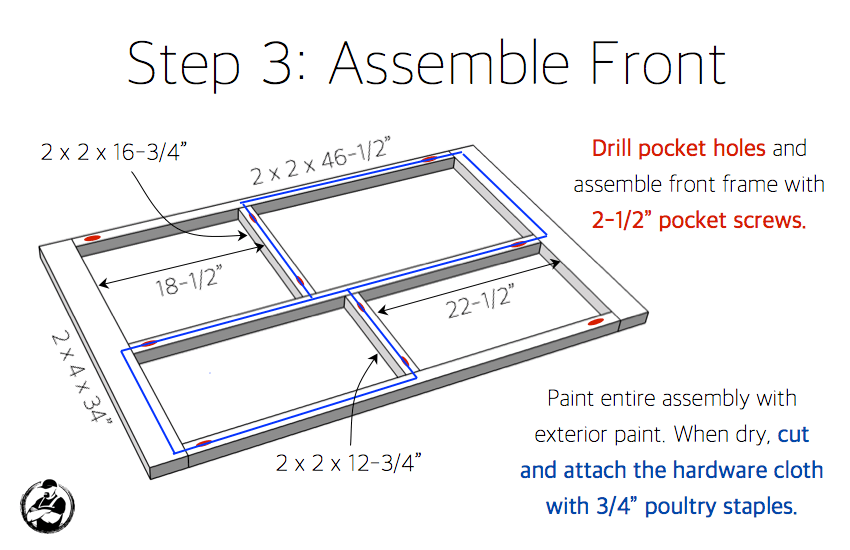
The front frame mirrors the back — 2×4 × 34″ rail, 2×2 × 46-1/2″ rails, and 2×2 uprights — but every opening stays open: the two door openings (18-1/2″ and 22-1/2″) and the run below all get hardware cloth only. Assemble with 2-1/2″ pocket screws, paint, then staple on the hardware cloth.
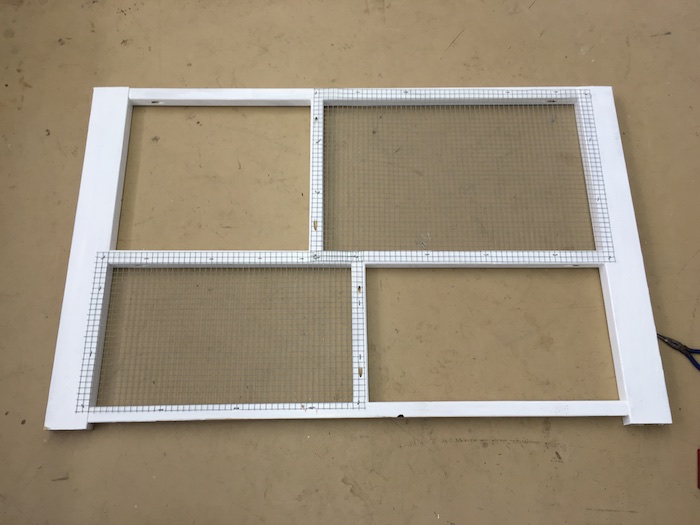
Step 4: Assemble the house door
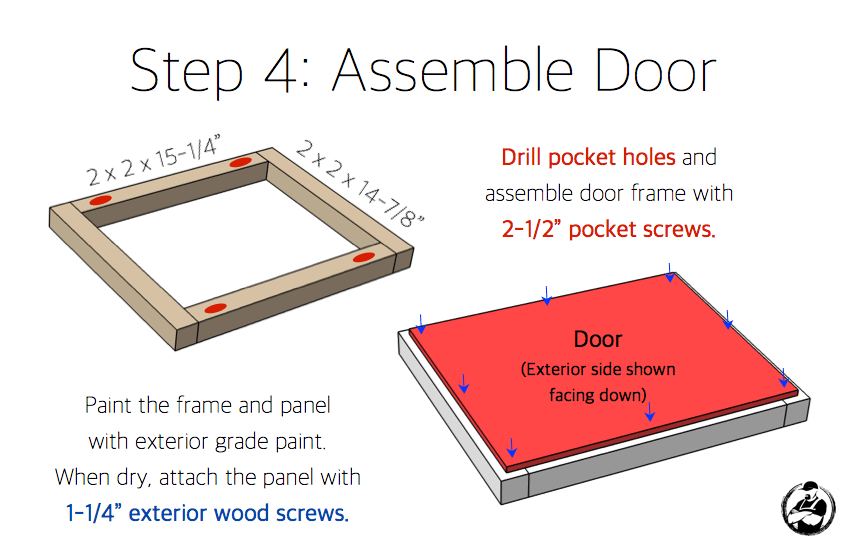
Build the small door frame from 2×2 × 15-1/4″ and 2×2 × 14-7/8″ pieces with 2-1/2″ pocket screws. Paint the frame and panel, then attach the composite panel with 1-1/4″ exterior wood screws — this is the solid door into the enclosed house.
Step 5: Assemble the tray
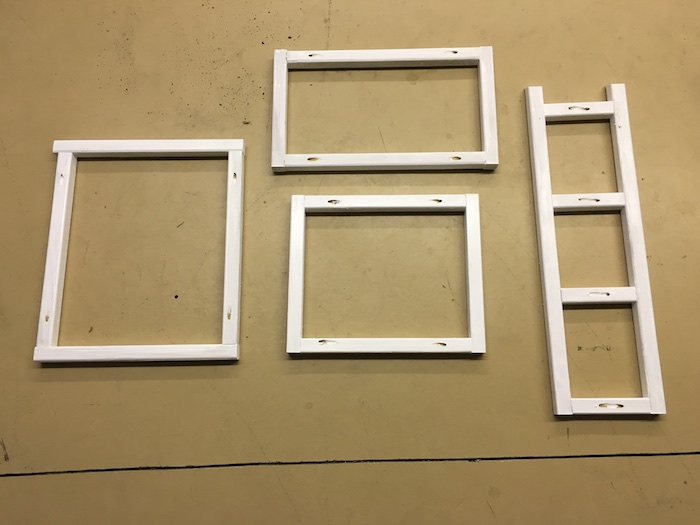
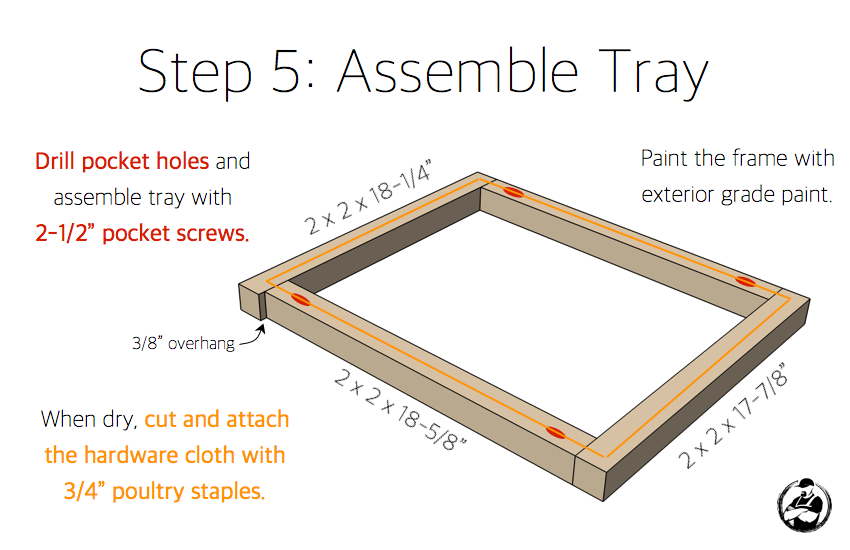
The tray frame (2×2s at 18-1/4″, 18-5/8″, and 17-7/8″) gets a 3/8″ overhang on one side as shown — it slides under the house floor so droppings fall through the hardware cloth into it. Pocket-screw it together, paint, then staple hardware cloth across the frame.
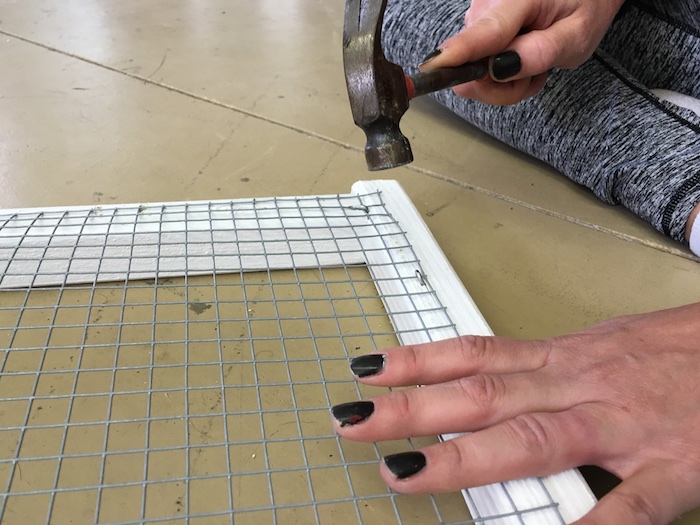
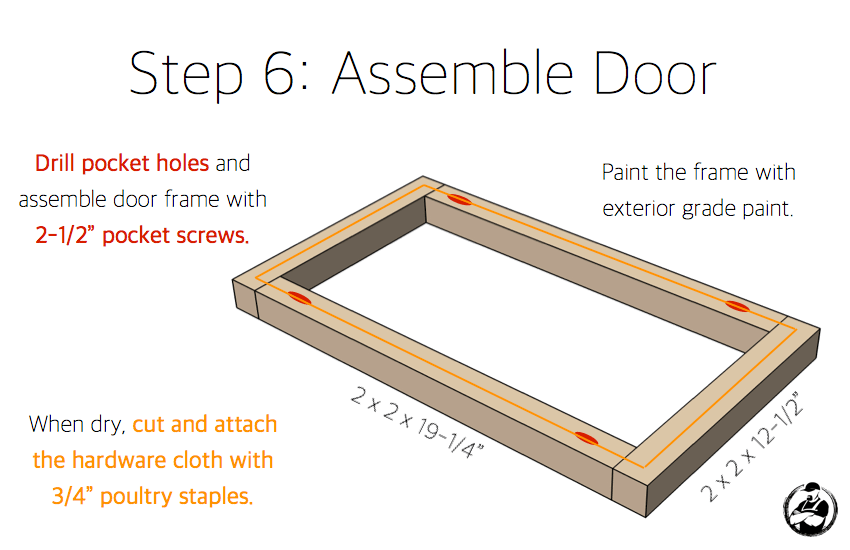
Step 6: Assemble the run door
Build the larger run door from 2×2 × 19-1/4″ and 2×2 × 12-1/2″ pieces with 2-1/2″ pocket screws. Paint it, then cover it with hardware cloth — this one stays see-through so you can reach into the lower run.
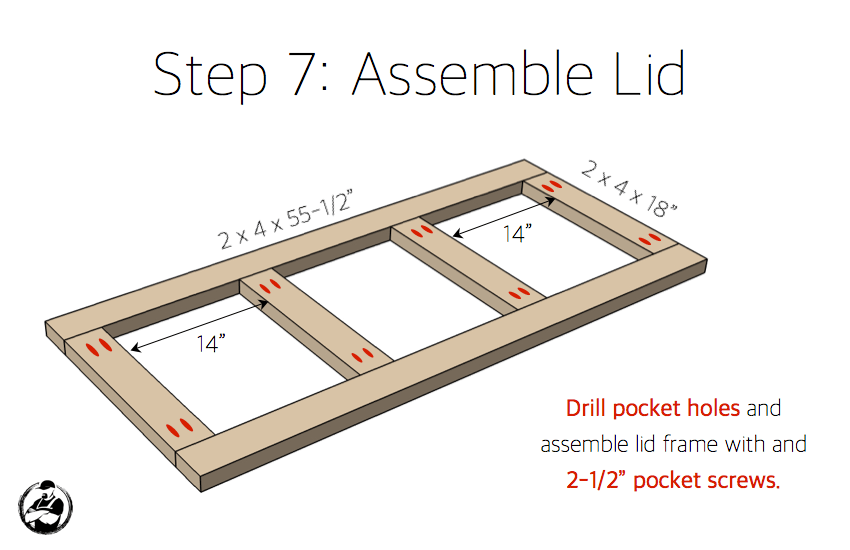
Step 7: Assemble the lid
The lid is a 2×4 frame — two 55-1/2″ rails, 18″ ends, and crossmembers on 14″ spacing — joined with 2-1/2″ pocket screws. It hinges over the whole top so cleaning the house never means reaching through a little door.
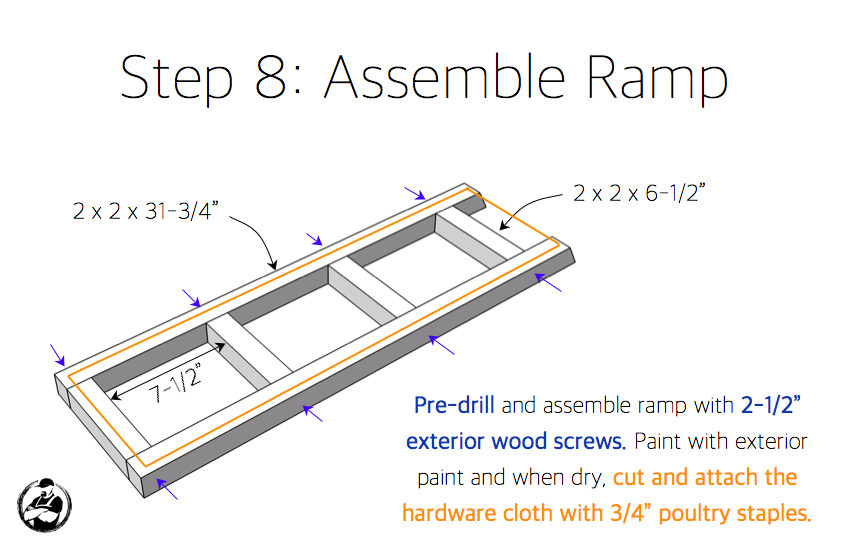
Step 8: Assemble the ramp
Pre-drill and assemble the ramp from two 2×2 × 31-3/4″ rails and 2×2 × 6-1/2″ rungs every 7-1/2″, using 2-1/2″ exterior wood screws. Paint it, then wrap the top face in hardware cloth for grip — this is how the rabbit commutes between the house and the run.
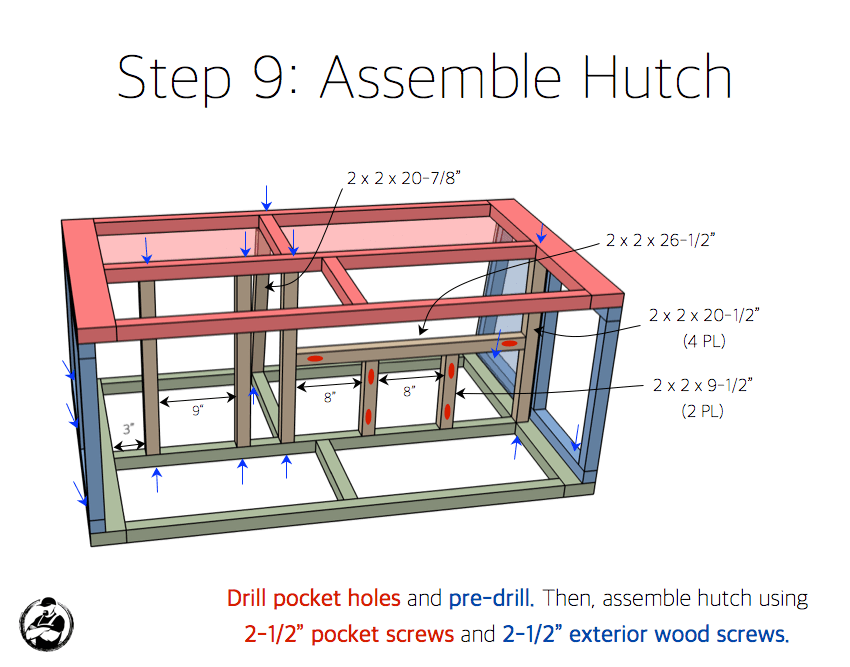
Step 9: Assemble the hutch
Now it all comes together: join the sides, back, and front with 2-1/2″ pocket screws and 2-1/2″ exterior wood screws, then add the interior 2×2 floor joists — 20-7/8″ and 26-1/2″ rails with 20-1/2″ (4) and 9-1/2″ (2) supports spaced as shown (3″, 9″, 8″, 8″). These carry the house floor and frame the hatch the ramp passes through.
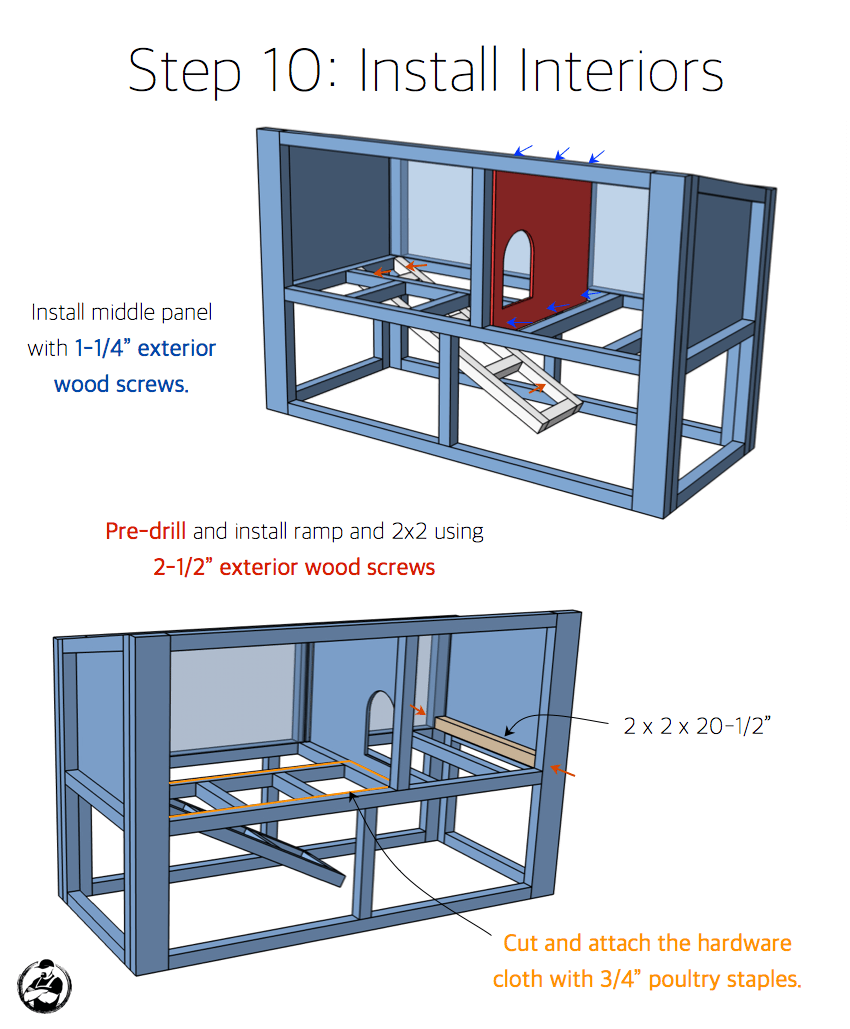
Step 10: Install the interiors
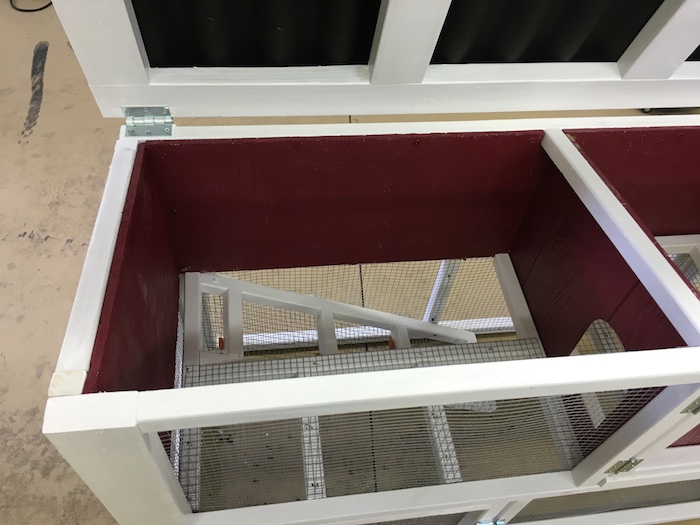
Screw the middle divider panel (with its arched doorway) in place with 1-1/4″ exterior wood screws, then pre-drill and install the ramp and its 2×2 × 20-1/2″ support rail with 2-1/2″ exterior screws. Finish by stapling hardware cloth over the house floor openings — droppings fall through to the slide-out tray below.
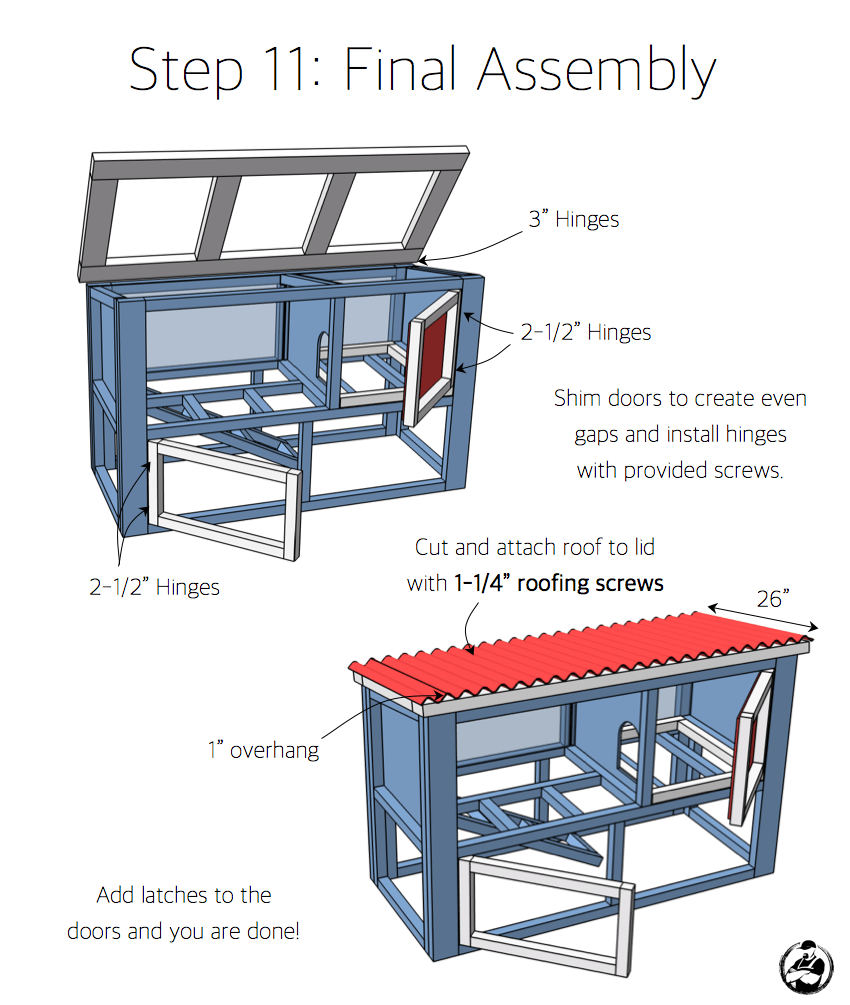
Step 11: Final assembly
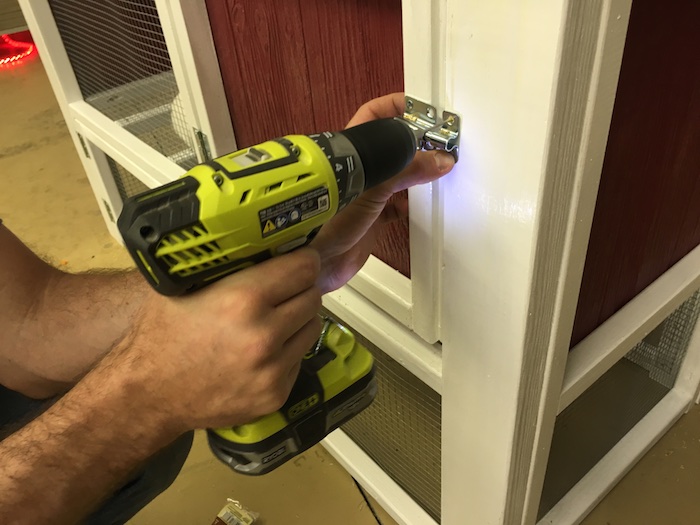
Shim the doors in their openings to create even gaps and hang them on the 2-1/2″ hinges; the lid gets 3″ hinges across the back. Cut the corrugated roofing to give a 1″ overhang (26″ wide) and fasten it to the lid with 1-1/4″ roofing screws. Add latches to the doors and you are done!
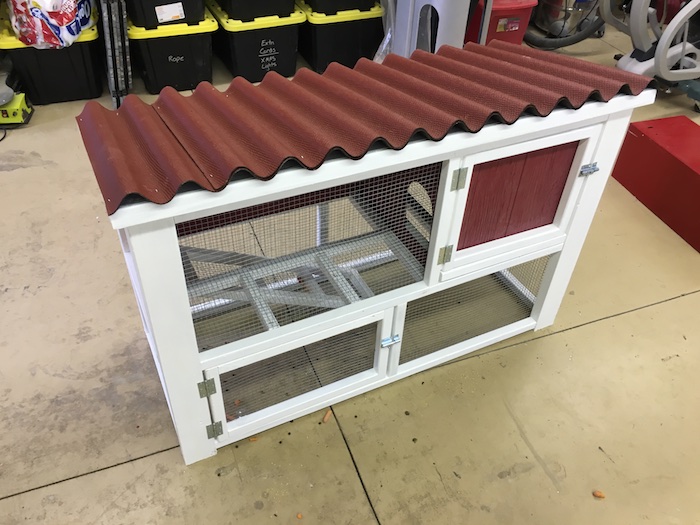
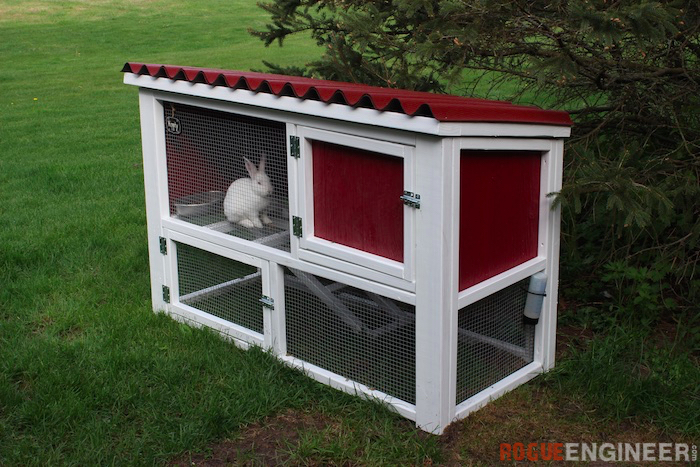
The finished hutch
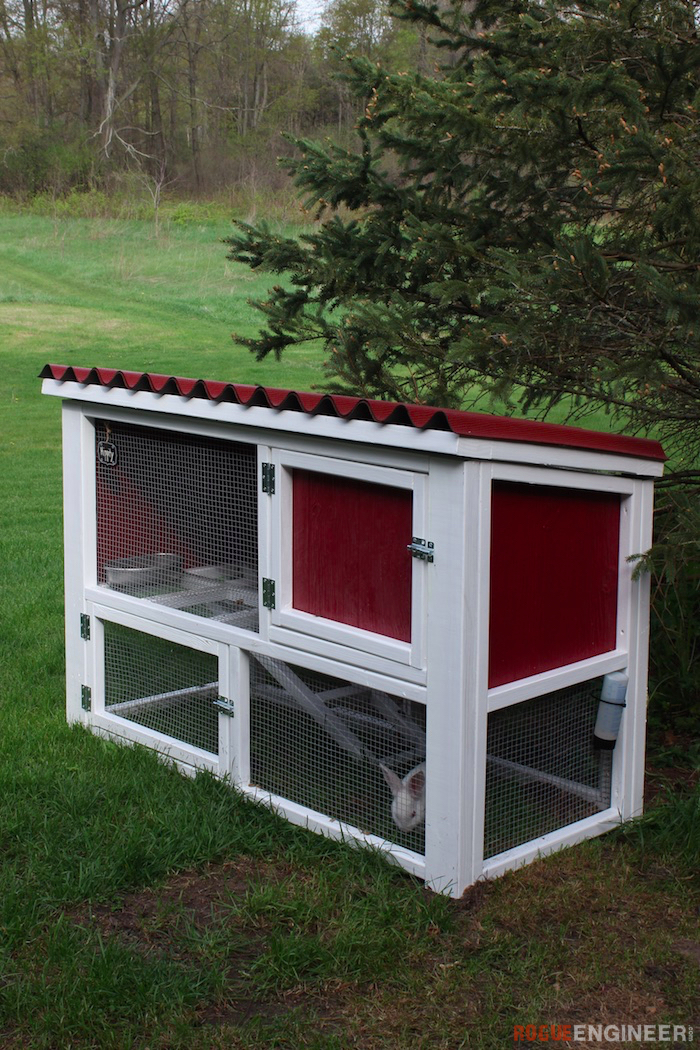
Rabbit hutch questions, answered
What size should a rabbit hutch be?
This hutch is 55-1/2″ long × 25″ deep × 36″ tall, split between an enclosed upper house and an open lower run connected by a ramp — so the rabbit always has both shelter and room to move. As a general rule, bigger is better: the hutch should let your rabbit stretch out fully and hop a few lengths, and pairing it with supervised yard time keeps a bunny happiest.
Are these rabbit hutch plans free?
Yes — everything you need to build it is free on this page: overall dimensions, both cut-list sheets, and all 11 illustrated steps. If you want it in one printable document for the shop, the PDF plans are $10.
What materials do you use for an outdoor rabbit hutch?
A 2×2/2×4 frame joined with pocket screws, weather-resistant composite panels for the enclosed areas, hardware cloth (stapled with 3/4″ poultry staples) for the run and doors, exterior-grade screws and paint, and a corrugated roof panel. Hardware cloth beats chicken wire here — it’s stiffer and far better at keeping predators out.
How do you keep a rabbit hutch clean?
Two features do the heavy lifting: the house floor is hardware cloth over a slide-out mesh tray, so droppings fall through and the tray empties in seconds, and the entire lid hinges open on 3″ hinges so you can reach every corner instead of fishing through a small door.
More backyard builds
Questions? Comments?
As always, if you have any questions don’t hesitate to comment below and especially don’t forget to post pictures of your finished products in the comments! ENJOY!
I want to get a rabbit just so I can build this now. Jamison, when are you going to show us how to make a sweet chicken coop?
Soon I promise! Our chickens should get here in the middle of the month. The good thing about his rabbit hutch is that you could also use it for a coop 🙂
Your pet rabbit is an indoor rabbit, they have been bred to be indoor rabbits. Outside, predators can and will get into the hutch. Never mind that rabbits are prey aminals and can easily die of fright. What, exactly, we’re your long term plans for this rabbit? Rabbits take more to care for than a dog, did you figure that into your equation? Before you impulse buy, kindly think it through. And learn to say no to your kids!
Thanks for your concern about our rabbit Hippity. As far as predators, Hippity not only lives next to the house, has locks on her hutch, but also has 2 dogs protecting her. She is a very loved bunny, who is well cared for by my wife and my children. Before you comment you may want to consider into your equation that my wife comes from a family who has raised animals. And as far as my parenting is concerned, we will say no to our children when we find it fit to do so. However, when it comes to teaching our children the value of responsibly, hard work, and how to love and care for animals we will make those decisions wisely and with the best of intentions.
I don’t think Rebecca was speaking to your situation, per se, but to those who look at this hutch and think, ‘hey, rabbits, they don’t take much work and the kids will stop nagging about a dog’.
And I vote for wheels and a handle on the other end; I’m sure that not only would I like to collect the rabbit poop for the garden (much less nitrogen than chicken poop) but because the rabbits would knosh the grass in one spot down to the ground if left there too long.
As for building: there are a LOT of 2×2 fussy-cut pieces. It would be useful to have some sort of organization to ensure that the proper pieces are used after cutting, ’cause who wants to have to measure each piece before use to ensure the correct piece is being used?
That is true. I hope that before anyone decided to add a new pet of any sort to their family they understand the responsibilities it comes with.
And as for the wheels, I completely agree. Hippity can mow down a section of grass in a day. We move her cage often, and wheels would be a huge help!
Rebecca I resent your preachy little diatribe here. When I want your opinion I will give it to you. These are rodents. I may go buy a dozen to feed the coyotes just to piss you off. Mind your own business or take your meds and go pester your ex-husband. I don’t need some liberal big-mouth woman telling me my business. People like you are what has destroyed this country. Shut your sewer!
Do you plan to move the hutch on a fairly frequent basis? If not, you need to raise it and add a catch pan of some sort for the animal waste — especially if you plan to have more than one rabbit. Rabbit manure may be the finest fertilizer on the planet, but too much of it will kill the grass and begin to smell (not nearly so badly as dog or cat manure, but still …) and the urine will quickly become smelly and will kill the grass. I grew up raising rabbits commercially.
We do move the hutch probably more frequently that we would like. I’ve been considering adding wheels to it to makes things a little easier. Thanks for the advice. Appreciate it.
I always enjoy your weekly emails and seeing what projects I should attempt. Great project for the rabbits and I may attempt it for our chinchillas to be outside at times.
Thanks William! I’m sure your chinchillas would love it.
So we just built this hutch this weekend! Love it! We did have to tweak it a bit since the cut list doesn’t match what the description says in the drawn out steps. Also in the list of materials it says 3 2×4’s but you need 4- 2×4’s! We did also added more floor uptop so where the ramp is has some flooring over part of the open space. We also did a solid bottom to the top floor as we clean her cage/hutch out daily.
Over all we LOVE your plan!
Thanks for the heads up.. Ill be sure to go back and check over the plans! I know our little rabbit is still loving her hutch so I sure hope yours does too!
I also had that issue! Went to the hardware store which is 30 minutes away and only got 3 2×4’s, thankfully I had a scrap big enough at home…. cut all the wood and the diagram shows cut 4 boards at 17 1/4 and the instructions for assembly said 17 1/2… I will finish up tomorrow. Just wanted to give you a heads up since the instructions haven’t been changed since Rebecca’s mention of it 🙂
Thank you! I was just about to cut the pieces up and I accidentally scrolled down too far and read this. I’m assuming the plans have never been updated in the last 2 years. 🙁
On the construction diagram on the side pieces you say to use 17 1/2 inch pieces but on the cut list/diagram there are no 17 1/2 inch pieces. There are 17 1/4 inch pieces, which I used. But they are about a quarter inch too short in the middle one. Other than that, these are great instructions! Thanks!
Nicely done plans and instructions. Very complete and easy to follow.
A couple of mods I’m considering. I’m going to put a floor on to keep the mess a little more contained. In order to more easily clean it, I’m putting two doors on the bottom. Also, hinging the ramp so that it can get tucked out of the way when cleaning.
Also thinking of making the lid a little lighter, using 2×2 for most of it rather than all 2×4. And some kind of hydrolic hinge to help the lid stay open.
Hi Ron. How did your modifications come out? I’m contemplating building this rabbit pad too. We are in an apartment so I need to think this through. Thanks!
I needed up buying a commercial hutch from amazon
About how much mesh did u have to buy for the job
What is the roof material and dimensions?
Anybody considering building this needs to review the plans and read them over a few times. The plans are rife with errors, from measurement errors on the size of the sides to a complete omission of how to build the little ramp. You can probably figure it out but if you’re looking to cut and assemble quickly this isn’t it! Caveat emptor.
Apparently Christian “engineers” can’t handle constructive criticism of their poorly done plans. If you had any integrity you would have left the critique up, but apparently you want more people to waste time.
I spent about a week building this hutch. There were a few dimensions which didn’t add up and I had to make slight adjustments but it is a very nice hutch. My rabbits absolutely love it!
My aim is to make it self-sustaining as much as possible. I plan to set the food and water to dispense at the desire of the rabbits. I put hardware cloth for the flooring on the downstairs and I set the hutch off the ground.
Hey Thanks for the step by step I just built mine took 3 days.I also put hardware on the bottom. And im probably going to build a stand for it as well. It looks good and I’m picking up my rabbits this weekend
I’m not sure what I’m doing wrong, but when I used the 2 1/2” pocket screws for the side frane, they were too long and went right through the other side of the wood.
I had the same problem – the kreg jog should be held back 1.25 in from the edge of the wood for this material thickness. I know this comment is two years old but for others who have the same issue…
If you decide to build this – Please, please, please put some sort of bottom on the cage. Our precious bunny loved the cage, but last night she dug out and has been missing for 24 hours. We are very upset and worried. It didn’t take her long to figure out how to get out.
Going to finish the build on this hutch. Went to the store to buy every thing on the list but no hinges or locks are on the materials list nor us the roofing material. Pleas add these items to your list. I have to go back to the store today to get these materials since I didnt have them from the initial purchase list.
Are you able to see step 8? If so can you tell me what it says or post a screen shot. And read the other comments on here before you cut. Some of the cuts are wrong in the cut list diagram.
A couple of the cuts in the cut list diagram are wrong. I also recommend using your cutoffs to do the 6-1/2” cuts for the 2×2. Also step 8 is missing.
I have a question What about the waste?
My only comment is to use 2″ or 2″ 1/4 pocket screws for the rabbit hutch and if you plan on breeding try 1/2 or 3/8 netting
I assume when the plans state 2×2 it doesn’t actually mean 2×2, I’ve attempted building this over the past couple of days. Got every single cut correct and none of it has fitted together properly. I’ve had to make adjustments at every single step
We had the SAME problem. Total nightmare! We were short a 2×4 because it was just left off of the list. Certain pieces mentioned in diagrams were never on the cut list. We had several left overs that were never mentioned on the diagram. Diagram also is VERY hard to read to know exactly what goes where. Especially when the angles aren’t shown. We ended up winging the entire interior assembly part because nothing was matching up. We finished and my bunny is happy but NEVER AGAIN!
Can anyone tell me where and the orientation of the tray from step 5 goes?
Is it the ‘bottom’ of the enclosure, with the door and latch?
Hi Jamison,
I just want to thank you for the plans and share these photos. These are Jade, Saulo and Lindo (the rabbit) enjoying their new little house. Saludos from Durango, Mexico !!
https://uploads.disquscdn.c…
I like these plans. Thank you for sharing.
It seems the link to the PDF plans is not working. Could you send them to me or modify the link? Thanks,
Adam Hoover
There’s a number of discrepencies, has anyone figured those out?
The missing ramp steps are easy enough, but is the assembly diagram or the cut diagram correct for the 2×2 cut to 17-1/2 or 17 1/4? Or the 18 1/4″ vs 17 7/8″ and 20 1/8 vs 20 1/2?
This hutch is great. Just a note: the wire mesh on the floor bruises the rabbits’ legs and bodies when they lie on it. So don’t use it and put a real floor, even if you have to clean it more often. Otherwise, thank you for this beautiful sharing.
You can find the image for step 8 here https://rogueengineer.com/w…
Update: Plans have been updated to fix known errors