
Industrial Bookcase
Note: Coffee table pictured above is the Tribal Coffee Table.
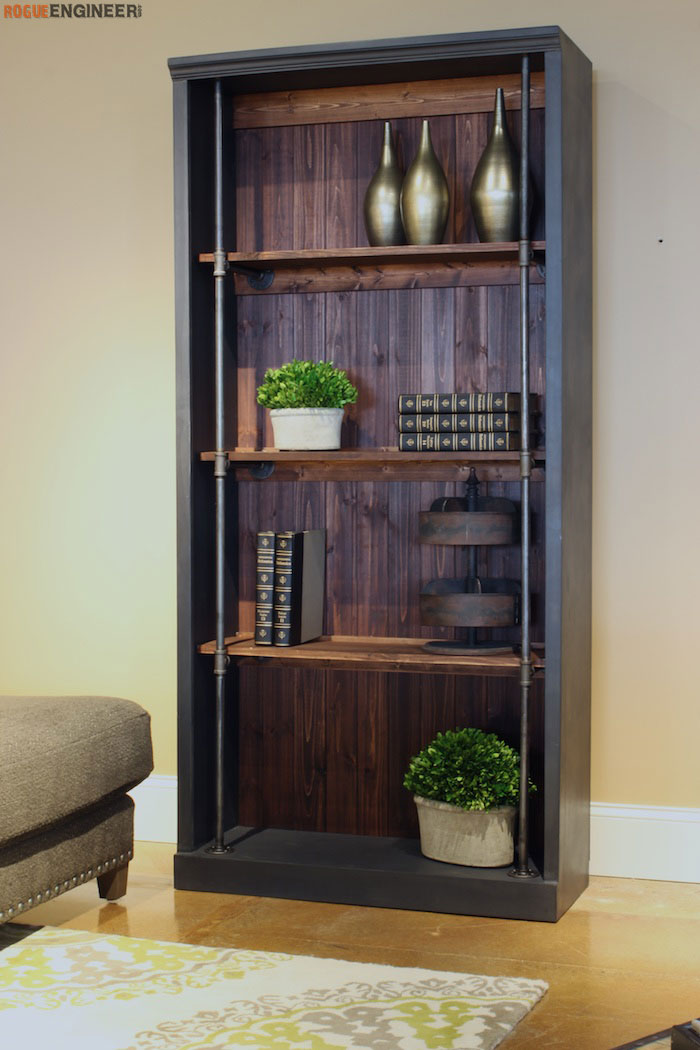
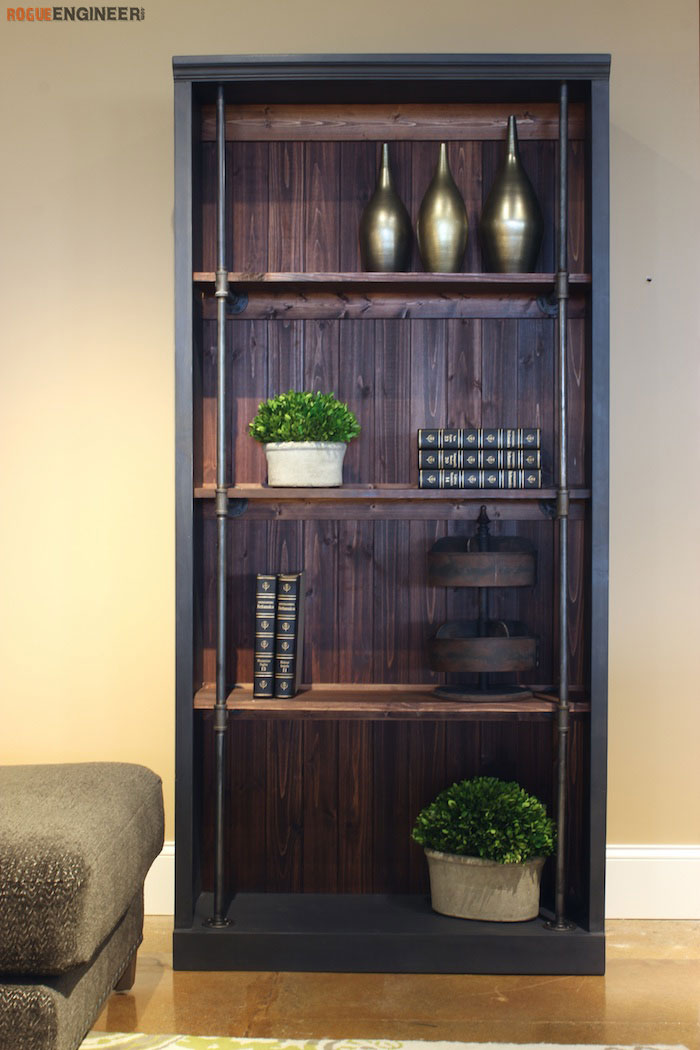
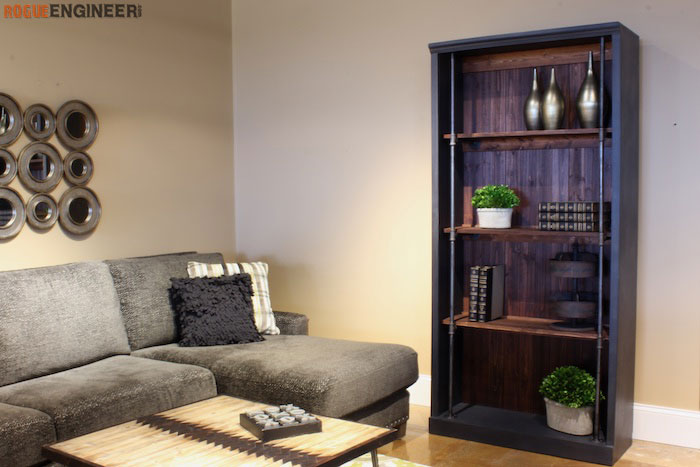
A while back we stumbled upon this awesome industrial bookcase from Pottery Barn for $1900! I knew we could do it for a lot less so we posted it on Facebook for some reader feedback and it was a resounding YES! So I got to work. After a couple of weeks and 1000 mile move to Michigan we are finally finished and couldn’t be happier with how it turned out. And it only cost us about $275! The pipe is what drove this project cost up however it is still a far cry from the $1900 Pottery Barn price tag and well worth it if you ask me. Let us know what you think in the comments.
For sneak peeks of our upcoming projects be sure to follow me on Facebook and Instagram. Also, follow me on Pinterest to get tons of projects plans from all around the web!


Required Tools
Materials
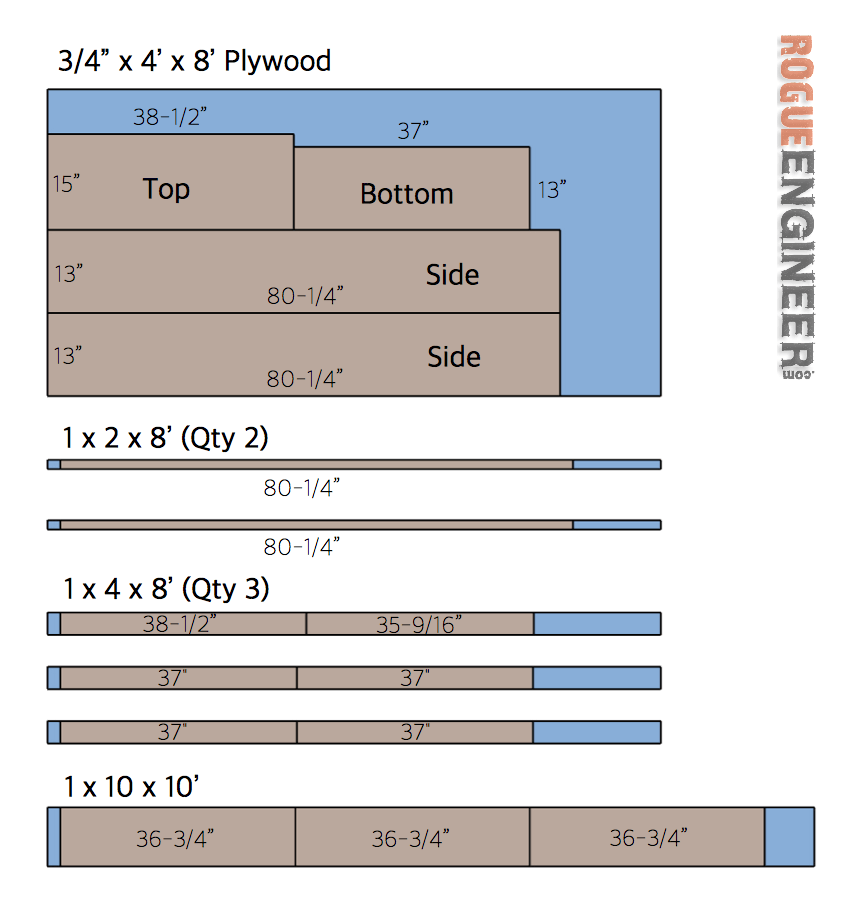
- Qty 1 – 3/4″ x 48″ x 96″ Plywood
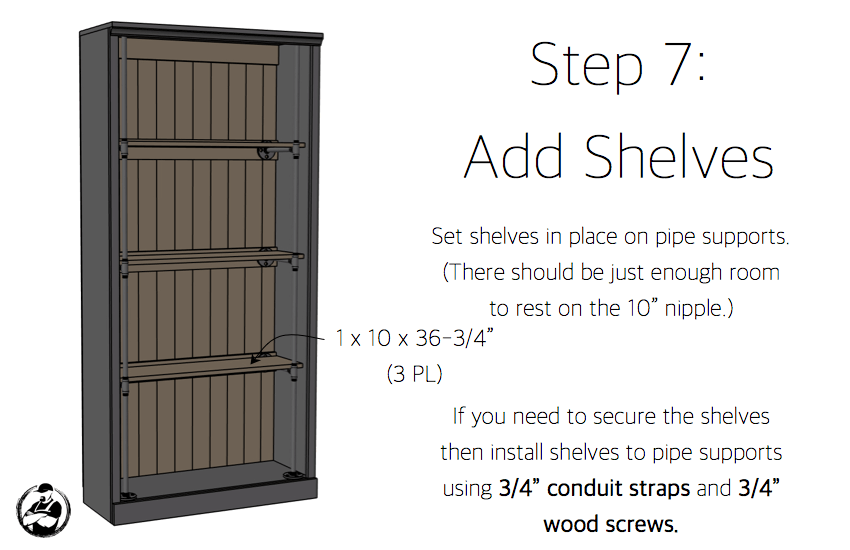
- Qty 1 – 1 x 10 x 10′
- Qty 3 – 1 x 4 x 8′
- Qty 2 – 1 x 2 x 8′
- 4′ – 3/4″ Thick Decorative Trim
- Qty 2 – Cedar Planks (6-pack)
- 1/2″ x 3-1/2″ x 8′ tongue and groove boards
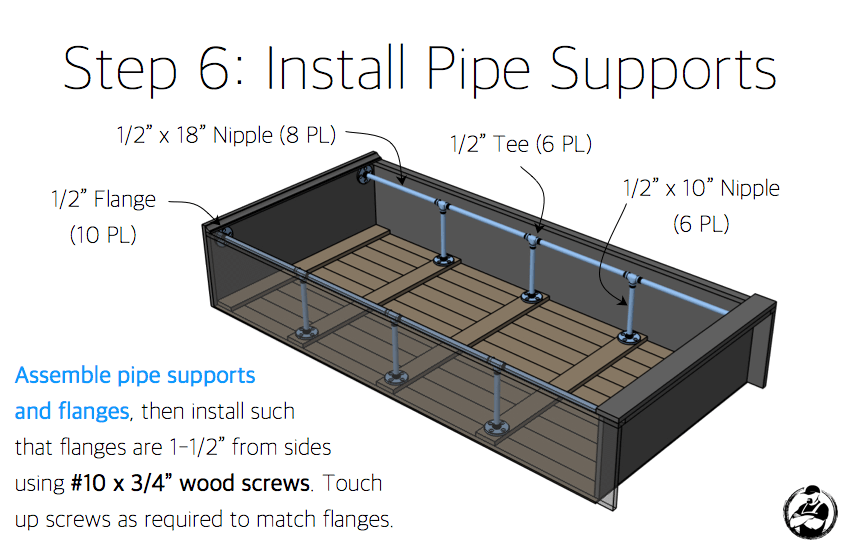
- Qty 10 – 1/2″ Black Steel Flange
- Qty 8 – 1/2″ x 18″ Black Steel Nipple
- Qty 6 – 1/2″ x 10″ Black Steel Nipple
- Qty 6 – 1/2″ Black Steel Tee
- 1-1/4″ Kreg Pocket Hole Screws (Coarse)
- 1-1/4″ Brad Nails
- Qty 4 – #10 x 3/4″ Wood screws (Pack of 12)
- Qty 2 – 1/2″ Conduit Straps (Pack of 10) (Optional)
- 3/4″ Wood Screws (Optional)
- Wood Glue
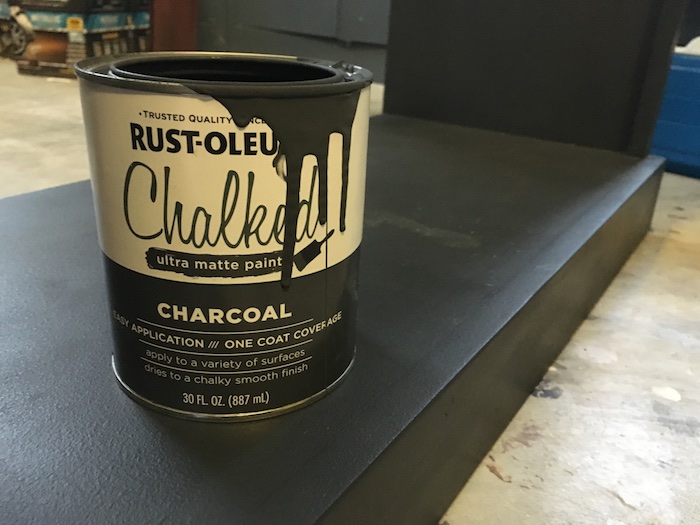
- Rust-Oleum Chalked Paint – Charcoal
- Johnson Paste Wax
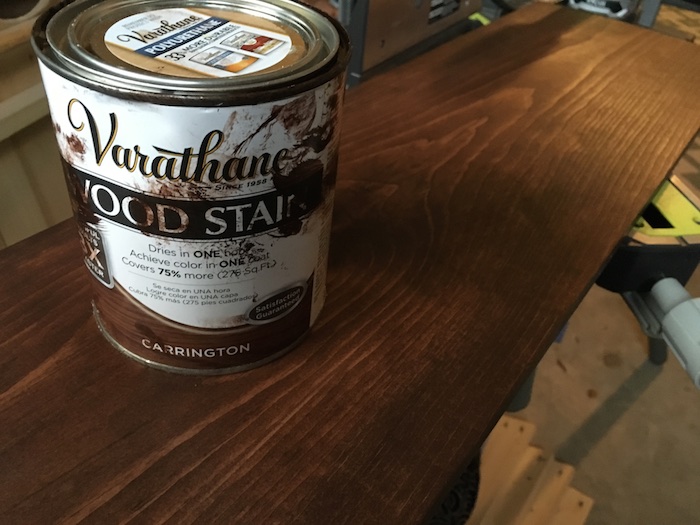
- Varathane Wood Stain – Carrington
- Varathane Polyurethane – Satin
Disclosure: The links provided in the “materials” and “required tools” sections are affiliate links. If you would like to support our site and help keep our content free come find out more about how we can make money with no extra cost to you.
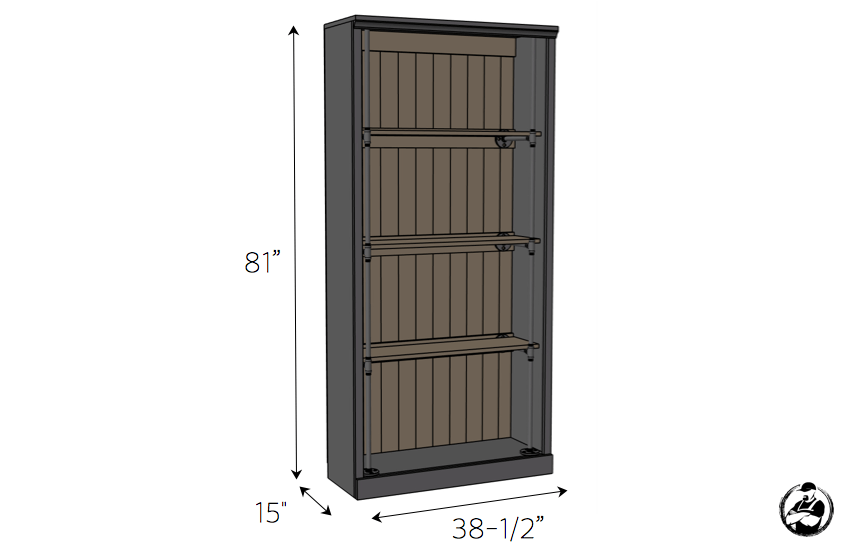
Dimensions
Cut List
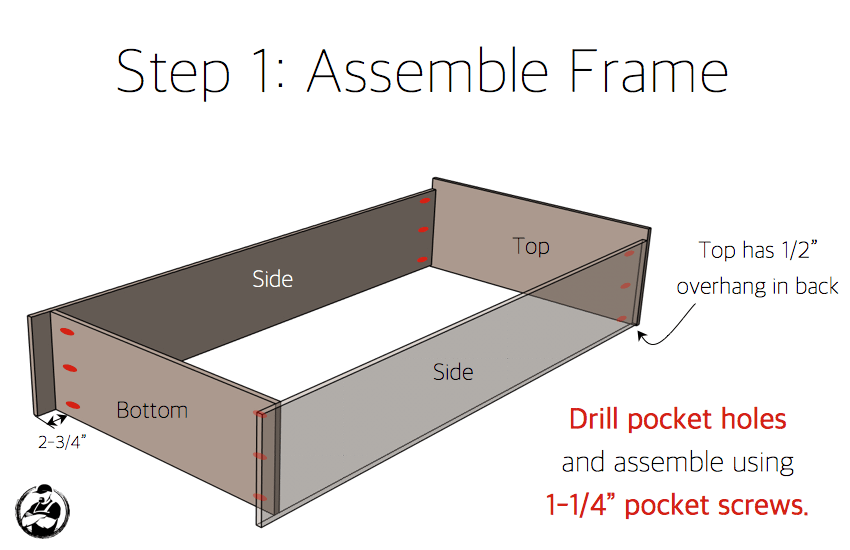
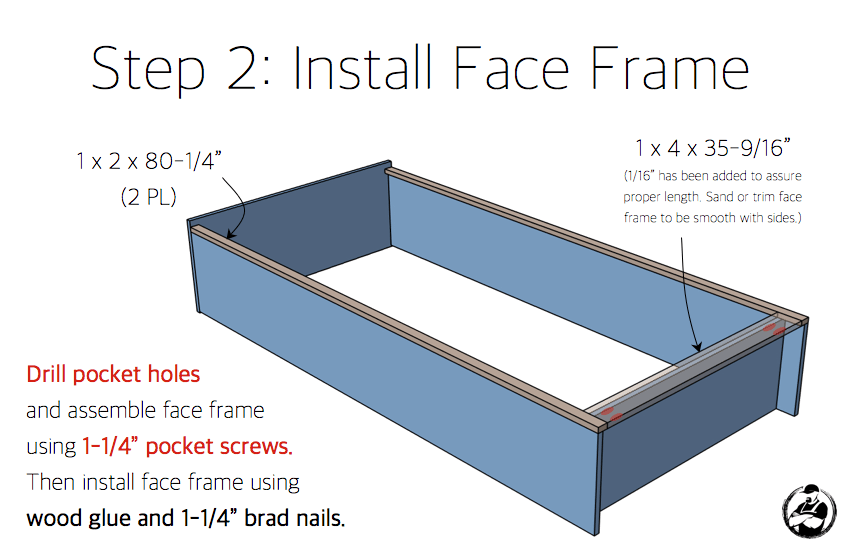
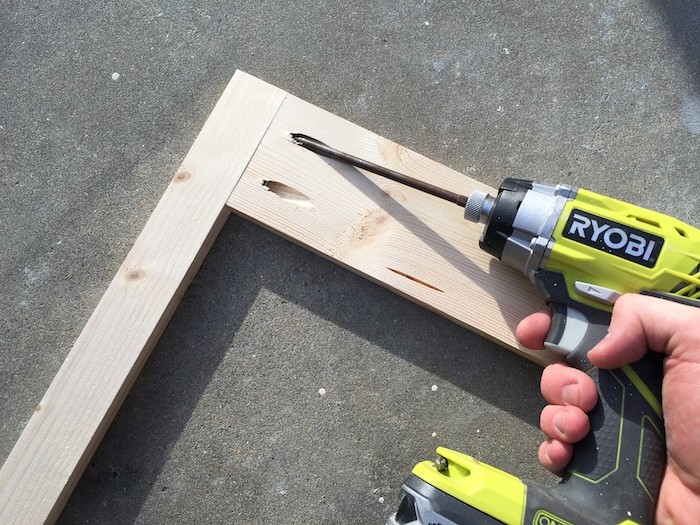
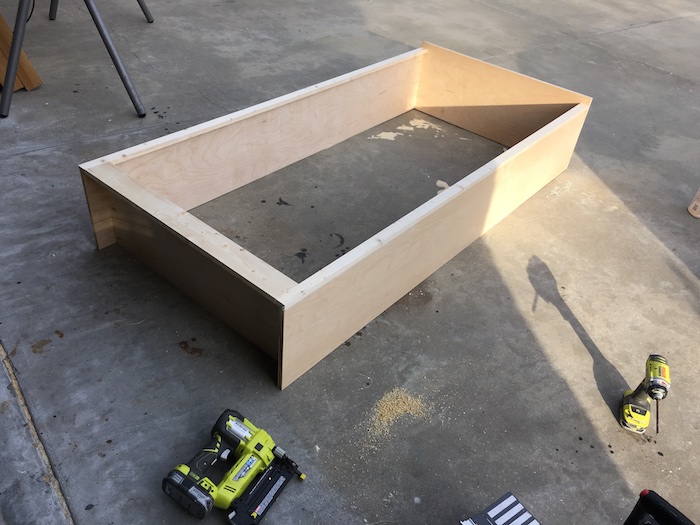
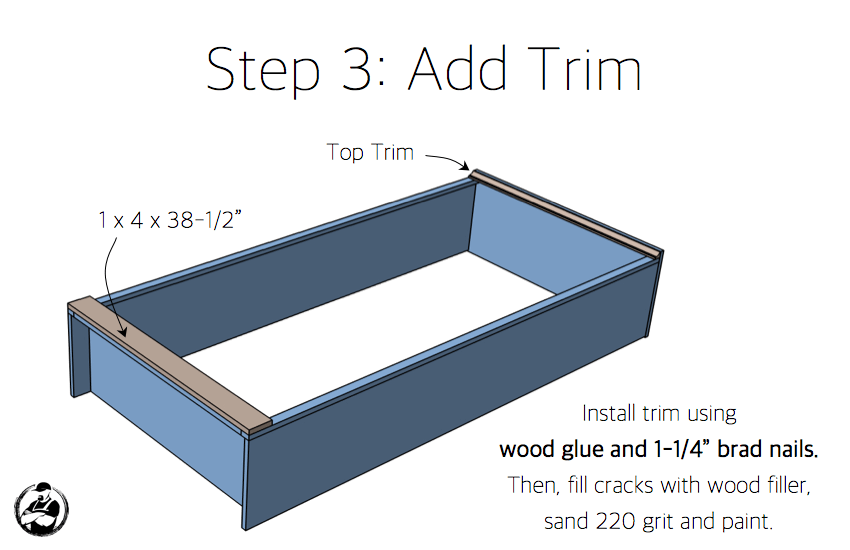
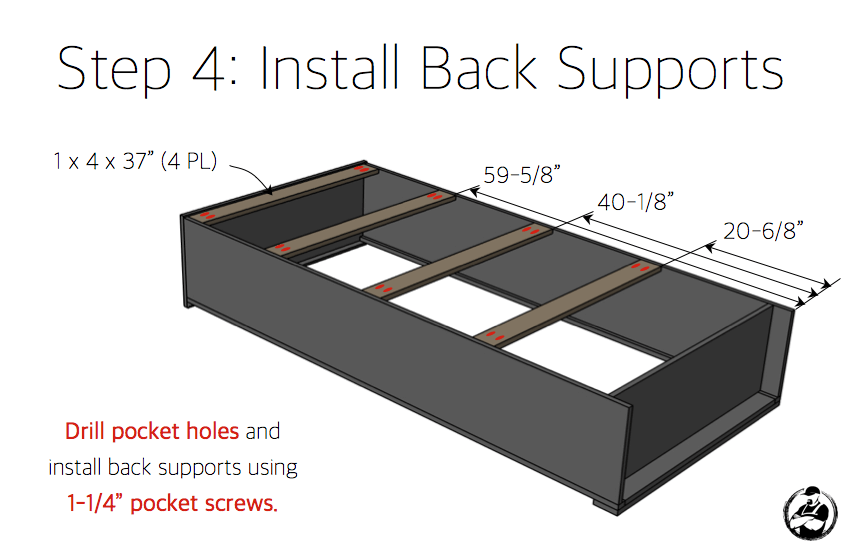
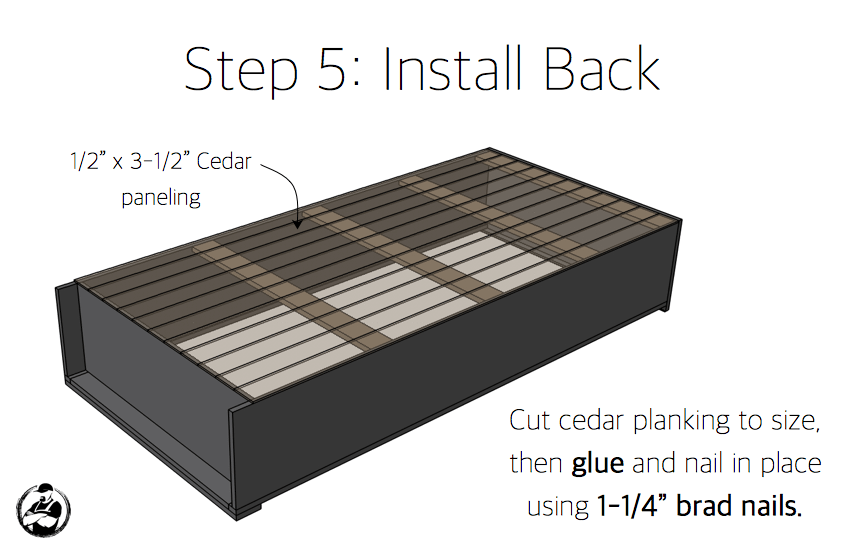
How to build an Industrial Bookcase
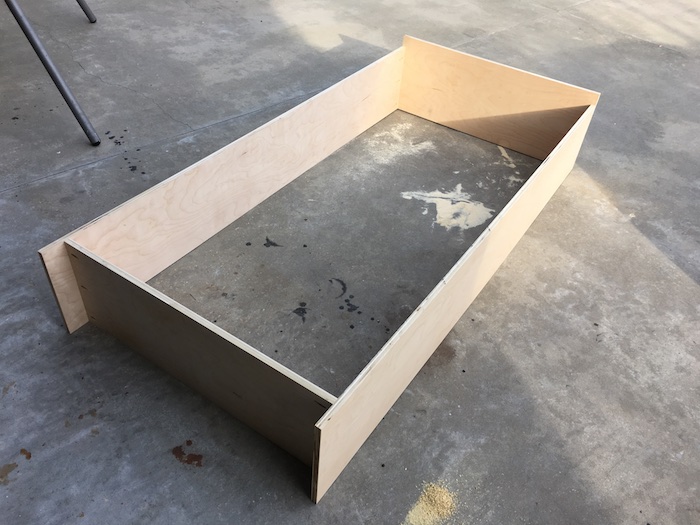
I totally forgot to include the 1/2″ overhang in the back 🙁
Finishing
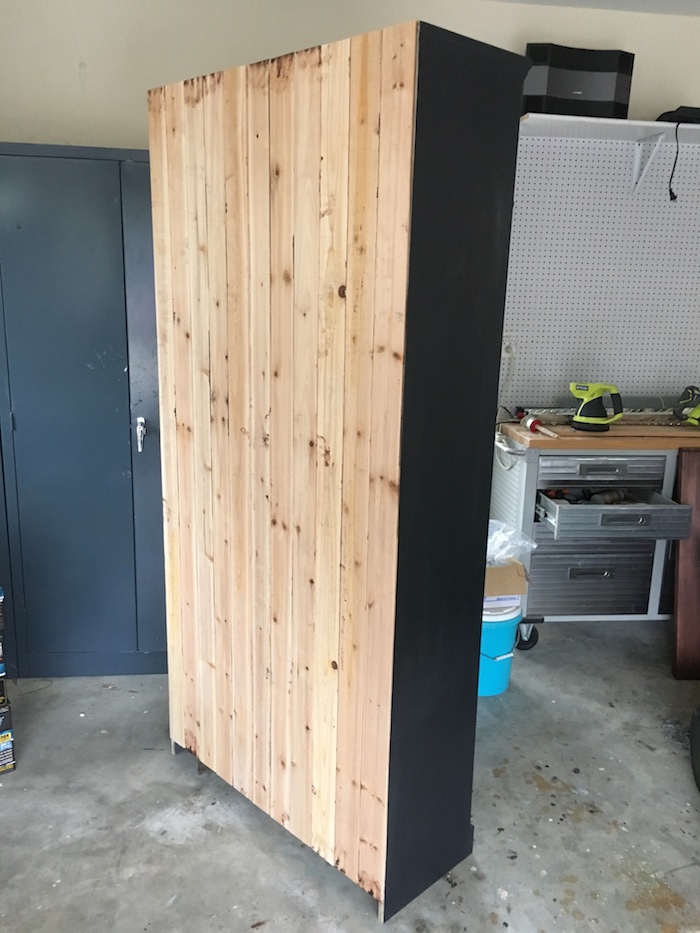
Since this project contains two different finishes it is best to do the finishing before going any farther in the assembly process. We wanted to match the Pottery Barn finish as closely as possible so we went with the charcoal Chalked ultra matte paint from Rust-Oleum. I love the thick textured look of this paint. To brighten it up a bit and give it a cool look we decided to wax it with a Johnson Paste wax and a lot of elbow grease.
For the shelves, back supports, and cedar planking we decided to go with the Carrington wood stain by Varathane and sealed it with 3 coats of the satin polyurethane from Varathane.
I absolutely love this color combination. I think Jamie nailed it on this one. It just blends so nicely with the industrial look of the black steel pipe.

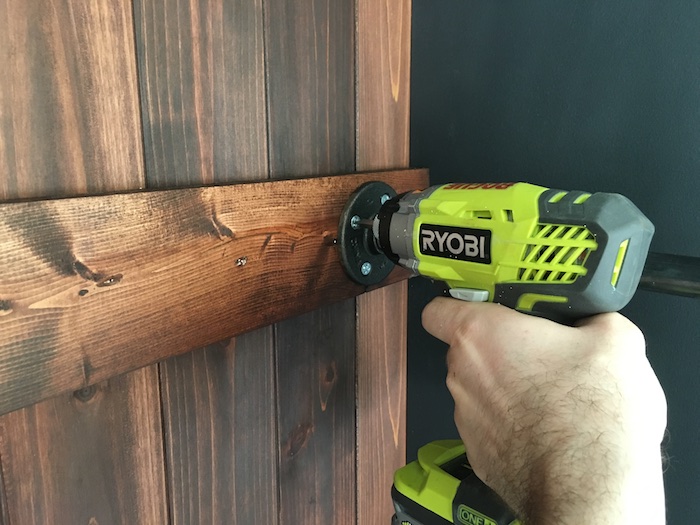
I used some left over oil rubbed bronze spray paint to touch up the screw heads and it matched fairly well. I sprayed it until it pooled on a piece of cardboard and touched them up with a small paint brush.
Questions? Comments?
As always, if you have any questions don’t hesitate to comment below and especially don’t forget to post pictures of your finished products in the comments! ENJOY!
Excellent project! To be honest the ads that cover the bottom of each picture are annoying.
Curt, I will put up with the ads as long as Jamison continues to give us these great ideas and plans for free.
Randy, me too. I appreciate Jamison’s work! I didn’t word my comment appropriately and probably should have suggested making the pictures longer in the future so that the ads don’t cover up his beautiful work. Sorry.
Didn’t mean to cast dispersions and I never thought that you were being unreasonable in your comments.
That’s a good idea Curt and thanks for your input unfortunately those annoying ads do pay the bills. I’ll do my best to minimize them in the future.
Hey! This will definitely be my project this weekend! Love the contrast in finishes. I have completed to of your plans and altered both to include a stained and clear coat top with painted or distressed bottom. This will go perfect with those. Rogue Engineer and Kreg have made me a hero to my wife!
BTW, check the quantities on the materials list. Should be two 1x2s and three 1x4s. Also, no mention on the materials list of the molding piece for the top. Thanks again for your efforts!
Thanks for this info and sorry I overlooked this! I was in the middle of my move so I’m sure my mind was elsewhere. I have updated the materials section. Thanks again!
Haha Thanks Randy! I would love to see how yours turns out!
GREAT project, plan on tackling ASAP. I do, however, plan on modifying this to make a “set” as it were. Including a wall shelf, and 2 end tables, maybe a coffee table. Any suggestions on measurements, or modifications?
Thanks Ben! I think that would be awesome to see. You can google most general dimensions for furniture pieces. Best of luck and I would love to see how they turn out!
Here is the finished product, very pleased with how it turned out. Modified the design a bit, used pallet wood and some reclaimed door trim for the back and shelf. It’s just over a foot high, 9 inches of storage space, about a foot deep. What do you think? (Bonus shot of me and the fiance!)
Thats awesome! Nice mod and great work man.
Thanks a bunch. I’ve gotten lots of compliments. Even a request!
Thanks Christina! I think that would be fairly easy to build. The only hard part would be the metal frame around the edge of the shelves.
Do you have a link to the decorative trim that you used?
I dont. That was just a scrap piece I had lying around the garage.
My boss loves it. She’s even okay sacrificing her parking spot in the garage as long as I keep turning out new pieces.
Wow Randy! That look amazing! Really nice work man.
Wow that looks amazing! Can I ask what you spent in supplies?
Love this bookshelf! I plan on tackling it this weekend. Any advice on assembling the pipe portion, like what to screw in first so it all fits easy? I’m a newb
We assembled the pipes first, then you can tighten or loosen the fittings to give it a snug fit.
Nice work! I’m actually thinking of modifying your design to be a combination entryway solution with a bench seat at the bottom and some space for coats, hats and shoes while providing a little visual separation. Is the piece strong enough to stand up to that kind of workload with kids using it?
Yes, especially when you add the bench at the base it will make this bookshelf even sturdier. Be sure to post pictures, would love to see how it turns out.
follow on question since I still haven’t gotten to doing this – do you think a translucent plastic backing would be strong enough? It looks like the frame is otherwise pretty self supporting, so i was thinking the backing material would mostly help keep things in place. The translucent plastic for the entry would allow light to still move between rooms – at least that’s my current idea.
Hi, i. Looking for a piece similar to this but with a door. I’d like to use it as a pantry. Maybe a door with chicken wire or a cute reclaimed screen door. Any thoughts???
Love this bookcase! Are the cedar planks recessed so they can’t be seen from the side view? Looks like they are from the pics but in the plans looks like the back supports are flush with the end of the sides.
Doing this project with all ash wood, no plywood. Also making it taller and wider and therefore thicker (and heavier!) Thinking of using different stain for the “black” color – Any recommendations?