

Cooper Nightstand
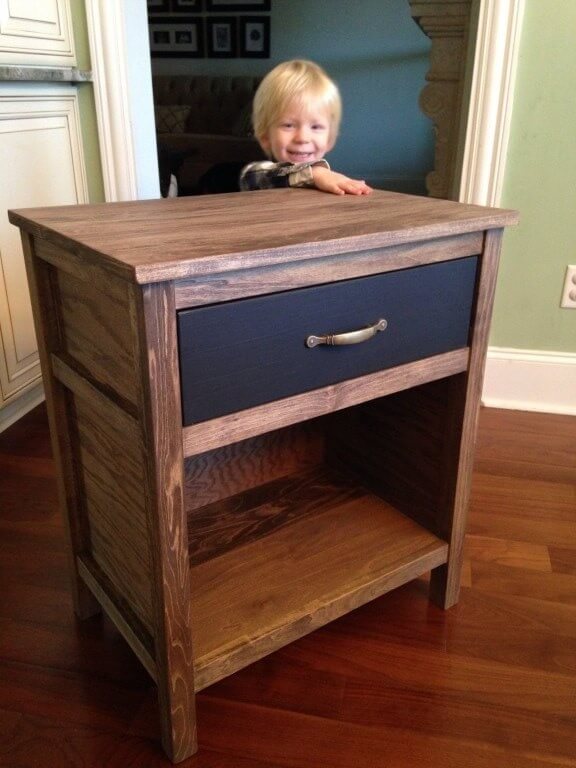
So our friends have a baby boy on the way and for a baby gift I wanted to build them a little something. After talking to them about what they needed we decided on a nightstand. Since their nursery is on the smaller side they need a nightstand that could double as a bookshelf, this time I opted for a custom design by yours truly.
As always if you have any questions don’t hesitate to comment below and especially don’t forget to post pictures of your finished products in the comments! ENJOY!
Tools Required
Material List
If your planning on staining this, I would recommend building it in red oak. I have tried to use materials that are convenient to most at the big box stores. You could always do it in a pine but from my experience, its worth the extra money to go with a hardwood or copper for something like this. Have a gander at some copper size tables to get a better idea of what I mean.
- 4x 2”x2”x36”
- 3x 1”x2”x6’
- 1x 1”x6”x8’
- 2x 1”x4”x6’
- 1x ½”x24”x48” (plywood)
- 1x ¼”x24”x48” (drawer bottom)
- Drawer Pull
- 1-¼” Pocket Hole Screws
- ¾” Wood Screws
- Wood Glue
Cut List:
| Qty: | Dimensions: | Notes: |
| 4x | 2 x 2 x 27.25” | |
| 6x | 1 x 2 x 20” | Only cut 2 pieces per 6’ board |
| 6x | 1 x 2 x 12.5” | Only cut 2 pieces per 6’ board |
| 4x | 1 x 4 x 20” | Only cut 2 pieces per 6’ board |
| 2x | 1 x 4 x 13” | Only cut 1 piece per 6’ board |
| 2x | 1 x 4 x 17.25” | Only cut 1 piece per 6’ board |
| 3x | 1 x 6 x 24” | |
| 1x | 1 x 6 x 19.75” | |
| 6x | ¾ x ½ x 12.5” | This can be cut using some leftover scrap |
| 2x | ½ x 12.5 x 23.25” | |
| 1x | ½ x 20 x 23.25” | |
| 1x | ¼ x 12 x 17.75” | If you don’t have a dado blade don’t cut this yet |
How to Build a Nightstand with a Drawer
Step 1:
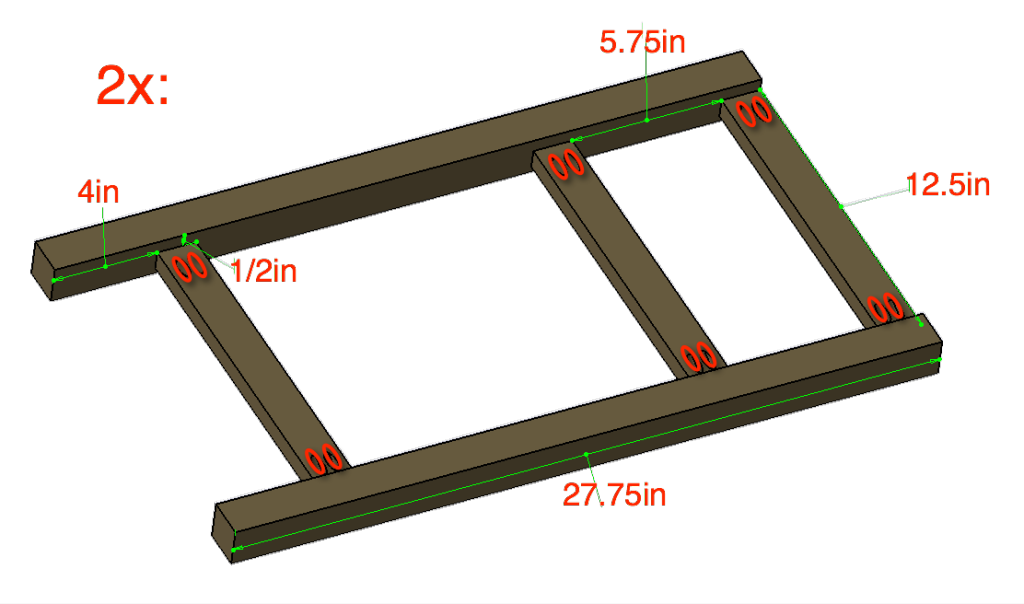
Start out by assembling the two sides first. Drill 2 pocket holes in both ends of the 1x2x12.5” boards.
When screwing and gluing the boards together I would suggest using a small piece of the ½” plywood as your ½” spacer and cut a ¼” piece as a space on the outward facing side (bottom side in this picture).
Clamp the 2x2x27.5” to the 1x2x12.5” board (sandwiched between your ½” and ¼” spacers) and glue and screw together, as shown below with 1-¼” pocket hole screws. Make sure to wipe off any excess glue (Hint: Glue doesn’t stain).
Step 2:
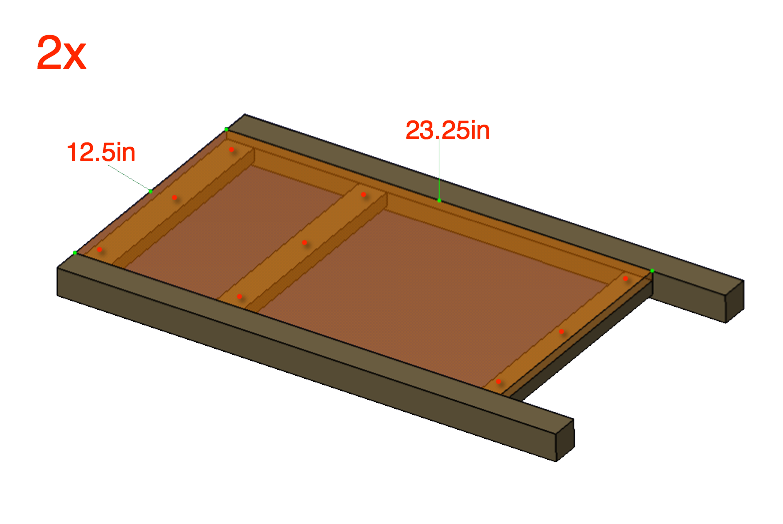
After assembling your sides, glue and screw your ½”x12.5”x23.25” plywood panels to the 1x2x12.5” boards using nine ¾” countersunk wood screws.
Make sure to wipe off any excess glue (Hint: Glue doesn’t stain).
Step 3:
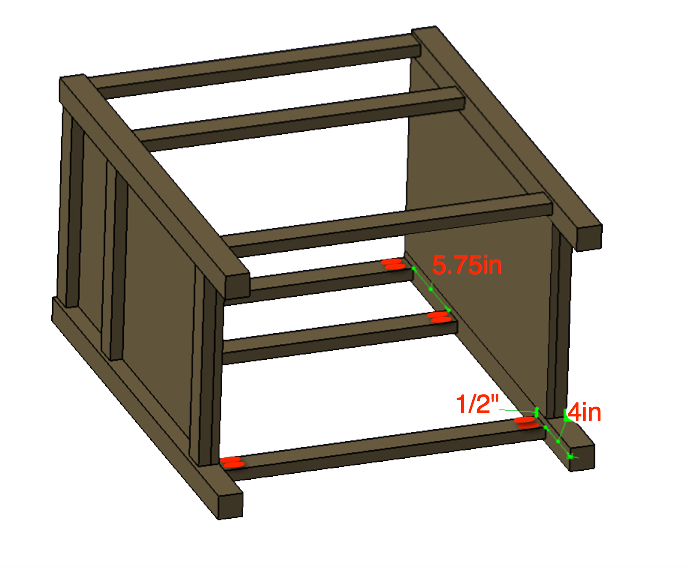
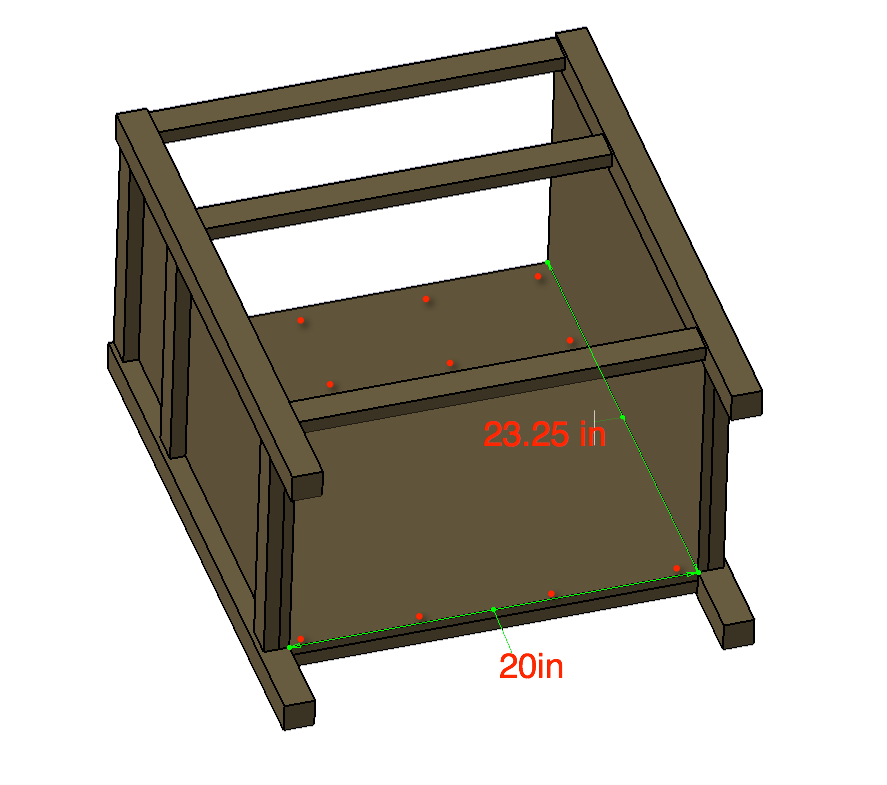
Now, to make the front and back, drill 2 pocket holes in both ends of the 1x2x20” boards. (When screwing and gluing the boards together I would suggest using your ¼” spacer from step 1 to support the 1×2 board on the outward facing side; this should leave you with the ½” of space needed for your back panel.) Glue and screw together the 1×2’s to the 2×2 corner posts, as shown below, with 1-¼” pocket hole screws.
Make sure to wipe off any excess glue (Hint: Glue doesn’t stain).
Step 4:
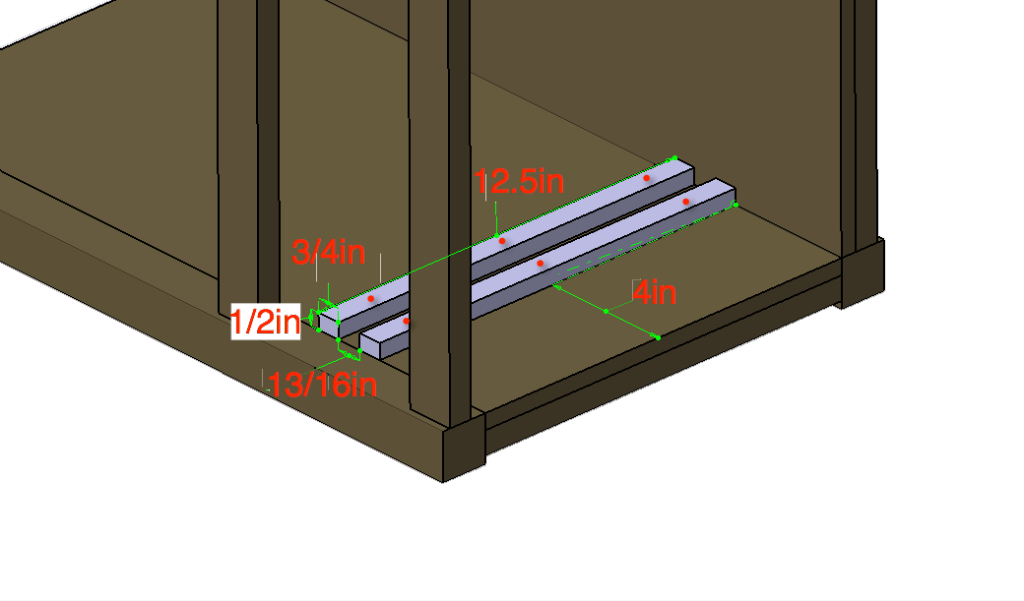
To finish off the box, screw and glue the ½”x20”x23.25” plywood back panel to the rear 1x2x20” boards with twelve ¾” wood screws.
Make sure to wipe off any excess glue (Hint: Glue doesn’t stain).
Step 5:
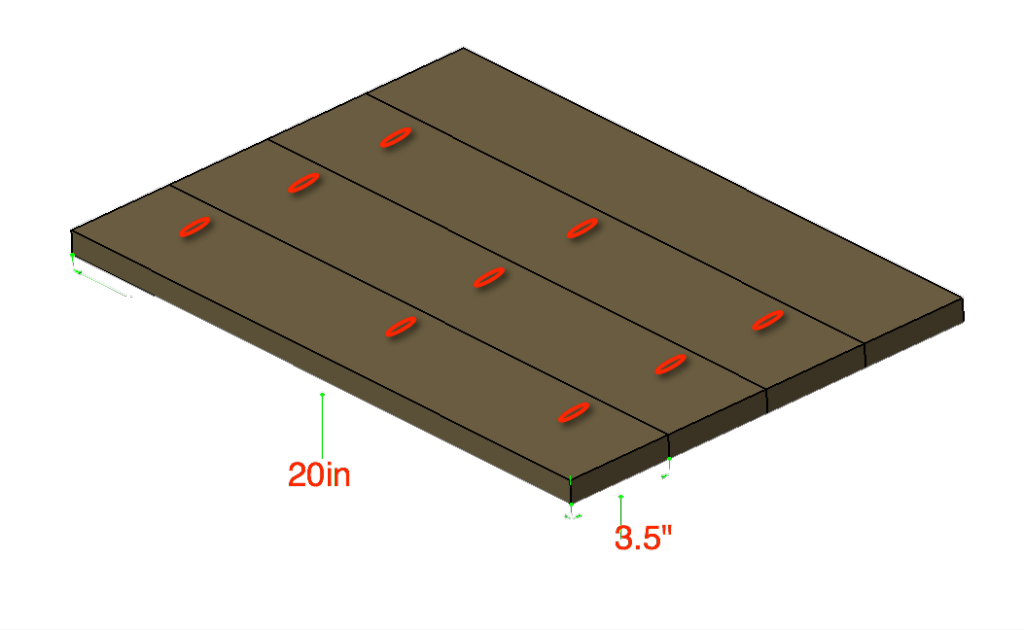
Add the rails for the drawer, as shown, leaving a 13/16” gap (just over ¾”) to accept the rail on the drawer. Remember to pre-drill your holes and then screw and glue the rails in place, with 3/4” wood screws.
Make sure to wipe off any excess glue (Hint: Glue doesn’t stain).
Step 6:
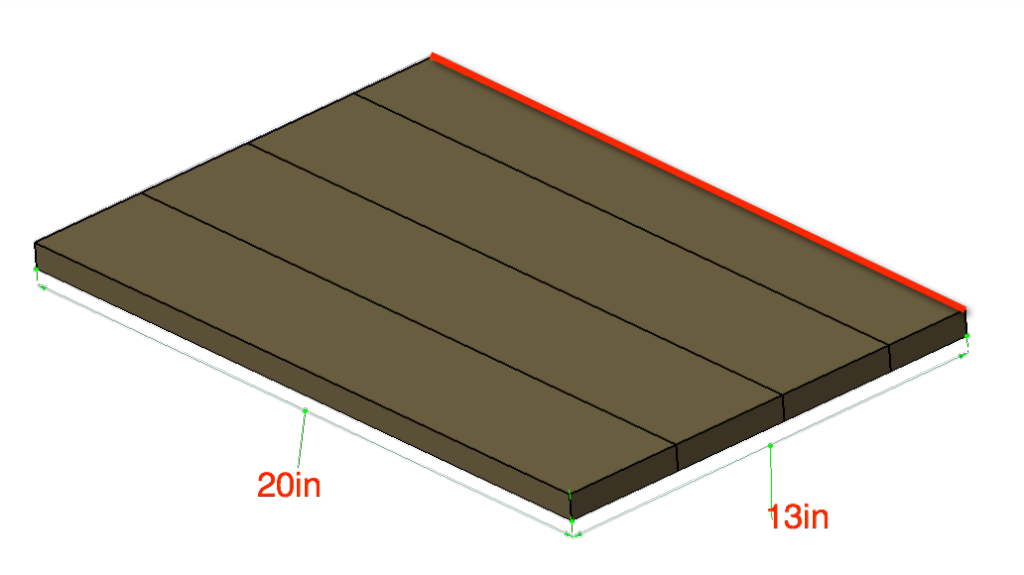
Assemble the lower shelf by drilling three pocket holes in three of the four 1x4x20” boards. Next, glue and screw one board at a time making sure to keep a flat shelf by clamping at each screw point.
(Note: If you have any 1×3 scrap handy, I suggest you substitute the last board for it, being as, in the next step we have to cut 1” off the back.)
Make sure to wipe off any excess glue (Hint: Glue doesn’t stain).
Step 7:
Take the lower shelf that you have just assembled and cut 1” off the back.
Yes, I know you could have just used a 1×3, and if you had the scrap laying around you should have, but it doesn’t make sense to buy a 1x3x6’ just for this now does it?
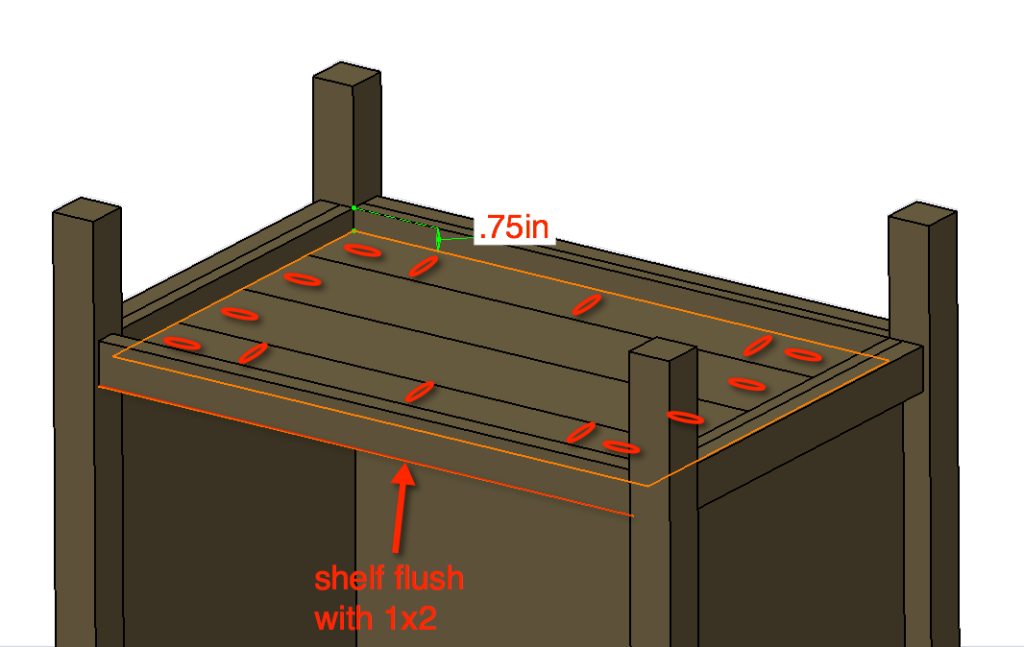
Step 8:
Drill pocket holes in each end of each board and then three along the front and back of the shelf.
Wedge the shelf in place. You should have ¾” between the bottom of the shelf and the bottom of your frame. Also, make sure that the top of your shelf is flush with the 1×2 on the front, as shown in the picture.
Clamping everything together, screw the shelf in place, with 1-¼” pocket hole screws. You will notice that I didn’t say anything about gluing. Well, trying to glue and wedge this shelf in place will make quite a mess and with this many screws hold the shelf in place I think it will be more than okay.
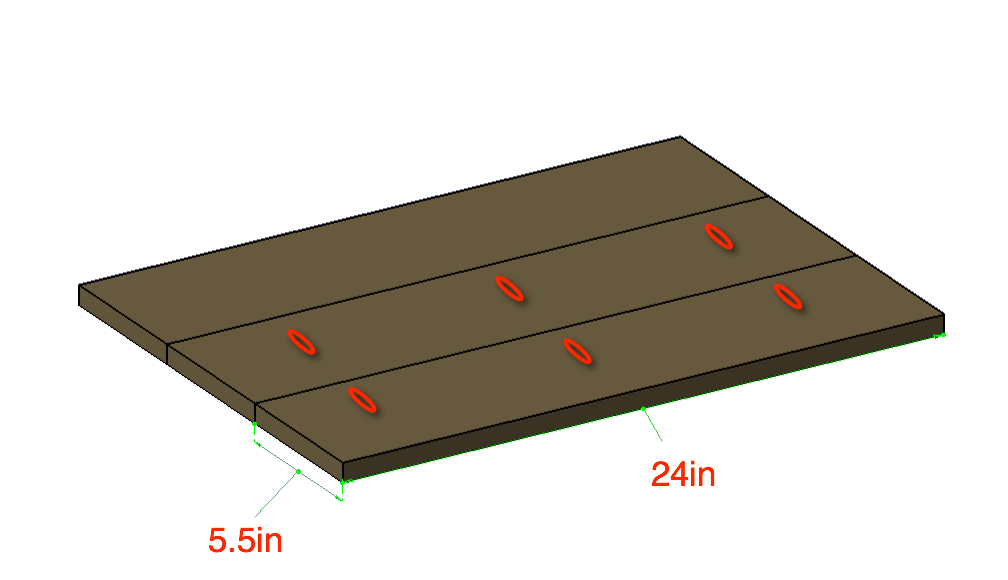
Step 9:
Now, on to the top. Drill three pocket holes in two of the three 1x6x24” boards. Making sure to keep your top as even as possible, glue and screw each board together. Make sure you clamp the boards by the hole when screwing together with 1-¼” pocket hole screws.
Make sure to wipe off any excess glue (Hint: Glue doesn’t stain).
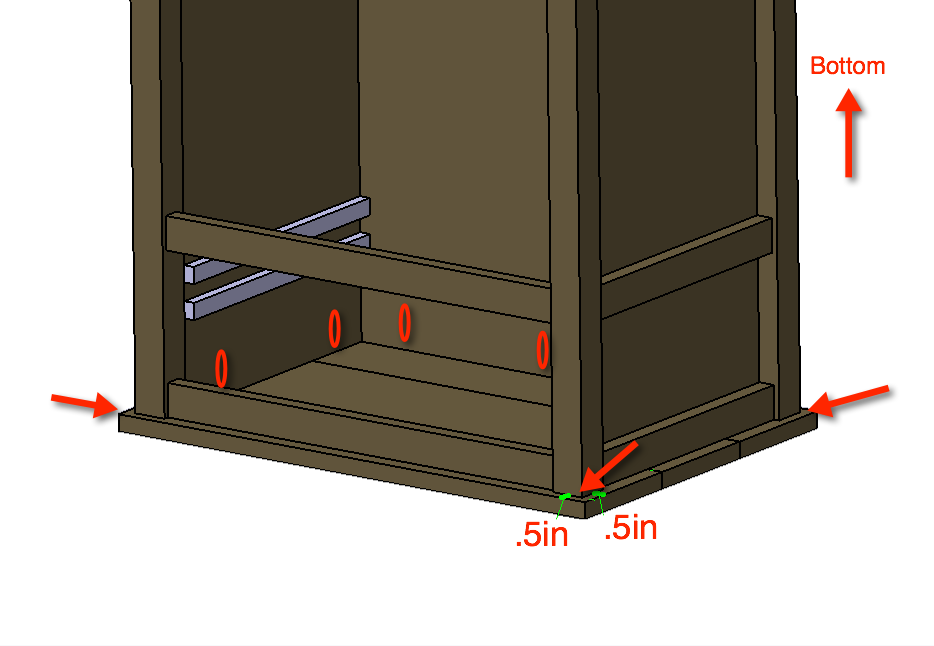
Step 10:
To attach your top, drill two or three pocket holes on the inside of all sides.
Keeping a ½” over-hang on all sides from the corner posts, screw and glue your top in place with 1-¼” pocket hole screws.
Make sure to wipe off any excess glue (Hint: Glue doesn’t stain).
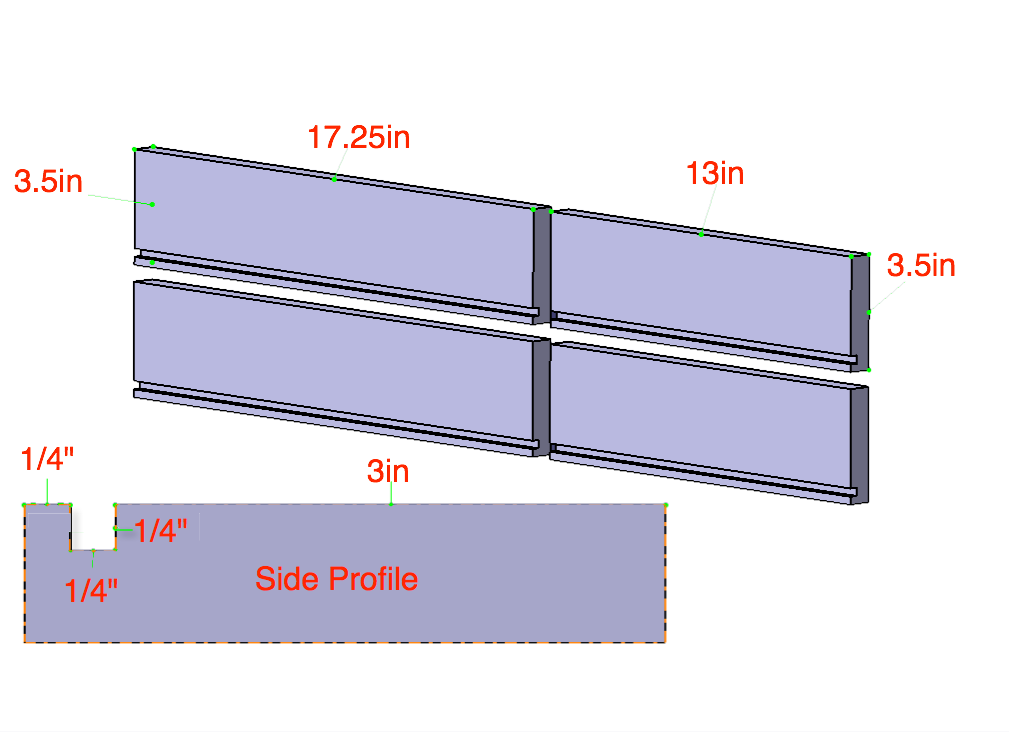
Step 11:
Cutting the groove as shown in the sides, front and back of the box is really easy with a dado blade. Or you can take two side by side passes with a table saw or circle set to a depth of ¼”.
Don’t fret if you don’t have a dado blade and this looks intimidating, just skip the groove. You can always make the bottom panel in the steps ahead large enough that you can just tack it to the bottom.
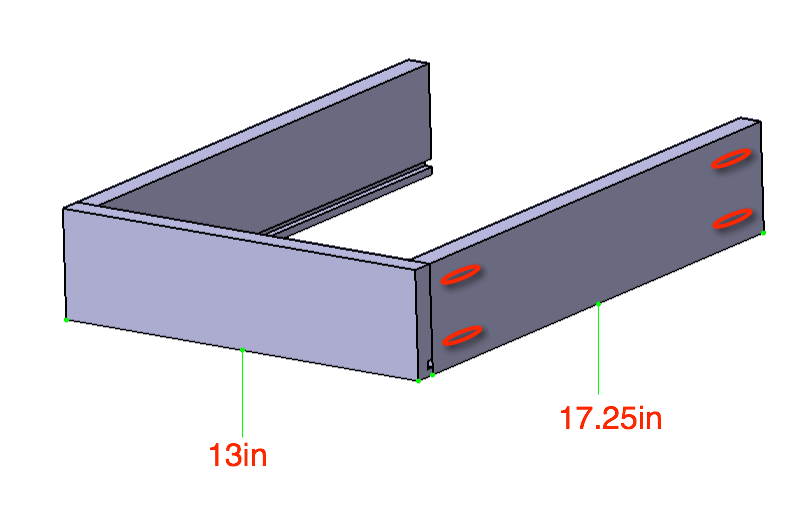
Step 12:
Drill two pocket holes in each end of the front and back boards (the longer ones!)
Now screw and glue ONLY one side with 1-¼” pocket hole screws.
Make sure to wipe off any excess glue (Hint: Glue doesn’t stain).
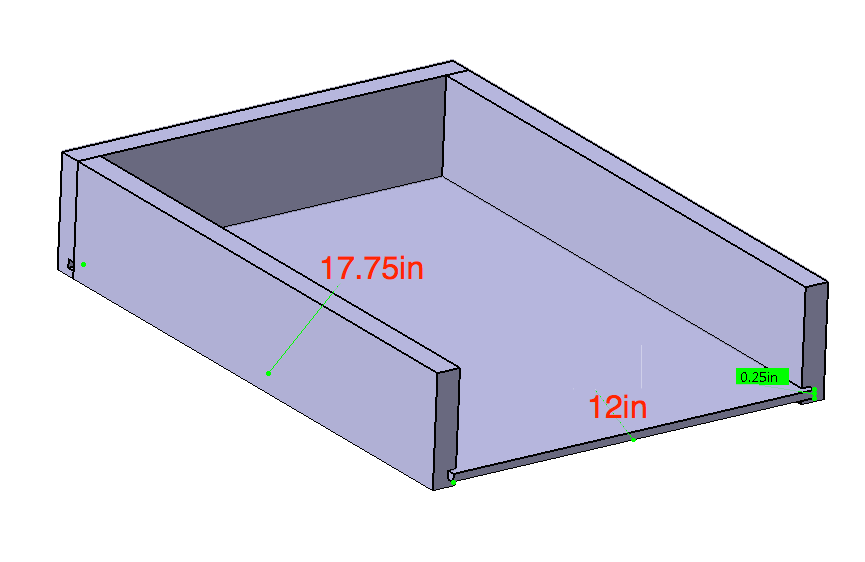
Step 13:
This is an easy one, just slide your ¼” plywood (12”x17.75”) in the grove.
Note: If you did not cut the groove you will need to make your drawer bottom 18.75”x13” and tack with finishing nails.
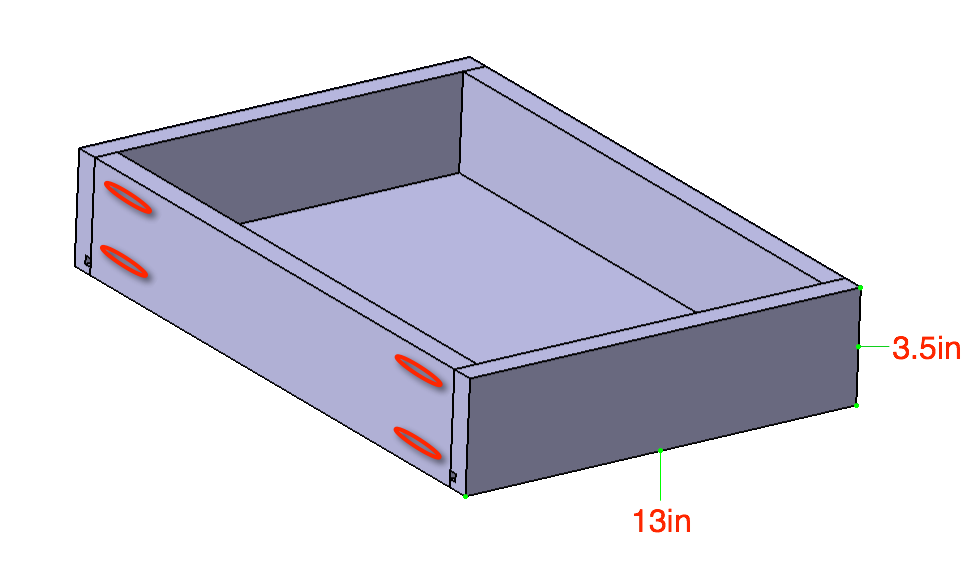
Step 14:
Now fit the last side in place and screw and glue it together with 1-¼” pocket hole screws.
Make sure to wipe off any excess glue (Hint: Glue doesn’t stain).
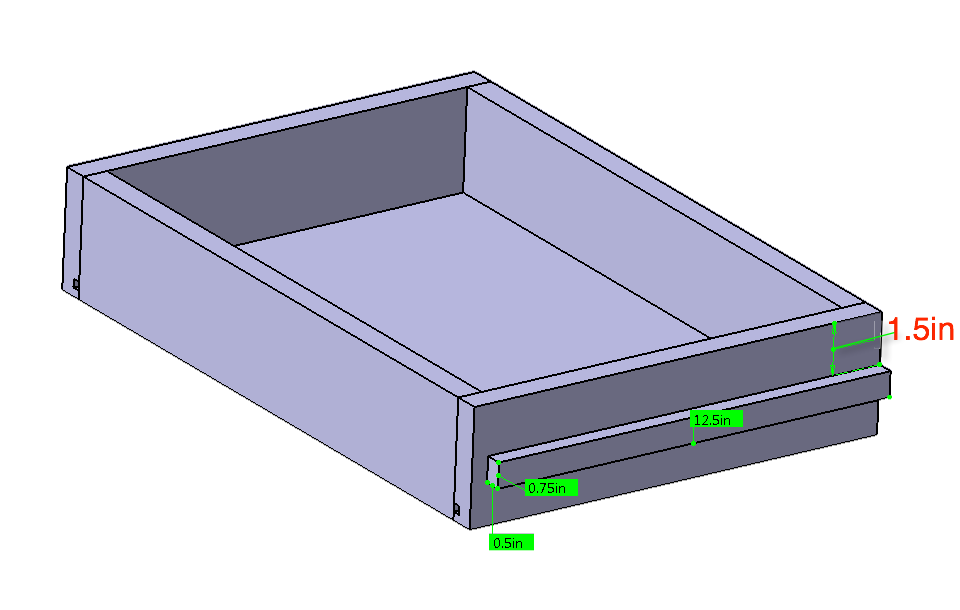
Step 15:
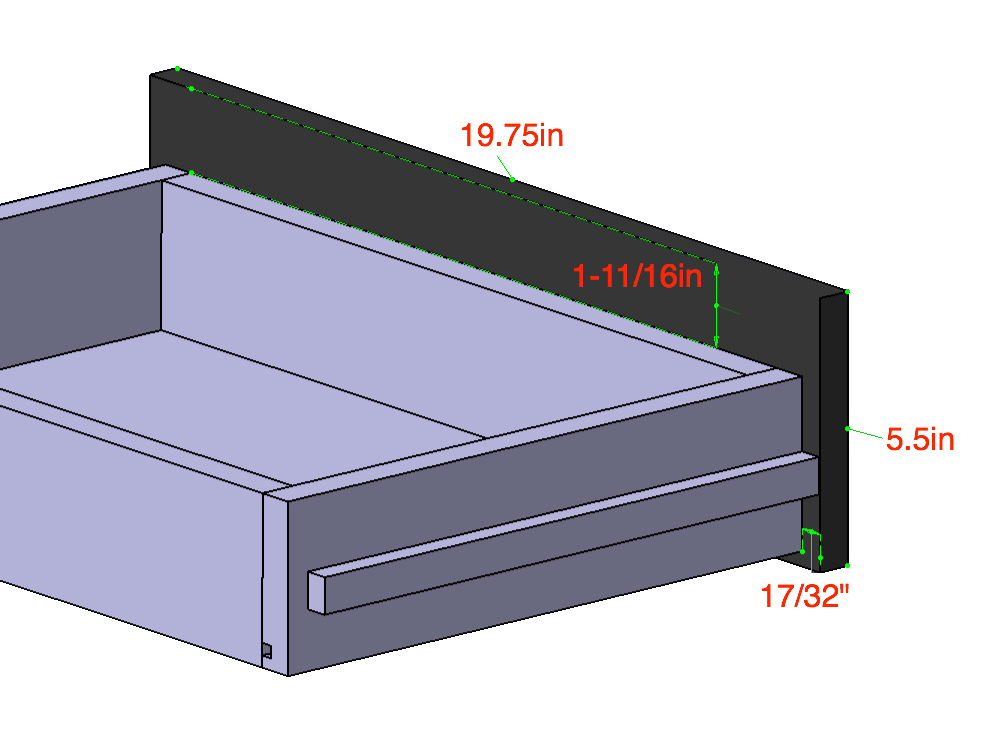
Now, with ¾” wood screws, screw and glue the .5x.75×12.5” rails to the sides of the drawer. Make sure to keep one side flush to the front and maintaining 1.5” from the top of the drawer.
Make sure to wipe off any excess glue (Hint: Glue doesn’t stain).
Step 16:
Finally, attach the 1x6x19.75” drawer front with two 1-¼” wood screws.
Note: Depending on the drawer pull you picked out and the hardware it came with you may need to add the hardware to the drawer front beforehand.
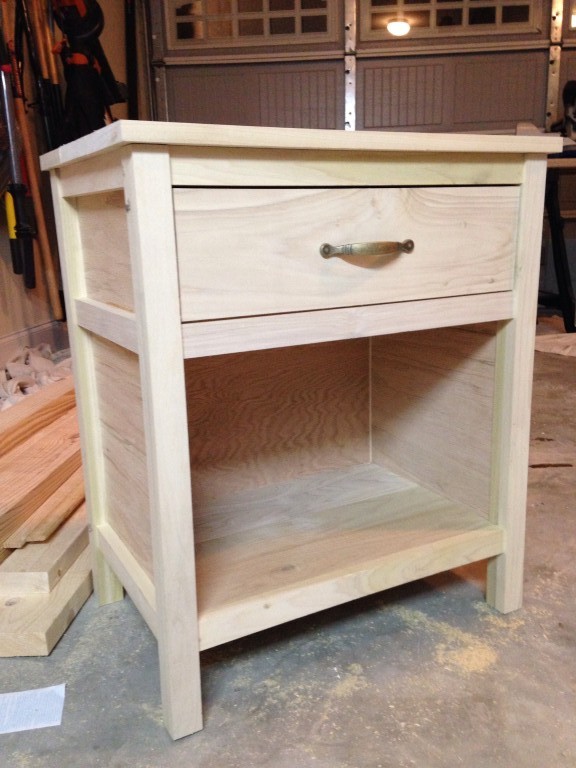

Finishes:
For this project I choose the following combination stain:
As for a sealant, I went with 4 coats of Rustoleum Zinsser Bulls Eye Shellac on the nights stand and Minwax Paste Finishing Wax on the drawer front.
For other finishing ideas please take a look at our finishes page where my wife Jamie lays out, step-by-step how to’s on different popular and beautiful finishes and techniques.
As always if you have any questions don’t hesitate to comment below and especially don’t forget to post pictures of your finished products in the comments! ENJOY!
Looks good very very good
Make me 2, please! 🙂
So excited!!!!!!!
This is beautiful! 🙂 Looks like another build to add to my very long build list. Thank you.
Looks awesome! Is there anything I could use instead of a kreg jig? I tried it for my first project and it did not turn out well.
Thanks Maddison! You could use a biscuit jointer but I will say this is more difficult then a Kreg jig. Can I ask what went wrong? Which kreg jig do you have and did you use a clamp?
Thanks Yurrabazain! I know a thing or two about long build lists! (My wife has a problem)
I’m building this now. There’s a typo in your instructions. Your cut list says this:
–“1x 1x6x19.25”–
But your instructions say this:
–“Finally, attach the 1x6x19.75” drawer front with two 1-¼” wood screws.”–
Luckily my hardware store only had 10′ 1x6s of Red Oak, so I had 2ft of it to spare! (otherwise I’d have had to go buy another board). Might want to get that fixed.
I’ll make sure to let you know how it turns out!
Hey Jay, thanks for the heads up. I fixed that typo and I’m glad you didn’t have to buy another board. Looking forward to seeing how yours turns out!
Another issue I almost ran into. In Step 5, you say “screw and glue the rails in place, with 1-¼” pocket hole screws.”, but you’re only going through 1″ of material! (1/2″ for the slider, then 1/2″ for the plywood behind it). Did you use the 3/4″ wood screws instead? (I suspect so)
Thanks again, I fixed this and your correct, the 3/4″ wood screws are what should have been used here. Sorry about that. This was one of my first plans.
One final question: In your ‘finishes’ section, you list 3 colors of stain: Walnut, Oak, and Gray. But in your finished product (which I quite like), I only see two colors, one for the drawer front and one for everything else. Can you clarify this for me?
I used the walnut as a base color and then lightly stained over it with the weathered oak. That didn’t give me the grayish look that I wanted so I added the weathered gray which is even more gray. If you used red oak I would recommend the carrington or early american stain from rustoleum. I of these should get you the color you want without all the work it took me.
Also, for the drawer front I used actually chalkboard paint and then waxed it to give it the polished finish.
Sorry about the confusion.
Here’s my final product. I use Minwax “Early American” instead of Rustoleum, and it came out a bit redder than yours. I’m still very happy with it though.
I gave this one to my wife, time to build a second one for myself!
Wow that turned out great. Excellent job Jay!
Reattaching photo that was removed
I’m not entirely sure I understand how to use the spacers in step 1. Would you be able to explain it a bit more?
Thanks
I might have over complicated it. What I was saying was that the 1×2 will have a 1/2″ set back on the inside and a 1/4″ set back from the outside. Honestly, if you take a strip of 1/4″ scrap and use it as a spacer under the 1×2 when screwing to the 2×2 post you’ll be just fine.
Hope this helps.
This will be my second project. I too am confused on this step. So these spacers are just temporary to maintain the offset of the 1x2x12.5″ boards from inside and outside of the 2x2x27.5″ boards, right? After you have glued and screwed the 2x2x27.5” boards to the 1x2x12.5” boards, the spacers are removed, right? Also, do you have some more information on the drawer rails? It wasn’t included in your material list.
Hey Chris,
You are correct. These spacers are just to locate the 1×2 and will be removed after installing it.
As far as the drawer slides, I made mine using scrap wood as detailed in step 5. Since these are 1/2″ thick and most drawer slides are 1/2″ thick as well I think you might find it easier to get some 12″ drawer slides from your local home improvement store and substitute them.
Hope this helps!
how expensive is the red oak
A full sheet (4’x8′) of 1/2″ oak plywood is about $40. I used only 2’x4 so only 1/4 of the sheet. You can sometimes find smaller sizes of ply at certain stores. The rest is poplar and that varies based on the board. If I could do it over I would have used all oak.
whats a circle saw and and is the ply wood ruff
A circular saw is handheld powered saw commonly used to break down plywood and make long straight cuts. The plywood is what would be common at any big box store like Home Depot or Lowes.
Hi Jamison,
I just wanted to say thanks for posting the design. I’m new to this and the instructions were perfect. I made a few mistakes, but overall, the night stand came out great. I had to make the drawer a little larger because of an accidental measurement. Anyways, here is my final night stand! Thanks again!
Kyle
Excellent Job Kyle!
By looking at this nightstand I’d never know you were a noobie or you made any mistakes. Great woork man, and happy building in the future!
Reattaching photo that was removed
[…] Cooper Nightstand at Rogue Engineer […]
Thanks for the plans. I m brand new to this and the directions made this pretty easy. I used pine instead of oak as i was worried that being a rookie i might make an expensive mistake on oak. I am thinking of going with a whitewash stain, any thoughts?
That’s great to hear @Paul Shirriff! As far as a whitewash stain, Rustoleum just came out with an Antique White wood stain which is great. You’ll probably have the best luck finding it at Lowes. Or you could go with an actual whitewash which is done by just painting with watered down white paint and wiping off immediately. If you need more detail you can google it and you’ll find a ton of tutorials. Either way I think it’s a great idea!
I need clarification for Step 2 and the bold part of Step 3 pleae.
Hey Robert, step 2 is simply placing the plywood side panel over the 1x2s and gluing and screwing in place. The bold part of step 3 is just saying to use a 1/4″ spacer under the 1x2s to give you the 1/2″ spacing shown in the photo. Hope that make sense.
I made one. This is my first wood project. You instructions are helpful. Since this is my first project, I used the less expensive wood material from homedepot and used the leftover paint I had in my garage. Now, I should make one more with nicer wood and stain.
Thanks for your instructions.
That looks awesome! Nice thing is that it doesn’t really matter what wood you use if you paint it! Great work!
You simply can’t be a first-timer. THIS LOOKS WONDERFUL!!!
Reattaching photo that was removed
I snagged your x-brace coffee table design and made some cosmetic changes to suit personal taste last year but it turned out great, then I just happened to search the web and found this plan via a Google search and liked this nightstand the best and then realized it was another one of your masterpieces, so thanks for that, and keep it up, thanks for the time you put in to this and I’ll upload some pics of the finished product. Thanks again!
Thanks Gabe! I can’t wait to see how yours turns out!
[…] Cooper Nightstand […]
Hi Jamison:
How can I copy and paste your plans so I can take them to my shop?
Sorry about that, this was one of my first plans and I didn’t have a printable PDF of the plans available. Thanks to your tip I have now added one. Please see the link just before step 1.
Hi, I am working on this project now and am just getting to step five. In your material list, there is no mention of drawer rails. This is my first time including a drawer so am feeling a bit clueless. What time of rail should I get for this? Thank you!
The drawers rails are the wood and are included in the cut list. They are the 6 ¾ x ½ x 12.5”
A friend of mine asked if I could build her a night stand. In my search I came across your site. I had used your plans for the cooper nightstand. Now all my friends think I’m some sort of master wood worker. Of course I tell them where idea from. Thank you for sharing the plans, you should of seen the smile on my friend’s face when I presented it to her. Everybody loved the 2 tone color.
That is awesome man. Thanks for sharing. Its awesome to hear stories like yours. I’m glad your friend was happy with the end table, but be careful… soon you will have a whole list of people asking you to build stuff for them!
I just completed my Cooper nightstand. I had the help of a friend with some woodworking knowledge (and a few power tools), and for my first woodworking project I am really pleased with how it turned out. Thanks for the plans!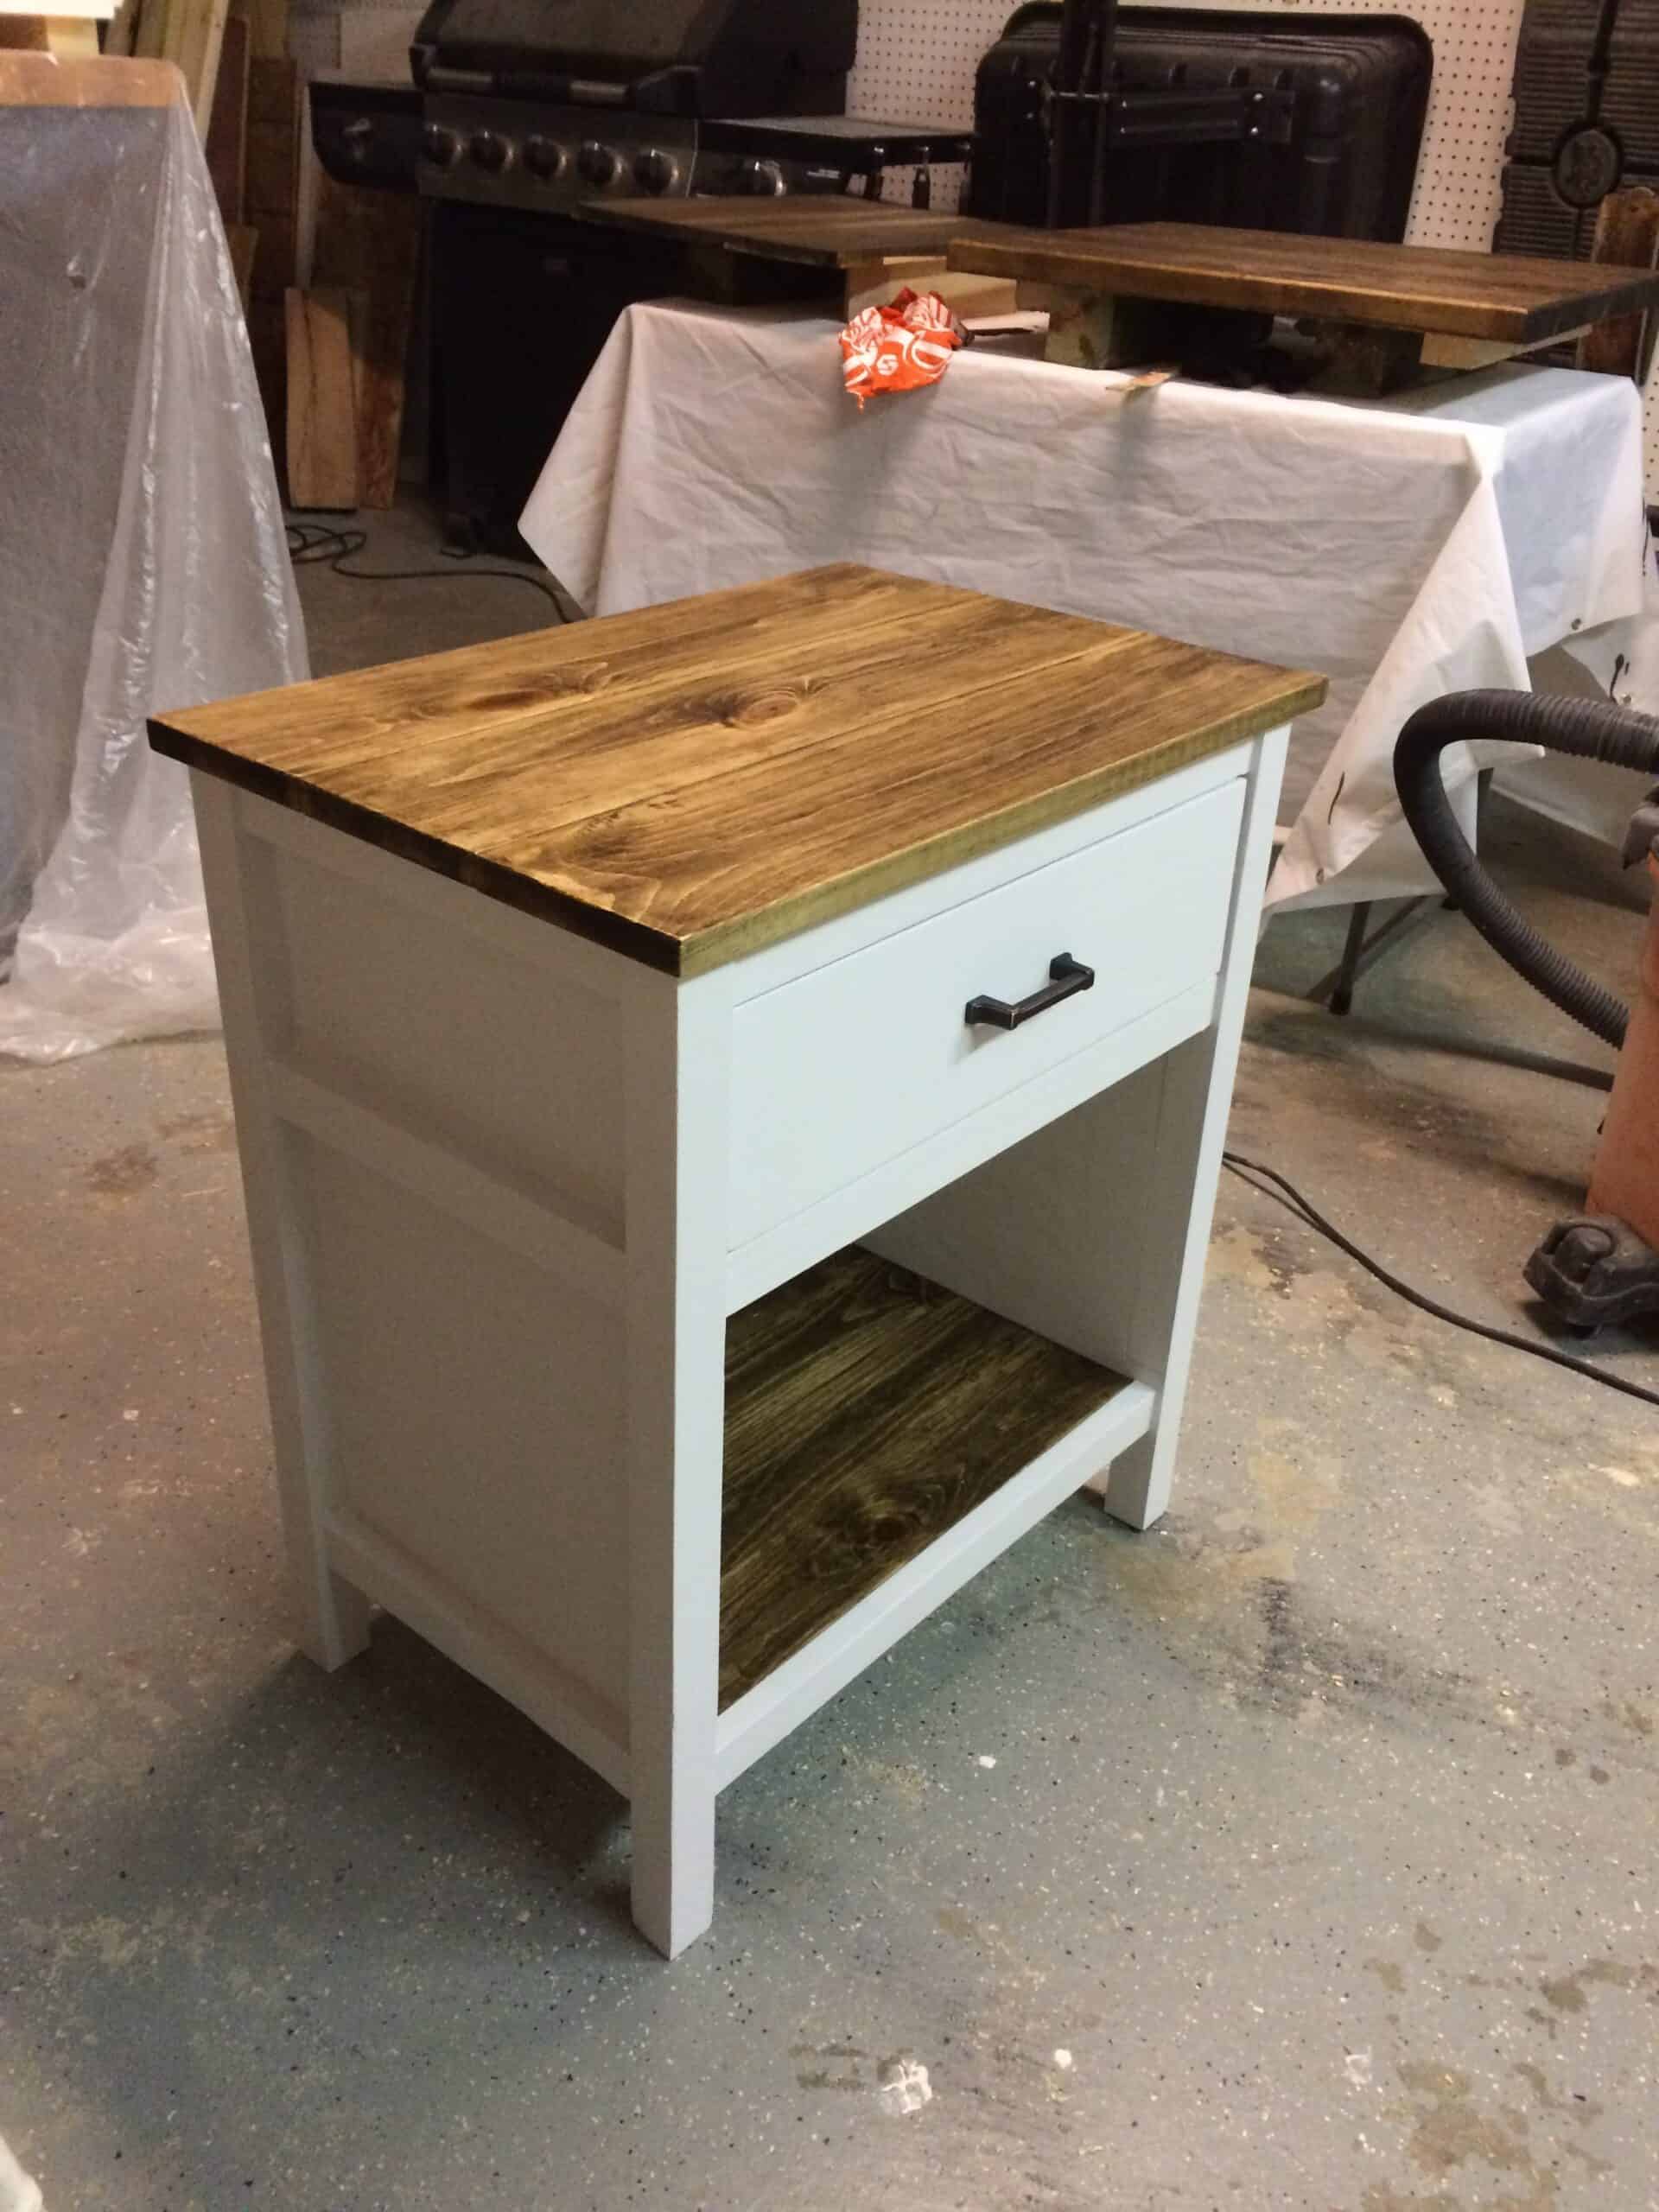
Hi! I love the finish you used. What wood, paint, and stain combo did you use?
Going to build a pair of these for our bedroom in the next couple weeks. Unless I’m missing it up there somewhere, what are the finished dimensions of this? I have a rough idea but want to know how much space I’ll be needing to free up!
I didn’t pay attention to the cut limits per piece. That will send you back to the store for a 1*4 and a 1*2.
Other issue is the cut list has to cut 6 of 3/4 x 1/2×12.5 but there was no 3/4 wood in the plan. Back at home with no 3/4. Perhaps he meant 1/2*3/4*12.5
I figured he meant a spare piece of 1x since a dimensional 1x is 3/4 inch.
I finished this earlier this year and I used the leftover plywood for the 3/4 but recommend your suggestion of the 1X if possible. Either will work. Those are for the drawer rails. Plywood is tough to cut that thin because it comes apart.
Just curious what the cost of this project is excluding finishing. That would be a great thing to add to all of your projects!
Great plans and thanks for putting this all out there for the community! I’m in the process of building a pair of these and wondered if there was a typo in the dimensions for the legs. The cut list has 2x2x27.25″, step 1 states, “clamp the 2x2x27.5″….” and the image associated with Step 1 shows a dimension of 27.75″. I’m well past this but it stopped me for a minute; I decided it was a typo and moved on. I’ll put up some pictures when I’m done with the build. Thanks again!
Same question here. What was your result? Typo?
Are your numbers actual size i.e. 2x2x27.5. Are you using dimensional lumber numbers or actual. For example you go to lowes and buy a 2×2 board as listed, you are really going to get a 1.5×1.5 board.
I was wondering the same thing, but if you look at the illustrations, some boards have measurements. Like in Step 6, the 1×4 in the pic is marked as 3.5″. So he’s using dimensional lumber. You probably already figured it out but thought I’d reply for future readers.
I recently completed my first project the Cooper nightstand. I adjusted the dimensions and added a door to conceal a safe. Overall pleased with the outcome.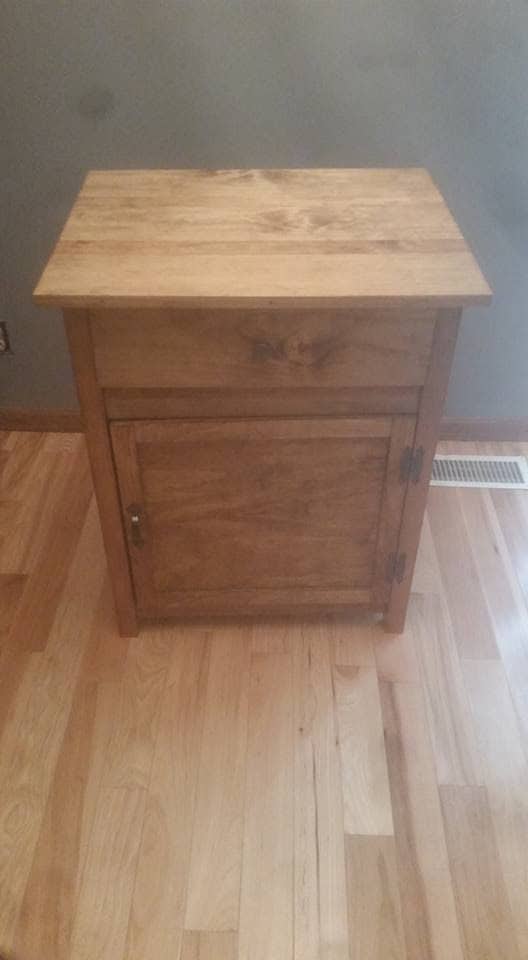
This is GREAT….I wish you lived in Indianapolis, Indiana. I am getting together a group of volunteers for our annual community commitment and this year we are re-doing a bedroom at a homeless shelter. Two of these sturdy night stands would be great for our project.
I would like to receive the printable PDF of the plans for the nightstand but after I click on the red Download Printable Pdf tab it shows that the process has only gone “50%” I have tried several times . I would really appreciate your emailing it to me at dougwest@hargray.com.
Where did you get your drawer sliders. I cant find those dimensions. .5 x .75 x 12.5?
Hi. Great plans. I am looking forward to making more of your projects. I am on step 10 and have a worry. It seems like the pocket holes required to secure the top on would mostly need to be drilled into the plywood according to the plans. Is that going to be secure enough? I feel like those top edges are exactly where someone will grab when moving this and the screws will not sink into the weak plywood strongly, On the other hand, the outside hardwood would be ab option, but that would then leave some blotches in the wood even if I filled the holes. Do you have any thoughts?
HI. in answer to my question, I wound up countersinking some screws on the top 1X2’s. Here’s a pic of what the finished woodworking looks like. Now my wife is going to paint it. https://uploads.disquscdn.c…
just built mine.. the plans may be a few years old but they’re still accurate. the spacer 1/4″ plywood is an excellent trick for locating the 1x2s. I made mine shorter to match the bed they are going beside.
https://uploads.disquscdn.c…
I made this nightstand for my son. It was the first time I made a drawer! The plans made building this much easier, but I messed up several times and learned a lot. https://uploads.disquscdn.c…
Is there still a pdf available for the Cooper Nightstand? I clicked on the link and it gives me an error message.
https://uploads.disquscdn.c… I modified the plans a little, used hickory for the frame and red oak plywood for top and bottom shelf. Also did undermount hardware for the drawer. Nice plans.
I tried downloading the plan but the link took me to a different page and no plans.