
Floating Media Console
We’ve been working on our theater room whenever we get a little extra time. We built the riser for the back row earlier this year and carpeted the room at the end of summer. After moving in the theater seating, installing lighting and home theater system, the last thing we needed to do to bring it all together was build a floating media console to help house some of the essentials. The catch was that I needed it to also fit around the subwoofer which needed to go right in the middle. So this is what I came up with. Let me know what you think in the comments.
If you love this stuff as much as we do, you might want to consider following us on Instagram where we post sneak peeks and behind the scenes stuff in our stories. Also, did you know you can get tons of projects plans from all around the web when you follow us on Facebook and Pinterest!
Disclosure: This project was sponsored by Kreg Tool Company however the design and opinions are 100% my own.
Tools
Materials
- 3/4″ x 4′ x 8′ Plywood
- 3/4″ x 2′ x 4′ Walnut Plywood
- Optional: See cut list note
- 1-1/4″ Kreg Pocket Screws (Coarse)
- 3″ Cabinet Screws
- Qty 2 – European Full Overlay Hinges (pair)
- Wood Filler
- Edge Banding
- Wood Glue
- Hinge Lights
Disclosure: The links provided in the “materials” and “required tools” sections are affiliate links. If you would like to support our site and help keep our content free come find out more about how we can make money with no extra cost to you.
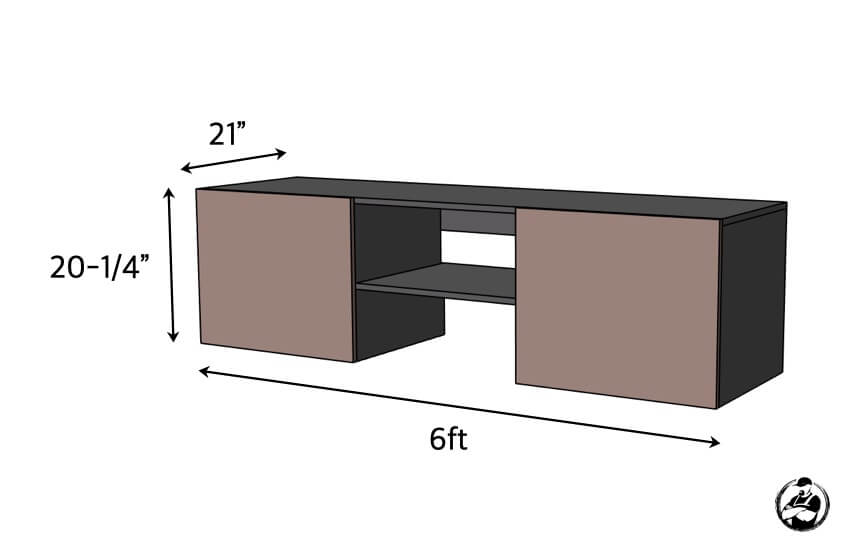
Overall Dimensions
Cut List
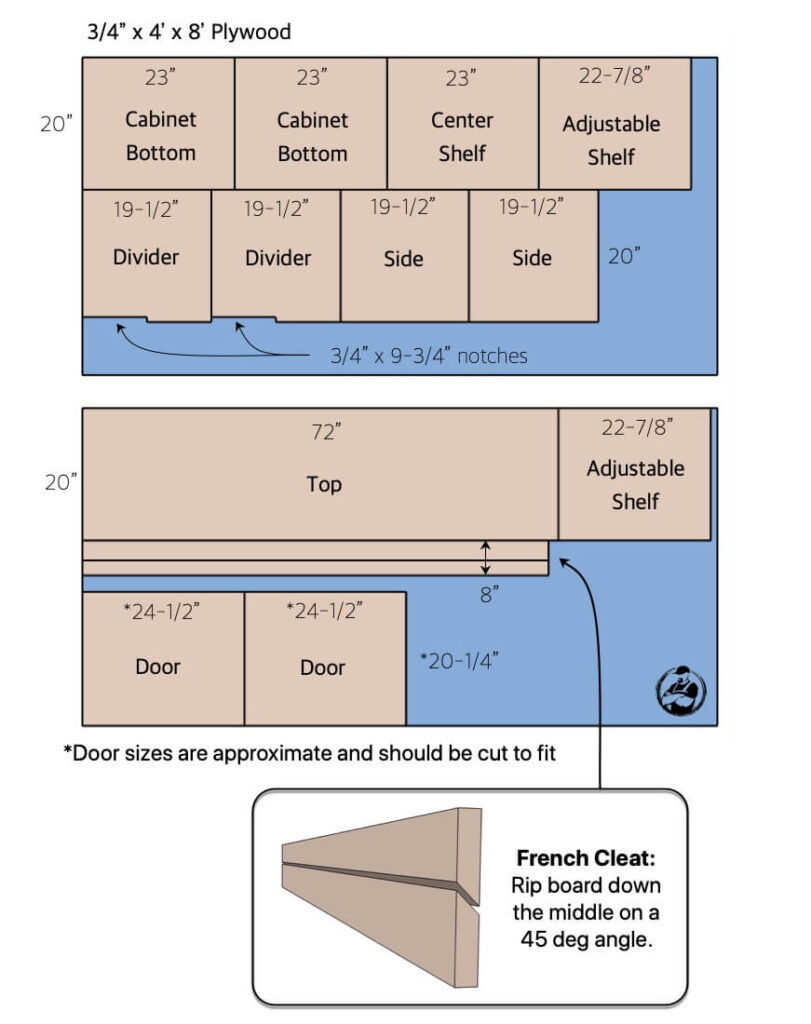
Note: If you would like to use a nicer piece of plywood, like walnut, for the doors only then you might want to consider making the cabinet bottoms 1″ narrower and the center shelf 2″ wider. This way you can make both of the cabinet doors from a 24″x48″ piece of walnut plywood.
Also, if you find yourself breaking down plywood often then I highly recommend the Kreg Track Saw (currently offering free additional track) but if you can’t spend that kind of money then definitely consider the Accu-cut Circular Saw guide

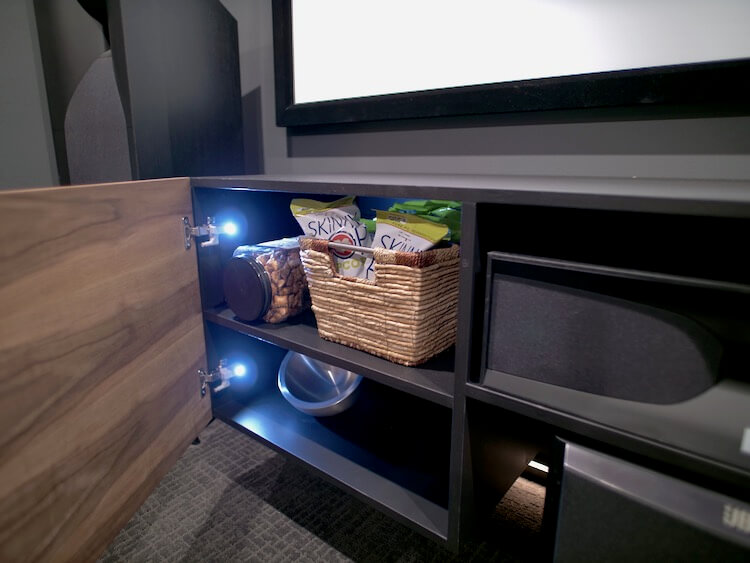
This floating media console is designed with two cabinets, one on each side, and a shelf in the middle for the center speaker. The bottom of the unit in the middle is notched to allow for a subwoofer below it. The cabinet construction is all 3/4″ plywood, which will get painted, and the doors are made from walnut plywood, which will receive an oil finish to bring out the natural beauty.
Total Time: 2 days
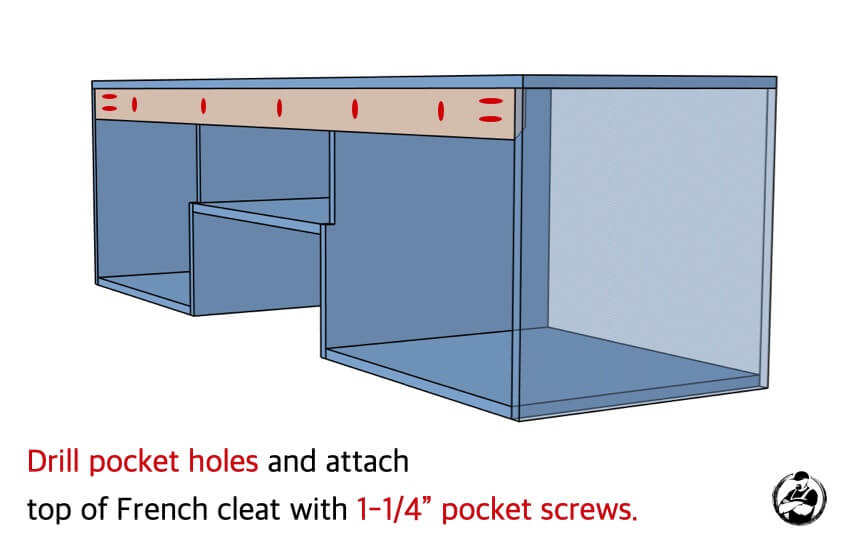
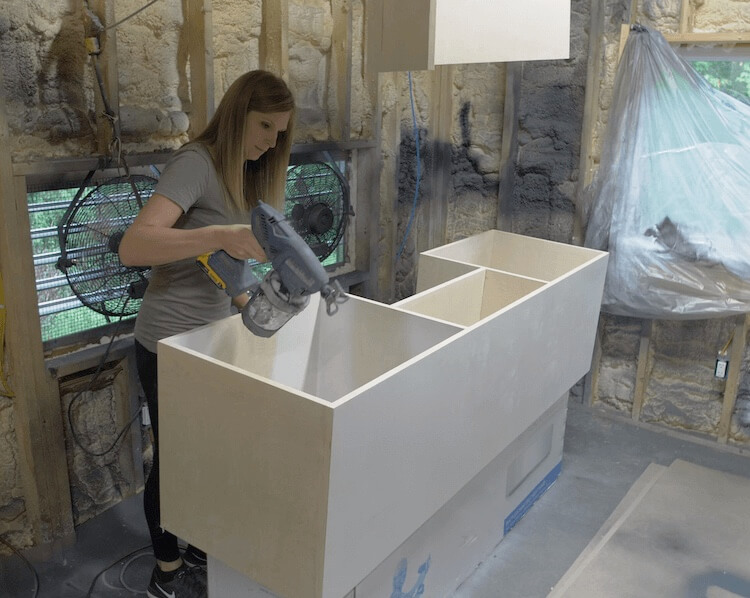
Assembling the Cabinet Carcass
When I assembled this cabinet I used the cabinet bottoms as spacers for the dividers. The biggest thing here it to take note of which side of the dividers to drill the pocket holes. I would recommend hiding the pocket holes inside the cabinet boxes.

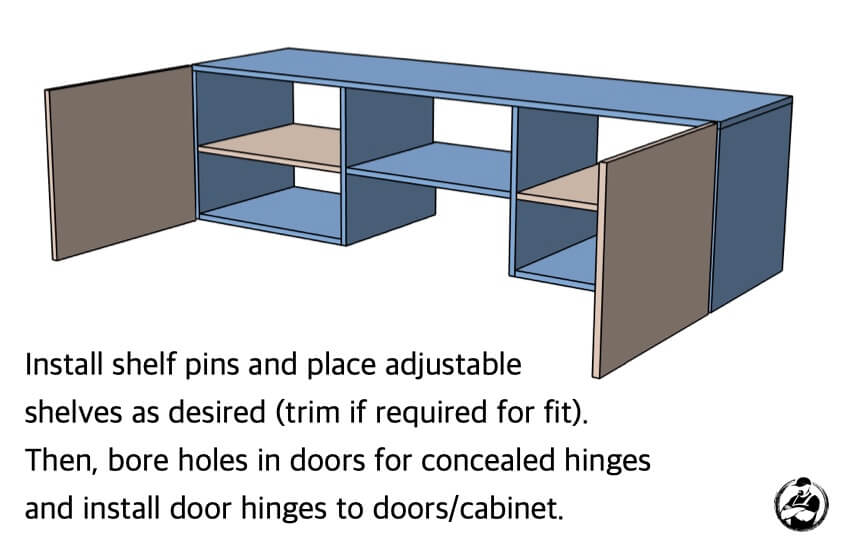
After you get the cabinet assembled you can then use a shelf pin jig to drill the shelf pin holes. 3 or 4 holes is all you should really need.
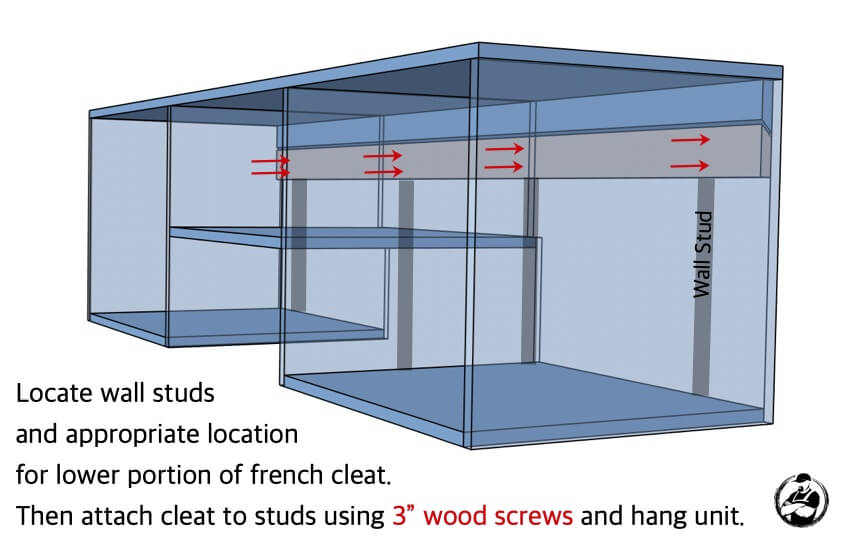
Installing the French Cleat to the Cabinet
When positioning the cleat make sure to place it such that the long side is toward the back of the unit. This way the unit will slide into place and lock into the other side of the cleat that is mounted against the wall.
Concealing Exposed Edges
When working with plywood most of the time you end up with exposed edges. There are two ways that I like to deal with this. One is applying a thin coat of wood filler to build up the edge, or blend into another, and sanding it down smooth. We used this method for the exposed edges on the sides which allowed us to blend the edge of the top into the sides.
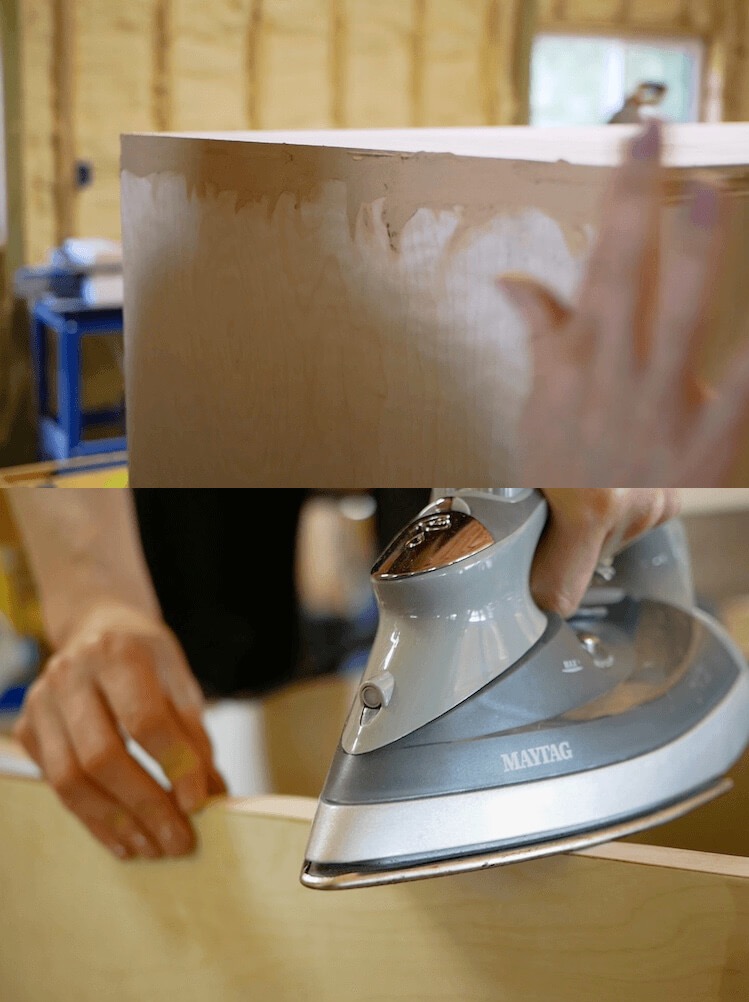
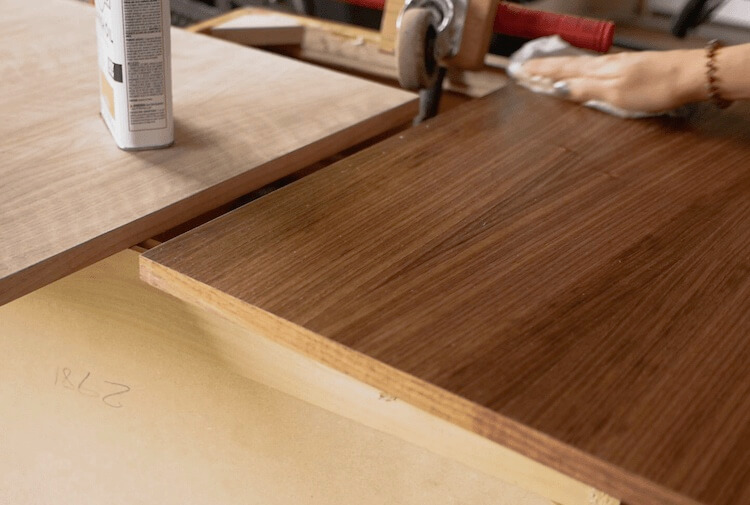
Another way is to apply and edge banding. We used an iron on edge banding for the front face of the cabinet and the cabinet doors. This is great because you can match the wood veneer for clear finishes and for painted finishes it leaves a flat smooth edge.
Finishing the Cabinet
Since this cabinet is bare plywood with exposed edges you’ll have to prime the wood first which will help create a smooth surface that the paint can bond to better.
Follow up with two coats of paint. Ideally this would be sprayed on for the best results but a foam roller works great too.

Finishing the Doors
We went with a simple danish oil finish on the cabinet doors. After applying a couple coats to the birch plywood, that we originally were going to use, we realized the veneer was extremely thin and the door started to look like crap. Polyurethane probably wouldn’t do this since it sits on top. However, that’s when we made the decision to order walnut plywood. Once that came in we edge banded them with walnut edge banding, applied the same oil and they turned out exactly how we wanted.
Hanging the Console on the Wall
Now it’s time to install this thing. The french cleat system really makes this easy. Figure out the height you want your unit and where the cleat will need to go to achieve that. Then find your wall studs and grab a level. Attach the bottom cleat to the wall with the long side out and up with one screw. Then level the cleat and finish installing with two screws at each stud. Two screws will help keep the cleat from rocking against the wall.
Installing Shelves and Doors
I’m not going to go into too much depth on the cabinet door installation because I feel like this could be a tutorial on its own and I should be doing this one pretty soon. However, I used the Kreg concealed hinge jig to bore the holes for hinges in the doors as well as a small scrap piece that I used as a template to install the bases of the hinges to the inside of the cabinet. More on that in the video.
Installing Hinge Lights
If you have the right hinges, adding a hinge light is really simple and great for this cabinet since the room will be dark the majority of the time.
Conclusion
This floating media console is perfect for us because it allows the lighted baseboards to shine below and the notch in the middle accepts our subwoofer perfectly. If you didn’t want this console to float you could easily add legs like these or these. And, if you didn’t need the notch for the subwoofer it would be fairly straightforward to shorten the dividers by 3/4″ and run the bottom all the way through. Below are a few finished shots of our theater room and we couldn’t be happier with how it turned out.


