
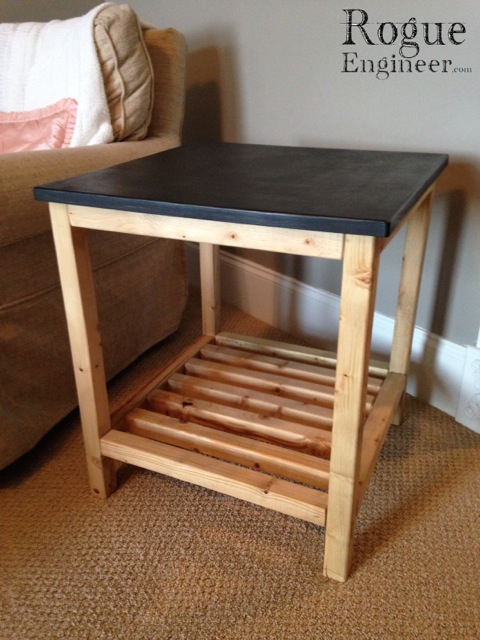
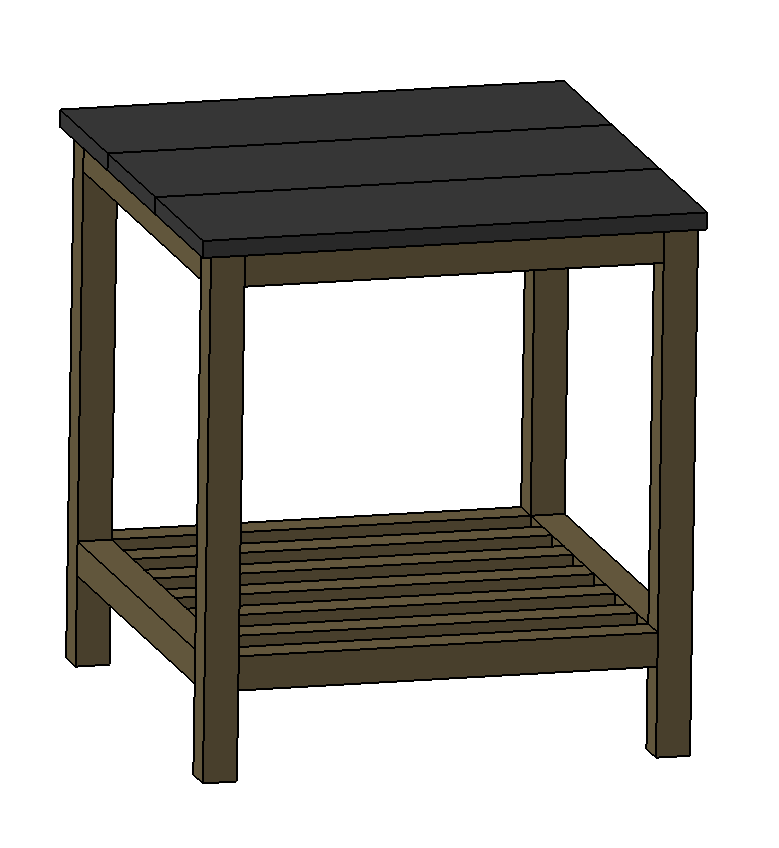
Connor Side Table
DIY End Table Inspiration
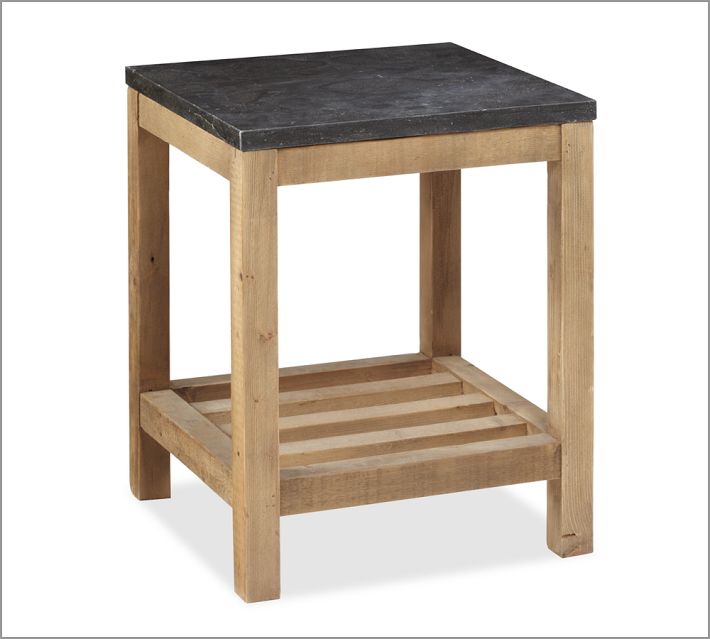
So after our baby Madison was born my wife asked me to haul the glider downstairs from the nursery to our master bedroom so she would have a relaxing place to nurse the baby. Right away we discovered that we needed a side table to accompany it for drinks, books, and what not. So we decided on this lovely $400 Connor Side Table from Pottery Barn. Well that’s an easy one to build. Consider it done. Here are the DIY end table plans that I created and built too myself.
Required Tools
- Miter Saw
- Kreg Pocket-Hole Jig
- Cordless Drill
- Level
- Square
- Tape Measure
- Safety Glasses
- Ear Protection
Materials
- 4x 2 x 2 x 8′
- 1x 1 x 8 x 6′
- 1-1/4″ Coarse Washer-Head Pocket Screws
- 2″ Coarse Washer-Head Pocket Screws
- 2″ Wood Screws
Cut List
- 13x 2 x 2 x 18.5″ Note: If it looks to big for you all you need to do is decrease the length of these.
- 4x 2 x 2 x 23.25″
- 3x 1 x 8 x 22.25″
DIY End Table Instructions
As always if you have any questions don’t hesitate to comment below and especially don’t forget to post pictures of your finished products in the comments! ENJOY!

Step 1: Assembling the sides (Qty 2)
Assemble the TWO sides by drilling pocket holes at each end of the 2 x 2 x 18.5″ pieces as shown. Then, screw the 2 x 2 x 18.5″ pieces to the 2 x 2 x 23.25″ pieces as shown in the picture.
Check for square and level.
Step 2:
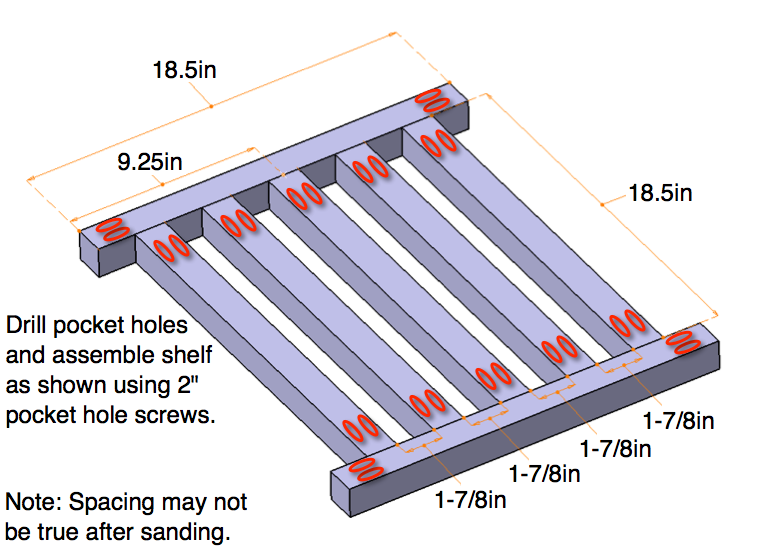
Assemble the shelf by first drilling pocket holes in each end of the seven 2 x 2 x 18.5″ pieces. It’s always best to choose wisely which side you drill pocket holes on since the opposite side will be most visable.
Using 2 inch pocket hole screws, then screw the middle slat in place making sure center is center of the ouside piece. Screw in the four remaining slats (two per side) while maintaining 1-7/8 inch gap between each slat.
Step 3:
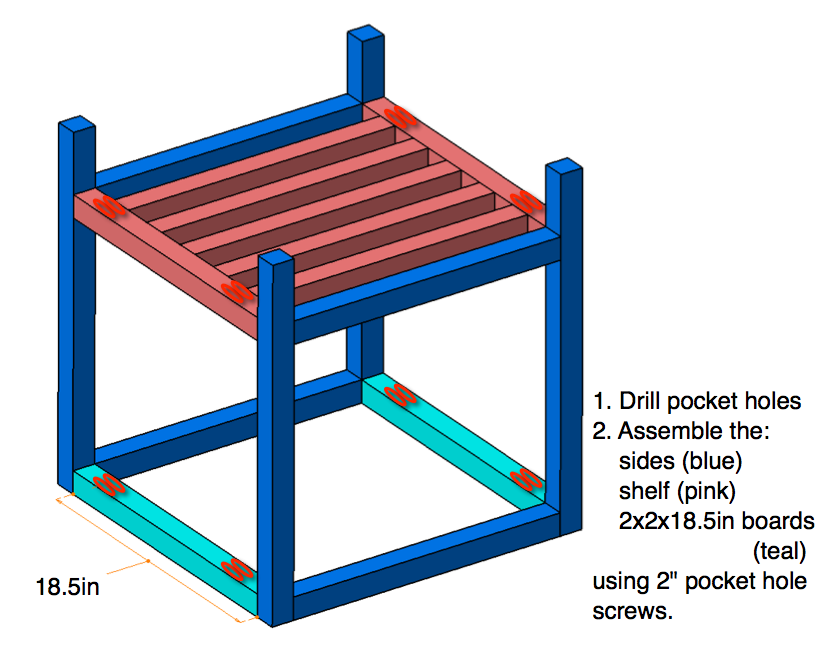
Drill pocket hole screws in each end of the remaining two 2 x 2 x 18.5″ boards, as shown in the picture.
Now assemble the table base by attaching the shelf (pink), sides (blue) and the remaining two 2 x 2 x 18.5″ boards using 2 inch pocket hole screws.

Step 4:
Drill three pocket holes in two of the 1 x 8 x 22.25″ boards. Make sure to adjust your jig to accommodate the 3/4″ material thickness.
To form the tabletop, assemble the three boards by screwing and gluing the joints using 1-1/4 inch pocket hole screws. Make sure to clamp the joints to assure a nice even top.
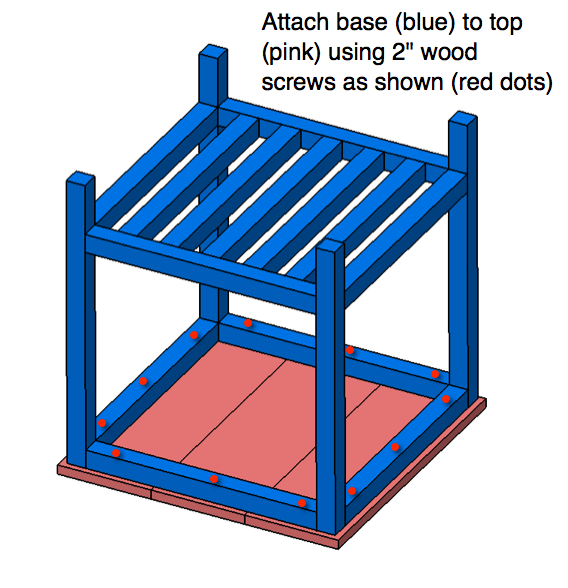
Step 5:
Attach the base to the top using 2 inch wood screws shown by red dot in this picture.
Note: If you are planning to have two different finishes for the top and base like I did then you should do so before this step.
Finish
Tabletop Color:

Base Color:

Sealant:

As always if you have any questions don’t hesitate to comment below and especially don’t forget to post pictures of your finished products in the comments! ENJOY!
Very nice!!!
Looks so cool and esay,also it’s applied.Thank you!We can change it’s colcour to what we like.
Thanks Elmyzhou! Yes you can change the colors to whatever you like just keep in mind if your going for one uniform stain color then you would want to use the same type of wood for the base that you did for the top to assure a uniform color as different types of wood stain differently.
I have been looking for end tables for a long time and I can never find anything like, most are too small, too short, or just way too expensive. I am so excited I found your website, I am going to attempt to make this. I will let you know how it goes.
That awesome Anjellica! I’m so glad you found my website as well and I can’t wait to see how yours turns out! Be sure to post pictures in the brags section!
Just watched a video on how to do freehand pocket holes and tried it out, and it works well. How far back from the end of each slat should the pilot hole start?
@alexanderp interesting question. I don’t think I’ve ever heard of anyone doing this freehand. As for how far back the pilot hole should start I wouldn’t know. But I do know that the pocket hole is at a 15 deg angle and the screw should exit the board at the mid point. Using this info you could draw a 15 deg line on the side of your board and plot the path your pocket hole should be drilled. Best of luck.
PS if your doing more than one pocket hole I strongly advise the http://amzn.to/1lhTUSn or the at the very least. I promise its worth the investment!
how do you make the top of the table appear to be one piece rather than see creases from the three board?
When you screw the top together with pocket hole screws you can clamp the seams and then sand smooth before painting. This will give you a seamless look.
will the dimension of my 2x2x8′ of 1 3/4 x 1 3/4 affect the design of the table? I see home depot has the 1 1/2 x 1 1/2. What dimension of 2×2 does your plan utilize? how should I proceed with 1 3/4 x 1 3/4?
My 1x8x6′ is 3/4 x 7 1/2
Wood type – Red Oak
thanks
I used the pine 2×2’s from Home Depot and their actual measurements are 1-1/2″ x 1-1/2″ which is accounted for in these plans. The 1×8’s should measure 3/4 x 7-1/2 so thats good.
Using 1-3/4″ Oak (nice choice btw) would make your table base 1/2″ wider which would bring the base right out to the edge of the top. To fix this just cut all your 18-1/2″ boards at 18″. Then in step 2 ignore the spacing measurements and just make sure they are evenly spaced.
Best of luck and make sure you post a picture! Red oak will be beautiful!
I noticed in step #4 you say use 1 1/4″ and 2″ pocket hole screws to assemble the top 3 boards. With the Kreg Jig set at 3/4 (stock thickness) of the 1×8’s, which PH screw would you suggest.
Definitely use the 1-1/4″ pocket screws.
Sorry about he confusion, the 2″ screws I call for in the sketch is a typo and I’ll fix that right away.
The Connor Side Table.
Red Oak wood w/ 1 3/4 x 1 3/4 (2×2)
I haven’t sanded or stained yet. Right now I have Minwax Gunstock and Special Walnut stains. If someone has an idea on another stain color let me know. I’m not trying to match anything in particular, but I do prefer more brown and medium to dark stain. I am open for suggestion. Thanks for the plans!!!
Wow! What a beautiful piece. I knew it would look good with the red oak but that is exceptional! Dang, your showing me up on my own website! Haha.
As far as stain color goes, Rustoleum’s Early American stain has always been a favorite of mine.
Reattaching photo that was removed:
another picture with the top turned. I haven’t screwed the top on yet.
FYI, I wanted to let you know my experience with red oak. I think a laquer is a good way to finish this off. But I wanted to point out that if you just apply 2-3 coats normally you will get this open pore look (shown below). If your going for a smooth, glass like finish you’ll need to sand fairly aggressively after each coat of laquer and therefore require a few more coats.
Either way I think this is personally preference and both options look beautiful, just thought I’d give you a heads up on the red oak pores.
Reattaching photo that was removed:
Reattaching photo that was removed
Thanks Jamison. This was my third project ever (4×4 rolling cubby storage for shoes and a Raised double dog bowl). I have very little experience with stain and coating. I painted the cubby and stained the dog bowl with minwax gray. I used minwax fast drying polyurathane on the dog bowl.
This is what i know from my limited experience. 1) I prefer to apply stain with a lint-free cloth 2) I hated using a brush to apply the polyurathane.
Questions:
1) can i use my Graco TrueCoat Plus II to spray Lacquer or poly?
2) can i use cloth to apply lacquer or Poly?
3) i read a bit about lacquer stating “not” to sand between coats. You suggest i do?
What Lacquer do you recommend?
Love your web site. thanks for the help
Well thanks, and no one would every know this was your third project. Again, well done!
1) I have never had good luck with any sprayer so I can’t recommend that. Some people on the other hand love them, but still I would only suggest for larger projects.
2) I wouldn’t use a cloth to lacquer or poly but if you need a little more control then a bristle brush you could try a foam brush.
3) I always use at least the 3M Between Coats Finishing Pads and 3M Final Finishing Pads. I was just saying if you didn’t want the open pore look (which I kind of like) but instead more of a glass-like finish, you might want to conside using a 220 grit sand paper between coats so that you dont get the build up around the pores.
As for a lacquer I would recommend the Watco Lacquer. Best of luck and I can’t wait to see it finished!
final product.
Red Wood
Special Walnut Minwax Stain
Thanks for the plans
Red Oak
Reattaching photo that was removed:
That looks amazing. Excellent job! Thanks for sharing!
Reattaching photo that was removed
Attached a picture of the table I name. Thanks for the great instructions. I look forward to building more of your plans.
That looks great Derek! Thanks for sharing.
Reattaching photo that was removed:
Really happy with how mine is turning out. One question: Is the finishing wax applied to the chalk finish as well? I was planning on using polyurethane on the stained base, but I would like a glossier finish on the top. Would the paste advertised work?
Hey Will, the finishing wax was applied to the chalk finish as well. This gives it that limestone, matte look that I was trying to achieve. If you want a glossier look then I would recommend the poly in a gloss or semi-gloss. FYI, Varathane just came out with a triple thick polyurethane which is a real time saver! (It’s carried at Lowes and most HD’s.)
Really happy with how mine turned out! Thanks for the plans!
Awesome! Glad I could help!
wonder if you have any idea if this could support a vessel sink? looking for an easier base for a small bathroom’s sink.( We’d make it a little taller probably)
Janet, I think it would hold the weight of a vessel sink. But I can’t say for sure. The only issue I see with using this for a bathroom vanity is the plumbing would be exposed unless you a larger apron to the table, which would also provide for additional support. Hope I could be of help.
Here is the tables I made from your plans I made two of these and a coffee table to match. I went with the smaller boards because I thought that it would look nice. stained the top and put three coats of clear gloss poly on the top. Haven’t buffed them yet still drying. painted the bottom part with some mis mixed paint that I got at a discount
Keep inspiring and be blessed
Thanks Keith. They look awesome! Great work!
Reattaching photo that was removed
On the bottom shelf you have the side stretcher pieces running 90 degrees to each other. Are there any issues with the screws running into each other? Is this why 2 inch screws are used besides 2.5 inch screws?
You should be able to use either with no issues.
I made two of these to donate to a family through our church and they were a big hit. I’m no good at finishes so I used paint instead and the turned out great
These turned out awesome! Thanks for sharing. I’m so glad that they went to part of your church family. As much as we love to build things, we are always looking for a way for what we do to touch the lives others. It’s a great feeling to know that our plans are being used to spread the love of Christ. Thanks again man.
Thanks for the plans! I just completed this as my first major wood working project. I’m happy with the results!
And here is a photo of the finished product!
This looks great! Awesome job.
Great plans. Does anyone have plans of a coffee table version?
Love the design of this. I didn’t see the link to download the PDF plans.