

Personalized Hope Chest
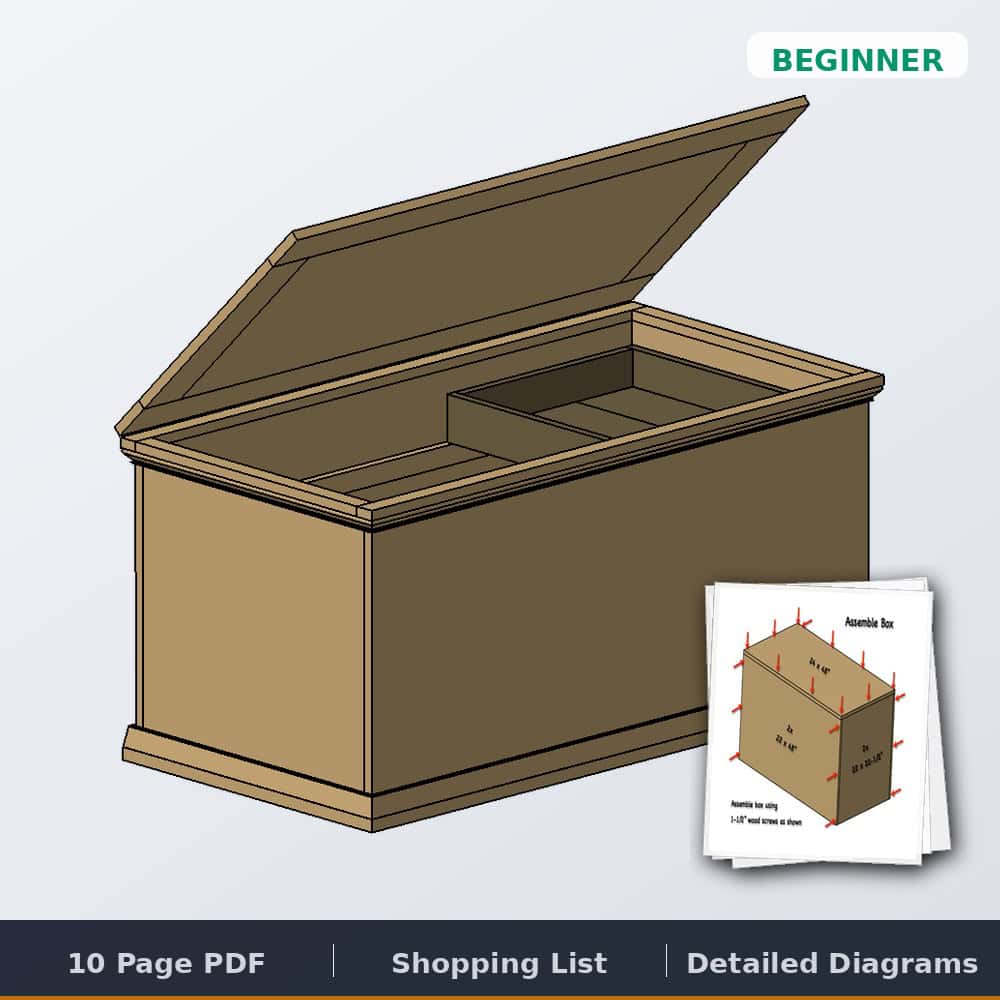
Quick answer: These free hope chest plans build a keepsake chest that doubles as a toy chest: a plywood-and-pine box with a trim-wrapped base, a removable cedar shelf that helps keep the bugs out, a piano-hinged lid on child-safety lid supports (no smashed fingers), and manila rope handles. Finished with dark walnut stain, a distressed painted box, and a vinyl-lettering name personalization. Built with a pocket hole jig, brad nailer, and drill. Full cut list and nine illustrated steps below. Designed, built, and documented by Jamison Rantz.
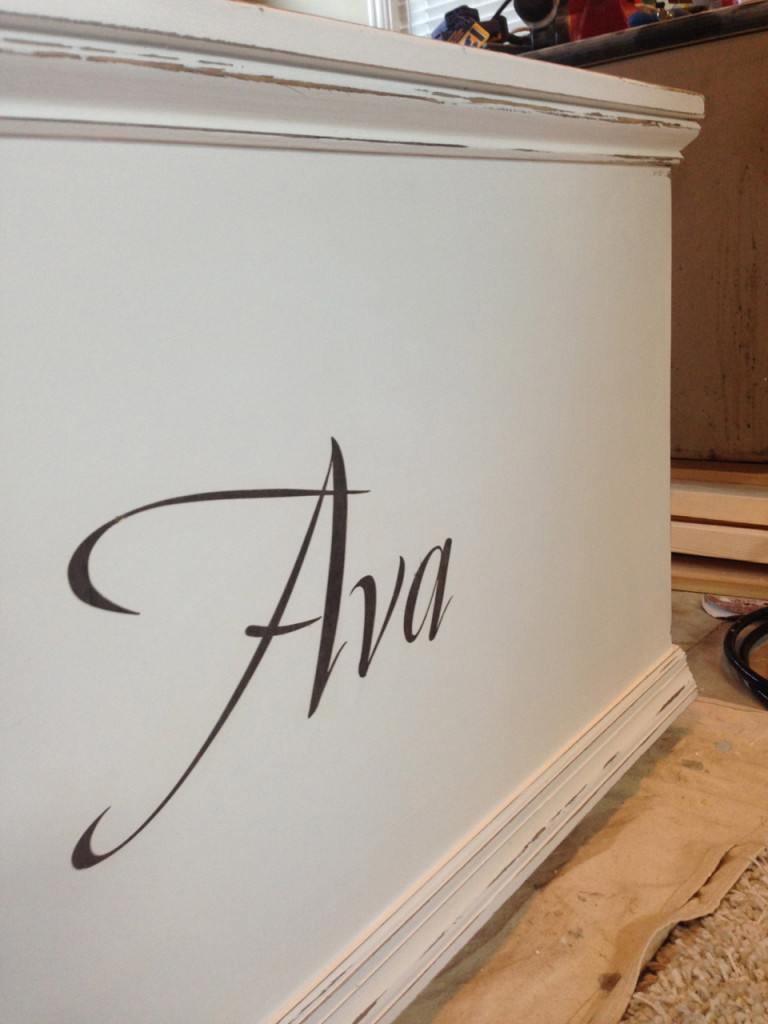
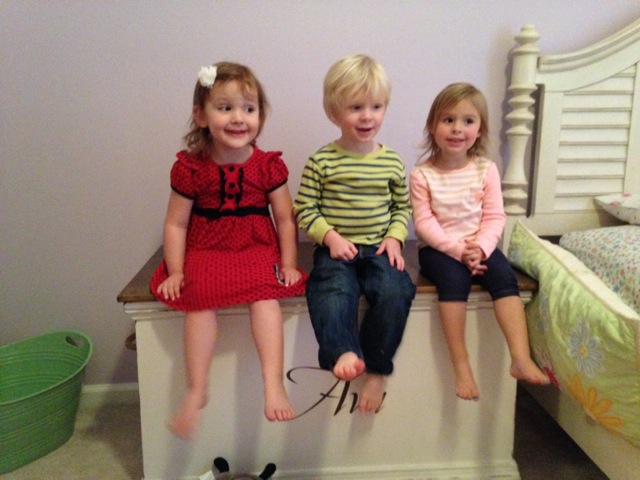
So some good friends of ours, Jeff and Cynthia, over at Whole Food. Real Families. have a little girl, Ava, who happens to be one of Brayden’s best friends. Well she had her 3rd birthday coming up and Brayden wanted to make her a very special birthday present so we decide to make her something that would last for a lifetime, a hope chest. Hope chests are popular in the south and are used by unmarried, young women, to store clothing and household items in preparation for marriage. My thought was that is could currently be used as a toy chest until then. Below I have the hope chest plans that I went by to make this.
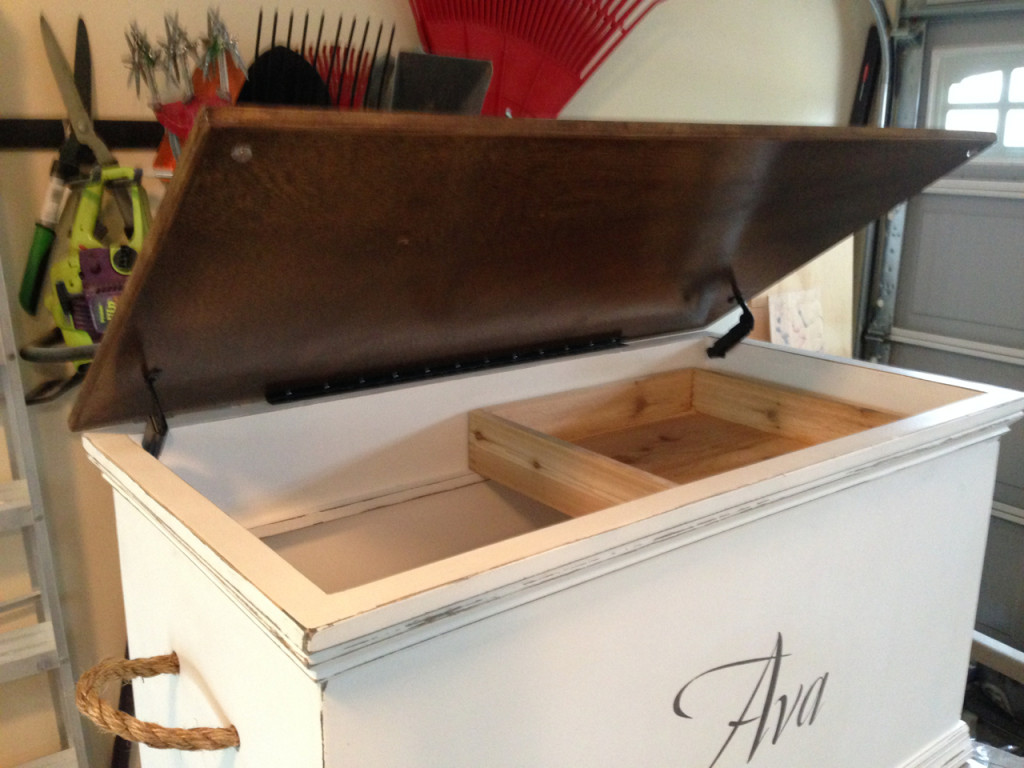
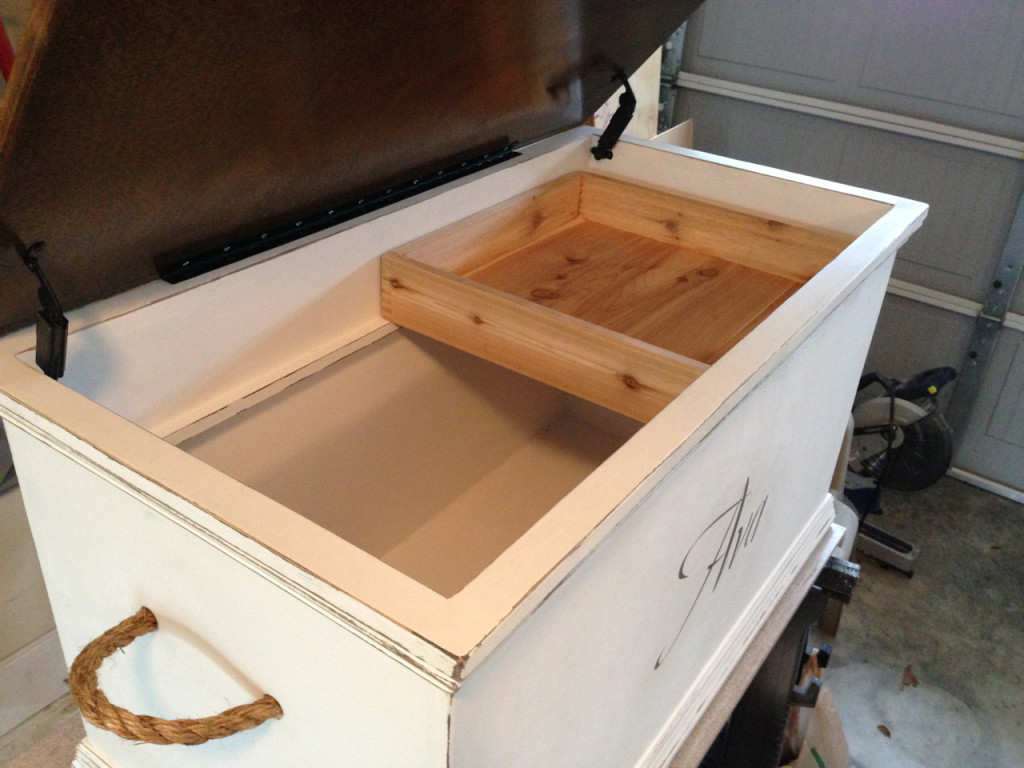
Safety hinges on this toy chest / hope chest will keep the little ones from smashing their fingers. A cedar shelf provides great storage for those smaller items as well as helps keep the bugs out.
Tools & materials
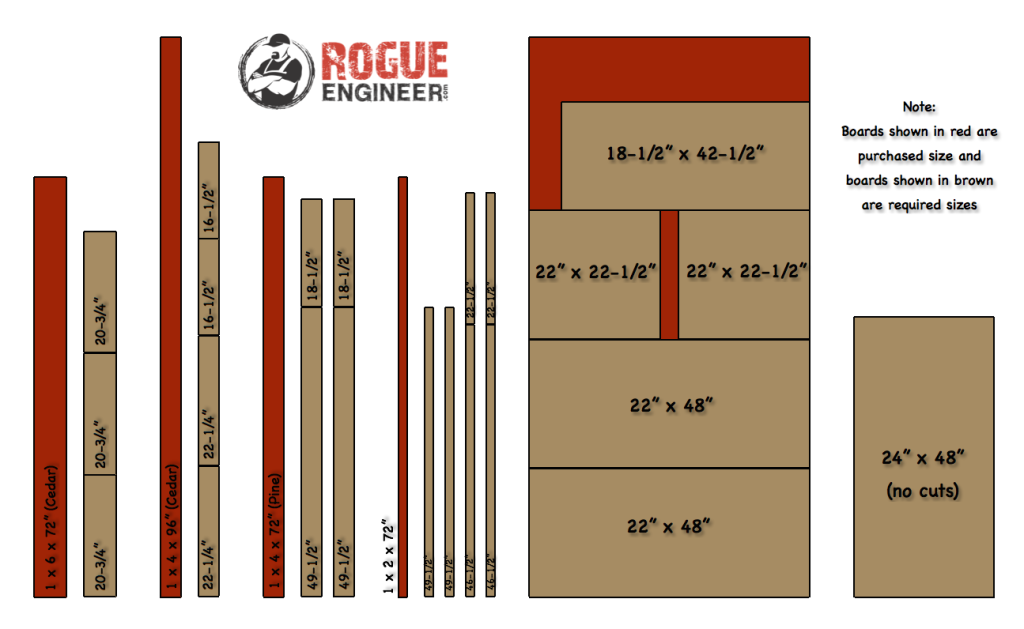
Cut list
How to build a hope chest
Step 1: Assemble the box
Assemble the box as shown in the picture using 1½″ wood screws. Make sure to bury the screws slightly into the wood so you can fill and sand smooth for paint.

Step 2: Add rails for the shelf
Using wood glue and 1¼″ finishing nails, add the two 1×2 × 46½″ rails that the cedar shelf will sit on, 5¼″ from the top of the box.

Step 3: Assemble the top rail
Assemble the top rail by first drilling two pocket holes in each end of the 1×2 × 22½″ boards. Then screw and glue together using 1¼″ pocket hole screws and wood glue.

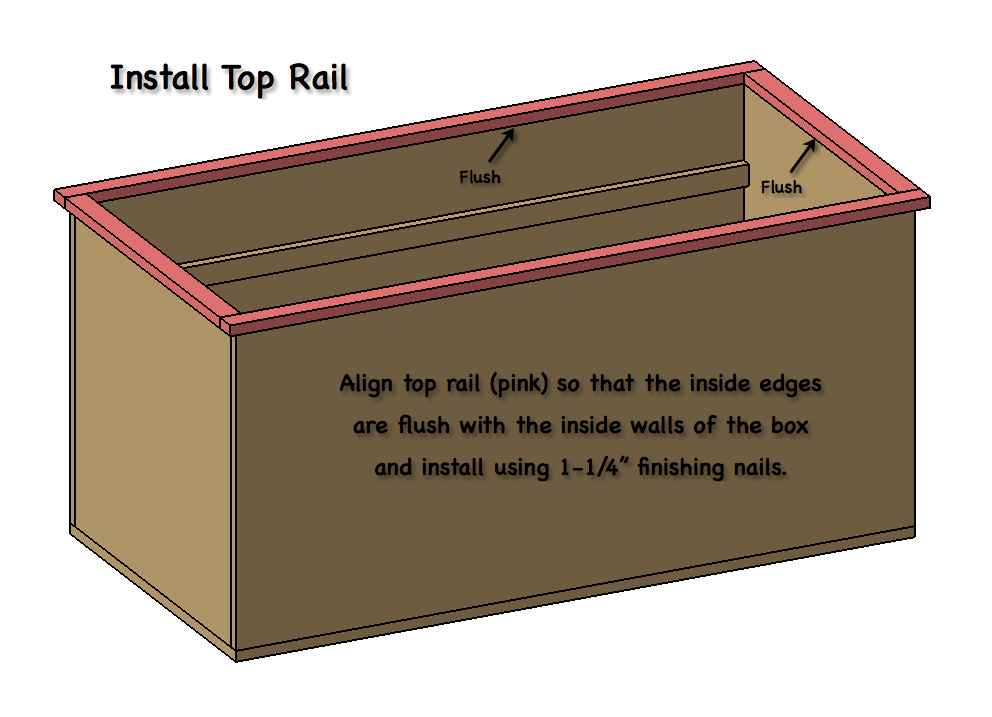
Step 4: Install the top rail
Align the top rail so that the inside edges are flush with the inside edges of the box and nail in place using 1¼″ finishing nails.
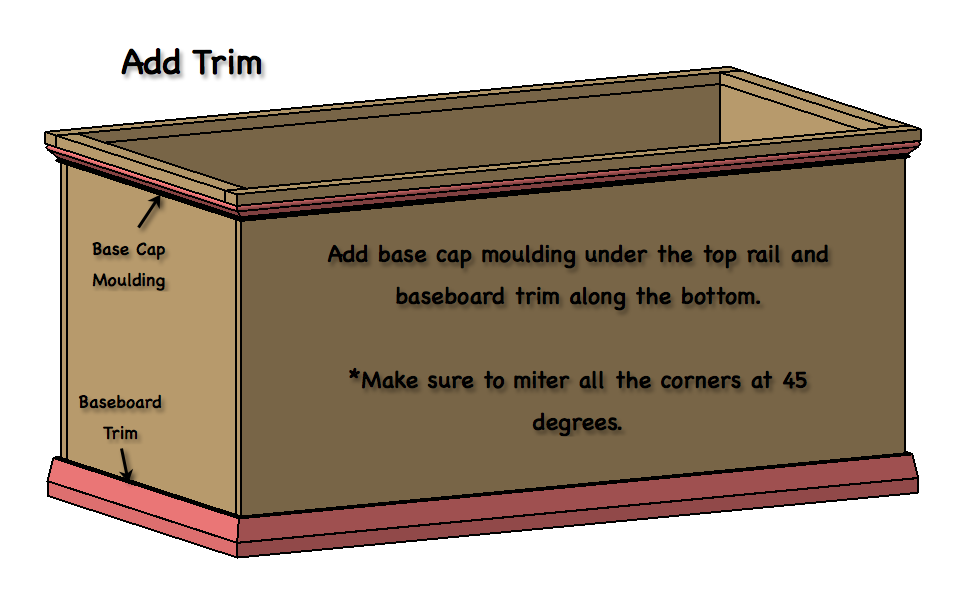
Step 5: Add trim
Dress up the hope chest using base cap moulding around the top and baseboard trim around the bottom. Do so by cutting to size and mitering the corners at 45 degrees.
Step 6: Assemble the top
Assemble the top by first drilling pocket holes in each end of the 1×4 × 18½″ boards as well as in the 18½″ × 42½″ plywood as shown. Screw together using 1¼″ pocket hole screws.

Step 7: Assemble the cedar shelf
Assemble the cedar shelf by first drilling pocket holes in all the boards as shown. Next, using 1¼″ pocket hole screws, screw together the three 1×6 × 20¾″ boards to form the bottom. Now, using 1¼″ pocket hole screws, screw the sides together and the bottom to the sides. You may drill slots in the two sides to create handles (like a serving tray) if you wish. Note: If your cedar has a rough side, face that side out so the smooth side is the only side shown when the shelf is installed.

Step 8: Install hinges, bumpers and top
You may want to start by painting your piano hinge an appropriate color. This is optional. You may also want to skip to finishing before completing this step.
First install the piano hinge on the back, top rail of the box and the top per manufacturers instructions. Now install right and left safety hinges per manufacturers instructions. Finally add the bumpers to the corners of the top to prevent the top from rubbing against the chest.

Step 9: Drill holes for the rope handles
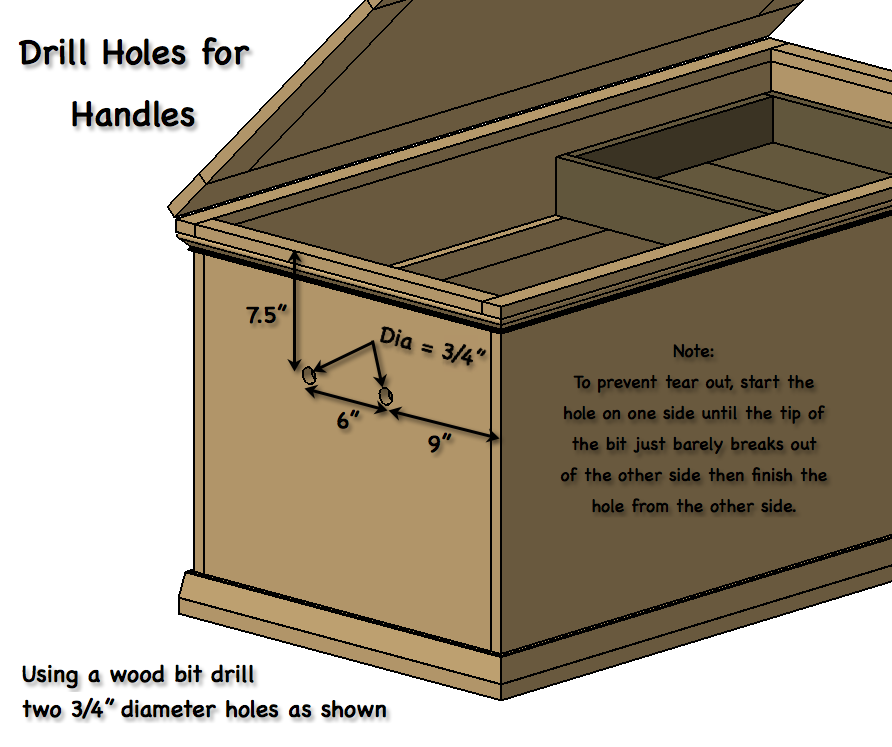
Using a 3/4″ wood bit, drill two holes in the side panel of the chest. These holes should be 7½″ from the top so that they do not clash with the cedar shelf. Space them 6″ apart; each being 3″ from center. To prevent tear out when drilling, make sure to start the hole from one side and as soon as the tip of the bit barely breaks out of the other side, use that as a location and finish the hole from the other side. Add handles after finishing. To do so, tie a knot as close as possible to the end. Then run the rope through the hole (from inside to out) and back in the other. Adjust to the desired length and tie a knot on the inside. Pull firmly on the handle to tighten knots and cut rope as close as possible to the knots.
Finishing: the personalized look
Top
We decided to stain the top with Minwax’s dark walnut stain. Then we sealed the top with several coats of clear gloss polycrylic to give it a glossy finish.
Box
For the box of this hope chest we wanted to do a distressed finish with Minwax’s dark walnut stain as the base color. We then laid vinyl lettering of Ava’s name on the front. After painting over everything with flat white paint, we then distress the edges with some sand paper and pealed away the lettering to expose the beautiful stain underneath. Then we sealed the bottom using Minwax’s finishing wax. This makes for a great contrast to the glossy top.
Some vinyl lettering was laid over the stained area to protect from paint and after removing leaves a beautiful stained personalization.
For other finishing ideas visit the finishes page.
Hope chest questions, answered
What is a hope chest used for?
Traditionally — especially in the south — a hope chest stored clothing and household items for a young woman preparing for marriage. In practice this one works as a toy chest first and a keepsake chest for life: blankets and linens below, smaller treasures on the removable cedar shelf.
Why put a cedar shelf in a hope chest?
Cedar is the classic chest wood because it helps keep bugs and moths away from stored fabric. Building just the removable shelf from cedar gets you that protection — plus a handy tray for small items — while the chest itself uses affordable pine and plywood. Face the rough side of the cedar outward so only the smooth side shows.
How do you make a toy chest safe for kids?
Two pieces of hardware: left- and right-hand child-safety lid supports, which stop the piano-hinged lid from slamming on little fingers, and clear adhesive bumpers on the lid corners. This chest was built for a 3-year-old’s birthday, so those weren’t optional.
How do you personalize a hope chest?
Stain the front, apply vinyl lettering of the name over the stain, paint the whole box (flat white here), then peel the lettering to reveal the stained name and distress the edges with sandpaper. Seal with finishing wax — the matte box contrasts beautifully with a gloss-sealed stained top.
More heirloom builds
Questions? Comments?
As always, if you have any questions don’t hesitate to comment below and especially don’t forget to post pictures of your finished products in the comments! ENJOY!
[…] Free and Easy Hope Chest Plans Rogue Engineer source […]
I have been looking for something like this! Thank you, thank you.
I’m glad this works for you Squish49284! No problem at all!
Just wondering how thick the plywood is.
Good catch @CherylHanna ! The plywood is 3/4″ thick. I’ll update the materials to reflect that.
Jamison Rantz Thanks! Starting making this today. As this is our first project I hope ours turns out as beautiful as yours.
Awesome! Can’t wait to see how it turns out! Make sure you post a picture here when your done.
Can you get by without the use of a Kreg jig?
I think that’s possible. To do so you could skip step 3 and just nail the top rails in place. I think the trim underneath would allow enough support. Then for the top you could cut the plywood to the overall dimensions and use the iron on plywood edges.
FYI you could probably get by with the $20 kreg mini.
Thank you so much for these design plans…. The plans were very detailed and easy to follow, and the chest cam out amazing!!!! I should post a pic….
No problem Mallack, I’m glad it turned it well. And yes you should definitely post a picture, I would love to see how it turned out!! (you can do so right here in the comments!)
Here are some pics… I’m very happy about how it came out!
Great job Mallack! That looks amazing and it looks as though your kids have already put it to good use!
How did you get those hinge supports to work? I bought the right and the left supports and the lid will not close all the wy when I follow the manufacturers dIngram on instillation.
Reattaching photo that was removed:
this
Reattaching photo that was removed
this too
Reattaching photo that was removed:
and this
That top came out really well! Kudos!
Reattaching photo that was removed
Did you stain the entire box inside and out before painting? I am starting this project soon and want to be sure it comes out durable and will stand the test of time. On another note I am super happy that I cam across your site. I have been looking for detailed plans for different items I would like to build. thanks again!
Josh, I just stained the areas that I planned to distress and where the personalization was to go. Plan on 3-4 coats of paint to cover the stain though. And thanks to the compliments hopefully the plans serve you well! Be sure to post a pic when your done. I look forward to seeing how it turns out!
Jamison, great looking plans. I’m thinking of building this for my wife as a kind of storage. My mom has a cedar chest that she’s had since before I can remember, and my wife has mentioned wanting one. My questions for you is this: Could I substitute the plywood for something a little more durable and “fancy” looking. I plan to just stain the whole thing as opposed to painting it white.
Thanks Phil! I think you could easily use 1×4’s kregged together for the side panels. And alternating the exposed end grain at the corners would give that faux box joint look. I think its a great idea. Let me know how it turns out!
Hi, I was just wondering what size did you use for the lettering? Thanks.
Hey Tony!
Good question. I just had to look back at the invoice and it looks like I used the 6″ height. Details below.
Vinyl Lettering (Rosetta, Black, 11.25 inch width, 6 inch height)
Thanks a lot. Also I’m just curious do you pull the letters off while the paint is still wet or do you let it dry? And do you have any tips for getting them off perfectly.
No problem Tony, I waited until the paint dried and used an exacto knife to score the outline so the name would come off more cleanly.
Sorry I keep asking questions but what do you mean when you say plywood that is sandply?
Here’s a link to it: Link
Just specifying which one I used. I try to stay away from oak when painting because of the open pores but birch would have been fine too.
Hi, great looking work! I’m going to build one this weekend. A few questions
1. What are the dimensions of the molding?
2. What grit sandpaper did you use to distress the paint? Was it oil based paint?
3. Did you sand the entire box before painting or just the wood filler spots where you utilized screws?
4. On step 6 you write, “If you are a perfectionist like me you may want to” but it got cut off. What was the rest of that sentence?
Thank you so much in advance for your help and for posting this online!
Thanks Joe! And no problem, here are the answers to your questions
1. What are the dimensions of the molding?
11/16 in. x 1-3/8 in. x 96 in. Wood Pine Base Cap Moulding
9/16 in. x 3-1/4 in. x 96 in. Solid Pine Base Moulding
2. What grit sandpaper did you use to distress the paint? Was it oil based paint?
I just used a 220 grit sandpaper to distress the chest and yes I believe it was an oil based paint.
3. Did you sand the entire box before painting or just the wood filler spots where you utilized screws?
Those spots got the most attention but yes the entire box does need a sanding with 220 grit to get a nice smooth finish.
4. On step 6 you write, “If you are a perfectionist like me you may want to” but it got cut off. What was the rest of that sentence?
Hmmm.. that’s interesting. Haha I believe I would have finished that by saying that those pocket holes needed to be filled with pine Kreg plugs and sanded to a smooth finish.
Thanks Joe! And no problem, here are the answers to your questions1. What are the dimensions of the molding?11/16 in. x 1-3/8 in. x 96 in. Wood Pine Base Cap Moulding9/16 in. x 3-1/4 in. x 96 in. Solid Pine Base Moulding2. What grit sandpaper did you use to distress the paint? Was it oil based paint?I just used a 220 grit sandpaper to distress the chest and yes I believe it was an oil based paint.3. Did you sand the entire box before painting or just the wood filler spots where you utilized screws?Those spots got the most attention but yes the entire box does need a sanding with 220 grit to get a nice smooth finish.4. On step 6 you write, “If you are a perfectionist like me you may want to” but it got cut off. What was the rest of that sentence?Hmmm.. that’s interesting. Haha I believe I would have finished that by saying that those pocket holes needed to be filled with pine Kreg plugs and sanded to a smooth finish.
One last question, when installing the piano hinge, is there an orientation you need to put it to install it? I know it may be a silly question, just want to make sure I don’t put it on wrong.
Also, here is a photo of my progress so far. Your plans have been great!
Joe! That is looking great so far! Excellent work. Here’s a shot I grabbed of how a piano hinge should be installed. (I was struggling to try and describe it)
Reattaching photo that was removed
Reattaching photos that were removed
Sorry, one more. Do you remember whether you used oil or water based paint? Just curious to know whether the stain bled through latex coats of paint
I think I used oil based paint but I’m pretty sure I’ve used latex to cover stain on other projects with no problem. I does take a lot of paint to cover the dark stain however. If you’re worried about it you can use a stain blocking primer .
.
Here is my finished project. Keep in mind this is the first time I have ever built something. My wife told me that it couldn’t be done but I think I proved her wrong on this one. Thank you for the detailed plans and I look forward to doing more builds in the future! Thanks again!!
Here is the finished product. Thanks again for the plans and I look forward to doing more of your builds in the future!
Awesome job man! I would say you definitely proved her wrong and probably proved it to yourself as well. If you’re like me then you’ve got the bug now, so I look forward to seeing your future projects!
Reattaching photos that were removed
How much do all of the msterials cost to build this?
I’m not sure of the exact total but I think it was somewhere around $150.
Hi,
Your instructions are fantastic! I’ve never build anything from scratch before and I did it in one week! It was daunting and when I started I thought, ‘what did I get myself into?’ but I’m so glad I did.
I gave the chest as a gift to my 15 year old daughter for her birthday and what a treat it is to make her something homemade with love and in this magnitude!! Based on her age, I left off the rope and initials on the box, but will be installing an engraved plague on the inside with a favourite quote! I’ve got the bug. Thanks again!!
Sherri
Here are some updated shots. I went with antique brass handles and am going to wood burn in the Name, though I think I certainly would have been better suited with your method of the vinyl lettering. I cannot for the life of me figure out the hinges though. I tried it and it pulled off my top rail when it tried to close. I don’t know if you installed per the exact dimensions on the Stanley hardware or if you altered them based on the size of the backboard and the molding. Any help would be very much appreciated! I’m totally stuck!
Joe,
First off, your chest looks amazing, great job!
I do remember having an issue with the support hinges like you’ve stated. I don’t have the chest on hand, since it was a gift, or I would measure it for you and give you exact dimension. However, if I recall correctly I believe the problem is that the pivot point of the lid is moved slightly backward. To make these hinges work I believe the part of the hinge that attaches to the base should be per the manufactures diagram but the upper part should be slightly lower. I remember just eyeballing it.
If you wanted to figure out this dimension I believe you could secure it to the base per diagram, then contort the hinge as it would be if the lid were closed. Then measure the distance from the back of the rail to one of the hinge lid attach points and transfer that measurement to the lid. This way you will know that the lid should close all the way.
This results in the lid not opening up all the way that it should but it was still 80 degrees or so which was plenty enough for me. Let me know if this works for you. Good luck and sorry I forgot to include this issue in the plans.
Reattaching photos that were removed
Sherri! Excellent job! The engraved plaque is a very nice touch. Again, well done, and it’s hard to believe this was your first go at it!
Reattaching photos that were removed:
The rest of the photos
Again, excellent job Joe! Just a thought, I used the rope handles because I was worried about metal handles not being quite strong enough for a loaded down chest. However, I think if you got some oversized washers to go on the inside it would distribute the load better and would help with this issue.
Reattaching photos that were removed:
How do you install the lid supports. I used the same ones as the user above and cannot get them to work out by using the manufacturers directions.
I do remember having an issue with the support hinges like you’ve stated. I don’t have the chest on hand, since it was a gift, or I would measure it for you and give you exact dimension. However, if I recall correctly I believe the problem is that the pivot point of the lid is moved slightly backward. To make these hinges work I believe the part of the hinge that attaches to the base should be per the manufactures diagram but the upper part should be slightly lower. I remember just eyeballing it.
If you wanted to figure out this dimension I believe you could secure it to the base per diagram, then contort the hinge as it would be if the lid were closed. Then measure the distance from the back of the rail to one of the hinge lid attach points and transfer that measurement to the lid. This way you will know that the lid should close all the way.
This results in the lid not opening up all the way that it should but it was still 80 degrees or so which was plenty enough for me. Let me know if this works for you. Good luck and sorry I forgot to include this issue in the plans.
Hi. Could you tell me where you purchased the vinyl letting from?
I’m struggling to find anything similar.
I used custom lettering from WordsAnywhere.com. They were the best and cheapest I could find.
Hi, I doubt you remember but do you know what size piano hinge you used as far as width goes? Or does it matter?
Could you tell me exactly what width or piano hinge you used or does it really matter? Thanks!
Jeremy, I used a 36″ long piano hinge But I think plus or minus a few inches would be fine. You just don’t want it to be to short or your lid will wobble.
Yeah I knew the length, I was just wondering about the width? Wether it was 1/2″ or an 1″ wide? Sorry I didn’t clarify in my intitial question above
No worries. The hinge I used was 1-1/2″ wide.
First thanks for the plans. This was a fun project. I did install my rope handles in a different fashion. I used a washer and a stainless steel hose clamp. I felt like this was more secure then a tied knot. .
I am about 95% done and when I am ill post a picture.
Here is a Picture of how I installed my handles
Clever idea James! It looks great.
The knots actually tighten when you pull on them but the downfall was they use up a lot more rope then you think! That’s why I put 8′ in the materials section.
Can’t wait to see yours completed!
Reattaching photo that was removed:
Done
Reattaching photo that was removed
Outside of the box
Reattaching photo that was removed:
I used a 48′ x 1 1/2 Hinge
James! Very nice! That turned out great. Thanks for sharing.
Reattaching photo that was removed
Ok so how do I srew it together if I want to stain it. Cause I don’t want the srews to show??
Hey Rob,
If you wanted to stain it you could cut the plywood panels and then iron on edge banding to hide the end grain of the plywood. Then you could hide the screws with pocket holes on the inside of the box.
Another option would be to Kreg four 1x6s together in place of each side panel and if you wanted to get really fancy you could alternate the end grains at the corners to create a large faux box joint.
Hope this helps.
Thank you very much for putting these pictures and measurements …….I made this for my daughters first Christmas present and This was my first wood project I have ever done , don’t think I would have attempted it without all your help
Thanks again
Dave
Toronto Ontario
No problem Dave, I’m glad I could help. I’m sure she will love it for many years to come!
Hey I was just wondering if you could tell me where you got your lid supports from and if they are weight rated? I got mine from home depot and they are giving me a really hard time. It’s the last thing I have to do and the box is done. But I can’t figure these lid supports out. Please help…..
I got mine from Amazon. There’s a link in the materials section.
I do remember having an issue with the support hinges. I don’t have the chest on hand, since it was a gift, or I would measure it for you and give you exact dimension. However, if I recall correctly I believe the problem is that the pivot point of the lid is moved slightly backward. To make these hinges work I believe the part of the hinge that attaches to the base should be per the manufactures diagram but the upper part should be slightly lower. I remember just eyeballing it.
If you wanted to figure out this dimension I believe you could secure it to the base per diagram, then contort the hinge as it would be if the lid were closed. Then measure the distance from the back of the rail to one of the hinge lid attach points and transfer that measurement to the lid. This way you will know that the lid should close all the way.
This results in the lid not opening up all the way that it should but it was still 80 degrees or so which was plenty enough for me. Let me know if this works for you. Good luck and sorry I forgot to include this issue in the plans.
Thanks for posting these plans, and all your prior responses to others’ questions – it has helped me greatly in creating my own!
My question for you is about the alignment of the lid to the self support. I thought I measured everything perfectly, and was quite pleased when the alignment matched perfectly flush. But as a result, this offers very little room to slip your fingers in to open the lid (even with the bumper pads added).
Did I mis-measure or cut the lid incorrectly and should have created an overhang to grip? Perhaps I can use a 1/2″ cove bit to carve out a 4-6″ groove in the underlying 1×2 self support to create space under the lid? Just curious if you recalled how the lid fit.
Thanks in advance for your answer, and thanks again for the great plans!
Great job Kevin! Thanks for sharing.
As far as your concern about opening the lid. It wasn’t an issue for me since with the lid supports in the lid was very light. I simple fix could be as easy as using larger bumpers. But, yes a 1/2″ or even 1/4″ cove bit on the forward edge of the top of the box would work well. I would even suggest routing all the way down the edge except for 2-3 inches from the corner. Would love to see how it turns out!
Thanks again for sharing!
Jamison
Thanks for the fast reply! I went ahead and used a cove bit to run the full length as you suggested. But, for whatever reason, I left 3 1/2″ off each end so that it would line up with the 1×4 framing the lid. Also, I started with a 1/4″ cove bit but found it was still tight for my big/fat fingers so went ahead and did the 1/2″ instead. (From this attached photo you can also see I also used a 3/8 roundover only partially lowered on the outer edge of the lid during the initial build.)
And, since I went with the 1/2 cove for the groove, a leftover 1″ dowel from another project was used wrapped in sandpaper to smooth everything out.
Thanks again for your inputs!
I’m glad it worked out. Again, excellent job on this! It look great and I’m sure Alex will enjoy it for a long time.
Thanks for sharing!
Jamison
Reattaching photos that were removed
Reattaching photos that were removed:
So whatcha think about my finished chest?
Do you have a photo you can share?
I’m trying but I can’t seem to get them up loaded
If the file is too big you could always email it to me at @Jamison Rantz.com">jamison@Jamison Rantz.com
Thanks for the plans. This is my first furniture project and I am making this as my son’s first birthday present. It is all together and the stain is complete. I was just curious to know if you would recommend oil or latex paint? And did you prime the bare wood before you painted? Thanks again. Your site is great and based on how well this project is shaping up I will be sure to pick out something else to try very soon.
Thanks! I’m glad it’s coming together nicely for you! I would suggest and oil based paint over an oil based stain. And I didn’t prime it so it took me several coats of paint but I good idea would be to use a stain blocking primer. Make sure to post a picture when you’re done. I’d love to see how it turns out!
On the trim, did you trim out the back side or did you just do the front and two sides?
I trimmed all four sides.
Jamison …
Found the plans in between Christmas & New Years. I stewed over the idea for a bit, then this past weekend I commenced on the project. So far it has been fantastic !!! As you can see, I just finished the construction today & my bride hasn’t quite decided on how she wants me to finish it yet. I went with a little bit larger base trim to try to offset the large “boxy” look and break up the front elevation. After reading other comments, I too chose to use 1/2″ cove bit on the front lip. I came in 8″ from each corner and ran across the front. I used oak 3/4″ plywood, hope the paint/finish turns out well. As I stated, just not too sure what my wife wants the finished product to look like. We share a personal aspect in common, I too am associated in the aerospace industry !!!! Thanks for the plans….already looking forward to something else !!!
Hey Chris!
I’m glad I could be of help to you and I’m glad it’s coming along well. I agree with you, I like the cove bit idea that Kevin went with. Unfortunately the photos aren’t attached. I would love to see how it turns out so make sure you post a pic when its done!
Jamison
Hope my pics came through ok !!
I’m almost ready to put on the wax. I bought Minwax finishing wax but noticed it is “natural” and has a light tint to it. Is this the right stuff to use over white paint or is their a “clear” version I should have bought? Thanks.
That is what I used and I would say it goes on pretty much clear if anything it left a very subtle antiqued look to it which I liked. You could always test this on a scrap painted piece and make sure you like it before putting it on the box. If you want a clear wax you I know Briwax makes a clear wax or you could just omit the wax all together.
I just wanted to thank you for the step-by-step instructions on this hope chest!! My husband and I made this for our baby’s room, and he should be coming within the next week or so:) This chest is very heavy but I know t will last him many years to come:) Thank you again and I will be looking for more projects in the near future:)
Awesome! Congrats on the baby and I’m glad the chest turned out well.
Thanks for the instructions. I love the finished project.
Hopefully the uploaded pic worked this time…
That tuned out really well! Great work and thanks for sharing.
Reattaching photo that was removed
Thanks for the easy-to-follow instructions, Jamison. The paint wasn’t dry yet before I got an order to make a princess dress closet…
Hahah that’s awesome! I know the feeling!
Reattaching photo that was removed
Hi Jamison
I LOVE your plans!!!! Thank you for posting your plans!! I have taken your plans and have reduced them to make a wine box. My son is getting married and I was planning to build your hope box but he asked for a wine box, i can only do one.. Sad… The question I have for you is….
Did you use anything to secure the lettering? I have been practising on pieces of wood and i get alot of bleeding. I have heard that you can paint decopage over the lettering and it will keep it from bleedng. Did you do anything to keep the paint from bleeding into the lettering?
Last question… I want to add a latch. With the molding added what would you suggest?
Ok 1 more.. lol.. You have suggested in prior posting that using a stain blocking primer on top of the stain. What stain blocking primer would you use? Some paints have a ‘stain blocking primer” would you use an oil based primer or go to the stain blocking propertise of the higher quality of paint?
Thank you for all you do!!!
Thanks @dena lewis! Just in case you missed it, I wrote these plans for a wedding wine box. Nevertheless, for the lettering I actually bought adhesive vinyl lettering from wordsanywhere.com and sense they are adhered on to the box I didn’t have any issues with bleed through. So to recap, we stained the box first, then placed the adhesive lettering, then painted (several coats), and finally peeled off the lettering to reveal the stain.
Take a look at this swing arm latch and see if that would work for you.
I use Zinsser Stain Blocking Primer. If you plan to use a latex paint over that, then you might want to scuff up the primer slightly to help the paint stick. To be honest, for such a small box I would say just to spray paint it with Rustoleum’s 2X Spray Paint and not worry with the primer.
Thanks @dena lewis! Just in case you missed it, I wrote these plans for a wedding wine box. Nevertheless, for the lettering I actually bought adhesive vinyl lettering from wordsanywhere.com and sense they are adhered on to the box I didn’t have any issues with bleed through. So to recap, we stained the box first, then placed the adhesive lettering, then painted (several coats), and finally peeled off the lettering to reveal the stain.Take a look at this swing arm latch and see if that would work for you.I use Zinsser Stain Blocking Primer. If you plan to use a latex paint over that, then you might want to scuff up the primer slightly to help the paint stick. To be honest, for such a small box I would say just to spray paint it with Rustoleum’s 2X Spray Paint and not worry with the primer.
Here’s my attempt at a modified version. I have used a flat base coat, color is a greyish brown and a flat white top coat. Not finished yet. painted the inside the same color as the base coat for contrast and have not used the inner shelf.
Spent a great deal of time getting the miters and surface smooth, and filling and primer to get crisp edges on the corners.
I will paint a couple more layers of the white before i sand the edges and moldings to age it. I am going to paint the lid in the same color as the base coat and install pneumatic hinges.
Thanks for a great idea and instructions!
That looks great @Oystein! Thanks for sharing in such detail. And the pneumatic hinges will be a very nice touch. I’m not sure how much you wanted to spend but these Soft Down Lid Supports are amazing but pricey.
Jamison, do you need 1 or 2 of the Soft Down Lid Supports? Thank you.
I think it will require two
Reattaching photos that were removed:
Thank you =) That was the kind of hinges i was looking for, but i could not find them over here. (Norway) I am going to try to install these ikea hinges. If they are not up to the task i will order some from the web. Also i am going to use these kind of handles instead of the rope, because i used rope on a different project: Beer crate for homebrew =)
I’m sure the IKEA hinges will do the trick and those handles will work well. You might want to consider using washers on the inside though to prevent the heads of the screws from sinking into the plywood.
Nice beer crate by the way! Nothing like a good homebrew! 🙂
Reattaching photos that were removed